Android沉浸式状态栏(透明状态栏)最佳实现
2016-12-06 16:58
686 查看
Android沉浸式状态栏(透明状态栏)最佳实现
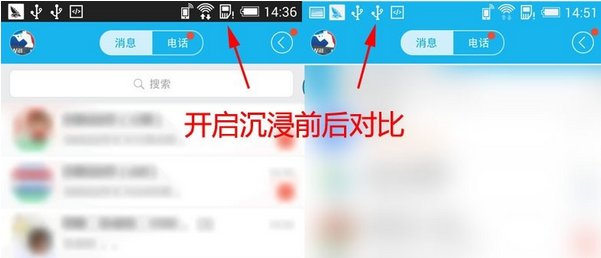
在Android4.4之前,我们的应用没法改变手机的状态栏颜色,当我们打开应用时,会出现上图中左侧的画面,在屏幕的顶部有一条黑色的状态栏,和应用的风格非常不协调;为了提供更好的界面交互,google在Android4.4以后提供了设置沉浸式状态栏的方法,对于沉浸式状态栏这个名字存在争议,我们不做讨论,实际的效果其实就是透明的状态栏,然后在状态栏的位置显示我们自定义的颜色,通常为应用的actionbar的颜色,或者是将应用的整体的一张图片也占据到状态栏中,如下图所示:
由于这种透明的状态栏是在Android4.4以后才出现的,所以我们需要为4.4以上的版本做适配,方法有两种,一种是在资源文件(style)中设置,一个是在代码中设置。
在资源文件中设置透明状态栏
首先,我们先在values下的style中加入如下代码:<!-- Base application theme. --> <style name="AppTheme" parent="Theme.AppCompat.Light.NoActionBar"> <!-- Customize your theme here. --> <item name="colorPrimary">@color/colorPrimary</item> <item name="colorPrimaryDark">@color/colorPrimaryDark</item> <item name="colorAccent">@color/colorAccent</item> </style> <style name="AppTheme.Main" parent="AppTheme" />
AppTheme.Main是我们要设置给activity的主题,它应该继承于AppTheme.NoActionBar,然后
我们在values-v19中加入同样的AppTheme.Main,如下所示:
<style name="AppTheme.Main" parent="AppTheme.NoActionBar">
<item name="android:windowTranslucentStatus">true</item>
</style>
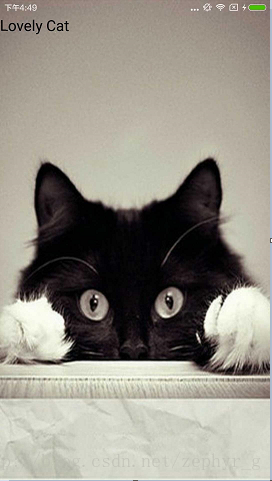
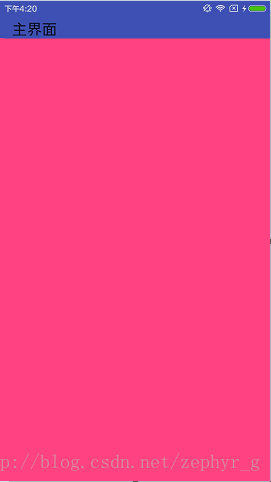
然后运行程序,效果如图所示:
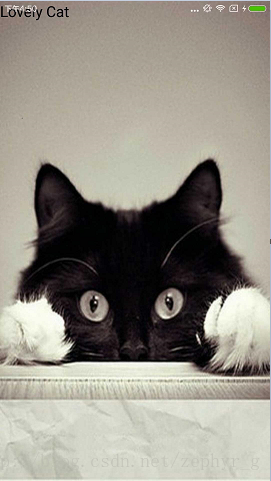
图片中我们发现,虽然我们实现了透明的状态栏,但是上边的文字和状态栏的信息重叠了。为了修复这个问题,我们应该在布局文件的根布局中加入android:fitsSystemWindows=”true” 就可以了,加入后效果如下:

应用的文字和系统显示的文字错开了,这也是我们最终的显示效果
需要注意的几点:
为Android4.4+适配的同时,不要忘了在values的style.xml中加入同名的自定义style,不然4.4以下会报错
不要忘记在布局文件中加入 android:fitsSystemWindows=”true”,不然布局内容会和状态栏内容重叠
在Android5.0中,透明标题的效果和4.4中有所不同,但是实现方法相同,我们可以不必为5.0+单独适配,同时5.0+的版本提供了新的API android:statusBarColor,可以用来单独设置状态栏的颜色,但是这种方法不适用于我们例子中的图片占据状态栏,它适用于纯色的状态栏,并且它应该放到value-v21文件夹中
上边的例子中,我们只设置了一个图片,使其占据了状态栏。但是我们平常见到更多的可能不是这种,而且带actionbar的情况,如下所示:
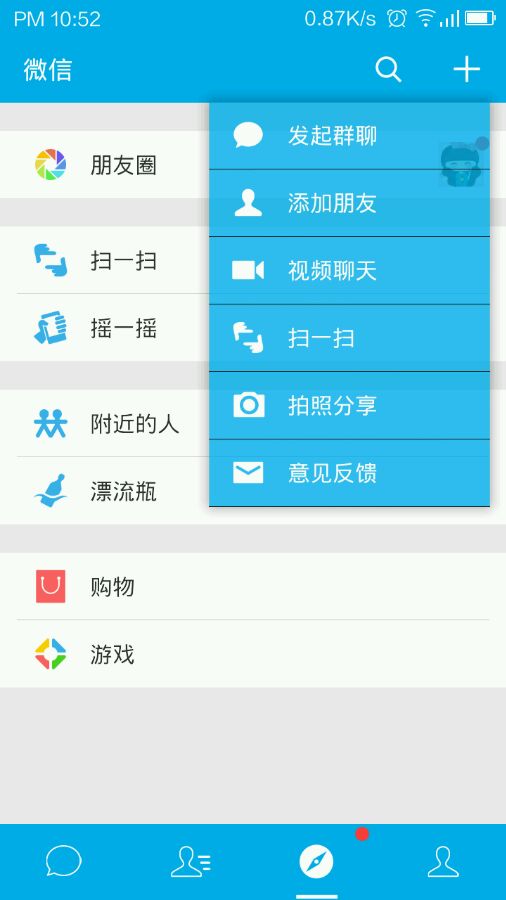
在上图中,存在一个actionbar,然后状态栏的颜色与其相同,接下来我们来实现这种效果。
style文件不用改变,我们需要在布局文件中加入一个toolbar,代码如下:
<?xml version="1.0" encoding="utf-8"?>
<LinearLayout
xmlns:android="http://schemas.android.com/apk/res/android"
xmlns:app="http://schemas.android.com/apk/res-auto"
xmlns:tools="http://schemas.android.com/tools"
android:layout_width="match_parent"
android:layout_height="match_parent"
android:background="@color/colorAccent"
android:orientation="vertical"
tools:context="com.zephyr.musicapp.MainActivity">

<android.support.v7.widget.Toolbar
android:id="@+id/toolbar"
android:layout_width="match_parent"
android:layout_height="wrap_content"
android:fitsSystemWindows="true"
android:background="?attr/colorPrimary"
app:popupTheme="@style/AppTheme.PopupOverlay"/>

</LinearLayout>
然后在activity中
Toolbar toolbar = (Toolbar) findViewById(R.id.toolbar);
setSupportActionBar(toolbar);
在一个LinearLayout中包含了一个toolbar,和第一个例子相比,我们把android:fitsSystemWindows=”true”加在了Toolbar上边,而不是LinearLayout中,如果把android:fitsSystemWindows=”true”放到LinearLayout中,会出现下边的效果:

虽然状态栏透明了,但是颜色却和根布局的颜色相同而不是toolbar,这样显然不行,如果我们把android:fitsSystemWindows=”true”放到toolbar中就可以实现我们的效果,如下图所示:

在这里,我们还需要特别注意一个地方,那就是在设置toolbar高度的时候,应该设置成wrap_content,不然也没法实现我们的效果,比如我把高度固定为50dp,效果如下:
虽然占据了状态栏,但是toolbar的高度明显不够了,效果很不好。
在Android5.0以后,增加了新的API android:statusBarColor 用于设置状态栏的颜色,同时以前的windowTranslucentStatus也是对它有效的,所以如果想通过新的API设置状态栏颜色的话,首先应该将windowTranslucentStatus设置为false,不然是没有效果的。
以上就是通过资源文件设置透明状态栏的方法。
代码中设置透明状态栏
在代码中设置透明状态栏的方法也很简单,思路就是首先通过 WindowManager.LayoutParams.FLAG_TRANSLUCENT_STATUS设置当前window为透明状态栏,这样标题栏就可以占据状态栏了,但是会出现布局中的内容和状态栏的内容重叠的问题,为了解决这个问题,我们应该获得状态栏的高度,然后设置标题栏的paddingTop为状态栏的高度,这样就可以实现透明效果的标题栏的,代码如下:protected void setImmerseLayout(View view) {// view为标题栏
if (Build.VERSION.SDK_INT >= Build.VERSION_CODES.KITKAT) {
Window window = getWindow();
window.addFlags(WindowManager.LayoutParams.FLAG_TRANSLUCENT_STATUS);
int statusBarHeight = getStatusBarHeight(this.getBaseContext());
view.setPadding(0, statusBarHeight, 0, 0);
}
}
public int getStatusBarHeight(Context context) {
int result = 0;
int resourceId = context.getResources().getIdentifier("status_bar_height", "dimen",
"android");
if (resourceId > 0) {
result = context.getResources().getDimensionPixelSize(resourceId);
}
return result;
}fitSystemWindows属性:
官方描述:
Boolean internal attribute to adjust view layout based on system windows such as the status bar. If true, adjusts the padding of this view to leave space for the system windows. Will only take effect if this view is in a non-embedded activity.
补充:
当为纯色actionbar的情况下,我们将toolbar的高度设为wrap_content,并且将fitsSystemWindows=“true”参数设置到了toolbar上,这样虽然实现了4.4版本的沉浸效果,但是却不能有效的适配5.0及以上的版本,所以做出以上修改。
在4.4版本上:
1. 我们将根布局的背景颜色设置成和toolbar一样的,并且设fitsSystemWindows为true。
2. toolbar的fitsSystemWindows属性去掉,并且高度设置为?attr/actionBarSize
3. 在toolbar下增加一个子布局,颜色设置为white,这样就可以在4.4及5.0以上实现带actionbar的沉浸式布局
2017.12.14更新:
使用纯色actionbar的时候,可以使用容器包裹toolbar,只设置容器 fitsSystemWindows为true。由于fitsSystemWindows属性本质上是给当前控件设置了一个padding,所以我们设置到根布局的话,会导致状态栏是透明的,并且和窗口背景一样,和toolbar背景不同。如果我们设置给toolbar,则会由于padding的存在,导致toolbar的内容下移。所以我们选择使用LinearLayout包裹toolbar,并将toolbar的背景等属性设置在appbarlayout上就可以完美实现效果,代码:
<LinearLayout
android:layout_width="match_parent"
android:layout_height="wrap_content"
android:background="@color/colorPrimary"
android:fitsSystemWindows="true"
android:orientation="vertical">

<android.support.v7.widget.Toolbar
android:layout_width="match_parent"
android:layout_height="?attr/actionBarSize"
app:title="Login"/>
</LinearLayout>

相关文章推荐
- Android Handler、LOOP和Message
- Android隐藏标题栏问题
- 解决Android签名混淆后WebView与JS交互失效的问题
- ViewPager嵌套Fragment切换Fragment时不更新页面
- Android 封装SharedPreferences类
- android视频适配与裁剪
- Android gc垃圾回收研究学习
- android Studio初体验
- genymotion无法下载或下载慢解决方法
- Android 中使用极光推送消息详细介绍
- 获取Android设备的方向
- Android 编程下的 TraceView 简介及其案例实战
- Android View绘制流程(二)
- Android View绘制流程
- RxAndroid学习指南
- android开发drawable-nodpi
- android 仿淘宝、京东商品详情页 向上拖动查看图文详情控件
- Android,iso接口调试-抓包调试接口
- 解决Android模拟器联网
- Android 截屏(Screenshot)代码流程小结