FastDFS分布式文件系统安装与使用(单节点)
2016-12-01 16:44
681 查看
原文链接:http://blog.csdn.net/xyang81/article/details/52837974
FastDFS是由淘宝的余庆先生所开发,是一个轻量级、高性能的开源分布式文件系统,用纯C语言开发,包括文件存储、文件同步、文件访问(上传、下载)、存取负载均衡、在线扩容、相同内容只存储一份等功能,适合有大容量存储需求的应用或系统。做分布式系统开发时,其中要解决的一个问题就是图片、音视频、文件共享的问题,分布式文件系统正好可以解决这个需求。同类的分布式文件系统有谷歌的GFS、HDFS(Hadoop)、TFS(淘宝)等。
源码开放下载地址:https://github.com/happyfish100
早期源码开放下载地址:https://sourceforge.net/projects/fastdfs/files/
官网论坛:http://bbs.chinaunix.net/forum-240-1.html
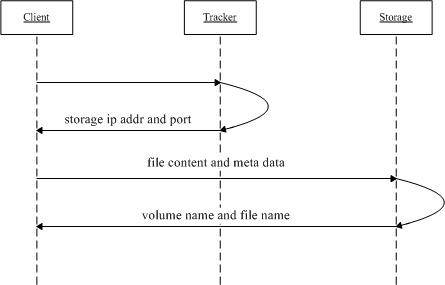
1、client询问tracker上传到的storage,不需要附加参数;
2、tracker返回一台可用的storage;
3、client直接和storage通讯完成文件上传。
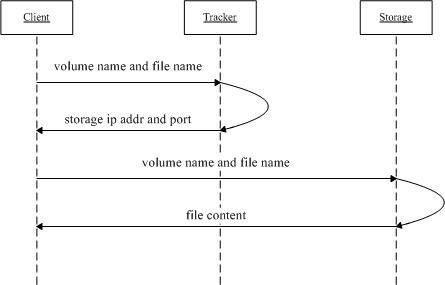
1、client询问tracker下载文件的storage,参数为文件标识(组名和文件名);
2、tracker返回一台可用的storage;
3、client直接和storage通讯完成文件下载。
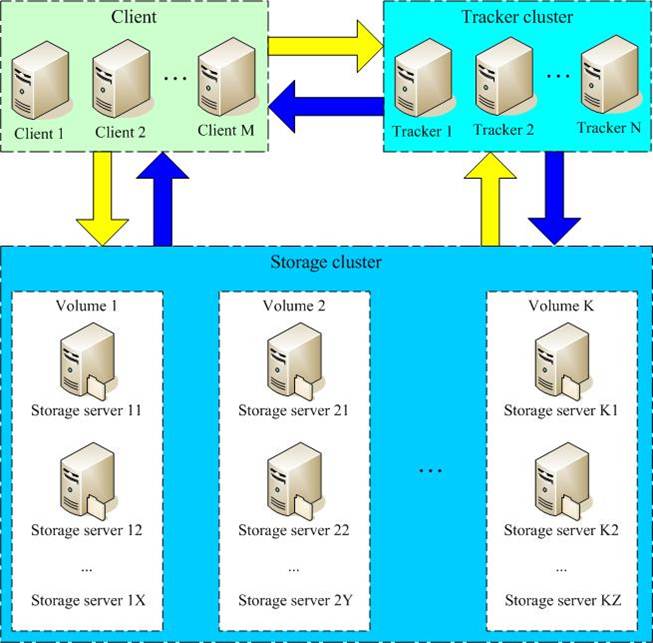
FastDFS两个主要的角色:Tracker Server 和 Storage Server
Tracker Server:跟踪服务器,主要负责调度storage节点与client通信,在访问上起负载均衡的作用,和记录storage节点的运行状态,是连接client和storage节点的枢纽。
Storage Server:存储服务器,保存文件和文件的meta data(元数据)
Group:文件组,也可以称为卷。同组内服务器上的文件是完全相同的,做集群时往往一个组会有多台服务器,上传一个文件到同组内的一台机器上后,FastDFS会将该文件即时同步到同组内的其它所有机器上,起到备份的作用。
meta data:文件相关属性,键值对(Key Value Pair)方式,如:width=1024, height=768。和阿里云OSS的meta data相似。
跟踪服务器(Tracker Server):192.168.0.200
存储服务器(Storage Server):192.168.0.201
操作系统:CentOS7
用户:root
数据存储目录:/fastdfs
安装包:
fastdfs-master-V5.05.zip:FastDFS源码
libfastcommon-master.zip:(从 FastDFS 和 FastDHT 中提取出来的公共 C 函数库)
fastdfs-nginx-module-master.zip:storage节点http服务nginx模块
nginx-1.10.0.tar.gz:Nginx安装包
ngx_cache_purge-2.3.tar.gz:图片缓存清除Nginx模块(集群环境会用到)
点击这里下载所有安装包,你也可以从作者github官网去下载。
下载完成后,将压缩包解压到
1
2
3
4
5
6
7
8
9
10
11
12
13
14
1
2
3
4
5
6
7
8
9
10
11
12
13
14
2
3
4
5
6
7
8
9
10
11
12
13
14
15
16
17
18
19
20
21
22
23
24
1
2
3
4
5
6
7
8
9
10
11
12
13
14
15
16
17
18
19
20
21
22
23
24
1> 服务脚本:
2
1
2
2> 配置文件(示例配置文件):
2
3
4
5
6
1
2
3
4
5
6
3> 命令行工具(/usr/bin目录下)
2
3
4
5
6
7
8
9
10
11
12
13
14
15
1
2
3
4
5
6
7
8
9
10
11
12
13
14
15
1> 复制tracker样例配置文件,并重命名
1
2> 修改tracker配置文件
2
3
4
5
1
2
3
4
5
其它参数保留默认配置, 具体配置解释可参考官方文档说明:http://bbs.chinaunix.net/thread-1941456-1-1.html
3> 创建base_path指定的目录
1
4> 防火墙中打开tracker服务器端口( 默认为 22122)
添加如下端口行:
重启防火墙:
5> 启动tracker服务器
1
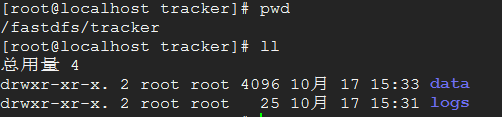
初次启动,会在/fastdfs/tracker目录下生成logs、data两个目录。
检查FastDFS Tracker Server是否启动成功:

6> 停止tracker服务器
1
7> 设置tracker服务开机启动
1
1> 复制storage样例配置文件,并重命名
1
2> 编辑配置文件
2
3
4
5
6
7
8
9
1
2
3
4
5
6
7
8
9
其它参数保留默认配置, 具体配置解释可参考官方文档说明:http://bbs.chinaunix.net/thread-1941456-1-1.html
3> 创建基础数据目录
1
4> 防火墙中打开storage服务器端口( 默认为 23000)
添加如下端口行:
重启防火墙:
5> 启动storage服务器
1
初次启动,会在/fastdfs/storage目录下生成logs、data两个目录。

检查FastDFS Tracker Server是否启动成功:

6> 停止storage服务器
1
7> 设置storage服务开机启动
1
2
3
4
5
1
2
3
4
5
1
返回文件ID号:group1/M00/00/00/wKgAyVgEjSGANYtkAAB7mZt7HdQ08538.h
(能返回以上文件ID,说明文件已经上传成功)

1> fastdfs-nginx-module 作用说明
FastDFS 通过 Tracker 服务器,将文件放在 Storage 服务器存储,但是同组存储服务器之间需要进入文件复制,有同步延迟的问题。假Tracker 服务器将文件上传到了 192.168.0.201,上传成功后文件ID已经返回给客户端。此时 FastDFS 存储集群机制会将这个文件同步到同组存储 192.168.0.202,在文件还没有复制完成的情况下,客户端如果用这个文件 ID 在 192.168.4.126 上取文件,就会出现文件无法访问的错误。而 fastdfs-nginx-module 可以重定向文件连接到源服务器取文件,避免客户端由于复制延迟导致的文件无法访问错误
2> 解压fastdfs-nginx-module-master.zip
2
1
2
3> 安装Nginx
Nginx安装请参考《Nginx源码安装》
注意:在执行./configure配置nginx参数的时候,需要将fastdfs-nginx-moudle源码作为模块编译进去:
4> 复制 fastdfs-nginx-module 源码中的配置文件到/etc/fdfs 目录, 并修改
2
1
2
修改以下配置:
2
3
4
5
6
7
1
2
3
4
5
6
7
其它配置保持默认即可。
5> 复制 FastDFS 的部分配置文件到/etc/fdfs 目录
2
1
2
6> 在/fastdfs/storage文件存储目录下创建软连接,将其链接到实际存放数据的目录
1
7> 配置nginx访问storage文件
简洁版nginx配置:
2
3
4
5
6
7
8
9
10
11
12
13
14
15
16
17
18
19
20
21
22
23
1
2
3
4
5
6
7
8
9
10
11
12
13
14
15
16
17
18
19
20
21
22
23
注意事项:
A> 8888 端口值是要与/etc/fdfs/storage.conf 中的http.server_port=8888 相对应,因为 http.server_port 默认为 8888,如果想改成 80,则要对应修改过来。
B> Storage 对应有多个 group 的情况下,访问路径带 group 名,如
2
3
1
2
3
C> 如查下载时如发现老报 404, 将 nginx.conf 第一行 user nobody 修改为 user root 后重新启动。
8> 防火墙中打开 Nginx 的 8888 端口
添加:
重新启动防火墙:
1
9> 启动Nginx
2
1
2
nginx重启命令为:
启动nginx后,如果打印出ngx_http_fastdfs_set pid=xxx,表示fastdfs-nginx-module模块加载成功了,xxx表示模块的进程ID。
10> 通过浏览器访问测试时上传的文件
测试上传后返回的文件ID为:group1/M00/00/00/wKgAyVgEjSGANYtkAAB7mZt7HdQ08538.h,用浏览访问的地址为:http://192.168.0.201:8888/group1/M00/00/00/wKgAyVgEjSGANYtkAAB7mZt7HdQ08538.h
注意: 千万不要使用 kill -9 命令强杀 FastDFS 进程,否则可能会导致 binlog 数据丢失。
FastDFS介绍(官方文档):http://download.csdn.net/detail/xyang81/9656542
FastDFS配置文件详解:http://download.csdn.net/detail/xyang81/9656557
FastDFS是由淘宝的余庆先生所开发,是一个轻量级、高性能的开源分布式文件系统,用纯C语言开发,包括文件存储、文件同步、文件访问(上传、下载)、存取负载均衡、在线扩容、相同内容只存储一份等功能,适合有大容量存储需求的应用或系统。做分布式系统开发时,其中要解决的一个问题就是图片、音视频、文件共享的问题,分布式文件系统正好可以解决这个需求。同类的分布式文件系统有谷歌的GFS、HDFS(Hadoop)、TFS(淘宝)等。
源码开放下载地址:https://github.com/happyfish100
早期源码开放下载地址:https://sourceforge.net/projects/fastdfs/files/
官网论坛:http://bbs.chinaunix.net/forum-240-1.html
FastDFS系统架构:
FastDFS文件上传流程:
1、client询问tracker上传到的storage,不需要附加参数;
2、tracker返回一台可用的storage;
3、client直接和storage通讯完成文件上传。
FastDFS文件下载流程:
1、client询问tracker下载文件的storage,参数为文件标识(组名和文件名);
2、tracker返回一台可用的storage;
3、client直接和storage通讯完成文件下载。
术语
FastDFS两个主要的角色:Tracker Server 和 Storage Server Tracker Server:跟踪服务器,主要负责调度storage节点与client通信,在访问上起负载均衡的作用,和记录storage节点的运行状态,是连接client和storage节点的枢纽。
Storage Server:存储服务器,保存文件和文件的meta data(元数据)
Group:文件组,也可以称为卷。同组内服务器上的文件是完全相同的,做集群时往往一个组会有多台服务器,上传一个文件到同组内的一台机器上后,FastDFS会将该文件即时同步到同组内的其它所有机器上,起到备份的作用。
meta data:文件相关属性,键值对(Key Value Pair)方式,如:width=1024, height=768。和阿里云OSS的meta data相似。
FastDFS单节点安装 - 服务器规划:
跟踪服务器(Tracker Server):192.168.0.200 存储服务器(Storage Server):192.168.0.201
操作系统:CentOS7
用户:root
数据存储目录:/fastdfs
安装包:
fastdfs-master-V5.05.zip:FastDFS源码
libfastcommon-master.zip:(从 FastDFS 和 FastDHT 中提取出来的公共 C 函数库)
fastdfs-nginx-module-master.zip:storage节点http服务nginx模块
nginx-1.10.0.tar.gz:Nginx安装包
ngx_cache_purge-2.3.tar.gz:图片缓存清除Nginx模块(集群环境会用到)
点击这里下载所有安装包,你也可以从作者github官网去下载。
下载完成后,将压缩包解压到
/usr/local/src目录下
一、所有tracker和storage节点都执行如下操作
1、安装所需的依赖包
shell> yum install make cmake gcc gcc-c++1
1
2、安装libfatscommon
shell> cd /usr/local/src
shell> unzip libfastcommon-master.zip
shell> cd libfastcommon-master
shell> ll
-rw-r--r--. 1 root root 6670 10月  8 09:39 HISTORY
-rw-r--r--. 1 root root  566 10月  8 09:39 INSTALL
-rw-r--r--. 1 root root 1438 10月  8 09:39 libfastcommon.spec
-rwxr-xr-x. 1 root root 3099 10月  8 09:39 make.sh
drwxr-xr-x. 2 root root 4096 10月  8 09:39 php-fastcommon
-rw-r--r--. 1 root root  812 10月  8 09:39 README
drwxr-xr-x. 3 root root 4096 10月  8 09:39 src
## 编译、安装
shell> ./make.sh
shell> ./make.sh install
1
2
3
4
5
6
7
8
9
10
11
12
13
14
1
2
3
4
5
6
7
8
9
10
11
12
13
14
3、安装FastDFS
shell> cd /usr/local/src
shell> unzip fastdfs-master-V5.05.zip
shell> cd fastdfs-master
shell> ll
[root@localhost fastdfs-master]# ll
drwxr-xr-x. 3 root root  4096 8月   8 15:17 client
drwxr-xr-x. 2 root root  4096 8月   8 15:17 common
drwxr-xr-x. 2 root root  4096 8月   8 15:17 conf
-rw-r--r--. 1 root root 35067 8月   8 15:17 COPYING-3_0.txt
-rw-r--r--. 1 root root  2881 8月   8 15:17 fastdfs.spec
-rw-r--r--. 1 root root 32259 8月   8 15:17 HISTORY
drwxr-xr-x. 2 root root    46 8月   8 15:17 init.d
-rw-r--r--. 1 root root  7755 8月   8 15:17 INSTALL
-rwxr-xr-x. 1 root root  5548 8月   8 15:17 make.sh
drwxr-xr-x. 2 root root  4096 8月   8 15:17 php_client
-rw-r--r--. 1 root root  2380 8月   8 15:17 README.md
-rwxr-xr-x. 1 root root  1768 8月   8 15:17 restart.sh
-rwxr-xr-x. 1 root root  1680 8月   8 15:17 stop.sh
drwxr-xr-x. 4 root root  4096 8月   8 15:17 storage
drwxr-xr-x. 2 root root  4096 8月   8 15:17 test
drwxr-xr-x. 2 root root  4096 8月   8 15:17 tracker
## 编译、安装
shell> ./make.sh
shell> ./make.sh install
1
2
3
4
5
6
7
8
9
10
11
12
13
14
15
16
17
18
19
20
21
22
23
24
1
2
3
4
5
6
7
8
9
10
11
12
13
14
15
16
17
18
19
20
21
22
23
24
采用默认安装方式,相应的文件与目录如下:
1> 服务脚本:/etc/init.d/fdfs_storaged /etc/init.d/fdfs_trackerd1
2
1
2
2> 配置文件(示例配置文件):
/etc/fdfs
shell> ll /etc/fdfs/
总用量 20
-rw-r--r--. 1 root root 1461 10月 17 15:15 client.conf.sample
-rw-r--r--. 1 root root 7927 10月 17 15:15 storage.conf.sample
-rw-r--r--. 1 root root 7200 10月 17 15:15 tracker.conf.sample
1
2
3
4
5
6
1
2
3
4
5
6
3> 命令行工具(/usr/bin目录下)
shell> ll /usr/bin/ | grep fdfs
-rwxr-xr-x.   1 root root      315391 10月 17 15:15 fdfs_appender_test
-rwxr-xr-x.   1 root root      315168 10月 17 15:15 fdfs_appender_test1
-rwxr-xr-x.   1 root root      302016 10月 17 15:15 fdfs_append_file
-rwxr-xr-x.   1 root root      301692 10月 17 15:15 fdfs_crc32
-rwxr-xr-x.   1 root root      302075 10月 17 15:15 fdfs_delete_file
-rwxr-xr-x.   1 root root      302810 10月 17 15:15 fdfs_download_file
-rwxr-xr-x.   1 root root      302400 10月 17 15:15 fdfs_file_info
-rwxr-xr-x.   1 root root      316229 10月 17 15:15 fdfs_monitor
-rwxr-xr-x.   1 root root     1101974 10月 17 15:15 fdfs_storaged
-rwxr-xr-x.   1 root root      325327 10月 17 15:15 fdfs_test
-rwxr-xr-x.   1 root root      320448 10月 17 15:15 fdfs_test1
-rwxr-xr-x.   1 root root      447878 10月 17 15:15 fdfs_trackerd
-rwxr-xr-x.   1 root root      303002 10月 17 15:15 fdfs_upload_appender
-rwxr-xr-x.   1 root root      304022 10月 17 15:15 fdfs_upload_file
1
2
3
4
5
6
7
8
9
10
11
12
13
14
15
1
2
3
4
5
6
7
8
9
10
11
12
13
14
15
二、配置tracker服务器
1> 复制tracker样例配置文件,并重命名shell> cp /etc/fdfs/tracker.conf.sample /etc/fdfs/tracker.conf1
1
2> 修改tracker配置文件
shell> vim /etc/fdfs/tracker.conf
# 修改的内容如下:
disabled=false              # 启用配置文件
port=22122                  # tracker服务器端口(默认22122)
base_path=/fastdfs/tracker  # 存储日志和数据的根目录
1
2
3
4
5
1
2
3
4
5
其它参数保留默认配置, 具体配置解释可参考官方文档说明:http://bbs.chinaunix.net/thread-1941456-1-1.html
3> 创建base_path指定的目录
shell> mkdir -p /fastdfs/tracker1
1
4> 防火墙中打开tracker服务器端口( 默认为 22122)
shell> vi /etc/sysconfig/iptables
添加如下端口行:
-A INPUT -m state --state NEW -m tcp -p tcp --dport 22122 -j ACCEPT
重启防火墙:
shell> service iptables restart
5> 启动tracker服务器
shell> /etc/init.d/fdfs_trackerd start1
1
初次启动,会在/fastdfs/tracker目录下生成logs、data两个目录。
检查FastDFS Tracker Server是否启动成功:
ps -ef | grep fdfs_trackerd
6> 停止tracker服务器
shell> /etc/init.d/fdfs_trackerd stop1
1
7> 设置tracker服务开机启动
shell> chkconfig fdfs_trakcerd on1
1
三、配置storage服务器
1> 复制storage样例配置文件,并重命名shell> cp /etc/fdfs/storage.conf.sample /etc/fdfs/storage.conf1
1
2> 编辑配置文件
shell> vi /etc/fdfs/storage.conf

# 修改的内容如下:
disabled=false                      # 启用配置文件
port=23000                          # storage服务端口
base_path=/fastdfs/storage          # 数据和日志文件存储根目录
store_path0=/fastdfs/storage        # 第一个存储目录
tracker_server=192.168.0.200:22122  # tracker服务器IP和端口
http.server_port=8888               # http访问文件的端口
1
2
3
4
5
6
7
8
9
1
2
3
4
5
6
7
8
9
其它参数保留默认配置, 具体配置解释可参考官方文档说明:http://bbs.chinaunix.net/thread-1941456-1-1.html
3> 创建基础数据目录
shell> mkdir -p /fastdfs/storage1
1
4> 防火墙中打开storage服务器端口( 默认为 23000)
shell> vi /etc/sysconfig/iptables
添加如下端口行:
-A INPUT -m state --state NEW -m tcp -p tcp --dport 23000 -j ACCEPT
重启防火墙:
shell> service iptables restart
5> 启动storage服务器
shell> /etc/init.d/fdfs_storaged start1
1
初次启动,会在/fastdfs/storage目录下生成logs、data两个目录。
检查FastDFS Tracker Server是否启动成功:
ps -ef | grep fdfs_storaged
6> 停止storage服务器
shell> /etc/init.d/fdfs_storaged stop1
1
7> 设置storage服务开机启动
shell> chkconfig fdfs_storaged on1
1
四、文件上传测试(192.168.0.200)
1> 修改Tracker服务器客户端配置文件
shell> cp /etc/fdfs/client.conf.sample /etc/fdfs/client.conf
shell> vim /etc/fdfs/client.conf
# 修改以下配置,其它保持默认
base_path=/fastdfs/tracker
tracker_server=192.168.0.200:22122
1
2
3
4
5
1
2
3
4
5
2> 执行文件上传命令
shell> /usr/bin/fdfs_upload_file /etc/fdfs/client.conf /usr/include/stdio.h1
1
返回文件ID号:group1/M00/00/00/wKgAyVgEjSGANYtkAAB7mZt7HdQ08538.h
(能返回以上文件ID,说明文件已经上传成功)
五、在所有storage节点安装fastdfs-nginx-module
1> fastdfs-nginx-module 作用说明 FastDFS 通过 Tracker 服务器,将文件放在 Storage 服务器存储,但是同组存储服务器之间需要进入文件复制,有同步延迟的问题。假Tracker 服务器将文件上传到了 192.168.0.201,上传成功后文件ID已经返回给客户端。此时 FastDFS 存储集群机制会将这个文件同步到同组存储 192.168.0.202,在文件还没有复制完成的情况下,客户端如果用这个文件 ID 在 192.168.4.126 上取文件,就会出现文件无法访问的错误。而 fastdfs-nginx-module 可以重定向文件连接到源服务器取文件,避免客户端由于复制延迟导致的文件无法访问错误
2> 解压fastdfs-nginx-module-master.zip
shell> cd /usr/local/src
shell> unzip fastdfs-nginx-module-master.zip
1
2
1
2
3> 安装Nginx
Nginx安装请参考《Nginx源码安装》
注意:在执行./configure配置nginx参数的时候,需要将fastdfs-nginx-moudle源码作为模块编译进去:
./configure --prefix=/opt/nginx --sbin-path=/usr/bin/nginx --add-module=/usr/local/src/fastdfs-nginx-module/src
4> 复制 fastdfs-nginx-module 源码中的配置文件到/etc/fdfs 目录, 并修改
shell> cp /usr/local/src/fastdfs-nginx-module/src/mod_fastdfs.conf /etc/fdfs/
shell> vi /etc/fdfs/mod_fastdfs.conf
1
2
1
2
修改以下配置:
connect_timeout=10                  # 客户端访问文件连接超时时长(单位:秒)
base_path=/tmp                      # 临时目录
tracker_server=192.168.0.200:22122  # tracker服务IP和端口
storage_server_port=23000           # storage服务端口
group_name=group1                   # 组名
url_have_group_name=true            # 访问链接前缀加上组名
store_path0=/fastdfs/storage        # 文件存储路径
1
2
3
4
5
6
7
1
2
3
4
5
6
7
其它配置保持默认即可。
5> 复制 FastDFS 的部分配置文件到/etc/fdfs 目录
shell> cd /usr/local/src/fastdfs-master/conf
shell> cp http.conf mime.types /etc/fdfs/
1
2
1
2
6> 在/fastdfs/storage文件存储目录下创建软连接,将其链接到实际存放数据的目录
shell> ln -s /fastdfs/storage/data/ /fastdfs/storage/data/M001
1
7> 配置nginx访问storage文件
简洁版nginx配置:
user nobody;
worker_processes 1;
events {
worker_connections 1024;
}
http {
include mime.types;
default_type application/octet-stream;
sendfile on;
keepalive_timeout 65;
server {
listen 8888;
server_name localhost;
location ~/group([0-9])/M00 {
ngx_fastdfs_module;
}
error_page 500 502 503 504 /50x.html;

location = /50x.html {
root html;
}
}
}12
3
4
5
6
7
8
9
10
11
12
13
14
15
16
17
18
19
20
21
22
23
1
2
3
4
5
6
7
8
9
10
11
12
13
14
15
16
17
18
19
20
21
22
23
注意事项:
A> 8888 端口值是要与/etc/fdfs/storage.conf 中的http.server_port=8888 相对应,因为 http.server_port 默认为 8888,如果想改成 80,则要对应修改过来。
B> Storage 对应有多个 group 的情况下,访问路径带 group 名,如
/group1/M00/00/00/xxx,对应的 Nginx 配置为:
location ~/group([0-9])/M00 {
ngx_fastdfs_module;
}12
3
1
2
3
C> 如查下载时如发现老报 404, 将 nginx.conf 第一行 user nobody 修改为 user root 后重新启动。
8> 防火墙中打开 Nginx 的 8888 端口
vi /etc/sysconfig/iptables
添加:
-A INPUT -m state --state NEW -m tcp -p tcp --dport 8888 -j ACCEPT
重新启动防火墙:
shell> service iptables restart1
1
9> 启动Nginx
shell> /usr/bin/nginx
ngx_http_fastdfs_set pid=xxx
1
2
1
2
nginx重启命令为:
/usr/sbin/nginx -s reload
启动nginx后,如果打印出ngx_http_fastdfs_set pid=xxx,表示fastdfs-nginx-module模块加载成功了,xxx表示模块的进程ID。
10> 通过浏览器访问测试时上传的文件
测试上传后返回的文件ID为:group1/M00/00/00/wKgAyVgEjSGANYtkAAB7mZt7HdQ08538.h,用浏览访问的地址为:http://192.168.0.201:8888/group1/M00/00/00/wKgAyVgEjSGANYtkAAB7mZt7HdQ08538.h
注意: 千万不要使用 kill -9 命令强杀 FastDFS 进程,否则可能会导致 binlog 数据丢失。
FastDFS介绍(官方文档):http://download.csdn.net/detail/xyang81/9656542
FastDFS配置文件详解:http://download.csdn.net/detail/xyang81/9656557

相关文章推荐
- FastDFS分布式文件系统安装与使用(单节点)
- FastDFS分布式文件系统安装与使用(单节点)
- FastDFS 分布式文件系统的安装与使用(单节点)
- Dubbo分布式架构实战--FastDFS分布式文件系统的安装与使用(单节点)
- FastDFS分布式文件系统安装与使用(单节点)
- FastDFS分布式文件系统安装与使用(单节点)
- FastDFS之——FastDFS 分布式文件系统的安装与使用(单节点)
- FastDFS分布式文件系统安装与使用(单节点)
- FastDFS 分布式文件系统的安装与使用 (单节点)
- 分布式架构学习之:017--FastDFS分布式文件系统的安装与使用(单节点)
- FastDFS分布式文件系统安装与使用(单节点)
- 170519、FastDFS分布式文件系统的安装与使用(单节点)
- FastDFS 分布式文件系统的安装与使用(单节点)
- 分布式架构学习之:FastDFS分布式文件系统的Linux安装与使用(单节点)
- FastDFS分布式文件系统的安装与使用(单节点)
- Fastdfs 单节点安装使用教程整理
- FastDFS 分布式文件系统的安装与使用
- FastDFS分布式文件系统的安装(单节点)
- FastDFS安装与使用(单节点)
- [置顶] dubbo高级篇-12 fastdfs分布式文件系统安装与使用