ROS机器人Diego 1#制作(九)视觉系统之使用Xtion发布点云数据
2016-11-26 22:53
555 查看
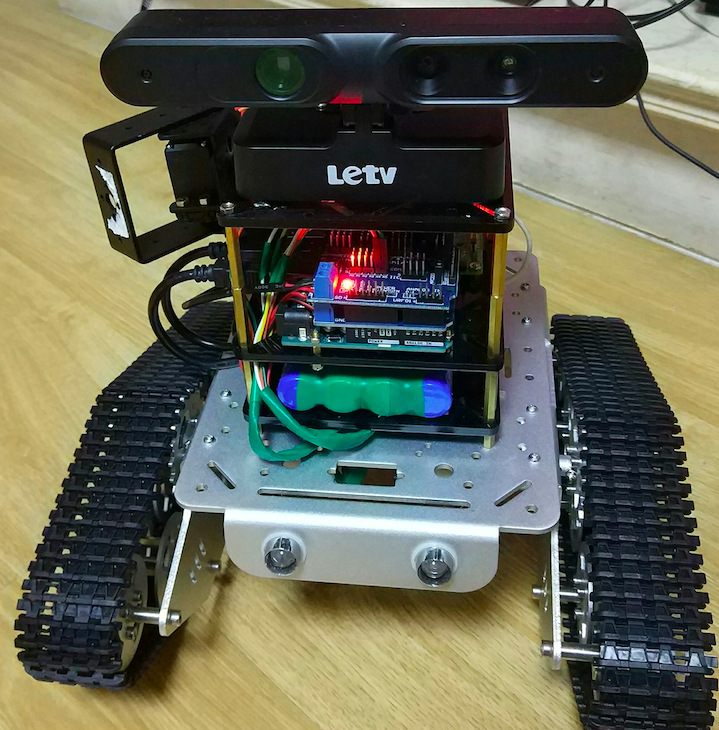
要做到机器人的SLAM自适应导航,最基本的要有激光雷达数据或者点云数据,但激光雷达目前价格太高,在淘宝上便宜的也要将近3000块,实在是太贵了,另外可替代的方法是用具有深度摄像机作为传感器发布点云数据,一般用的比较多的是微软的Kinect,或者华硕的Xtion。目前Kinect已经有2.0版本,而且二手的价格也比较便宜,但Kinect2.0支持的USB3.0接口,树莓派USB接口都是2.0的,无奈只能放弃Kinect2.0,Kinect1.0笔者曾经有过一台,影像中感觉体积太大。考虑再三后最终决定使用Xtion,赶紧到淘宝上找,发现价格不便宜,后来发现乐视电视配的第一代体感摄像头,完全是OEM的Xtion,关键是价格要比Xtion便宜好几百,果断进了一台LeTV Xtion,货到后发现装上效果还不错,先上张图:
一、安装:
1.安装OpenNI包
2.安装Xtion的新版驱动(现在买到的都是新版本的)
3.启动openni节点(先要在其他终端中启动roscore)
启动成功后终端应该显示如下信息

这里的警告信息可以忽略,不影响使用
4.查看摄像头的所生成的影像
也可以通过rviz来查看生成的影像,执行如下命令
二、生成点云数据,参考了两篇文档
OpenNI本身就已经有点云数据了,这篇文章完全是看了前辈的文章,就想把这些优秀的代码整合到ROS中来
官方文档http://wiki.ros.org/navigation/Tutorials/RobotSetup/Sensors
古月居的http://blog.csdn.net/hcx25909/article/details/8654684
1.源代码
2.另外在包目录下的CMakeLists.txt文件中有两处修改,否则编译会出错
增加openni的引用路径
增加新的可执行文件说明
修改保存后在~/catkin_ws下执行编译命令
3.启动XtionPointCloud节点
打开另外一个终端查看发布的点云数据
这时候就会看到一屏一屏的数据

树莓派处理其点云数据还是很吃力的,这个时候树莓派的系统资源使用情况:
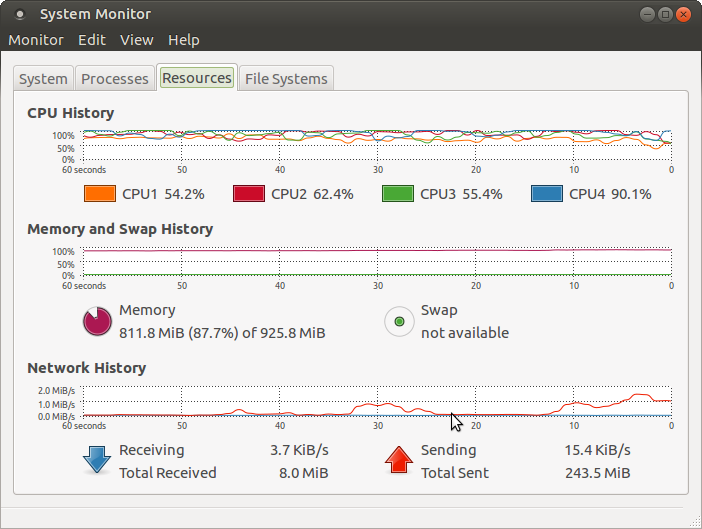
4个CPU的使用都在50%以上
内存使用接近90%
一、安装:
1.安装OpenNI包
sudo apt-get install ros-kinetic-openni-camera
sudo apt-get install ros-kinetic-openni-launch
2.安装Xtion的新版驱动(现在买到的都是新版本的)
sudo apt-get install libopenni-sensor-primesense0
3.启动openni节点(先要在其他终端中启动roscore)
roslaunch openni_launch openni.launch
启动成功后终端应该显示如下信息
这里的警告信息可以忽略,不影响使用
4.查看摄像头的所生成的影像
rosrun image_view disparity_view image:=/camera/depth/disparity
也可以通过rviz来查看生成的影像,执行如下命令
rosrun rviz rviz
二、生成点云数据,参考了两篇文档
OpenNI本身就已经有点云数据了,这篇文章完全是看了前辈的文章,就想把这些优秀的代码整合到ROS中来
官方文档http://wiki.ros.org/navigation/Tutorials/RobotSetup/Sensors
古月居的http://blog.csdn.net/hcx25909/article/details/8654684
1.源代码
#include <ros/ros.h>
#include <sensor_msgs/PointCloud.h>
#include <XnCppWrapper.h>
#include <iostream>
#include <iomanip>
#include <vector>

using namespace xn;
using namespace std;

struct SColorPoint3D
{
float  X;
float  Y;
float  Z;
float  R;
float  G;
float  B;

SColorPoint3D( XnPoint3D pos, XnRGB24Pixel color )
{
X = pos.X;
Y = pos.Y;
Z = pos.Z;
R = (float)color.nRed / 255;
G = (float)color.nGreen / 255;
B = (float)color.nBlue / 255;
}
};

void GeneratePointCloud( DepthGenerator& rDepthGen,
const XnDepthPixel* pDepth,
const XnRGB24Pixel* pImage,
vector<SColorPoint3D>& vPointCloud )
{
// number of point is the number of 2D image pixel
DepthMetaData mDepthMD;
rDepthGen.GetMetaData( mDepthMD );
unsigned int uPointNum = mDepthMD.FullXRes() * mDepthMD.FullYRes();

// build the data structure for convert
XnPoint3D* pDepthPointSet = new XnPoint3D[ uPointNum ];
unsigned int i, j, idxShift, idx;
for( j = 0; j < mDepthMD.FullYRes(); ++j )
{
idxShift = j * mDepthMD.FullXRes();
for( i = 0; i < mDepthMD.FullXRes(); ++i )
{
idx = idxShift + i;
pDepthPointSet[idx].X = i;
pDepthPointSet[idx].Y = j;
pDepthPointSet[idx].Z = pDepth[idx];
}
}

// un-project points to real world
XnPoint3D* p3DPointSet = new XnPoint3D[ uPointNum ];
rDepthGen.ConvertProjectiveToRealWorld( uPointNum, pDepthPointSet, p3DPointSet );
delete[] pDepthPointSet;

// build point cloud
for( i = 0; i < uPointNum; ++ i )
{
// skip the depth 0 points
if( p3DPointSet[i].Z == 0 )
continue;

vPointCloud.push_back( SColorPoint3D( p3DPointSet[i], pImage[i] ) );
}
delete[] p3DPointSet;
}

int main(int argc, char** argv){
ros::init(argc, argv, "point_cloud_publisher");

ros::NodeHandle n;
ros::Publisher cloud_pub = n.advertise<sensor_msgs::PointCloud>("cloud", 50);

unsigned int num_points = 100;

int count = 0;
ros::Rate r(1.0);

/////////////////
XnStatus eResult = XN_STATUS_OK;
int i = 0;

// init
Context mContext;
eResult = mContext.Init();

DepthGenerator mDepthGenerator;
eResult = mDepthGenerator.Create(mContext);
ImageGenerator mImageGenerator;
eResult = mImageGenerator.Create(mContext);

// set output mode
XnMapOutputMode mapMode;
mapMode.nXRes = XN_VGA_X_RES;
mapMode.nYRes = XN_VGA_Y_RES;
mapMode.nFPS  = 30;
eResult = mDepthGenerator.SetMapOutputMode(mapMode);
eResult = mImageGenerator.SetMapOutputMode(mapMode);

// start generating
eResult = mContext.StartGeneratingAll();
// read data
vector<SColorPoint3D> vPointCloud;
/////////////////

while(n.ok()){

eResult = mContext.WaitNoneUpdateAll();
// get the depth map
const XnDepthPixel*  pDepthMap = mDepthGenerator.GetDepthMap();

// get the image map
const XnRGB24Pixel*  pImageMap = mImageGenerator.GetRGB24ImageMap();

// generate point cloud

d4e4
vPointCloud.clear();
GeneratePointCloud(mDepthGenerator, pDepthMap, pImageMap, vPointCloud );

// print point cloud
cout.flags(ios::left);    //Left-aligned
cout << "Point number: " << vPointCloud.size() << endl;

num_points=vPointCloud.size();

sensor_msgs::PointCloud cloud;
cloud.header.stamp = ros::Time::now();
cloud.header.frame_id = "sensor_frame";

cloud.points.resize(num_points);

//we'll also add an intensity channel to the cloud
cloud.channels.resize(3);
cloud.channels[0].name = "R";
cloud.channels[0].values.resize(num_points);
cloud.channels[1].name = "G";
cloud.channels[1].values.resize(num_points);
cloud.channels[2].name = "G";
cloud.channels[2].values.resize(num_points);

//generate some fake data for our point cloud
for(unsigned int i = 0; i < num_points; ++i){
cloud.points[i].x = vPointCloud[i].X;
cloud.points[i].y = vPointCloud[i].Y;
cloud.points[i].z = vPointCloud[i].Z;
cloud.channels[0].values[i] = vPointCloud[i].R;
cloud.channels[1].values[i] = vPointCloud[i].G;
cloud.channels[2].values[i] = vPointCloud[i].B;
}

cloud_pub.publish(cloud);
++count;
r.sleep();
}
return 0;
}
2.另外在包目录下的CMakeLists.txt文件中有两处修改,否则编译会出错
增加openni的引用路径
include_directories ("/usr/include/ni/")增加新的可执行文件说明
add_executable(XtionPointCloud src/XtionPointCloud.cpp)
target_link_libraries(XtionPointCloud ${catkin_LIBRARIES})
target_link_libraries(XtionPointCloud OpenNI)
修改保存后在~/catkin_ws下执行编译命令
catkin_make
3.启动XtionPointCloud节点
rosrun diego_nav XtionPointCloud
打开另外一个终端查看发布的点云数据
rostopic echo /cloud
这时候就会看到一屏一屏的数据
树莓派处理其点云数据还是很吃力的,这个时候树莓派的系统资源使用情况:
4个CPU的使用都在50%以上
内存使用接近90%

相关文章推荐
- ROS机器人Diego 1#制作(十)摄像头tf数据的发布
- ROS机器人Diego 1#制作(七)ROS语音系统
- ROS机器人Diego 1#制作(八)ROS语音系统之整合讯飞语音
- ROS机器人Diego 1#制作(二十二)基于EAI F4激光雷达数据进行定位amcl
- ROS机器人Diego 1#制作(十一)将letv xtion点云数据转换成激光数据
- ROS机器人Diego 1#制作(三)base controller---ros_arduino_bridge
- ROS机器人Diego 1#制作总结
- ROS机器人Diego 1#制作(二十)搭载EAI F4激光雷达Hector创建室内地图
- ROS机器人Diego 1#制作(二十三)搭载EAI F4激光雷达move_base路径规划
- ROS机器人Diego 1#制作(十五)机械臂的控制---通过键盘控制机械臂舵机
- ROS机器人Diego 1#制作(二十一)搭载EAI F4激光雷达gmapping创建室内地图
- ROS机器人Diego 1#制作(十七)用moveit assistant生成配置包
- ROS机器人Diego 1#制作(五)base controller---角速度的标定
- ROS机器人Diego 1#制作(十四)机械臂的控制---arduino驱动
- ROS机器人Diego 1#制作(十八)模拟环境测试moveit
- ROS机器人Diego 1#制作(十九)diego机器人的moveit驱动
- ROS机器人Diego 1#制作(十六)创建机器人的urdf模型描述文件
- ROS机器人Diego 1#制作(十二)SLAM导航的配置
- ROS机器人Diego 1#制作(十三)launch启动文件
- ROS机器人Diego 1#制作(二)base controller---rosserial_arduino