android调用系统照相机拍照,并压缩保存在本地
2016-11-26 10:33
561 查看
1.首先拍照和保存文件肯定就需要申请权限
2.在布局中添加一个按钮和一个ImageView用来显示图片缩略图,布局如下:
3.点击button调用系统照相机进行拍照,button监听事件如下:
4.重写onActivityResult()方法,在该方法中来处理返回的数据。
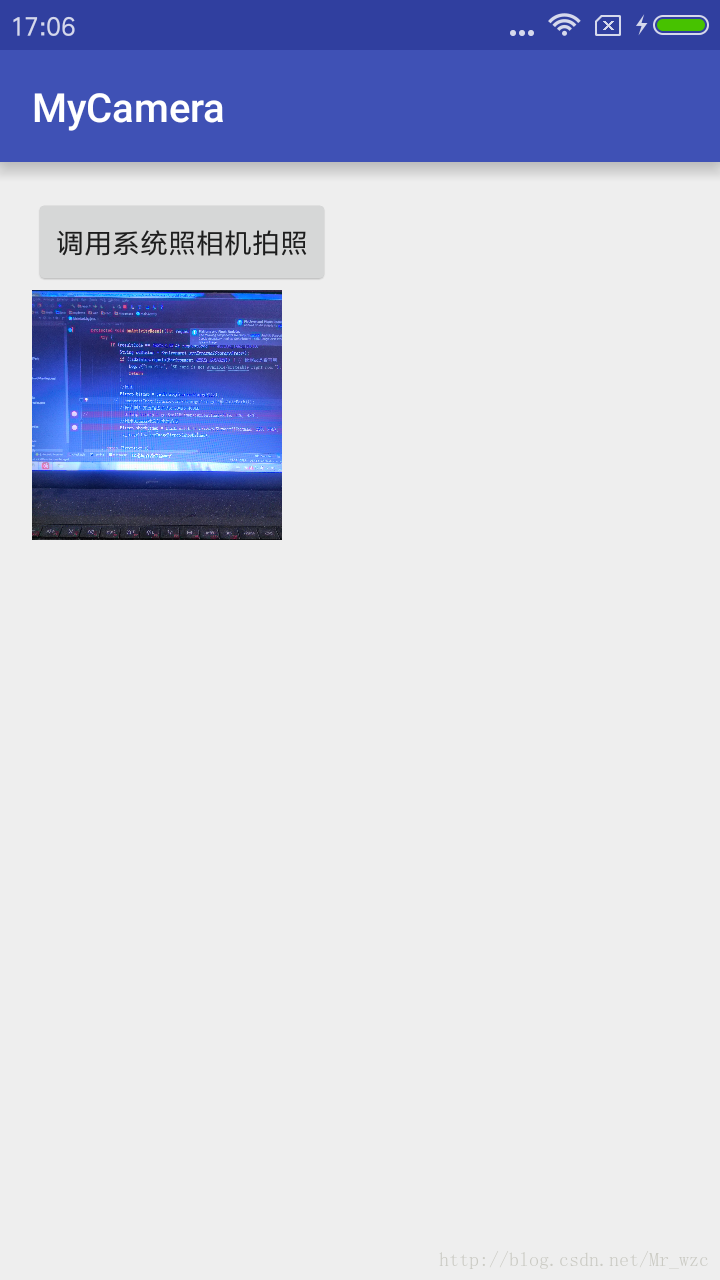
此时我们拍照完成之后,照片会保存在SD下的myimage文件夹下,但是图片没有进行压缩。图片大小大约1M多(这和手机有关),并且缩略图并没有保存只是显示而已。
效果如图:
4.对图片进行压缩,压缩方法有按比例大小压缩 和 按质量压缩。
下面是我进行压缩前后的对比:
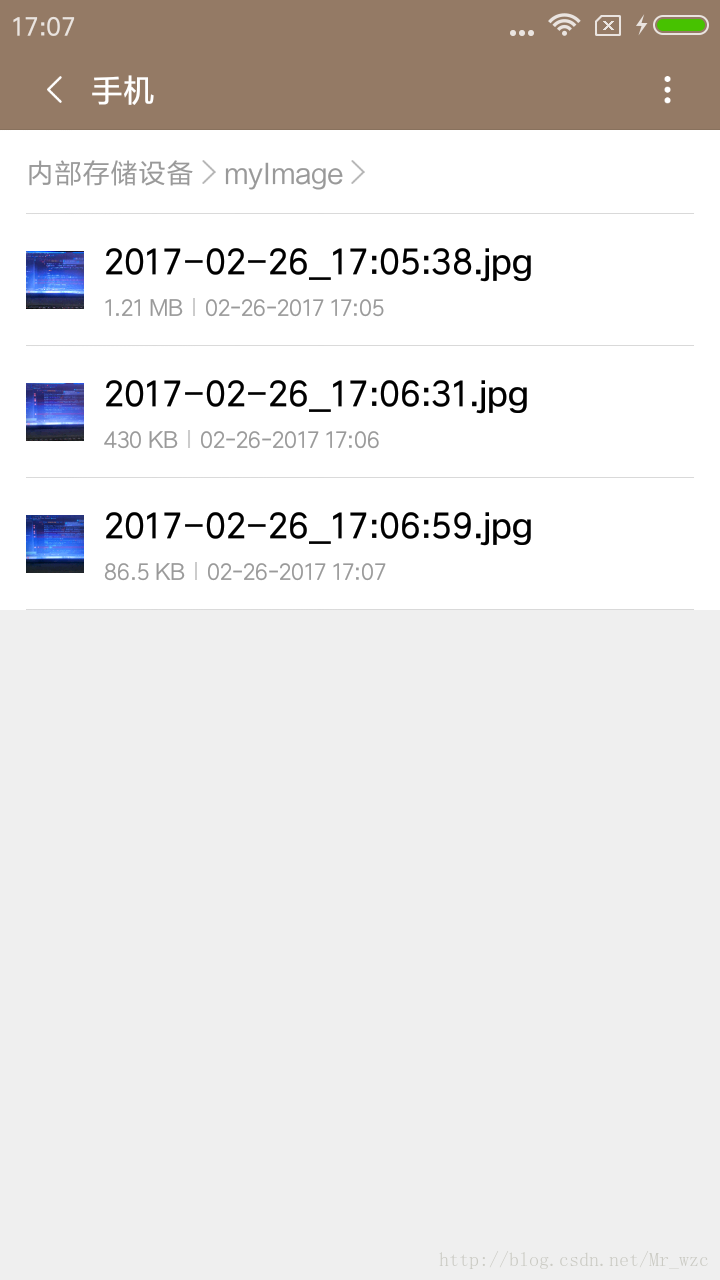
第一张是没有进行压缩的图片,第二张是进行按比例压缩的图片,最后一张是按比例压缩后在进行质量压缩后的照片。
<!-- 往SDCard写入数据权限 -->
<uses-permission android:name="android.permission.WRITE_EXTERNAL_STORAGE"/>
<!-- 在SDCard中创建与删除文件权限 -->
<uses-permission android:name="android.permission.MOUNT_UNMOUNT_FILESYSTEMS"/>
<!--照相机权限-->
<uses-permission android:name="android.permission.CAMERA"/>
2.在布局中添加一个按钮和一个ImageView用来显示图片缩略图,布局如下:
<?xml version="1.0" encoding="utf-8"?>
<LinearLayout xmlns:android="http://schemas.android.com/apk/res/android"
xmlns:tools="http://schemas.android.com/tools"
android:id="@+id/activity_main"
android:layout_width="match_parent"
android:layout_height="match_parent"
android:paddingBottom="@dimen/activity_vertical_margin"
android:paddingLeft="@dimen/activity_horizontal_margin"
android:paddingRight="@dimen/activity_horizontal_margin"
android:paddingTop="@dimen/activity_vertical_margin"
android:orientation="vertical"
tools:context="mydemo.wzc.com.mycamera.MainActivity">
<Button
android:id="@+id/camera"
android:layout_width="wrap_content"
android:layout_height="wrap_content"
android:text="调用系统照相机拍照"/>

<ImageView
android:id="@+id/image"
android:layout_width="wrap_content"
android:layout_height="wrap_content" />
</LinearLayout>
3.点击button调用系统照相机进行拍照,button监听事件如下:
//调用系统相机
File dir = new File(Environment.getExternalStorageDirectory(), "myimage");//在sd下创建文件夹myimage;Environment.getExternalStorageDirectory()得到SD卡路径文件
if (!dir.exists()) {    //exists()判断文件是否存在,不存在则创建文件
dir.mkdirs();
}
SimpleDateFormat df = new SimpleDateFormat("yyyyMMddHHmmss");//设置日期格式在android中,创建文件时,文件名中不能包含“:”冒号
String filename = df.format(new Date());
currentImageFile = new File(dir, filename + ".jpg");
if (!currentImageFile.exists()) {
currentImageFile.createNewFile();
}
Intent openCameraIntent = new Intent(MediaStore.ACTION_IMAGE_CAPTURE);
openCameraIntent.putExtra(MediaStore.EXTRA_OUTPUT, Uri.fromFile(currentImageFile));
startActivityForResult(openCameraIntent, ACTION_TAKE_PHOTO);
4.重写onActivityResult()方法,在该方法中来处理返回的数据。
if (resultCode == RESULT_OK && requestCode == ACTION_TAKE_PHOTO) {
String sdStatus = Environment.getExternalStorageState();
if (!sdStatus.equals(Environment.MEDIA_MOUNTED)) { // 检测sd是否可用
Log.i("TestFile", "SD card is not avaiable/writeable right now.");
return;
}
//原图
String filePath = file.getAbsolutePath();
Bitmap bitmap = BitmapFactory.decodeFile(filePath);
//利用Bitmap对象创建缩略图
Bitmap showbitmap = ThumbnailUtils.extractThumbnail(bitmap, 250, 250);
iv_imageView.setImageBitmap(showbitmap);
此时我们拍照完成之后,照片会保存在SD下的myimage文件夹下,但是图片没有进行压缩。图片大小大约1M多(这和手机有关),并且缩略图并没有保存只是显示而已。
效果如图:
4.对图片进行压缩,压缩方法有按比例大小压缩 和 按质量压缩。
//图片按比例大小压缩方法(根据路径获取图片并压缩):
public Bitmap getSmallBitmap(File file, int reqWidth, int reqHeight) {
try {
String filePath = file.getAbsolutePath();
BitmapFactory.Options options = new BitmapFactory.Options();
options.inJustDecodeBounds = true;//开始读入图片,此时把options.inJustDecodeBounds 设回true了
BitmapFactory.decodeFile(filePath, options);//此时返回bm为空
options.inSampleSize = calculateInSampleSize(options, reqWidth, reqHeight);//设置缩放比例
options.inJustDecodeBounds = false;//重新读入图片,注意此时把options.inJustDecodeBounds 设回false了
Bitmap bitmap = BitmapFactory.decodeFile(filePath, options);
//压缩好比例大小后不进行质量压缩
BufferedOutputStream bos = new BufferedOutputStream(new FileOutputStream(currentImageFile));
bitmap.compress(Bitmap.CompressFormat.JPEG, 100, bos);//质量压缩方法,这里100表示不压缩,把压缩后的数据存放到bos中
//压缩好比例大小后再进行质量压缩
//compressImage(bitmap,filePath);
return bitmap;
} catch (Exception e) {
Log.d("wzc", "类:" + this.getClass().getName() + " 方法:" + Thread.currentThread()
.getStackTrace()[0].getMethodName() + " 异常 " + e);
return null;
}
}

/**
* 计算图片的缩放值
*
* @param options
* @param reqWidth
* @param reqHeight
* @return
*/
public int calculateInSampleSize(BitmapFactory.Options options, int reqWidth, int reqHeight) {
try {
int height = options.outHeight;
int width = options.outWidth;
int inSampleSize = 1;  //1表示不缩放
if (height > reqHeight || width > reqWidth) {
int heightRatio = Math.round((float) height / (float) reqHeight);
int widthRatio = Math.round((float) width / (float) reqWidth);
inSampleSize = heightRatio < widthRatio ? heightRatio : widthRatio;
}
return inSampleSize;
} catch (Exception e) {
Log.d("wzc", "类:" + this.getClass().getName() + " 方法:" + Thread.currentThread()
.getStackTrace()[0].getMethodName() + " 异常 " + e);
return 1;
}
}

// 质量压缩法:
private Bitmap compressImage(Bitmap image, String filepath) {
try {
ByteArrayOutputStream baos = new ByteArrayOutputStream();
image.compress(Bitmap.CompressFormat.JPEG, 100, baos);//质量压缩方法,这里100表示不压缩,把压缩后的数据存放到baos中
int options = 100;
while (baos.toByteArray().length / 1024 > 100) {    //循环判断如果压缩后图片是否大于100kb,大于继续压缩
baos.reset();//重置baos即清空baos
options -= 10;//每次都减少10
image.compress(Bitmap.CompressFormat.JPEG, options, baos);//这里压缩options%,把压缩后的数据存放到baos中

}
//压缩好后写入文件中
FileOutputStream fos = new FileOutputStream(filepath);
fos.write(baos.toByteArray());
fos.flush();
fos.close();
return image;
} catch (IOException e) {
e.printStackTrace();
return null;
}
}
下面是我进行压缩前后的对比:
第一张是没有进行压缩的图片,第二张是进行按比例压缩的图片,最后一张是按比例压缩后在进行质量压缩后的照片。

相关文章推荐
- Android学习之调用系统照相机拍照并保存(照片会被压缩)
- 完美调用系统相机拍照,获取图片进行压缩并本地保存
- android调用系统相机拍照并保存在本地
- android调用系统相机拍照并保存在本地
- android 调用系统照相机拍照后保存到系统相册
- android调用系统相机拍照并保存在本地
- android 调用系统照相机拍照后保存到系统相册,在系统图库中能看到
- android调用系统照相机保存照片以及压缩上传下载
- android 调用系统照相机拍照后保存到系统相册,在系统图库中能看到
- Android 调用系统照相机拍照和录像
- Android 调用系统相机拍照保存以及调用系统相册的方法
- android调用系统相机拍照保存照片并显示在当前界面
- 调用android系统相机拍照并保存
- Android 调用系统相机拍照保存以及调用系统相册的方法
- 安卓调用系统摄像头拍照并保存到本地
- Android调用相机拍照,压缩图片后保存SD卡中
- App调用Android设备本地相机拍照并保存到本地相册
- android 调用系统照相机拍照后剪裁
- 调用android系统相机拍照并保存
- android 调用系统相机拍照,并保存到SD卡