[置顶] R-FCN+ResNet-50用自己的数据集训练模型(python版本)
2016-11-17 21:35
447 查看
说明:
本文假设你已经做好数据集,格式和VOC2007一致,并且Linux系统已经配置好caffe所需环境(博客里教程很多),下面是训练的一些修改。
py-R-FCN源码下载地址:
https://github.com/Orpine/py-R-FCN
也有Matlab版本:
https://github.com/daijifeng001/R-FCN
本文用到的是python版本。
本文主要参考https://github.com/Orpine/py-R-FCN。
准备工作:
(1)配置caffe环境(网上找教程)
(2)安装
然后,我们就可以开始配置R-FCN了。
本文假设你已经做好数据集,格式和VOC2007一致,并且Linux系统已经配置好caffe所需环境(博客里教程很多),下面是训练的一些修改。
py-R-FCN源码下载地址:
https://github.com/Orpine/py-R-FCN
也有Matlab版本:
https://github.com/daijifeng001/R-FCN
本文用到的是python版本。
本文主要参考https://github.com/Orpine/py-R-FCN。
准备工作:
(1)配置caffe环境(网上找教程)
(2)安装
cython,
python-opencv,
easydict
pip install cython
pip install easydict
apt-get install python-opencv
然后,我们就可以开始配置R-FCN了。
1.下载py-R-FCN
git clone https://github.com/Orpine/py-R-FCN.git[/code] 下面称你的py-R-FCN路径为RFCN_ROOT.2.下载caffe
注意,该caffe版本是微软版本cd $RFCN_ROOT git clone https://github.com/Microsoft/caffe.git[/code]如果一切正常的话,python代码会自动添加环境变量 $RFCN_ROOT/caffe/python,否则,你需要自己添加环境变量。3.Build Cython
cd $RFCN_ROOT/lib make4.Build caffe和pycaffe
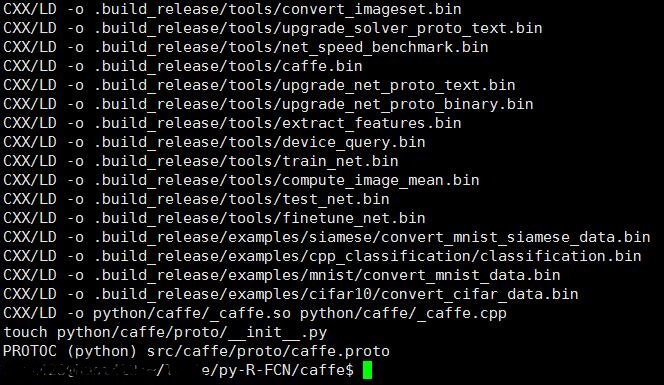
cd $RFCN_ROOT/caffe cp Makefile.config.example Makefile.config然后修改Makefile.config。caffe必须支持python层,所以WITH_PYTHON_LAYER := 1是必须的。其他配置可参考:Makefile.config
接着:cd $RFCN_ROOT/caffe make -j8 && make pycaffe如果没有出错,则:5.测试Demo
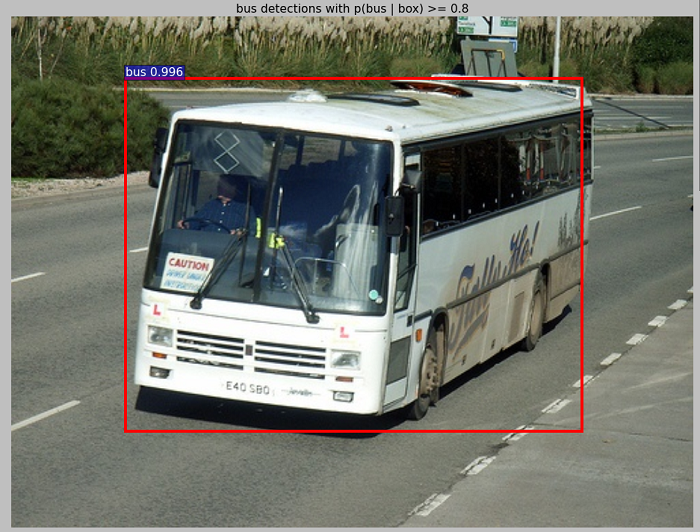
经过上面的工作,我们可以测试一下是否可以正常运行。
我们需要下载作者训练好的模型,地址:链接:http://pan.baidu.com/s/1kVGy8DL 密码:pwwg
然后将模型放在$RFCN_ROOT/data。看起来是这样的:$RFCN_ROOT/data/rfcn_models/resnet50_rfcn_final.caffemodel $RFCN_ROOT/data/rfcn_models/resnet101_rfcn_final.caffemodel
运行:cd $RFCN_ROOT ./tools/demo_rfcn.py --net ResNet-506.用我们的数据集训练
(1)拷贝数据集
假设我们已经做好数据集了,格式是和VOC2007一致,将你的数据集
拷贝到$RFCN_ROOT/data下。看起来是这样的:$VOCdevkit0712/ # development kit $VOCdevkit/VOCcode/ # VOC utility code $VOCdevkit/VOC0712 # image sets, annotations, etc. # ... and several other directories ...
如果你的文件夹名字不是VOCdevkit0712和VOC0712,修改成0712就行了。
(作者是用VOC2007和VOC2012训练的,所以文件夹名字带0712。也可以修改代码,但是那样比较麻烦一些,修改文件夹比较简单)
(2)下载预训练模型
本文以ResNet-50为例,因此下载ResNet-50-model.caffemodel。下载地址:链接:http://pan.baidu.com/s/1slRHD0L
密码:r3ki
然后将caffemodel放在$RFCN_ROOT/data/imagenet_models
(data下没有该文件夹就新建一个)(3)修改模型网络
打开$RFCN_ROOT/models/pascal_voc/ResNet-50/rfcn_end2end
(以end2end为例)
注意:下面的cls_num指的是你数据集的类别数+1(背景)。比如我有15类,+1类背景,cls_num=16.
<1>修改class-aware/train_ohem.prototxtlayer { name: 'input-data' type: 'Python' top: 'data' top: 'im_info' top: 'gt_boxes' python_param { module: 'roi_data_layer.layer' layer: 'RoIDataLayer' param_str: "'num_classes': 16" #cls_num } }layer { name: 'roi-data' type: 'Python' bottom: 'rpn_rois' bottom: 'gt_boxes' top: 'rois' top: 'labels' top: 'bbox_targets' top: 'bbox_inside_weights' top: 'bbox_outside_weights' python_param { module: 'rpn.proposal_target_layer' layer: 'ProposalTargetLayer' param_str: "'num_classes': 16" #cls_num } }layer { bottom: "conv_new_1" top: "rfcn_cls" name: "rfcn_cls" type: "Convolution" convolution_param { num_output: 784 #cls_num*(score_maps_size^2) kernel_size: 1 pad: 0 weight_filler { type: "gaussian" std: 0.01 } bias_filler { type: "constant" value: 0 } } param { lr_mult: 1.0 } param { lr_mult: 2.0 } }layer { bottom: "conv_new_1" top: "rfcn_bbox" name: "rfcn_bbox" type: "Convolution" convolution_param { num_output: 3136 #4*cls_num*(score_maps_size^2) kernel_size: 1 pad: 0 weight_filler { type: "gaussian" std: 0.01 } bias_filler { type: "constant" value: 0 } } param { lr_mult: 1.0 } param { lr_mult: 2.0 } }layer { bottom: "rfcn_cls" bottom: "rois" top: "psroipooled_cls_rois" name: "psroipooled_cls_rois" type: "PSROIPooling" psroi_pooling_param { spatial_scale: 0.0625 output_dim: 16 #cls_num group_size: 7 } }layer { bottom: "rfcn_bbox" bottom: "rois" top: "psroipooled_loc_rois" name: "psroipooled_loc_rois" type: "PSROIPooling" psroi_pooling_param { spatial_scale: 0.0625 output_dim: 64 #4*cls_num group_size: 7 } }
<2>修改class-aware/test.prototxtlayer { bottom: "conv_new_1" top: "rfcn_cls" name: "rfcn_cls" type: "Convolution" convolution_param { num_output: 784 #cls_num*(score_maps_size^2) kernel_size: 1 pad: 0 weight_filler { type: "gaussian" std: 0.01 } bias_filler { type: "constant" value: 0 } } param { lr_mult: 1.0 } param { lr_mult: 2.0 } }layer { bottom: "conv_new_1" top: "rfcn_bbox" name: "rfcn_bbox" type: "Convolution" convolution_param { num_output: 3136 #4*cls_num*(score_maps_size^2) kernel_size: 1 pad: 0 weight_filler { type: "gaussian" std: 0.01 } bias_filler { type: "constant" value: 0 } } param { lr_mult: 1.0 } param { lr_mult: 2.0 } }layer { bottom: "rfcn_cls" bottom: "rois" top: "psroipooled_cls_rois" name: "psroipooled_cls_rois" type: "PSROIPooling" psroi_pooling_param { spatial_scale: 0.0625 output_dim: 16 #cls_num group_size: 7 } }layer { bottom: "rfcn_bbox" bottom: "rois" top: "psroipooled_loc_rois" name: "psroipooled_loc_rois" type: "PSROIPooling" psroi_pooling_param { spatial_scale: 0.0625 output_dim: 64 #4*cls_num group_size: 7 } }layer { name: "cls_prob_reshape" type: "Reshape" bottom: "cls_prob_pre" top: "cls_prob" reshape_param { shape { dim: -1 dim: 16 #cls_num } } }layer { name: "bbox_pred_reshape" type: "Reshape" bottom: "bbox_pred_pre" top: "bbox_pred" reshape_param { shape { dim: -1 dim: 64 #4*cls_num } } }
<3>修改train_agnostic.prototxtlayer { name: 'input-data' type: 'Python' top: 'data' top: 'im_info' top: 'gt_boxes' python_param { module: 'roi_data_layer.layer' layer: 'RoIDataLayer' param_str: "'num_classes': 16" #cls_num } }layer { bottom: "conv_new_1" top: "rfcn_cls" name: "rfcn_cls" type: "Convolution" convolution_param { num_output: 784 #cls_num*(score_maps_size^2) ### kernel_size: 1 pad: 0 weight_filler { type: "gaussian" std: 0.01 } bias_filler { type: "constant" value: 0 } } param { lr_mult: 1.0 } param { lr_mult: 2.0 } }layer { bottom: "rfcn_cls" bottom: "rois" top: "psroipooled_cls_rois" name: "psroipooled_cls_rois" type: "PSROIPooling" psroi_pooling_param { spatial_scale: 0.0625 output_dim: 16 #cls_num ### group_size: 7 } }
<4>修改train_agnostic_ohem.prototxtlayer { name: 'input-data' type: 'Python' top: 'data' top: 'im_info' top: 'gt_boxes' python_param { module: 'roi_data_layer.layer' layer: 'RoIDataLayer' param_str: "'num_classes': 16" #cls_num ### } }layer { bottom: "conv_new_1" top: "rfcn_cls" name: "rfcn_cls" type: "Convolution" convolution_param { num_output: 784 #cls_num*(score_maps_size^2) ### kernel_size: 1 pad: 0 weight_filler { type: "gaussian" std: 0.01 } bias_filler { type: "constant" value: 0 } } param { lr_mult: 1.0 } param { lr_mult: 2.0 } }layer { bottom: "rfcn_cls" bottom: "rois" top: "psroipooled_cls_rois" name: "psroipooled_cls_rois" type: "PSROIPooling" psroi_pooling_param { spatial_scale: 0.0625 output_dim: 16 #cls_num ### group_size: 7 } }
<5>修改test_agnostic.prototxtlayer { bottom: "conv_new_1" top: "rfcn_cls" name: "rfcn_cls" type: "Convolution" convolution_param { num_output: 784 #cls_num*(score_maps_size^2) ### kernel_size: 1 pad: 0 weight_filler { type: "gaussian" std: 0.01 } bias_filler { type: "constant" value: 0 } } param { lr_mult: 1.0 } param { lr_mult: 2.0 } }layer { bottom: "rfcn_cls" bottom: "rois" top: "psroipooled_cls_rois" name: "psroipooled_cls_rois" type: "PSROIPooling" psroi_pooling_param { spatial_scale: 0.0625 output_dim: 16 #cls_num ### group_size: 7 } }layer { name: "cls_prob_reshape" type: "Reshape" bottom: "cls_prob_pre" top: "cls_prob" reshape_param { shape { dim: -1 dim: 16 #cls_num ### } } }(4)修改代码
<1>$RFCN/lib/datasets/pascal_voc.pyclass pascal_voc(imdb): def __init__(self, image_set, year, devkit_path=None): imdb.__init__(self, 'voc_' + year + '_' + image_set) self._year = year self._image_set = image_set self._devkit_path = self._get_default_path() if devkit_path is None \ else devkit_path self._data_path = os.path.join(self._devkit_path, 'VOC' + self._year) self._classes = ('__background__', # always index 0 '你的标签1','你的标签2',你的标签3','你的标签4' )改成你的数据集标签。
<2>$RFCN_ROOT/lib/datasets/imdb.py
主要是assert (boxes[:, 2] >= boxes[:, 0]).all()可能出现AssertionError,具体解决办法参考:
http://blog.csdn.net/xzzppp/article/details/52036794
PS:
上面将有无ohem的prototxt都改了,但是这里训练用的是ohem。
另外,默认的迭代次数很大,可以修改$RFCN\experiments\scripts\rfcn_end2end_ohem.sh:case $DATASET in pascal_voc) TRAIN_IMDB="voc_0712_trainval" TEST_IMDB="voc_0712_test" PT_DIR="pascal_voc" ITERS=110000
修改ITERS为你想要的迭代次数即可。(5)开始训练
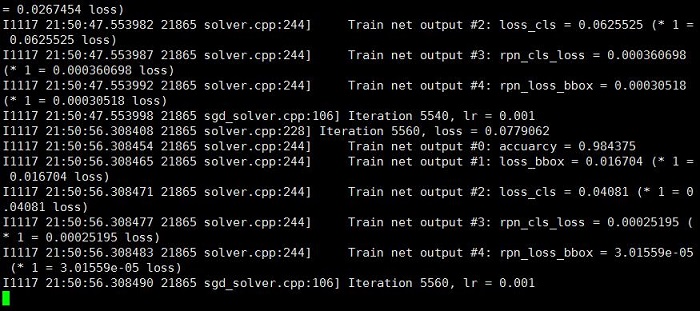
cd $RFCN_ROOT ./experiments/scripts/rfcn_end2end_ohem.sh 0 ResNet-50 pascal_voc
正常的话,就开始迭代了:
$RFCN_ROOT/experiments/scripts里还有一些其他的训练方法,也可以测试一下(经过上面的修改,无ohem的end2end训练也改好了,其他训练方法修改的过程差不多)。(6)结果
将训练得到的模型($RFCN_ROOT/output/rfcn_end2end_ohem/voc_0712_trainval里最后的caffemodel)拷贝到$RFCN_ROOT/data/rfcn_models下,然后打开$RFCN_ROOT/tools/demo_rfcn.py,将CLASSES修改成你的标签,NETS修改成你的model,im_names修改成你的测试图片(放在data/demo下),最后:cd $RFCN_ROOT ./tools/demo_rfcn.py --net ResNet-50
我将显示的标签改为了中文,修改方法参考:http://blog.csdn.net/sinat_30071459/article/details/51694037


相关文章推荐
- R-FCN+ResNet-50用自己的数据集训练模型(python版本)
- R-FCN+ResNet-50用自己的数据集训练模型(python版本)
- R-FCN+ResNet-50用自己的数据集训练模型(python版本)
- R-FCN+ResNet-50训练自己的数据集模型(python版本)
- R-FCN+ResNet-50训练自己的数据(python版本)
- Faster-RCNN+ZF用自己的数据集训练模型(Python版本)
- Faster-RCNN+ZF用自己的数据集训练模型(Python版本)
- Faster-RCNN+ZF用自己的数据集训练模型(Python版本)
- Faster-RCNN+ZF用自己的数据集训练模型(Python版本)
- Faster-RCNN+ZF用自己的数据集训练模型(Python版本)
- Faster-RCNN+ZF用自己的数据集训练模型(Python版本)
- Faster-RCNN+ZF用自己的数据集训练模型(Python版本)
- Faster-RCNN+ZF用自己的数据集训练模型(Python版本)
- [置顶] Faster-RCNN+ZF用自己的数据集训练模型(Matlab版本)
- Faster-RCNN+ZF用自己的数据集训练模型(Python版本)
- Faster-RCNN+ZF用自己的数据集训练模型(Python版本and MATLAB版本)
- Faster-RCNN+ZF用自己的数据集训练模型(Python版本)
- Faster-RCNN+ZF用自己的数据集训练模型(Python版本)
- Faster-RCNN+ZF用自己的数据集训练模型(Python版本)
- Faster-RCNN+ZF用自己的数据集训练模型(Python版本)