etmvc+jQuery EasyUI+combobox多值操作实现角色授权实例
2016-11-09 11:15
525 查看
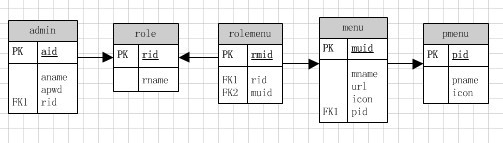
基于角色的权限管理一般有5张表构成,如下图,这里我们要实现对角色role进行授权操作,简单来说就是要对rolemenu进行添加操作,这里前端主要用easyui-combobox来实现权限多选。
总体思路是先初始化combobox,绑定所有的权限;然后根据当前的角色获取该角色已经拥有的权限,设置combobox选中这些权限;最后修改好权限了,获取combobox的选中值发送到后端进行保存。
1、控件初始化
先是前端html,设置combobox的value是角色id,text是角色name,代码如下:
<table class="grid">
<tr>
<td colspan="2"><input id="id" name="id" type="hidden" />
</td>
</tr>
<tr>
<td>角色名称:</td>
<td><input name="roleName" class="easyui-validatebox"
readonly></input></td>
</tr>
<tr>
<td>角色权限:</td>
<td><select id="roleRight" class="easyui-combobox"
name="roleRight"
data-options="
url:'/ciccpsMember/menu/getAllMenus',
editable:false,required:true,
valueField:'menuid',
textField:'menuname',
multiple:true,
panelHeight:'100'">
</select></td>
</tr>
</table>
后端获取系统所有的权限,也就是menu表的记录,代码如下:
public JsonView getAllMenus() throws Exception{
List<Menu> menus = Menu.findAll(Menu.class);
return new JsonView(menus);
}
2、获取角色当前拥有的权限
前端JS脚本获取当前角色role的id发送到后端获取该角色拥有的权限的id数组,如下:
function newAuthorize(){
var row = grid.datagrid('getSelected');
if (row){
win1.window('open');
form1.form('load',row);
$.post('/ciccpsMember/role/getMenusByRid', { id:row.id},
function(result) {
if (result) {
//获取权限menu的id
var t=[];
jsonList=result.rows;
for(var i=0;i<jsonList.length;i++){
t[i]=jsonList[i].muid;
}
$('#roleRight').combobox('setValues',t);//设置combobox的选中值
} else {
$.messager.alert('错误','出错了','error');
}
},'json');
//form.form('load', '/ciccpsMember/admin/getAdminById/'+row.id);
//form1.url = '/ciccpsMember/role/authorize/?id='+row.id;
} else {
$.messager.show({
title:'警告',
msg:'请先选择信息记录。'
});
}
}
后端根据前端传来的role的id查询数据库获取对应的权限id返回给客户端,代码如下:
//根据角色返回权限id
public JsonView getMenusByRid(Integer id) throws Exception {
List<Rolemenus> rolemenuss = Rolemenus.findAll(Rolemenus.class, "rid =?", new Object[]{id}); //根据角色id在rolemenu表中获取权限id
//构造JSON用的数据结构并返回JSON视图
Map<String, Object> result = new HashMap<String, Object>();
result.put("rows", rolemenuss);
return new JsonView(result);
}
3、提交修改后的角色权限
前端JS脚本获取combobox选中的值发送到后端,记住对combobox值进行escape编码,要以1%2C2%2C3的形式传送,否则到后端就剩一个值了,代码如下:
function authorize(){
var id=$('#id').attr("value");
var r = $('#roleRight').combobox('getValues');
var rr=escape(r);
//$.messager.alert('错误',id+'ddd'+rr,'error');
$.post('/ciccpsMember/role/authorize', { id:id,rr:rr },
function(result) {
if (result.success) {
win1.window('close');
$.messager.show({
title:'提示',
msg:'角色授权成功。'
});
} else {
$.messager.alert('错误',result.msg,'error');
}
},'json');
}
后端获取前端传过来的值,进行数据库操作,代码如下:
/**
* 授权操作
*/
public JsonView authorize(Integer id,String rr) throws Exception {
//删除旧的
Rolemenus.destroyAll(Rolemenus.class, "rid =?", new Object[]{id});
//追加新的
String[] ary = rr.split("%2C");
Rolemenus rm=null;
for(String item: ary){
//System.out.println(item);
rm=new Rolemenus();
rm.setRid(id);
rm.setMuid(Integer.parseInt(item));
rm.save();
}
return new JsonView("success:true");
}
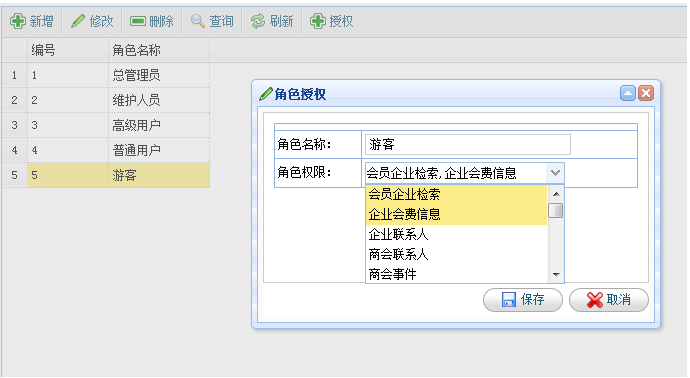
至此,角色授权就实现了,主要有两点要注意,一是对combobox赋多个值的问题,另一个就是获取combobox多个值(1,2,3)后要进行escape编码后再传到后端。效果图如下:
以上就是本文的全部内容,希望对大家的学习有所帮助,也希望大家多多支持脚本之家。
您可能感兴趣的文章:
- jQuery EasyUI API 中文文档 - DataGrid数据表格
- jQuery EasyUI API 中文文档 - ComboBox组合框
- jQuery EasyUI API 中文文档 - Tree树使用介绍
- Jquery EasyUI的添加,修改,删除,查询等基本操作介绍
- Jquery插件 easyUI属性汇总
- jQuery EasyUI NumberBox(数字框)的用法
- 初试jQuery EasyUI 使用介绍
- jQuery EasyUI API 中文文档 - Tabs标签页/选项卡
- jQuery EasyUI API 中文文档 - Panel面板
- jQuery EasyUI 中文API Button使用实例
- jquery easyui中treegrid用法的简单实例

相关文章推荐
- 角色权限etmvc+jQuery EasyUI+combobox多值操作实现角色授权
- 基于操作+角色的授权方案(具体实现篇)
- etmvc+jQuery EasyUI+combobox多值操作实现角色授权
- oracle 创建表用户/空间/临时表空间设置用户默认表空间 为用户授权操作实例
- SQL语句实现跨Sql server数据库操作实例
- 用sql语句实现数据库的操作(包括角色、权限、用户、存储过程)
- 用C#.NET实现拖放操作实例
- 用jQuery实现.net 2.0 treeview客户端无刷新操作的实例
- 深入体验JavaWeb开发内幕之Response对象操作实例之通过Response实现图片验证码
- ASP.NET4.0 Ajax实例 –Javascript调用 ADO.NET Data Service实现数据库操作
- SQL语句实现跨Sql server数据库操作实例 - 查询远程SQL,本地SQL数据库与远程SQL的数据传递
- 扩展JAAS实现类实例级授权(转)
- Linux C实现MySql数据库操作简单实例
- 如何实现共享软件网络授权认证,包括注册新用户、登录、修改密码等操作
- java--接口实现的操作实例
- sql语句实现数据库的操作(包括角色、权限、用户、存储过程)
- 用jQuery实现asp.net 2.0 treeview控件完全无刷新操作实例(AJAX的增、删、改、选择以及展开收缩节点)
- 基于角色的安全控制的架构的实现实例
- 实现操作主机角色的转移系列一
- 基于授权和角色的访问控制的设计和实现(一)