马哥2016全新Linux+Python高端运维班第九周作业
2016-10-28 17:08
639 查看
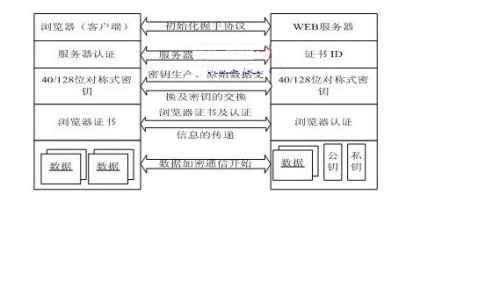
一、详细描述一次加密通讯的过程,结合图示最佳。
普通的TCP通信无法保证数据的安全,它随时可能被第三方截获而泄漏通信双方之间的隐私,这显然是我们不希望看到的,尤其在跟用户名、密码、个人信息息息相关的通信过程(如网上银行交易、机密文件传输等等)尤其看重数据交互的隐秘性,所以我们常常用SSL协议来建立安全保密的通信,SSL协议能够保证交互双方的数据按密文方式传输,第三方在没有私钥的情况下几乎无法破解,从而到达保密的目的。究竟SSL是如何交互数据来确保安全的,很多人却不得而知,为了解答大家的疑惑,这里详细介绍一下SSL的交互过程。
1、建立TCP连接
由于SSL协议依赖于TCP连接实施,所以在SSL交互之前需要先建立TCP连接。客户端connect服务端,服务端acccept客户端,经历三次握手以后TCP连接建立。
2、客户端发送SSL请求
客户端(Client)向服务端(Server)发送自身使用的SSL版本(SSL一共有三个版本)、加密算法的相关配置、随机数据以及其在在SSL协议中需要用到的信息。
3、服务端处理SSL请求
服务器(Server)反馈给客户端(Client)自己的SSL版本、加密算法的相关配置、随机数据以及用自己的私有密钥加密的SERVER-HELLO信息。服务端(Server)紧接着将自己的证书(包含公共密钥)传递过去。同时有个可选项目,即服务端(Server)可以要求客服端(Client)发送自己的证书。
4、客户端验证服务端身份
客服端(Client)用服务端(Server)传递过来证书验证服务端(Server)的身份,如果身份未验证通过则结束本次通信。证书验证通过后利用服务端(Server)的公共密钥尝试解开被其用私有密钥加密过的SERVER-HELLO信息,如果解开失败,说明该SERVER-HELLO必然是假的,故结束本次通信。
5、客户端发送公共密钥加密过的随机数据
客户端端(Client)生成随机数据(sharedsecret),并且把这个随机数据用服务端(Server)发送过来的的公共密钥加密,此次加密过程产生本次握手中的premastersecret(这个步骤是有可能有服务端的参与的,具体情况由他们使用的加密算法决定),然后将它(premastersecret)送回给服务端(Server)。如果服务端(Server)要求需要验证客户端(Client),那么客服端(Client)也需要自己把自己的证书(包含公共密钥)传递过去,同时送一些自己签过名(私有密钥加密)的数据过去。
6、服务端用私有密钥解密加密后的随机数据并协商暗号
Server验证完client的身份之后,然后用自己的私有密钥解密得到premastersecret然后双方利用这个premastersecret来共同协商,得到mastersecret(可理解为premastersecret为双方协商的暗号,然后使用这个暗号再协商一个mastersecret用来产生真正的会话密钥用来传输数据)以此来保证数据的决对安全。
7、服务端跟客户端利用暗号生成加密算法跟密钥key
双方用mastersecret一起产生真正的sessionkey,这将是一个对称加密的key。这个key还可以用来验证数据完整性。双方再交换结束信息。握手结束。
接下来双方就可以用协商好的算法和密钥key,采用对称加密算法来通信了。
二、描述创建私有CA的过程,以及为客户端发来的证书请求进行办法证书。
1、创建所需要的文件
命令: openssl req -new -x509 -key private/cakey.pem -days 7300 -out cacert.pem
参数 : -new: 生成新的证书签署请求;
-x509: 专用于CA生成自签证书;
-key: 生成请求时用到的私钥文件;
-days n:证书的有效期限;单位为“天”
-out:指明 证书的保存路径
(1)、能够对一些主机名进行正向解析和逆向解析;
(2)、对子域cdn.magedu.com进行子域授权,子域负责解析对应子域中的主机名;
(3)、为了保证DNS服务系统的高可用性,请设计一套方案,并写出详细的实施过程
1、安装并配置主DNS服务器正反向解析
LVS+keepalived负载均衡架构图
配置LVS实现负载均衡
四、请描述一次完整的http请求处理过程;
HTTP通信机制是在一次完整的HTTP通信过程中,Web浏览器与Web服务器之间将完成下列7个步骤:
1. 建立TCP连接
Apache有两种工作模型,一种是基于进程的preforker模型,一种是基于线程和进程混合的Worker模型 prefork模式
六、建立httpd服务器(基于编译的方式进行),要求:
提供两个基于名称的虚拟主机:
(a)www1.stuX.com,页面文件目录为/web/vhosts/www1;错误日志为/var/log/httpd/www1.err,访问日志为/var/log/httpd/www1.access;
(b)www2.stuX.com,页面文件目录为/web/vhosts/www2;错误日志为/var/log/httpd/www2.err,访问日志为/var/log/httpd/www2.access;
(c)为两个虚拟主机建立各自的主页文件index.html,内容分别为其对应的主机名;
(d)通过www1.stuX.com/server-status输出httpd工作状态相关信息,且只允许提供帐号密码才能访问(status:status);
1、编译安装依赖包

基于用户名的用户访问控制
apache状态页面
七、为第6题中的第2个虚拟主机提供https服务,使得用户可以通过https安全的访问此web站点;
(1)要求使用证书认证,证书中要求使用的国家(CN)、州(HA)、城市(ZZ)和组织(MageEdu);
(2)设置部门为Ops,主机名为www2.stuX.com,邮件为admin@stuX.com;
1、生成一个自签署证书
八、建立samba共享,共享目录为/data,要求:(描述完整的过程)
1)共享名为shared,工作组为magedu;
2)添加组develop,添加用户gentoo,centos和ubuntu,其中gentoo和centos以develop为附加组,ubuntu不属于develop组;密码均为用户名;
3)添加samba用户gentoo,centos和ubuntu,密码均为“mageedu”;
4)此samba共享shared仅允许develop组具有写权限,其他用户只能以只读方式访问;
5)此samba共享服务仅允许来自于172.16.0.0/16网络的主机访问;
九、搭建一套文件vsftp文件共享服务,共享目录为/ftproot,要求:(描述完整的过程)
1)基于虚拟用户的访问形式;
2)匿名用户只允许下载,不允许上传;
3)禁锢所有的用户于其家目录当中;
4)限制最大并发连接数为200:;
5)匿名用户的最大传输速率512KB/s
6)虚拟用户的账号存储在mysql数据库当中。
7)数据库通过NFS进行共享。
实验环境如下
1、安装nfs服务器
普通的TCP通信无法保证数据的安全,它随时可能被第三方截获而泄漏通信双方之间的隐私,这显然是我们不希望看到的,尤其在跟用户名、密码、个人信息息息相关的通信过程(如网上银行交易、机密文件传输等等)尤其看重数据交互的隐秘性,所以我们常常用SSL协议来建立安全保密的通信,SSL协议能够保证交互双方的数据按密文方式传输,第三方在没有私钥的情况下几乎无法破解,从而到达保密的目的。究竟SSL是如何交互数据来确保安全的,很多人却不得而知,为了解答大家的疑惑,这里详细介绍一下SSL的交互过程。
1、建立TCP连接
由于SSL协议依赖于TCP连接实施,所以在SSL交互之前需要先建立TCP连接。客户端connect服务端,服务端acccept客户端,经历三次握手以后TCP连接建立。
2、客户端发送SSL请求
客户端(Client)向服务端(Server)发送自身使用的SSL版本(SSL一共有三个版本)、加密算法的相关配置、随机数据以及其在在SSL协议中需要用到的信息。
3、服务端处理SSL请求
服务器(Server)反馈给客户端(Client)自己的SSL版本、加密算法的相关配置、随机数据以及用自己的私有密钥加密的SERVER-HELLO信息。服务端(Server)紧接着将自己的证书(包含公共密钥)传递过去。同时有个可选项目,即服务端(Server)可以要求客服端(Client)发送自己的证书。
4、客户端验证服务端身份
客服端(Client)用服务端(Server)传递过来证书验证服务端(Server)的身份,如果身份未验证通过则结束本次通信。证书验证通过后利用服务端(Server)的公共密钥尝试解开被其用私有密钥加密过的SERVER-HELLO信息,如果解开失败,说明该SERVER-HELLO必然是假的,故结束本次通信。
5、客户端发送公共密钥加密过的随机数据
客户端端(Client)生成随机数据(sharedsecret),并且把这个随机数据用服务端(Server)发送过来的的公共密钥加密,此次加密过程产生本次握手中的premastersecret(这个步骤是有可能有服务端的参与的,具体情况由他们使用的加密算法决定),然后将它(premastersecret)送回给服务端(Server)。如果服务端(Server)要求需要验证客户端(Client),那么客服端(Client)也需要自己把自己的证书(包含公共密钥)传递过去,同时送一些自己签过名(私有密钥加密)的数据过去。
6、服务端用私有密钥解密加密后的随机数据并协商暗号
Server验证完client的身份之后,然后用自己的私有密钥解密得到premastersecret然后双方利用这个premastersecret来共同协商,得到mastersecret(可理解为premastersecret为双方协商的暗号,然后使用这个暗号再协商一个mastersecret用来产生真正的会话密钥用来传输数据)以此来保证数据的决对安全。
7、服务端跟客户端利用暗号生成加密算法跟密钥key
双方用mastersecret一起产生真正的sessionkey,这将是一个对称加密的key。这个key还可以用来验证数据完整性。双方再交换结束信息。握手结束。
接下来双方就可以用协商好的算法和密钥key,采用对称加密算法来通信了。
二、描述创建私有CA的过程,以及为客户端发来的证书请求进行办法证书。
1、创建所需要的文件
[root@localhost CA]# touch index.txt
[root@localhost CA]# echo 01 > serail
2、创建私钥文件
[root@localhost CA]# (umask 077; openssl genrsa -out private/cakey.pem 2048)   #生成私钥文件
Generating RSA private key, 2048 bit long modulus
..................................................................................................................................................................................+++
.........................................+++
e is 65537 (0x10001)
3、CA主机生成证书请求,自己为自己颁发证书
命令: openssl req -new -x509 -key private/cakey.pem -days 7300 -out cacert.pem
参数 : -new: 生成新的证书签署请求;
-x509: 专用于CA生成自签证书;
-key: 生成请求时用到的私钥文件;
-days n:证书的有效期限;单位为“天”
-out:指明 证书的保存路径
[root@localhost CA]# openssl req -new -x509 -key private/cakey.pem -days 7300 -out cacert.pem
You are about to be asked to enter information that will be incorporated
into your certificate request.
What you are about to enter is what is called a Distinguished Name or a DN.
There are quite a few fields but you can leave some blank
For some fields there will be a default value,
If you enter '.', the field will be left blank.
-----
Country Name (2 letter code) [XX]:CN        #国家
State or Province Name (full name) []:shanghai        #省份
Locality Name (eg, city) [Default City]:shanghai        #市区
Organization Name (eg, company) [Default Company Ltd]:magedu        #组织名称
Organizational Unit Name (eg, section) []:ops        #部门
Common Name (eg, your name or your server's hostname) []:ca.magedu.com        #服务器名称
Email Address []:caadmin@magedu.com        #邮件地址
[root@localhost CA]# ll
总用量 24
-rw-r--r--. 1 root root 1424 10月 18 09:50 cacert.pem
drwxr-xr-x. 2 root root 4096 6月  29 2015 certs
drwxr-xr-x. 2 root root 4096 6月  29 2015 crl
-rw-r--r--. 1 root root    0 10月 17 17:42 index.txt
drwxr-xr-x. 2 root root 4096 6月  29 2015 newcerts
drwx------. 2 root root 4096 10月 18 09:38 private
-rw-r--r--. 1 root root    3 10月 17 17:42 serail
4、需要使用证书的主机上生成私钥文件
[root@localhost ssl]# (umask 077; openssl genrsa -out httpd.key 2048)
Generating RSA private key, 2048 bit long modulus
................+++
....................................+++
e is 65537 (0x10001)
5、需要使用证书的主机上生成CA请求
[root@localhost ssl]# openssl req -new -key httpd.key -days 365 -out httpd.csr
You are about to be asked to enter information that will be incorporated
into your certificate request.
What you are about to enter is what is called a Distinguished Name or a DN.
There are quite a few fields but you can leave some blank
For some fields there will be a default value,
If you enter '.', the field will be left blank.
-----
Country Name (2 letter code) [XX]:CN
State or Province Name (full name) []:shanghai
Locality Name (eg, city) [Default City]:shanghai
Organization Name (eg, company) [Default Company Ltd]:magedu
Organizational Unit Name (eg, section) []:ops
Common Name (eg, your name or your server's hostname) []:www.magedu.com
Email Address []:webadmin@magedu.com
Please enter the following 'extra' attributes
to be sent with your certificate request
A challenge password []:
An optional company name []:
6、将请求文件传输给CA所在主机
[root@localhost ssl]# scp httpd.csr root@10.18.11.29:/tmp
root@10.18.11.29's password:
httpd.csr                                                                                                                            100% 1058     1.0KB/s   00:00
7、CA签署证书
[root@localhost CA]# openssl ca -in /tmp/httpd.csr -out /tmp/httpd.crt -days 365
Using configuration from /etc/pki/tls/openssl.cnf
Check that the request matches the signature
Signature ok
Certificate Details:
Serial Number: 1 (0x1)
Validity
Not Before: Oct 18 02:36:27 2016 GMT
Not After : Oct 18 02:36:27 2017 GMT
Subject:
countryName               = CN
stateOrProvinceName       = shanghai
organizationName          = magedu
organizationalUnitName    = ops
commonName                = www.magedu.com
emailAddress              = webadmin@magedu.com
X509v3 extensions:
X509v3 Basic Constraints:
CA:FALSE
Netscape Comment:
OpenSSL Generated Certificate
X509v3 Subject Key Identifier:
2A:8A:76:E2:94:70:A1:CB:1A:CB:C0:32:35:A3:34:54:BB:4C:43:CA
X509v3 Authority Key Identifier:
keyid:C7:83:51:96:AC:82:AF:DA:35:58:02:CD:B3:75:B2:37:B8:5D:59:38
Certificate is to be certified until Oct 18 02:36:27 2017 GMT (365 days)
Sign the certificate? [y/n]:y
1 out of 1 certificate requests certified, commit? [y/n]y
Write out database with 1 new entries
Data Base Updated
8、CA将签署过的证书发回发送请求的主机
[root@localhost CA]# scp /tmp/httpd.crt 10.18.11.30:/etc/httpd/ssl/
The authenticity of host '10.18.11.30 (10.18.11.30)' can't be established.
ECDSA key fingerprint is 8a:97:c3:ae:80:30:d2:16:2f:3d:cc:fb:b8:f5:77:14.
Are you sure you want to continue connecting (yes/no)? yes
Warning: Permanently added '10.18.11.30' (ECDSA) to the list of known hosts.
root@10.18.11.30's password:
httpd.crt                                                                                                                            100% 4628     4.5KB/s   00:00
三、搭建一套DNS服务器,负责解析magedu.com域名(自行设定主机名及IP)
(1)、能够对一些主机名进行正向解析和逆向解析;
(2)、对子域cdn.magedu.com进行子域授权,子域负责解析对应子域中的主机名;
(3)、为了保证DNS服务系统的高可用性,请设计一套方案,并写出详细的实施过程
1、安装并配置主DNS服务器正反向解析
[root@localhost ~]# yum install -y bind        #安装DNS服务
[root@localhost ~]# yum install bind-utils        #安装DNS测试工具
[root@localhost ~]# vim /etc/named.conf         #修改主配置文件
options {
listen-on port 53 { 10.18.11.29; };        #监听在10.18.11.29上
listen-on-v6 port 53 { ::1; };
directory       "/var/named";
dump-file       "/var/named/data/cache_dump.db";
statistics-file "/var/named/data/named_stats.txt";
memstatistics-file "/var/named/data/named_mem_stats.txt";
allow-query     { any; };

/*
- If you are building an AUTHORITATIVE DNS server, do NOT enable recursion.
- If you are building a RECURSIVE (caching) DNS server, you need to enable
recursion.
- If your recursive DNS server has a public IP address, you MUST enable access
control to limit queries to your legitimate users. Failing to do so will
cause your server to become part of large scale DNS amplification
attacks. Implementing BCP38 within your network would greatly
reduce such attack surface
*/
recursion yes;

//      dnssec-enable yes;            #注释掉dnssec相关内容
//      dnssec-validation yes;

/* Path to ISC DLV key */
//      bindkeys-file "/etc/named.iscdlv.key";

//      managed-keys-directory "/var/named/dynamic";

pid-file "/run/named/named.pid";
session-keyfile "/run/named/session.key";
};

logging {
channel default_debug {
file "data/named.run";
severity dynamic;
};
};

zone "." IN {
type hint;
file "named.ca";
};

include "/etc/named.rfc1912.zones";
include "/etc/named.root.key";

[root@localhost ~]# vim /etc/named.rfc1912.zones
zone "magedu.com" IN {            #添加正向解析区域
type master;
file "magedu.com.zone";
};
zone "18.10.in-addr.arpa" IN {        #添加反向解析区域
type master;
file "18.10.in-addr.arpa.zone";
};
[root@localhost ~]# vim /var/named/magedu.com.zone         #配置服务器正向解析
$TTL 86400
@       IN      SOA     ns1.magedu.com. admin.magedu.com (
20161024
1H
5M
7D
1D )
IN      NS      ns1.magedu.com.
IN      NS      ns2.magedu.com.
ns1     IN      A       10.18.11.29
ns2     IN      A       10.18.11.30
[root@localhost named]# vim 18.10.zone        #配置服务器反向解析
$TTL 86400
@       IN      SOA     ns1.magedu.com. admin.magedu.com (
20161024
1H
5M
7D
1D )
IN      NS      ns1.magedu.com.
IN      NS      ns2.magedu.com.
11.29   IN      PTR     ns1.magedu.com.
11.30   IN      PTR     ns2.magedu.com.
11.29   IN      PTR     www.magedu.com.
11.30   IN      PTR     www.magedu.com.
11.29   IN      PTR     mx1.magedu.com.
11.30   IN      PTR     mx2.magedu.com.
[root@localhost ~]# chmod 640 /var/named/magedu.com.zone /var/named/18.10.zone        #修改配置文件权限和属组
[root@localhost ~]# chown :named /var/named/magedu.com.zone /var/named/18.10.zone
[root@localhost named]# named-checkzone "magedu.com.zone" /var/named/magedu.com.zone        #检测配置文件语法错误
zone magedu.com.zone/IN: loaded serial 20161024
OK
[root@localhost named]# systemctl reload named.service        #重载配置文件
[root@localhost named]# dig www.magedu.com @10.18.11.29        #正向解析测试
; <<>> DiG 9.9.4-RedHat-9.9.4-29.el7_2.4 <<>> www.magedu.com @10.18.11.29
;; global options: +cmd
;; Got answer:
;; ->>HEADER<<- opcode: QUERY, status: NOERROR, id: 1878
;; flags: qr aa rd ra; QUERY: 1, ANSWER: 2, AUTHORITY: 2, ADDITIONAL: 3

;; OPT PSEUDOSECTION:
; EDNS: version: 0, flags:; udp: 4096
;; QUESTION SECTION:
;www.magedu.com.                        IN      A

;; ANSWER SECTION:
www.magedu.com.         86400   IN      A       10.18.11.29
www.magedu.com.         86400   IN      A       10.18.11.30

;; AUTHORITY SECTION:
magedu.com.             86400   IN      NS      ns1.magedu.com.
magedu.com.             86400   IN      NS      ns2.magedu.com.

;; ADDITIONAL SECTION:
ns1.magedu.com.         86400   IN      A       10.18.11.29
ns2.magedu.com.         86400   IN      A       10.18.11.30

;; Query time: 0 msec
;; SERVER: 10.18.11.29#53(10.18.11.29)
;; WHEN: 三 10月 26 10:28:16 CST 2016
;; MSG SIZE  rcvd: 143

[root@localhost named]# dig -x 10.18.11.29 @10.18.11.29        #反向解析测试

; <<>> DiG 9.9.4-RedHat-9.9.4-29.el7_2.4 <<>> -x 10.18.11.29 @10.18.11.29
;; global options: +cmd
;; Got answer:
;; ->>HEADER<<- opcode: QUERY, status: NOERROR, id: 51511
;; flags: qr aa rd ra; QUERY: 1, ANSWER: 3, AUTHORITY: 2, ADDITIONAL: 3

;; OPT PSEUDOSECTION:
; EDNS: version: 0, flags:; udp: 4096
;; QUESTION SECTION:
;29.11.18.10.in-addr.arpa.      IN      PTR

;; ANSWER SECTION:
29.11.18.10.in-addr.arpa. 86400 IN      PTR     mx1.magedu.com.
29.11.18.10.in-addr.arpa. 86400 IN      PTR     www.magedu.com.
29.11.18.10.in-addr.arpa. 86400 IN      PTR     ns1.magedu.com.

;; AUTHORITY SECTION:
11.18.10.in-addr.arpa.  86400   IN      NS      ns2.magedu.com.
11.18.10.in-addr.arpa.  86400   IN      NS      ns1.magedu.com.

;; ADDITIONAL SECTION:
ns1.magedu.com.         86400   IN      A       10.18.11.29
ns2.magedu.com.         86400   IN      A       10.18.11.30

;; Query time: 0 msec
;; SERVER: 10.18.11.29#53(10.18.11.29)
;; WHEN: 三 10月 26 11:34:05 CST 2016
;; MSG SIZE rcvd: 1812、从DNS服务器配置[root@localhost ~]# yum install -y bind #安装DNS服务
[root@localhost ~]# yum install bind-utils #安装DNS测试工具
[root@localhost slaves]# vim /etc/named.conf
options {
listen-on port 53 { 10.18.11.30; };
listen-on-v6 port 53 { ::1; };
directory "/var/named";
dump-file "/var/named/data/cache_dump.db";
statistics-file "/var/named/data/named_stats.txt";
memstatistics-file "/var/named/data/named_mem_stats.txt";
allow-query { any; }; #允许任何人解析
/*
- If you are building an AUTHORITATIVE DNS server, do NOT enable recursion.
- If you are building a RECURSIVE (caching) DNS server, you need to enable
recursion.
- If your recursive DNS server has a public IP address, you MUST enable access
control to limit queries to your legitimate users. Failing to do so will
cause your server to become part of large scale DNS amplification
attacks. Implementing BCP38 within your network would greatly
reduce such attack surface
*/
recursion yes;
//dnssec-enable yes; #注释掉dnssec相关内容
//dnssec-validation yes;
/* Path to ISC DLV key */
bindkeys-file "/etc/named.iscdlv.key";
managed-keys-directory "/var/named/dynamic";
pid-file "/run/named/named.pid";
session-keyfile "/run/named/session.key";
};
logging {
channel default_debug {
file "data/named.run";
severity dynamic;
};
};
zone "." IN {
type hint;
file "named.ca";
};
include "/etc/named.rfc1912.zones";
include "/etc/named.root.key";
[root@localhost /]# vim /etc/named.rfc1912.zones
zone "magedu.com" IN {
type slave; #设定为slave类型
masters { 10.18.11.29; }; #设定主DNS为10.18.11.29
file "slaves/magedu.com.zone"; #设定zone文件路径
};
zone "11.18.10.in-addr.arpa." IN {
type slave;
masters { 10.18.11.29; };
file "slaves/11.18.10.zone";
[root@localhost /]# systemctl reload named.service #重载配置
[root@localhost /]# ll /var/named/slaves/ #查看slaves下已有配置文件从主DNS同步过来
总用量 8
-rw-r--r-- 1 named named 402 10月 26 16:27 11.18.10.zone
-rw-r--r-- 1 named named 500 10月 26 15:54 magedu.com.zone
[root@localhost named]# vim /var/named/magedu.com.zone #修改主DNS正向区域配置添加一条ftp.magedu.com的A记录
$TTL 86400
@ IN SOA ns1.magedu.com. admin.magedu.com. (
2016102402
1H
5M
7D
1D )
IN NS ns1
IN NS ns2
ns1 IN A 10.18.11.29
ns2 IN A 10.18.11.30
mx1 IN A 10.18.11.29
mx2 IN A 10.18.11.30
www IN A 10.18.11.29
www IN A 10.18.11.30
cdn IN NS ns1.cdn
ns1.cdn IN A 10.18.11.31
ftp IN A 10.18.11.29
[root@localhost named]# vim /var/named/11.18.10.zone #修改主DNS反向区域配置添加ftp.magedu.com记录
$TTL 86400
@ IN SOA ns1.magedu.com. admin.magedu.com. (
2016102402 #修改
1H
5M
7D
1D )
IN NS ns1.magedu.com.
IN NS ns2.magedu.com.
29 IN PTR ns1.magedu.com.
30 IN PTR ns2.magedu.com.
29 IN PTR www.magedu.com.
30 IN PTR www.magedu.com.
29 IN PTR mx1.magedu.com.
30 IN PTR mx2.magedu.com.
29 IN PTR ftp.magedu.com.
[root@localhost named]# systemctl reload named.servic #重载配置文件
[root@localhost slaves]# cat /var/named/slaves/magedu.com.zone #在从DNS上查看正反区域配置新加的ftp.magedu.com的配置已同步过来
$ORIGIN .
$TTL 86400 ; 1 day
magedu.com IN SOA ns1.magedu.com. admin.magedu.com. (
2016102402 ; serial
3600 ; refresh (1 hour)
300 ; retry (5 minutes)
604800 ; expire (1 week)
86400 ; minimum (1 day)
)
NS ns1.magedu.com.
NS ns2.magedu.com.
$ORIGIN magedu.com.
cdn NS ns1.cdn
$ORIGIN cdn.magedu.com.
ns1 A 10.18.11.31
$ORIGIN magedu.com.
ftp A 10.18.11.29
mx1 A 10.18.11.29
mx2 A 10.18.11.30
ns1 A 10.18.11.29
ns2 A 10.18.11.30
www A 10.18.11.29
A 10.18.11.30
[root@localhost slaves]# cat /var/named/slaves/11.18.10.zone
$ORIGIN .
$TTL 86400 ; 1 day
11.18.10.in-addr.arpa IN SOA ns1.magedu.com. admin.magedu.com. (
2016102402 ; serial
3600 ; refresh (1 hour)
300 ; retry (5 minutes)
604800 ; expire (1 week)
86400 ; minimum (1 day)
)
NS ns1.magedu.com.
NS ns2.magedu.com.
$ORIGIN 11.18.10.in-addr.arpa.
29 PTR ns1.magedu.com.
PTR www.magedu.com.
PTR mx1.magedu.com.
PTR ftp.magedu.com.
30 PTR ns2.magedu.com.
PTR www.magedu.com.
PTR mx2.magedu.com.
[root@localhost named]# dig ftp.magedu.com @10.18.11.30 #测试10.18.11.30可以正常的进行解析
; <<>> DiG 9.9.4-RedHat-9.9.4-29.el7_2.4 <<>> ftp.magedu.com @10.18.11.30
;; global options: +cmd
;; Got answer:
;; ->>HEADER<<- opcode: QUERY, status: NOERROR, id: 19587
;; flags: qr aa rd ra; QUERY: 1, ANSWER: 1, AUTHORITY: 2, ADDITIONAL: 3
;; OPT PSEUDOSECTION:
; EDNS: version: 0, flags:; udp: 4096
;; QUESTION SECTION:
;ftp.magedu.com. IN A
;; ANSWER SECTION:
ftp.magedu.com. 86400 IN A 10.18.11.29
;; AUTHORITY SECTION:
magedu.com. 86400 IN NS ns2.magedu.com.
magedu.com. 86400 IN NS ns1.magedu.com.
;; ADDITIONAL SECTION:
ns1.magedu.com. 86400 IN A 10.18.11.29
ns2.magedu.com. 86400 IN A 10.18.11.30
;; Query time: 3 msec
;; SERVER: 10.18.11.30#53(10.18.11.30)
;; WHEN: 三 10月 26 17:25:09 CST 2016
;; MSG SIZE rcvd: 127
[root@localhost named]# dig -x 10.18.11.29 @10.18.11.30
; <<>> DiG 9.9.4-RedHat-9.9.4-29.el7_2.4 <<>> -x 10.18.11.29 @10.18.11.30
;; global options: +cmd
;; Got answer:
;; ->>HEADER<<- opcode: QUERY, status: NOERROR, id: 38724
;; flags: qr aa rd ra; QUERY: 1, ANSWER: 4, AUTHORITY: 2, ADDITIONAL: 3
;; OPT PSEUDOSECTION:
; EDNS: version: 0, flags:; udp: 4096
;; QUESTION SECTION:
;29.11.18.10.in-addr.arpa. IN PTR
;; ANSWER SECTION:
29.11.18.10.in-addr.arpa. 86400 IN PTR ns1.magedu.com.
29.11.18.10.in-addr.arpa. 86400 IN PTR mx1.magedu.com.
29.11.18.10.in-addr.arpa. 86400 IN PTR ftp.magedu.com.
29.11.18.10.in-addr.arpa. 86400 IN PTR www.magedu.com.
;; AUTHORITY SECTION:
11.18.10.in-addr.arpa. 86400 IN NS ns1.magedu.com.
11.18.10.in-addr.arpa. 86400 IN NS ns2.magedu.com.
;; ADDITIONAL SECTION:
ns1.magedu.com. 86400 IN A 10.18.11.29
ns2.magedu.com. 86400 IN A 10.18.11.30
;; Query time: 1 msec
;; SERVER: 10.18.11.30#53(10.18.11.30)
;; WHEN: 三 10月 26 17:25:39 CST 2016
;; MSG SIZE rcvd: 1993、子域服务器配置[root@localhost ~]# yum install -y bind #安装DNS服务
[root@localhost ~]# yum install bind-utils #安装DNS测试工具
#修改配置主DNS配置文件
[root@localhost ~]# vim /var/named/magedu.com.zone
cdn IN NS ns1.cdn #添加两条记录
ns1.cdn IN A 10.18.11.31
#在子域服务器上添加区域配置
[root@localhost ~]# vim /etc/named.rfc1912.zones
zone "cdn.magedu.com" IN { #添加正向解析区域
type master;
file "cdn.magedu.com.zone";
};
zone "11.18.10.in-addr.arpa." IN { #添加反向解析区域
type master;
file "11.18.10.zone";
};
#配置子域服务器正向区域配置文件
[root@localhost ~]# vim /var/named/cdn.magedu.com.zone
$TTL 86400
@ IN SOA ns1.cdn.magedu.com. admin.magedu.com (
2016102401
1H
5M
7D
1D )
IN NS ns1
ns1 IN A 10.18.11.31
www IN A 10.19.11.31
#配置子域服务器反向区域配置文件
[root@localhost ~]# vim /var/named/11.18.10.zone
$TTL 86400
@ IN SOA ns1.cdn.magedu.com. admin.magedu.com. (
2016102401
1H
5M
7D
1D )
IN NS ns1.cdn.magedu.com.
31 IN PTR ns1.cdn.magedu.com.
31 IN PTR www.cdn.magedu.com.
#配置主域转发
[root@localhost named]# vim /etc/named.conf #添加转发域
zone "magedu.com" IN {
type forward;
forward first;
forwarders { 10.18.11.29; };
#测试子域解析
[root@localhost named]# dig www.cdn.magedu.com @10.18.11.31 #测试子域正向解析
; <<>> DiG 9.9.4-RedHat-9.9.4-29.el7_2.4 <<>> www.cdn.magedu.com @10.18.11.31
;; global options: +cmd
;; Got answer:
;; ->>HEADER<<- opcode: QUERY, status: NOERROR, id: 1172
;; flags: qr aa rd ra; QUERY: 1, ANSWER: 1, AUTHORITY: 1, ADDITIONAL: 2
;; OPT PSEUDOSECTION:
; EDNS: version: 0, flags:; udp: 4096
;; QUESTION SECTION:
;www.cdn.magedu.com. IN A
;; ANSWER SECTION:
www.cdn.magedu.com. 86400 IN A 10.19.11.31
;; AUTHORITY SECTION:
cdn.magedu.com. 86400 IN NS ns1.cdn.magedu.com.
;; ADDITIONAL SECTION:
ns1.cdn.magedu.com. 86400 IN A 10.18.11.31
;; Query time: 0 msec
;; SERVER: 10.18.11.31#53(10.18.11.31)
;; WHEN: 四 10月 27 11:41:57 CST 2016
;; MSG SIZE rcvd: 97
[root@localhost named]# dig -x 10.18.11.31 @10.18.11.31 #测试子域反向解析
; <<>> DiG 9.9.4-RedHat-9.9.4-29.el7_2.4 <<>> -x 10.18.11.31 @10.18.11.31
;; global options: +cmd
;; Got answer:
;; ->>HEADER<<- opcode: QUERY, status: NOERROR, id: 13311
;; flags: qr aa rd ra; QUERY: 1, ANSWER: 2, AUTHORITY: 1, ADDITIONAL: 2
;; OPT PSEUDOSECTION:
; EDNS: version: 0, flags:; udp: 4096
;; QUESTION SECTION:
;31.11.18.10.in-addr.arpa. IN PTR
;; ANSWER SECTION:
31.11.18.10.in-addr.arpa. 86400 IN PTR ns1.cdn.magedu.com.
31.11.18.10.in-addr.arpa. 86400 IN PTR www.cdn.magedu.com.
;; AUTHORITY SECTION:
11.18.10.in-addr.arpa. 86400 IN NS ns1.cdn.magedu.com.
;; ADDITIONAL SECTION:
ns1.cdn.magedu.com. 86400 IN A 10.18.11.31
;; Query time: 0 msec
;; SERVER: 10.18.11.31#53(10.18.11.31)
;; WHEN: 四 10月 27 11:42:29 CST 2016
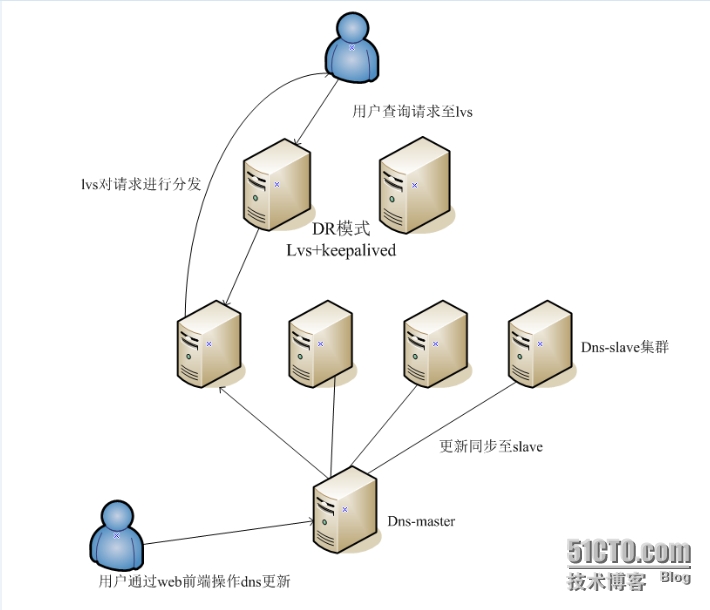
;; MSG SIZE rcvd: 1334、高可用DNS方案LVS+keepalived负载均衡架构图
| 名称 | IP |
| LVS-Master | 10.18.11.31 |
| LVS-BACKUP | 10.18.11.32 |
| LVS-VIP | 10.18.11.40 |
| DNS-master | 10.18.11.29 |
| DNS-slave | 10.18.11.30 |
[root@localhost ~]# yum install keepalived        #在两台LVS服务器上安装keepalived
[root@localhost ~]# vim /etc/keepalived/keepalived.conf        #修改LVS-Master配置文件
! Configuration File for keepalived

global_defs {
notification_email {
acassen@firewall.loc
failover@firewall.loc
sysadmin@firewall.loc
}
notification_email_from Alexandre.Cassen@firewall.loc
smtp_server 192.168.200.1
smtp_connect_timeout 30
router_id LVS_1
}

vrrp_instance VI_DNS1 {
state MASTER
interface ens192        #vip绑定的网卡
virtual_router_id 51        #虚拟路由标记ID,同一组vrrp一致
priority 100        ##优先级自定义,MASTER高于BACKUP即可
advert_int 1
authentication {
auth_type PASS
auth_pass 1111
}
virtual_ipaddress {
10.18.11.40        #VIP
}
}

virtual_server 10.18.11.40 53 {        #VIP和端口
delay_loop 6
lb_algo rr        #负载调度算法,RR为轮询
lb_kind DR        #LVS负载工作模式为DR
nat_mask 255.255.255.0
persistence_timeout 50         #会话保持时间,50秒内分配同一节点
protocol UDP        #协议类型UDP

real_server 10.18.11.29 53 {
weight 100        #权值大小,越大权值越高
TCP_CHECK {         #realserver 状态检测
connect_timeout 8        #连接超时时间8秒
nb_get_retry 3        #重试次数:3次
delay_before_retry 3        ##重试间隔3秒
connect_port 53        #检测端口
}
}

real_server 10.18.11.30 53 {
weight 100
TCP_CHECK {
connect_timeout 8
nb_get_retry 3
delay_before_retry 3
connect_port 53
}
}
}
57,1          30%
priority 100
advert_int 1
authentication {
auth_type PASS
auth_pass 1111
}
virtual_ipaddress {
10.18.11.40
}
}

virtual_server 10.18.11.40 53 {
delay_loop 6
lb_algo  rr
lb_kind DR
nat_mask 255.255.255.0
protocol TCP

real_server 10.18.11.29 53 {
weight 100
TCP_CHECK {
connect_timeout  3
nb_get_retry 3
delay_before_retry 3
connect_port 53
}
}

real_server 10.18.11.30 53 {
weight 100
TCP_CHECK {
connect_timeout  3
nb_get_retry 3
delay_before_retry 3
connect_port 53
}
}
}
[root@localhost ~]# vim /etc/keepalived/keepalived.conf         #修改LVS-BACKUP配置
! Configuration File for keepalived

global_defs {
notification_email {
acassen@firewall.loc
failover@firewall.loc
sysadmin@firewall.loc
}
notification_email_from Alexandre.Cassen@firewall.loc
smtp_server 127.0.0.1
smtp_connect_timeout 30
router_id LVS_2
}

vrrp_instance VI_DNS1 {
state backup        #状态为backup
interface ens192
virtual_router_id 51
priority 90        #优先级比master低
advert_int 1
authentication {
auth_type PASS
auth_pass 1111
}
virtual_ipaddress {
10.18.11.40
}
}

virtual_server 10.18.11.40 53 {
delay_loop 6
lb_algo rr
lb_kind DR
nat_mask 255.255.255.0
persistence_timeout 50
protocol UDP

real_server 10.18.11.29 53 {
1,1          顶端
advert_int 1
authentication {
auth_type PASS
auth_pass 1111
}
virtual_ipaddress {
10.18.11.40
}
}

virtual_server 10.18.11.40 53 {
delay_loop 6
lb_algo rr
lb_kind DR
nat_mask 255.255.255.0
#    persistence_timeout 1
protocol TCP

real_server 10.18.11.29 53 {
weight 100
TCP_CHECK {
connect_timeout 8
nb_get_retry 3
delay_before_retry 3
connect_port 80
}
}

real_server 10.18.11.30 53 {
weight 100
TCP_CHECK {
connect_timeout 8
nb_get_retry 3
delay_before_retry 3
connect_port 80
}
}
}在DNS服务器上执行脚本#!/bin/bash
SNS_VIP=10.18.11.40
. /etc/rc.d/init.d/functions
case "$1" in
start)
ifconfig lo:0 $SNS_VIP netmask 255.255.255.255 broadcast $SNS_VIP
/sbin/route add -host $SNS_VIP dev lo:0
echo "1" >/proc/sys/net/ipv4/conf/lo/arp_ignore
echo "2" >/proc/sys/net/ipv4/conf/lo/arp_announce
echo "1" >/proc/sys/net/ipv4/conf/all/arp_ignore
echo "2" >/proc/sys/net/ipv4/conf/all/arp_announce
sysctl -p >/dev/null 2>&1
echo "RealServer Start OK"
;;
stop)
ifconfig lo:0 down
route del $SNS_VIP >/dev/null 2>&1
echo "0" >/proc/sys/net/ipv4/conf/lo/arp_ignore
echo "0" >/proc/sys/net/ipv4/conf/lo/arp_announce
echo "0" >/proc/sys/net/ipv4/conf/all/arp_ignore
echo "0" >/proc/sys/net/ipv4/conf/all/arp_announce
echo "RealServer Stoped"
;;
*)
echo "Usage: $0 {start|stop}"
exit 1
esac
exit 0测试LVS负载均衡及高可用[root@localhost ~]# ipvsadm -ln #在主LVS服务器上查看lvs状态如下 说明配置生效 IP Virtual Server version 1.2.1 (size=4096) Prot LocalAddress:Port Scheduler Flags -> RemoteAddress:Port Forward Weight ActiveConn InActConn TCP 10.18.11.40:80 rr -> 10.18.11.29:80 Route 100 0 0 -> 10.18.11.30:80 Route 100 0 0 UDP 10.18.11.40:53 rr persistent 50 -> 10.18.11.29:53 Route 100 0 0 -> 10.18.11.30:53 Route 100 0 0 [16:49:09 root@qa36 /shell]#vim dns_test.sh #运行测试脚本进行100次dns请求 #! /bin/sh for((i=1;i<=100;i++));do dig www.magedu.com @10.18.11.40 >/dev/null 2>&1 sleep 1 done [root@localhost ~]# ipvsadm -ln #查看测试结果 IP Virtual Server version 1.2.1 (size=4096) Prot LocalAddress:Port Scheduler Flags -> RemoteAddress:Port Forward Weight ActiveConn InActConn TCP 10.18.11.40:53 rr -> 10.18.11.29:53 Route 100 0 0 -> 10.18.11.30:53 Route 100 0 0 UDP 10.18.11.40:53 rr -> 10.18.11.29:53 Route 100 0 50 -> 10.18.11.30:53 Route 100 0 50 [root@localhost ~]# systemctl stop named.service #关闭一台dns服务器 [root@localhost ~]# systemctl stop keepalived.service #停止LVS-Master服务 [root@localhost ~]# tail -100f /var/log/messages #在LVS-backup服务器上查看日志 Oct 28 16:46:34 localhost Keepalived_vrrp[4068]: VRRP_Instance(VI_DNS2) Received higher prio advert Oct 28 16:46:34 localhost Keepalived_vrrp[4068]: VRRP_Instance(VI_DNS2) Entering BACKUP STATE Oct 28 16:46:34 localhost Keepalived_vrrp[4068]: VRRP_Instance(VI_DNS2) removing protocol VIPs. Oct 28 16:46:34 localhost Keepalived_vrrp[4068]: Netlink: error: Cannot assign requested address, type=(21), seq=1477644341, pid=0 Oct 28 16:53:01 localhost Keepalived_healthcheckers[4067]: TCP connection to [10.18.11.29]:53 failed !!! #检测到一台dns服务器挂了 Oct 28 16:53:01 localhost Keepalived_healthcheckers[4067]: Removing service [10.18.11.29]:53 from VS [10.18.11.40]:53 Oct 28 16:53:01 localhost Keepalived_healthcheckers[4067]: Remote SMTP server [192.168.200.1]:25 connected. Oct 28 16:53:31 localhost Keepalived_healthcheckers[4067]: Timeout reading data to remote SMTP server [192.168.200.1]:25. Oct 28 16:53:42 localhost Keepalived_vrrp[4068]: VRRP_Instance(VI_DNS1) Transition to MASTER STATE #LVS-backup切换到master Oct 28 16:53:42 localhost Keepalived_vrrp[4068]: VRRP_Instance(VI_DNS2) Transition to MASTER STATE Oct 28 16:53:43 localhost Keepalived_vrrp[4068]: VRRP_Instance(VI_DNS1) Entering MASTER STATE Oct 28 16:53:43 localhost Keepalived_vrrp[4068]: VRRP_Instance(VI_DNS1) setting protocol VIPs. Oct 28 16:53:43 localhost Keepalived_vrrp[4068]: VRRP_Instance(VI_DNS1) Sending gratuitous ARPs on ens192 for 10.18.11.40 Oct 28 16:53:43 localhost Keepalived_healthcheckers[4067]: Netlink reflector reports IP 10.18.11.40 added Oct 28 16:53:43 localhost Keepalived_vrrp[4068]: VRRP_Instance(VI_DNS2) Entering MASTER STATE Oct 28 16:53:43 localhost Keepalived_vrrp[4068]: VRRP_Instance(VI_DNS2) setting protocol VIPs.
四、请描述一次完整的http请求处理过程;
HTTP通信机制是在一次完整的HTTP通信过程中,Web浏览器与Web服务器之间将完成下列7个步骤:
1. 建立TCP连接
在HTTP工作开始之前,Web浏览器首先要通过网络与Web服务器建立连接,该连接是通过TCP来完成的,该协议与IP协议共同构建Internet,即著名的TCP/IP协议族,因此Internet又被称作是TCP/IP网络。HTTP是比TCP更高层次的应用层协议,根据规则,只有低层协议建立之后才能进行更高层协议的连接,因此,首先要建立TCP连接,一般TCP连接的端口号是80。2. Web浏览器向Web服务器发送请求命令
一旦建立了TCP连接,Web浏览器就会向Web服务器发送请求命令。例如:GET/sample/hello.jsp HTTP/1.1。3. Web浏览器发送请求头信息
浏览器发送其请求命令之后,还要以头信息的形式向Web服务器发送一些别的信息,之后浏览器发送了一空白行来通知服务器,它已经结束了该头信息的发送。4. Web服务器应答
客户机向服务器发出请求后,服务器会客户机回送应答, HTTP/1.1 200 OK ,应答的第一部分是协议的版本号和应答状态码。5. Web服务器发送应答头信息
正如客户端会随同请求发送关于自身的信息一样,服务器也会随同应答向用户发送关于它自己的数据及被请求的文档。6. Web服务器向浏览器发送数据
Web服务器向浏览器发送头信息后,它会发送一个空白行来表示头信息的发送到此为结束,接着,它就以Content-Type应答头信息所描述的格式发送用户所请求的实际数据。7. Web服务器关闭TCP连接
一般情况下,一旦Web服务器向浏览器发送了请求数据,它就要关闭TCP连接,然后如果浏览器或者服务器在其头信息加入了这行代码:Connection:keep-alive
TCP连接在发送后将仍然保持打开状态,于是,浏览器可以继续通过相同的连接发送请求。保持连接节省了为每个请求建立新连接所需的时间,还节约了网络带宽。
五、httpd所支持的处理模型有哪些,他们的分别使用于哪些环境。
Apache有两种工作模型,一种是基于进程的preforker模型,一种是基于线程和进程混合的Worker模型 prefork模式
prefork模式可以算是很古老但是非常稳定的Apache模式。Apache在启动之初,就预先fork一些子进程,然后等待请求进来。之所以这样做,是为了减少频繁创建和销毁进程的开销。每个子进程只有一个线程,在一个时间点内,只能处理一个请求。
优点:成熟稳定,兼容所有新老模块。同时,不需要担心线程安全的问题。(我们常用的mod_php,PHP的拓展不需要支持线程安全)
缺点:一个进程相对占用更多的系统资源,消耗更多的内存。而且,它并不擅长处理高并发请求,在这种场景下,它会将请求放进队列中,一直等到有可用进程,请求才会被处理。
worker模式
worker模式比起上一个,是使用了多进程和多线程的混合模式。它也预先fork了几个子进程(数量比较少),然后每个子进程创建一些线程,同时包括一个监听线程。每个请求过来,会被分配到1个线程来服务。线程比起进程会更轻量,因为线程通常会共享父进程的内存空间,因此,内存的占用会减少一些。在高并发的场景下,因为比起prefork有更多的可用线程,表现会更优秀一些。
有些人会觉得奇怪,那么这里为什么不完全使用多线程呢,还要引入多进程?
原因主要是需要考虑稳定性,如果一个线程异常挂了,会导致父进程连同其他正常的子线程都挂了(它们都是同一个进程下的)。为了防止这场异常场景出现,就不能全部使用线程,使用多个进程再加多线程,如果某个线程出现异常,受影响的只是Apache的一部分服务,而不是整个服务。
优点:占据更少的内存,高并发下表现更优秀。
缺点:必须考虑线程安全的问题,因为多个子线程是共享父进程的内存地址的。如果使用keep-alive的长连接方式,某个线程会一直被占据,也许中间几乎没有请求,需要一直等待到超时才会被释放。如果过多的线程,被这样占据,也会导致在高并发场景下的无服务线程可用。
EVENT模式
这个是Apache中最新的模式,在现在版本里的已经是稳定可用的模式。它和worker模式很像,最大的区别在于,它解决了keep-alive场景下,长期被占用的线程的资源浪费问题(某些线程因为被keep-alive,空挂在哪里等待,中间几乎没有请求过来,甚至等到超时)。event
MPM中,会有一个专门的线程来管理这些keep-alive类型的线程,当有真实请求过来的时候,将请求传递给服务线程,执行完毕后,又允许它释放。这样增强了高并发场景下的请求处理能力。
六、建立httpd服务器(基于编译的方式进行),要求:
提供两个基于名称的虚拟主机:
(a)www1.stuX.com,页面文件目录为/web/vhosts/www1;错误日志为/var/log/httpd/www1.err,访问日志为/var/log/httpd/www1.access;
(b)www2.stuX.com,页面文件目录为/web/vhosts/www2;错误日志为/var/log/httpd/www2.err,访问日志为/var/log/httpd/www2.access;
(c)为两个虚拟主机建立各自的主页文件index.html,内容分别为其对应的主机名;
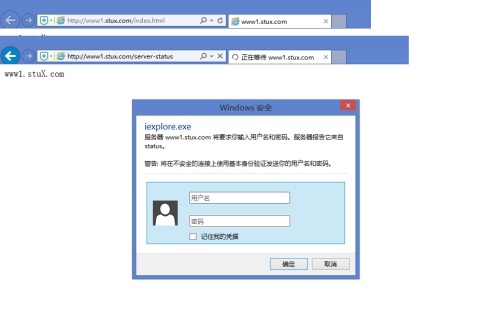
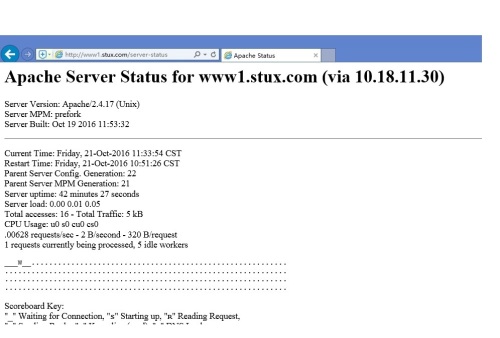
(d)通过www1.stuX.com/server-status输出httpd工作状态相关信息,且只允许提供帐号密码才能访问(status:status);
1、编译安装依赖包
#编译安装apr-1.5.2.tar.gz
[root@localhost opt]# tar xzvf apr-1.5.2.tar.gz && cd apr-1.5.2
[root@localhost apr-1.5.2]# ./configure --prefix=/usr/local/apr
[root@localhost apr-1.5.2]# make && make install

#编译安装apr-util-1.5.4.tar.gz
[root@localhost opt]# tar xzvf apr-util-1.5.4.tar.gz && cd apr-util-1.5.4
[root@localhost apr-util-1.5.4]# ./configure --prefix=/usr/local/apr-util --with-apr=/usr/local/apr/
[root@localhost apr-util-1.5.4]# make && make install

#编译安装pcre-8.38.tar.gz
[root@localhost opt]# tar xzvf pcre-8.38.tar.gz && cd pcre-8.38
[root@localhost pcre-8.38]# ./configure --prefix=/usr/local/pcre
[root@localhost pcre-8.38]# make && make install
2、编译安装httpd-2.4.17
#创建系统组和用户
[root@localhost httpd-2.4.17]# groupadd -r apache
[root@localhost httpd-2.4.17]# useradd -r -g apache aapache
[root@localhost opt]# tar xzvf httpd-2.4.17.tar.gz && cd httpd-2.4.17
[root@localhost httpd-2.4.17]# ./configure --prefix=/usr/local/apache \
> --sysconfdir=/etc/httpd \    # 指定配置文件路径
> --enable-so \    # 支持动态加载DSO模块
> --enable-ssl \    # 开启SSL功能,支持https
> --enable-cgi \    # 启用与外部应用程序的cgi接口功能
> --enable-rewrite \    # 支持url重写
> --with-zlib \    # 支持web页面压缩传送
> --with-pcre=/usr/local/pcre \    # 增强型的正则表达式分析工具,nginx等程序依赖,依赖于pcre-devel开发包
> --with-apr=/usr/local/apr \    # 指定高版本apr程序路径,不指定则会自动指定系统默认版本
> --with-apr-util=/usr/local/apr-util \    # 指定apr-util路径
> --enable-mpms-shared=all \    # 支持动态装卸载所有mpm
> --with-mpm=prefork \    # mpm默认使用prefork
> --enable-modules=all    # all为安装所有模块,most为安装常用模块(安装不代表启用)
[root@localhost httpd-2.4.17]# make && make install
3、配置虚拟主机
[root@localhost ~]# vim /etc/httpd/httpd.conf
# Virtual hosts
Include /etc/httpd/conf.d/*.conf
[root@localhost extra]# vim /etc/httpd/conf.d/stuX.com.conf        #配置www1.stuX.com
<VirtualHost 10.18.11.30:80>        #虚拟主机监听地址
ServerName www1.stuX.com        #虚拟主机域名
DocumentRoot /vhosts/www1.stuX.com        #网站根目录
CustomLog /var/log/httpd/www1.access combined    #配置访问日志路径
ErrorLog "/var/log/httpd/www1.err"        #配置错误日志路径
<Directory "/vhosts/www1.stuX.com">        #允许所有访问请求/vhosts/www1.stuX.com
<RequireAll>
Require all granted
</RequireAll>
</Directory>
</VirtualHost>
<VirtualHost 10.18.11.30:80>        #配置www2.stuX.com
ServerName www2.stuX.com
DocumentRoot /vhosts/www2.stuX.com
CustomLog /var/log/httpd/www2.access combined
ErrorLog "/var/log/httpd/www2.err"
<Directory "/vhosts/www2.stuX.com">
<RequireAll>
Require all granted
</RequireAll>
</Directory>
</VirtualHost>
[root@localhost httpd]# echo www1.stuX.com > /vhosts/www1.stuX.com/index.html        #生成主页文件
[root@localhost httpd]# echo www2.stuX.com > /vhosts/www2.stuX.com/index.html
[root@localhost conf.d]# cp /etc/httpd/extra/httpd-info.conf ../conf.d/
[root@localhost conf.d]# vim /etc/httpd/conf.d/httpd-info.conf    #修改其中server-status配置
<Location /server-status>
SetHandler server-status
Authtype   Basic        #设置认证类型
Authname   "status"    #定义受保护的领域名称,在浏览器访问的时候会显示
AuthUserFile /etc/httpd/conf.d/.htpasswd        #要求只有认证文件中的合法用户才能访问
Require valid-user        #valid-user表示所有合法用户,若只授权给单个用户,则改为指定的用户名
</Location>
[root@localhost conf.d]# htpasswd -c -m /etc/httpd/conf.d/.htpasswd status    #创建用户认证的数据库文件
访问结果
基于用户名的用户访问控制
apache状态页面
七、为第6题中的第2个虚拟主机提供https服务,使得用户可以通过https安全的访问此web站点;
(1)要求使用证书认证,证书中要求使用的国家(CN)、州(HA)、城市(ZZ)和组织(MageEdu);
(2)设置部门为Ops,主机名为www2.stuX.com,邮件为admin@stuX.com;
1、生成一个自签署证书
[root@localhost CA]# openssl req -new -x509 -key private/cakey.pem -out cacert.pem -days 3650        #生成一个自签署证书
You are about to be asked to enter information that will be incorporated
into your certificate request.
What you are about to enter is what is called a Distinguished Name or a DN.
There are quite a few fields but you can leave some blank
For some fields there will be a default value,
If you enter '.', the field will be left blank.
-----
Country Name (2 letter code) [XX]:CN
State or Province Name (full name) []:HA
Locality Name (eg, city) [Default City]:ZZ
Organization Name (eg, company) [Default Company Ltd]:MageEdu
Organizational Unit Name (eg, section) []:Ops
Common Name (eg, your name or your server's hostname) []:www2.stuX.com
Email Address []:admin@stuX.co
2、需要使用证书的主机上生成CA请求.
[root@localhost ssl]# openssl  req -new -key httpd.key -out httpd.csr        #生成签署证书请求
You are about to be asked to enter information that will be incorporated
into your certificate request.
What you are about to enter is what is called a Distinguished Name or a DN.
There are quite a few fields but you can leave some blank
For some fields there will be a default value,
If you enter '.', the field will be left blank.
-----
Country Name (2 letter code) [XX]:CN
State or Province Name (full name) []:HA
Locality Name (eg, city) [Default City]:ZZ
Organization Name (eg, company) [Default Company Ltd]:MageEdu
Organizational Unit Name (eg, section) []:Ops
Common Name (eg, your name or your server's hostname) []:www2.stuX.com
Email Address []:admin@stuX.com

Please enter the following 'extra' attributes
to be sent with your certificate request
A challenge password []:
An optional company name []:
[root@localhost ssl]# scp httpd.csr root@10.18.11.29:/tmp        #将请求文件传输给CA所在主机
3、CA签署证书
[root@localhost CA]# openssl ca -in /tmp/httpd.csr -out certs/www2.stuX.com.crt -days 3650
Using configuration from /etc/pki/tls/openssl.cnf
Check that the request matches the signature
Signature ok
Certificate Details:
Serial Number: 2 (0x2)
Validity
Not Before: Oct 21 14:10:05 2016 GMT
Not After : Oct 19 14:10:05 2026 GMT
Subject:
countryName               = CN
stateOrProvinceName       = HA
organizationName          = MageEdu
organizationalUnitName    = Ops
commonName                = www2.stuX.com
emailAddress              = admin@stuX.com
X509v3 extensions:
X509v3 Basic Constraints:
CA:FALSE
Netscape Comment:
OpenSSL Generated Certificate
X509v3 Subject Key Identifier:
16:5A:7B:84:A7:5F:7D:EA:CC:0D:1D:CB:5F:D3:A0:AD:29:20:98:63
X509v3 Authority Key Identifier:
keyid:C7:83:51:96:AC:82:AF:DA:35:58:02:CD:B3:75:B2:37:B8:5D:59:38

Certificate is to be certified until Oct 19 14:10:05 2026 GMT (3650 days)
Sign the certificate? [y/n]:y
1 out of 1 certificate requests certified, commit? [y/n]y
Write out database with 1 new entries
Data Base Updated
[root@localhost CA]# scp certs/www2.stuX.com.crt 10.18.11.30:/etc/httpd/ssl/        #将证书文件传到httpd服务中
4、添加httpd中ssl配置
[root@localhost conf.d]# vim /etc/httpd/conf.d/httpd_ssl.conf         #编辑ssl配置文件
LoadModule ssl_module modules/mod_ssl.so        #添加需要加载的模块
LoadModule socache_shmcb_module modules/mod_socache_shmcb.so
ServerName www2.stuX.com
DocumentRoot "/vhosts/www2.stuX.com"
<Directory "/vhosts/www2.stuX.com">
<RequireAll>
Require all granted
</RequireAll>
</Directory>
SSLCertificateFile "/etc/httpd/ssl/www2.stuX.com.crt"        #定义证书文件路径
SSLCertificateKeyFile /etc/httpd/ssl/httpd.key        #定义证书文件私钥
八、建立samba共享,共享目录为/data,要求:(描述完整的过程)
1)共享名为shared,工作组为magedu;
2)添加组develop,添加用户gentoo,centos和ubuntu,其中gentoo和centos以develop为附加组,ubuntu不属于develop组;密码均为用户名;
3)添加samba用户gentoo,centos和ubuntu,密码均为“mageedu”;
4)此samba共享shared仅允许develop组具有写权限,其他用户只能以只读方式访问;
5)此samba共享服务仅允许来自于172.16.0.0/16网络的主机访问;
[root@localhost /]# groupadd develop        #添加组develop
[root@localhost /]# useradd -G develop gentoo        #添加用户
[root@localhost /]# useradd -G develop centos
[root@localhost /]# useradd ubuntu

[root@localhost /]# echo gentoo | passwd --stdin gentoo        #设置用户密码
[root@localhost /]# echo centos | passwd --stdin centos
[root@localhost /]# echo ubuntu | passwd --stdin ubuntu

[root@localhost /]# smbpasswd -a gentoo        #添加samba用户
[root@localhost /]# smbpasswd -a centos
[root@localhost /]# smbpasswd -a ubuntu

[root@localhost /]# vim /etc/samba/smb.conf         #修改配置文件
hosts allow = 10.18.11.        #添加ip白名单

[share]
comment = share
path = /share        #设置共享路径
public = no        #设置共享目录是否允许匿名访问
writable = yes        #设置为有写入权限
write list = +develop        #设置具有写入权限的用户列表

[root@localhost ~]# smbclient //10.18.11.29/share -U centos        #使用centos用户有写权限
Enter centos's password:
Domain=[MYGROUP] OS=[Windows 6.1] Server=[Samba 4.2.10]
smb: \> ls
.                                   D        0  Sat Oct 22 17:20:02 2016
..                                 DR        0  Sat Oct 22 17:20:02 2016

77931220 blocks of size 1024. 71904540 blocks available
smb: \> lcd /etc
smb: \> put passwd
putting file passwd as \passwd (946.6 kb/s) (average 946.6 kb/s)

[root@localhost ~]# smbclient //10.18.11.29/share -U ubuntu        #使用ubuntu用户没有写权限
Enter ubuntu's password:
Domain=[MYGROUP] OS=[Windows 6.1] Server=[Samba 4.2.10]
smb: \> lcd
smb: \> lcd /etc
smb: \> put fstab
NT_STATUS_ACCESS_DENIED opening remote file \fstab
九、搭建一套文件vsftp文件共享服务,共享目录为/ftproot,要求:(描述完整的过程)
1)基于虚拟用户的访问形式;
2)匿名用户只允许下载,不允许上传;
3)禁锢所有的用户于其家目录当中;
4)限制最大并发连接数为200:;
5)匿名用户的最大传输速率512KB/s
6)虚拟用户的账号存储在mysql数据库当中。
7)数据库通过NFS进行共享。
实验环境如下
| ip | 用途 |
| 10.18.11.29 | mysql+vsftp |
| 10.18.11.30 | nfs |
[root@localhost /]# yum install nfsutil* rpcbind       #安装nfs和rpcbind服务所需软件包
[root@localhost /]# mkdir /nfs        #创建共享文件夹
[root@localhost ~]# groupadd -g 1001 mysql        #添加mysql组
[root@localhost ~]# useradd -u 1001 -g 1001 mysql        #添加mysql用户
[root@localhost ~]# chown mysql:mysql /nfs        #修改/nfs属组为mysql,为之后挂载到mysql服务器上做datadir做准备
[root@localhost /]# vim /etc/exports        #编辑/etc/exports文件,添加权限
/nfs 10.18.11.29(rw,sync,fsid=0,no_root_squash)
[root@localhost /]# systemctl start rpcbind.service        ##启动rpcbind服务
[root@localhost /]# systemctl start nfs-server.service        #启动nfs服务
2、客户端挂载nfs文件夹
[root@localhost /]# mkdir /mysqldata        #创建挂载路径
[root@localhost /]# mount -t nfs 10.18.11.30:/nfs /mysqldata        #挂载nfs目录到/mysqldata
3、安装mysql
[root@localhost ~]# yum install -y mariadb mariadb-devel
[root@localhost ~]# groupadd -g 1001 mysql        #添加mysql组
[root@localhost ~]# useradd -u 1001 -g 1001 mysql        #添加mysql用户
[root@localhost ~]# vim /etc/my.cnf        #修改mysql配置文件
[mysqld]
datadir=/mysqldata
socket=/var/lib/mysql/mysql.sock
character-set = utf8
user= mysql
[root@localhost /]# mysql_install_db --datadir="/mysqldata/"        #初始化mysql
[root@localhost /]# systemctl status mariadb.service        #启动mysql
4、创建数据库
MariaDB [(none)]> create database vsftpd;
MariaDB [vsftpd]>  grant select on vsftpd.* to vsftpd@'10.18.11.29' identified by 'magedu';        #创建数据库用户,添加查询权限
MariaDB [vsftpd]> create table users (id int AUTO_INCREMENT NOT NULL,name char(50) binary NOT NULL,password char(48) binary NOT NULL,primary key(id));        #在vsftpd数据库中创建表users
MariaDB [vsftpd]> use vsftpd
MariaDB [vsftpd]> flush privileges;
MariaDB [vsftpd]> insert into users(name,password) values('vsftpd1',password('magedu'));        #插入用户vsftpd1
Query OK, 1 row affected (0.02 sec)

MariaDB [vsftpd]> select * from users;
+----+---------+-------------------------------------------+
| id | name    | password                                  |
+----+---------+-------------------------------------------+
|  1 | vsftpd1 | *6B8CCC83799A26CD19D7AD9AEEADBCD30D8A8664 |
+----+---------+-------------------------------------------+
1 row in set (0.00 sec)5、pam-mysql配置[root@localhost pam_mysql-0.7RC1]# vim /etc/pam.d/vsftpd #编辑配置文件,添加如下两行 auth required /lib64/security/pam_mysql.so user=vsftpd passwd=magedu host=10.18.11.29 db=vsftpd table=users usercolumn=name passwdcolumn=password crypt=2 account required /lib64/security/pam_mysql.so user=vsftpd passwd=magedu host=10.18.11.29 db=vsftpd table=users usercolumn=name passwdcolumn=password crypt=26、修改vsftp配置
[root@localhost /]# useradd -s /sbin/nologin -d /var/ftproot vuser        #建立虚拟用户映射的系统用户及对应目录
[root@localhost /]# chmod go+rw /var/ftproot
[root@localhost /]# vim /etc/vsftpd/vsftpd.conf         #修改vsftpd配置文件
guest_enable=YES        #允许虚拟用户账号访问
guest_username=vuser        #gusest用户映射为vuser
max_clients=200        #最多同时允许100个客户连接
anonymous_enable=YES        #允许匿名用户访问
local_enable=YES
anon_max_rate=512000        #限制anonymous传输速率为512KB/s
anon_upload_enable=NO        #anonymous是否具有上传的权限
anon_mkdir_write_enable=NO        #anonymous是否具有建立目录的权限
anon_other_write_enable=NO        #anonymous是否具有写入的权限
chroot_local_user=YES        #对用户访问只限制在主目录不能访问其他目录
user_config_dir=/etc/vsftpd/vusers    #虚拟账号配置目录
pam_service_name=vsftpd.mysql

[root@localhost vusers]# vim /etc/vsftpd/vusers/vsftpd1         #配置虚拟账号权限
anon_upload_enable=YES
anon_mkdir_write_enable=YES
anon_other_write_enable=YES
7、运行结果
[root@localhost /]# ftp 10.18.11.29
Connected to 10.18.11.29 (10.18.11.29).
220 (vsFTPd 3.0.2)
Name (10.18.11.29:root): vsftpd1        #用虚拟账号登陆
331 Please specify the password.
Password:
230 Login successful.
Remote system type is UNIX.
Using binary mode to transfer files.
ftp> lcd /shell/
Local directory now /shell
ftp> get test        #下载文件
local: test remote: test
227 Entering Passive Mode (10,18,11,29,195,159).
150 Opening BINARY mode data connection for test (0 bytes).
226 Transfer complete.
ftp> put case.sh         #上传文件
local: case.sh remote: case.sh
227 Entering Passive Mode (10,18,11,29,234,27).
150 Ok to send data.
226 Transfer complete.
365 bytes sent in 9.2e-05 secs (3967.39 Kbytes/sec)
ftp>

相关文章推荐
- 马哥2016全新Linux+Python高端运维班第九周作业
- 马哥2016全新Linux+Python高端运维班第九周作业
- 马哥2016全新Linux+Python高端运维班第三周作业
- 马哥2016全新Linux+Python高端运维班第一周作业
- 马哥2016全新Linux+Python高端运维班第二周作业
- 马哥2016全新Linux+Python高端运维班第二周作业
- 马哥2016全新Linux+Python高端运维班第二周作业作答
- 马哥2016全新Linux+Python高端运维班第三周作业作答
- 马哥2016全新Linux+Python高端运维班第二周作业
- 马哥2016全新Linux+Python高端运维班第四周作业
- [作业] 马哥2016全新Linux+Python高端运维班第四周作业
- 马哥2016全新Linux+Python高端运维班第三周作业
- 马哥2016全新Linux+Python高端运维班第三周作业
- 马哥2016全新Linux+Python高端运维班第一周作业
- 马哥2016全新Linux+Python高端运维班第一周作业
- 马哥2016全新Linux+Python高端运维班第二周作业
- 马哥2016全新Linux+Python高端运维班第一周作业作答
- 马哥2016全新Linux+Python高端运维班第一周作业
- [作业] 马哥2016全新Linux+Python高端运维班第三周作业
- 马哥2016全新Linux+Python高端运维班第二周作业