android studio 2.2 利用NDK 开发
2016-10-22 09:40
519 查看
android studio 2.2 对C/C++ 的支持做了很大的改善, 现在利用android studio 编写C/C++ 库, DEBUG C/C++ , so easy!!! 这对于常用到ndk开发的android开发者来说,是多么值得庆幸的事。
废话不多说,我只记录一下怎么使用 android studio 2.2 做ndk开发首先是下载 NDK,LLDB,CMake
打开android studio的SDK Manager,点击 SDK TOOLS, 勾选CMake ,LLDB,NDK 进行下载(如果被墙了, 这里有可能看不到哦)
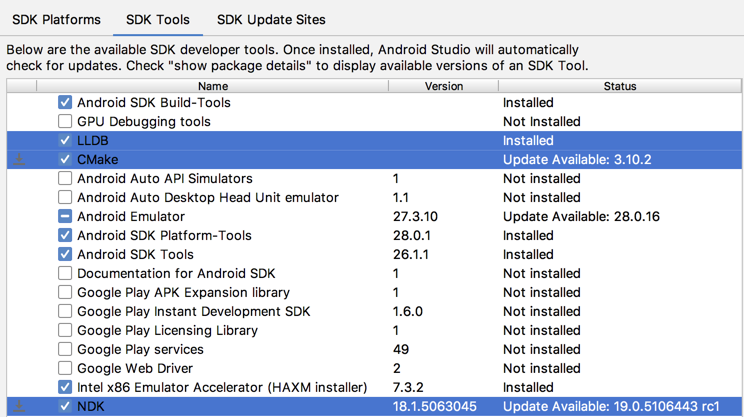
这三个安装好, android studio的NDK开发环境就OK了,接下来就是NDK开发步骤了:
Create a New Project with C/C++ Support
Creating a new project with support for native code is similar to creating any other Android Studio project, butthere are a few additional steps:
In the Configure your new project section of the wizard, check the Include C++ Support checkbox.
Click Next.
Complete all other fields and the next few sections of the wizard as normal.
In the Customize C++ Support section of the wizard, you can customize your project with the following options:
C++ Standard: use the drop-down list to select which standardization of C++ you want to use. Selecting Toolchain Default uses the default CMake setting.
Exceptions Support: check this box if you want to enable support for C++ exception handling. If enabled, Android Studio adds the
-fexceptionsflag to
cppFlagsin your
module-level
build.gradlefile, which Gradle passes to CMake.
Runtime Type Information Support: check this box if you want support for RTTI. If enabled, Android Studio adds the
-frttiflag to
cppFlagsin your module-level
build.gradlefile,
which Gradle passes to CMake.
Click Finish.
After Android Studio finishes creating your new project, open the Project pane from the left side of the IDE and select the Android view. As shown in figure 2, Android Studio adds the cpp and External
Build Files groups:
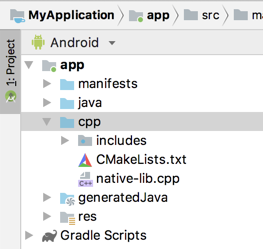
Figure 2. Android view groups for your native sources and external build scripts.
Note: This view does not reflect the actual file hierarchy on disk, but groups similar files to simplify navigating your project.
The cpp group is where you can find all the native source files, headers, and prebuilt libraries that are a part of your project. For new projects, Android Studio creates a sample C++ source file,
native-lib.cpp,
and places it in the
src/main/cpp/directory of your app module. This sample code provides a simple C++ function,
stringFromJNI(), that returns the string “Hello from C++”. You can learn how to add additional source
files to your project in the section about how to Create new native source files.The External Build Files group is where you can find build scripts for CMake or ndk-build. Similar to how
build.gradlefiles tell Gradle how to build your app, CMake and ndk-build require
a build script to know how to build your native library. For new projects, Android Studio creates a CMake build script,
CMakeLists.txt, and places it in your module’s root directory. You can learn more about the contents of this build
script in the section about how to Create a Cmake Build Script.
Build and run the sample app
When you click Run
,
Android Studio builds and launches an app that displays the text “Hello from C++” on your Android device or emulator. The following overview describes the events that occur in order to build and run the sample app:
Gradle calls upon your external build script,
CMakeLists.txt.
CMake follows commands in the build script to compile a C++ source file,
native-lib.cpp, into a shared object library and names it
libnative-lib.so, which Gradle then packages into
the APK.
During runtime, the app's
MainActivityloads the native library using
System.loadLibrary().
The library’s native function,
stringFromJNI(), is now availableto the app.
MainActivity.onCreate()calls
stringFromJNI(), which returns “Hello from C++”, and uses it to update the
TextView.
Note: Instant Run is not compatible with projects that use native code. Android Studio automatically
disables the feature.
If you want to verify that Gradle packages the native library in the APK, you can use the APK Analyzer:
Select Build > Analyze APK.
Select the APK from the
app/build/outputs/apk/directory and click OK.
As shown in figure 3, you can see
libnative-lib.soin the APK Analyzer window under
lib/<ABI>/.
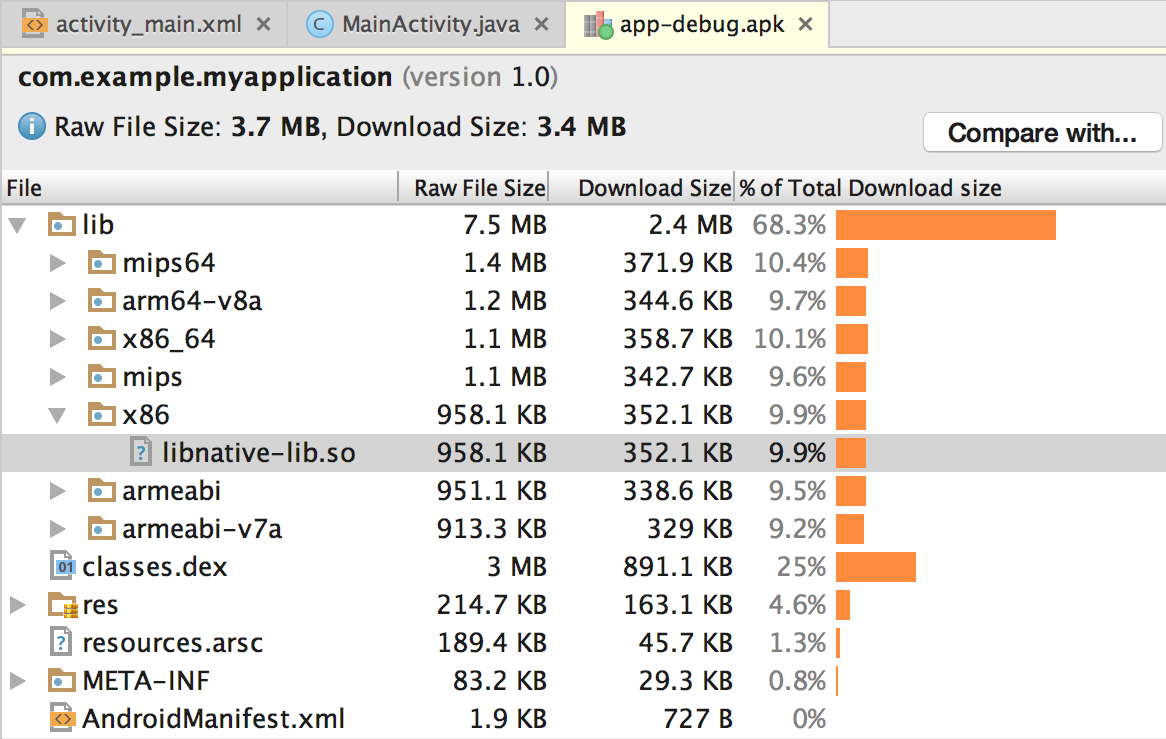
Figure 3. Locating a native library using the APK Analyzer.
Tip: If you want to experiment with other Android apps that use native code, click File > New > Import Sample and select a sample project from theNdk list.
Add C/C++ Code to an Existing Project
If you want to add native code to an existing project, perform these steps:Create new native source files and add them to your Android Studio
project.
You can skip this step if you already have native code or want to import a prebuilt native library.
Create a CMake build script to build your native source code
into a library. You also require this build script if you are importing and linking against prebuilt or platform libraries.
If you have an existing native library that already has a
CMakeLists.txtbuild script, or uses ndk-build and includes an
Android.mkbuild
script, you can skip this step.
Link Gradle to your native library by providing a path to your CMake
or ndk-build script file. Gradle uses the build script to import source code into your Android Studio project and package your native library (the SO file) into the APK.
Once you configure your project, you can access your native functions from Java code using the JNI
framework. To build and run your app, simply click Run
.
Gradle adds your external native build process as a dependency to compile, build, and package your native library with your APK.
Create new native source files
To create acpp/directory with new native source files in the main sourceset of your app module, proceed as follows:
Open the Project pane from the left side of the IDE and select the Project view from the drop-down menu.
Navigate to your-module > src, right-click on the main directory, and select New > Directory.
Enter a name for the directory (such as
cpp) and click OK.
Right-click on the directory you just created and select New > C/C++ Source File.
Enter a name for your source file, such as
native-lib.
From the Type drop-down menu, select the file extension for your source file, such as
.cpp.
You can add other file types to the drop-down menu, such as
.cxxor
.hxx, by clicking Edit File Types

.
In the C/C++ dialog box that pops up, select another file extension from the Source Extension and Header Extension drop-down menus and click OK.
If you also want to create a header file, check the Create an associated header checkbox.
Click OK.
Create a CMake build script
If your native sources don’t already have a CMake build script, you need to create one yourself and include the appropriate CMake commands. A CMake build script is a plain text file that you must nameCMakeLists.txt. This section covers
some basic commands you should include in your build script in order to tell CMake which sources to use when creating your native library.
Note: If your project uses ndk-build, you don’t need to create a CMake build script. You can link
Gradle to your native library by providing a path to your
Android.mkfile.
To create a plain text file that you can use as your CMake build script, proceed as follows:
Open the Project pane from the left side of the IDE and select the Project view from the drop-down menu.
Right-click on the root directory of your-module and select New > File.
Note: You can create the build script in any location you want. However, when configuring the build script, paths to your native source files and libraries are relative to the location of the build script.
Enter "CMakeLists.txt" as the filename and click OK.
You can now configure your build script by adding CMake commands. To instruct CMake to create a native library from native source code, add the
cmake_minimum_required()and
add_library()commands
to your build script:
# Sets the minimum version of CMake required to build your native library.
# This ensures that a certain set of CMake features is available to
# your build.

cmake_minimum_required(VERSION 3.4.1)

# Specifies a library name, specifies whether the library is STATIC or
# SHARED, and provides relative paths to the source code. You can
# define multiple libraries by adding multiple add.library() commands,
# and CMake builds them for you. When you build your app, Gradle
# automatically packages shared libraries with your APK.

add_library( # Specifies the name of the library.
native-lib

# Sets the library as a shared library.
SHARED

# Provides a relative path to your source file(s).
src/main/cpp/native-lib.cpp )
When you add a source file or library to your CMake build script using
add_library(), Android Studio also shows associated header files in the Projectview after you sync your project. However, in order for CMake to locate
your header files during compile time, you need to add the
include_directories()command
to your CMake build script and specify the path to your headers:
add_library(...)

# Specifies a path to native header files.
include_directories(src/main/cpp/include/)
The convention CMake uses to name the file of your library is as follows:
liblibrary-name.so
For example, if you specify "native-lib" as the name of your shared library in the build script, CMake creates a file named
libnative-lib.so. However, when loading this library in your Java code, use the name you specified in the CMake
build script:
static {
    System.loadLibrary(“native-lib”);
}
Note: If you rename or remove a library in your CMake build script, you need to clean your project before Gradle applies the changes or removes the older version of the library from your APK. To clean your project, select Build > Clean
Project from the menu bar.
Android Studio automatically adds the source files and headers to the cpp group in the Project pane. By using multiple
add_library()commands, you can define additional libraries for CMake to build from
other source files.
Add NDK APIs
The Android NDK provides a set of native APIs and libraries that you may find useful. You can use any of these APIs by including theNDK libraries in your project’s
CMakeLists.txtscript file.
Prebuilt NDK libraries already exist on the Android platform, so you don’t need to build them or package them into your APK. Because the NDK libraries are already a part of CMake’s search path, you don’t even need to specify the location of the library in your
local NDK installation—you only need to provide CMake with the name of the library you want to use and link it against your own native library.
Add the
find_library()command to your CMake build
script to locate an NDK library and store its path as a variable. You use this variable to refer to the NDK library in other parts of the build script. The following sample locates the Android-specific
log support library and stores its path in
log-lib:
find_library( # Defines the name of the path variable that stores the
# location of the NDK library.
log-lib

# Specifies the name of the NDK library that
# CMake needs to locate.
log )
In order for your native library to call functions in the
loglibrary, you need to link the libraries using the
target_link_libraries()command
in your CMake build script:
find_library(...)

# Links your native library against one or more other native libraries.
target_link_libraries( # Specifies the target library.
native-lib

# Links the log library to the target library.
${log-lib} )
The NDK also includes some libraries as source code that you need to build and link to your native library. You can compile the source code into a native library by using the
add_library()command in your CMake build script. To provide
a path to your local NDK library, you can use the
ANDROID_NDKpath variable, which Android Studio automatically defines for you.
The following command tells CMake to build
android_native_app_glue.c, which manages
NativeActivitylifecycle
events and touch input, into a static library and links it to
native-lib:
add_library( app-glue
STATIC
${ANDROID_NDK}/sources/android/native_app_glue/android_native_app_glue.c )

# You need to link static libraries against your shared native library.
target_link_libraries( native-lib app-glue ${log-lib} )
Add other prebuilt libraries
Adding a prebuilt library is similar to specifying another native library for CMake to build. However, because the library is already built, you need to use theIMPORTEDflag
to tell CMake that you only want to import the library into your project:
add_library( imported-lib
SHARED
IMPORTED )
You then need to specify the path to the library using the
set_target_properties()command
as shown below.
Some libraries provide separate packages for specific CPU architectures, or Application Binary Interfaces (ABI), and organize
them into separate directories. This approach helps libraries take advantage of certain CPU architectures while allowing you to use only the versions of the library you want. To add multiple ABI versions of a library to your CMake build script, without having
to write multiple commands for each version of the library, you can use the
ANDROID_ABIpath variable. This variable uses a list of the default ABIs
that the NDK supports, or a filtered list of ABIs you manually configure Gradle to use. For
example:
add_library(...)
set_target_properties( # Specifies the target library.
imported-lib

# Specifies the parameter you want to define.
PROPERTIES IMPORTED_LOCATION

# Provides the path to the library you want to import.
imported-lib/src/${ANDROID_ABI}/libimported-lib.so )
For CMake to locate your header files during compile time, you need to use the
include_directories()command and include the path to your header files:
include_directories( imported-lib/include/ )
Note: If you want to package a prebuilt library that is not a build-time dependency—for example, when adding a prebuilt library that is a dependency of
imported-lib, you do not need perform the following instructions to
link the library.
To link the prebuilt library to your own native library, add it to the
target_link_libraries()command in your CMake build script:
target_link_libraries( native-lib imported-lib app-glue ${log-lib} )When you build your app, Gradle automatically packages the imported library into the APK. You can verify which libraries Gradle packages into your APK by using the APK
Analyzer. For more information about CMake commands, see the CMake documentation."
Link Gradle to your native library
To link Gradle to your native library, you need to provide a path to your CMake or ndk-build script file. When you build your app, Gradle runs CMake or ndk-build as a dependency, and packages shared libraries with your APK. Gradle also uses the build scriptto know which files to pull into your Android Studio project, so you can access them from the Project window. If you don’t have a build script for your native sources, you need to create
a CMake build script before you proceed.
Once you link Gradle to a native project, Android Studio updates the Project pane to show your source files and native libraries in the cpp group, and your external build scripts in the External Build Files group.
Note: When making changes to the Gradle configuration, make sure to apply your changes by clicking Sync Project

in
the toolbar. Additionally, when making changes to your CMake or ndk-build script file after you have already linked it to Gradle, you should sync Android Studio with your changes by selecting Build > Refresh Linked C++ Projects from the menu
bar.
Use the Android Studio UI
You can link Gradle to an external CMake or ndk-build project using the Android Studio UI:Open the Project pane from the left side of the IDE and select the Android view.
Right-click on the module you would like to link to your native library, such as the app module, and select Link C++ Project with Gradle from the menu. You should see a dialog similar to the
one shown in figure 4.
From the drop-down menu, select either CMake or ndk-build.
If you select CMake, use the field next to Project Path to specify the
CMakeLists.txtscript file for your external CMake project.
If you select ndk-build, use the field next to Project Path to specify the
Android.mkscript
file for your external ndk-build project. Android Studio also includes the
Application.mkfile
if it is located in the same directory as your
Android.mkfile.
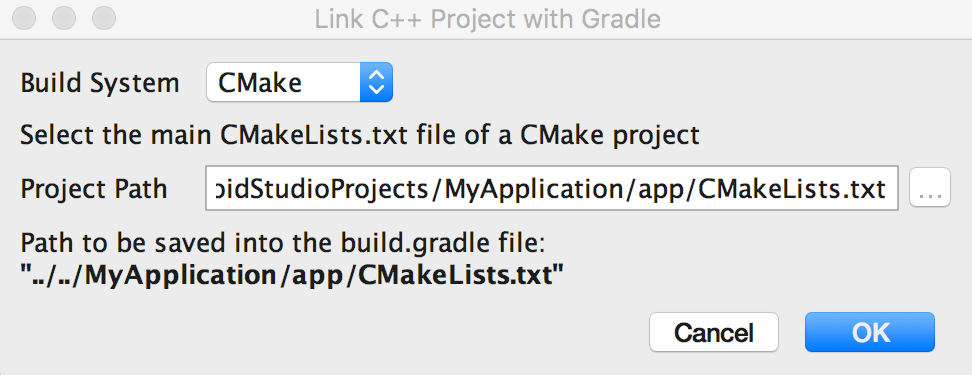
Figure 4. Linking an external C++ project using the Android Studio dialog.
Click OK.
Manually configure Gradle
To manually configure Gradle to link to your native library, you need to add theexternalNativeBuild {} block to your module-level build.gradlefile and configure it with either
cmake {} or ndkBuild
{}:android {
...
defaultConfig {...}
buildTypes {...}
// Encapsulates your external native build configurations.
externalNativeBuild {
// Encapsulates your CMake build configurations.
cmake {
// Provides a relative path to your CMake build script.
path "CMakeLists.txt"
}
}
}Note: If you want to link Gradle to an existing ndk-build project, use the
ndkBuild {} block instead of cmake {}, and provide a relative path to yourAndroid.mkfile.
Gradle also includes the
Application.mkfile if it is located in the same directory as your
Android.mkfile.
Specify optional configurations
You can specify optional arguments and flags for CMake or ndk-build by configuring another
externalNativeBuild {} block within the defaultConfig {} block of your module-level build.gradlefile.
Similar to other properties in the
defaultConfig {} block, you can override these properties for each product flavor in your build configuration.For example, if your CMake or ndk-build project defines multiple native libraries, you can use the
targetsproperty to build and package only a subset of those libraries for a given product flavor. The following code sample describes some
of the properties you can configure:
android {
...
defaultConfig {
...
// This block is different from the one you use to link Gradle
// to your CMake or ndk-build script.
externalNativeBuild {

// For ndk-build, instead use ndkBuild {}
cmake {

// Passes optional arguments to CMake.
arguments "-DANDROID_TOOLCHAIN=clang"

// Sets optional flags for the C compiler.
cFlags "-D_EXAMPLE_C_FLAG1", "-D_EXAMPLE_C_FLAG2"

// Sets a flag to enable format macro constants for the C++ compiler.
cppFlags "-D__STDC_FORMAT_MACROS"
}
}
}

buildTypes {...}

productFlavors {
...
demo {
...
externalNativeBuild {
cmake {
...
// Specifies which native libraries to build and package for this
// product flavor. If you don't configure this property, Gradle
// builds and packages all shared object libraries that you define
// in your CMake or ndk-build project.
targets "native-lib-demo"
}
}
}

paid {
...
externalNativeBuild {
cmake {
...
targets "native-lib-paid"
}
}
}
}

// Use this block to link Gradle to your CMake or ndk-build script.
externalNativeBuild {
cmake {...}
// or ndkBuild {...}
}
}
To learn more about configuring product flavors and build variants, go to Configure Build Variants. For a list of
variables you can configure for CMake with the
argumentsproperty, see Using CMake Variables.
Specify ABIs
By default, Gradle builds your native library into separate
.sofiles for the ABIs the NDK supports and
packages them all into your APK. If you want Gradle to build and package only certain ABI configurations of your native libraries, you can specify them with the
ndk.abiFiltersflag in your module-level
build.gradlefile,
as shown below:
android {
...
defaultConfig {
...
externalNativeBuild {
cmake {...}
// or ndkBuild {...}
}

ndk {
// Specifies the ABI configurations of your native
// libraries Gradle should build and package with your APK.
abiFilters 'x86', 'x86_64', 'armeabi', 'armeabi-v7a',
'arm64-v8a'
}
}
buildTypes {...}
externalNativeBuild {...}
}
In most cases, you only need to specify
abiFiltersin the
ndk {} block, as shown above, because it tells Gradle to both build and package those versions of your native libraries. However, if you want to control whatGradle should build, independently of what you want it to package into your APK, configure another
abiFiltersflag in the
defaultConfig.externalNativeBuild.cmake {} block (or defaultConfig.externalNativeBuild.ndkBuild
{}block). Gradle builds those ABI configurations but only packages the ones you specify in the defaultConfig.ndk{} block.To further reduce the size of your APK, consider configuring ABI APK splits—instead of
creating one large APK with the all versions of your native libraries, Gradle creates a separate APK for each ABI you want to support and only packages the files each ABI needs. If you configure an ABI split without specifying the
abiFiltersflag
as shown in the code sample above, Gradle builds all supported ABI versions of your native libraries, but only packages those you specify in your ABI split configuration. To avoid building versions of your native libraries that you don't want, provide the
same list of ABIs for both the
abiFiltersflag and your ABI split configuration.
这三个安装好, android studio的NDK开发环境就OK了,接下来就是NDK开发步骤了:

相关文章推荐
- Android Studio 2.2 中利用CAMKE进行OpenCV的NDK开发
- 【Android】Android Studio 2上利用NDK进行OpenCV 3.1开发(注意点)
- NDK开发 从入门到放弃(七:Android Studio 2.2 CMAKE 高效NDK开发)
- NDK开发 从入门到放弃(七:Android Studio 2.2 CMAKE 高效NDK开发)
- Android开发基础(2.2)--利用NDK搭建自己的Android交叉工具链
- Android Studio2.2 CMAKE高效NDK开发
- Android Studio 2.2 NDK 开发 之 cMake 方式
- android studio2.2初探ndk jni开发
- NDK开发 从入门到放弃(七:Android Studio 2.2 CMAKE 高效NDK开发)
- Android Studio 2.2 NDK开发环境搭建
- 我的第一篇博客——Android Studio 2.2 NDK开发之Cmake 编译多个源文件的问题
- Android Studio 2.2 之 NDK开发
- 【Android】Android Studio 2上利用NDK进行OpenCV 3.1开发
- Android Studio 2.2进行ndk开发的注意事项
- NDK开发 从入门到放弃(七:Android Studio 2.2 CMAKE 高效NDK开发)
- Android Studio 2.2 NDK开发 opencv 人脸识别
- NDK开发 从入门到放弃(七:Android Studio 2.2 CMAKE 高效NDK开发)
- Android的JNI【实战教程】5⃣️---Android Studio 2.2 以上 NDK开发