使用OpenCV进行人脸识别的三种方法
2016-10-09 22:18
831 查看
1 简介
OpenCV从版本2.4开始,加入了一个类FaceRecognizer,使用它可以方便的地进行人脸识别(源代码,在OpenCV的opencv\modules\contrib\doc\facerec\src下)。
目前支持三种算法(BSD license):
Eigenfaces特征脸: createEigenFaceRecognizer()
Fisherfaces:
createFisherFaceRecognizer()
LocalBinary Patterns Histograms(局部二值直方图):createLBPHFaceRecognizer()
2 人脸数据库
1) http://face-rec.org/databases/
2) http://face-rec.org
AT&T Facedatabase The AT&T Facedatabase, sometimes also referred to asORL Database of Faces,
contains ten different images of each of 40 distinct subjects. For some subjects, the images were taken at different times, varying the lighting, facial expressions (open / closed eyes, smiling / not smiling) and facial details (glasses / no glasses). All
the images were taken against a dark homogeneous background with the subjects in an upright, frontal position (with tolerance for some side movement).
Yale Facedatabase A, also known as Yalefaces. The AT&T Facedatabase is good for initial tests, but it’s a fairly easy
database. The Eigenfaces method already has a 97% recognition rate on it, so you won’t see any great improvements with other algorithms. The Yale Facedatabase A (also known as Yalefaces) is a more appropriate dataset for initial experiments, because the recognition
problem is harder. The database consists of 15 people (14 male, 1 female) each with 11 grayscale images sized 320X243 pixel. There are changes in the light conditions (center light, left light, right light), facial expressions (happy, normal, sad, sleepy,
surprised, wink) and glasses (glasses, no-glasses).
The original images are not cropped and aligned. Please look into the
Appendix for a Python script, that does the job for you.
Extended Yale Facedatabase B The Extended Yale Facedatabase B contains 2414 images of 38 different people
in its cropped version. The focus of this database is set on extracting features that are robust to illumination, the images have almost no variation in emotion/occlusion/... . I personally think, that this dataset is too large for the experiments I perform
in this document. You better use the
AT&T Facedatabase for intial testing. A first version of the Yale Facedatabase B was used in[BHK97]
to see how the Eigenfaces and Fisherfaces method perform under heavy illumination changes.[Lee05]
used the same setup to take 16128 images of 28 people. The Extended Yale Facedatabase B is the merge of the two databases, which is now known as Extended Yalefacedatabase B.
3 数据准备的格式和方法
用CSV文件存储下载的人脸数据的路径和标签,路径和标签用分号(;)隔开,格式如下:
其中/path/to/image.ext为图片的路径,标签0为人的序号标签。
下载AT&T的数据库和对应的CSV文件,格式是这样的:
CSV文件的创建可以用OpenCV提供的脚本create_csv.py完成。
例如;数据的存储路径数如下:
4 Eigenfaces
4.1 算法描述
令

表示一个随机特征,其中

.
1) 计算均值向量


2) 计算协方差矩阵 S

3) 计算S的特征值

和对应的特征向量


4)对特征值进行递减排序,特征向量和它顺序一致. K个主成分也就是k个最大的特征值对应的特征向量。
x的K个主成份:

其中

.
PCA基的重构:

其中

.
然后特征脸通过下面的方式进行人脸识别:
A. 把所有的训练数据投影到PCA子空间
B. 把待识别图像投影到PCA子空间
C. 找到训练数据投影后的向量和待识别图像投影后的向量最近的那个。
仍然有一个问题有待解决。假设给定400张100*100像素大小的图像,PCA需要解决协方差矩阵

的求解,而X的大小是10000*400,那么将会得到10000*10000大小的矩阵,大概0.8GB的内存。解决这个问题不容易,所以我们需要另一个计策,就是转置一下再求,特征向量不变化,描述如下:
线性代数课程中讲到。对于一个

的矩阵,如果

你只能得到

个非零的奇异值. So it’s possible to take the eigenvalue decomposition

of size

instead:
and
get the original eigenvectors of

with a left multiplication of the data matrix:

最终的结果奇异值向量是正交的, 要得到单位正交向量需要归一化为单位长度.文献 [Duda01]中有描述。
代码:
OpenCV中代码路径: src/facerec_eigenfaces.cpp
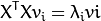
因为使用了伪彩色图像(jet colormap),所以可以看到在特征脸中灰度值是如何分布的。可以看到特征脸不但对人脸特征进行编码,还对图像中的光照进行编码。(看第四张图像是左侧的光照,而第五张是右侧的光照):
备注:PCA对光照变化图像识别效果很差
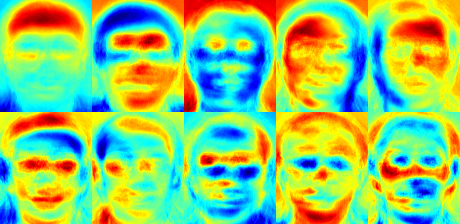
We’ve already seen, that we can reconstruct a face from its lower dimensional approximation. So let’s see how many Eigenfaces are needed for a good reconstruction. I’ll do a subplot with

Eigenfaces(可以利用低维近似来重构人脸,对于一个好的重构,看一下需要多少特征脸。将依次画出10,30,。。310张特征脸时的效果):
显然10个特征向量(备注: 1个特征向量可以变形成一个特征脸,这里特征向量和特征脸概念有些近似)是不够的,50个特征向量可以有效的编码出重要的人脸特征。在AT&T数据库中,当使用300个特征向量时,可以获取一个比较好的和重构结果。有定理可以给出出重构需要选择多少特征脸才合适,但它严重依赖于输入数据。文献[Zhao03]是一个好的开始研究起点。
5 Fisherfaces
5.1 算法描述
令x是一个来自c个类中的随机向量,

散度矩阵

和S_{W}如下计算:

, 其中

是全部数据的均值

:
而

是某个类

的均值:

Fisher的分类算法可以看出一个投影矩阵

, 使得类的可分性最大:

根据
[BHK97], 一个解决这个普通特征值优化问题的方法被提出:

还有一个问题要解决: Sw的秩最多为 (N-c), 包含N 个样本和c个类别。在模式识别中,样本数据个数N的一般小于输入数据的维数(像素的数量)。 (例如。图片数量N=400,而大小100x100=10000就是数据维数)。那么,散度矩阵Sw就是奇异的(文献[RJ91])。在文献[BHK97]中,使用PCA把数据投影到(N-c)维的子空间来解决,然后再使用线性鉴别分析(A
Linear Discriminant Analysis),因为Sw不是奇异矩阵了(可逆矩阵)。
然后优化问题可以写成:

可以把样本投影到(c-1)维的空间的变换矩阵W,可以表示为

代码:
OpenCV中代码的路径:src/facerec_fisherfaces.cpp
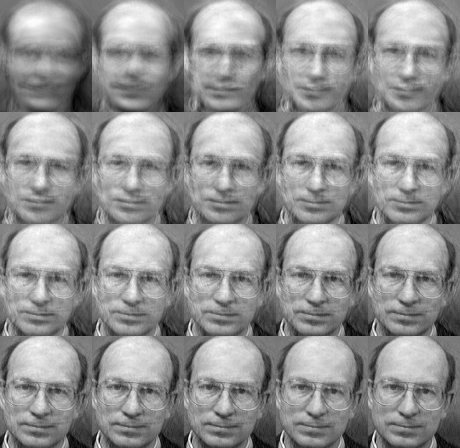
为显示更好些,在这个例子使用了YaleA人脸数据库。每一个Fisherface都和原始图像有同样长度,因此它可以被排列显示在一幅图像上。下面显示了16张Fisherfaces图像。
Fisherfaces方法学习一个正对标签的转换矩阵(class-specific transformation matrix),所依它不会如特征脸那样capture illumination那样明显。鉴别分析是寻找可以区分人的面部特征。需要特别说明的是,Fisherfaces的性能严重依赖于输入数据。实际上,如果用光照好的图片训练学习Fisherfaces,对光照不好的图片进行识别,那么他可能会找到错误的主元(因为在光照不好的图片上,这些特征不优越)。这是符合逻辑的,因为这个方法没有机会去学习光照。(备注:那么采集图像时就要考虑光照变化,训练时考虑所有光照情况,数据库multi-pie就考虑很多种光照)。
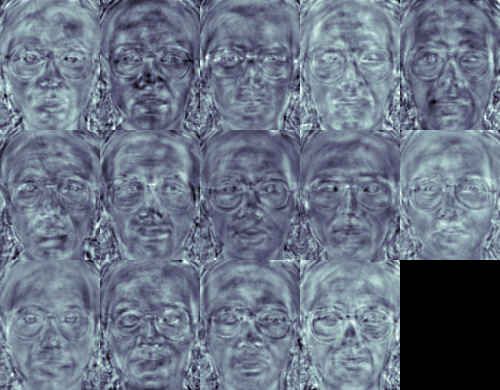
和特征脸一样,Fisherfaces允许对投影图像进行重建。由于我们仅仅使用这些特征来区分不同的类别,所以无法期待对原图像有一个好的重建效果。(备注:也就是特征脸把每个图片看成一个个体,重建时效果也有保证,而Fisherfaces把一个人的照片看成一个整体,那么重建时重建的效果则不是很好)。对于Fisherfaces方法我们将把样本图像逐个投影到Fisherfaces上。因此你可以获得一个好的可视效果,每个Fisherfaces特征可以被描述为:
对于人眼来说,差异比较微妙,但是任然可以看到一些差异的。

6 Local Binary Patterns Histograms
Eigenfaces和Fisherfaces使用整体方法来进行人脸识别[gm:直接使用所有的像素]。你把你的数据当作图像空间的高维向量。我们都知道高维数据是糟糕的,所以一个低维子空间被确定,对于信息保存可能很好。Eigenfaces是最大化总的散度,这样可能导致,当方差由外部条件产生时,最大方差的主成分不适合用来分类。所以为使用一些鉴别分析,我们使用了LDA方法来优化。Fisherfaces方法可以很好的运作,至少在我们假设的模型的有限情况下。
现实生活是不完美的。你无法保证在你的图像中光照条件是完美的,或者说1个人的10张照片。所以,如果每人仅仅只有一张照片呢?我们的子空间的协方差估计方法可能完全错误,所以识别也可能错误。是否记得Eigenfaces在AT&T数据库上达到了96%的识别率?对于这样有效的估计,我们需要多少张训练图像呢?下图是Eigenfaces和Fisherfaces方法在AT&T数据库上的首选识别率,这是一个简单的数据库:

因此,若你想得到好的识别率,你大约需要每个人有8(7~9)张图像,而Fisherfaces在这里并没有好的帮助。以上的实验是10个图像的交叉验证结果,使用了facerec框架: https://github.com/bytefish/facerec。这不是一个刊物,所以我不会用高深的数学分析来证明这个图像。 当遇到小的训练数据集时,可以看一下文献[KM01],了解二种方法的细节分析。
一些研究专注于图像局部特征的提取。主意是我们不把整个图像看成一个高维向量,仅仅用局部特征来描述一个物体。通过这种方式提取特征,你将获得一个低维隐式。一个好主意!但是你很快发现这种图像表示方法不仅仅遭受光照变化。你想想图像中的尺度变化、形变、旋转—我们的局部表示方式起码对这些情况比较稳健。正如SIFT,LBP方法在2D纹理分析中举足轻重。LBP的基本思想是对图像的像素和它局部周围像素进行对比后的结果进行求和。把这个像素作为中心,对相邻像素进行阈值比较。如果中心像素的亮度大于等于他的相邻像素,把他标记为1,否则标记为0。你会用二进制数字来表示每个像素,比如11001111。因此,由于周围相邻8个像素,你最终可能获取2^8个可能组合,被称为局部二值模式,有时被称为LBP码。第一个在文献中描述的LBP算子实际使用的是3*3的邻域。

6.1 算法描述
一个更加正式的LBP操作可以被定义为

其中

是中心像素,亮度是

;而

则是相邻像素的亮度。s是一个符号函数:

这种描述方法使得你可以很好的捕捉到图像中的细节。实际上,研究者们可以用它在纹理分类上得到最先进的水平。正如刚才描述的方法被提出后,固定的近邻区域对于尺度变化的编码失效。所以,使用一个变量的扩展方法,在文献[AHP04]中有描述。主意是使用可变半径的圆对近邻像素进行编码,这样可以捕捉到如下的近邻:


对一个给定的点

,他的近邻点

可以由如下计算:

其中,R是圆的半径,而P是样本点的个数。
这个操作是对原始LBP算子的扩展,所以有时被称为扩展LBP(又称为圆形LBP)。如果一个在圆上的点不在图像坐标上,我们使用他的内插点。计算机科学有一堆聪明的插值方法,而OpenCV使用双线性插值。

LBP算子,对于灰度的单调变化很稳健。我们可以看到手工改变后的图像的LBP图像(你可以看到LBP图像是什么样子的!)

那么剩下来的就是如何合并空间信息用于人脸识别模型。Ahonenet. Al在文献 [AHP04]中提出表示方法,对LBP图像成m个块,每个块提取直方图。通过连接局部特直方图(而不是合并)然后就能得到空间增强的特征向量。这些直方图被称为局部二值模式直方图。
代码:
参考文献: http://docs.opencv.org/2.4/modules/contrib/doc/facerec/facerec_tutorial.html
http://www.cnblogs.com/guoming0000/archive/2012/09/27/2706019.html
OpenCV从版本2.4开始,加入了一个类FaceRecognizer,使用它可以方便的地进行人脸识别(源代码,在OpenCV的opencv\modules\contrib\doc\facerec\src下)。
目前支持三种算法(BSD license):
Eigenfaces特征脸: createEigenFaceRecognizer()
Fisherfaces:
createFisherFaceRecognizer()
LocalBinary Patterns Histograms(局部二值直方图):createLBPHFaceRecognizer()
2 人脸数据库
1) http://face-rec.org/databases/
2) http://face-rec.org
AT&T Facedatabase The AT&T Facedatabase, sometimes also referred to asORL Database of Faces,
contains ten different images of each of 40 distinct subjects. For some subjects, the images were taken at different times, varying the lighting, facial expressions (open / closed eyes, smiling / not smiling) and facial details (glasses / no glasses). All
the images were taken against a dark homogeneous background with the subjects in an upright, frontal position (with tolerance for some side movement).
Yale Facedatabase A, also known as Yalefaces. The AT&T Facedatabase is good for initial tests, but it’s a fairly easy
database. The Eigenfaces method already has a 97% recognition rate on it, so you won’t see any great improvements with other algorithms. The Yale Facedatabase A (also known as Yalefaces) is a more appropriate dataset for initial experiments, because the recognition
problem is harder. The database consists of 15 people (14 male, 1 female) each with 11 grayscale images sized 320X243 pixel. There are changes in the light conditions (center light, left light, right light), facial expressions (happy, normal, sad, sleepy,
surprised, wink) and glasses (glasses, no-glasses).
The original images are not cropped and aligned. Please look into the
Appendix for a Python script, that does the job for you.
Extended Yale Facedatabase B The Extended Yale Facedatabase B contains 2414 images of 38 different people
in its cropped version. The focus of this database is set on extracting features that are robust to illumination, the images have almost no variation in emotion/occlusion/... . I personally think, that this dataset is too large for the experiments I perform
in this document. You better use the
AT&T Facedatabase for intial testing. A first version of the Yale Facedatabase B was used in[BHK97]
to see how the Eigenfaces and Fisherfaces method perform under heavy illumination changes.[Lee05]
used the same setup to take 16128 images of 28 people. The Extended Yale Facedatabase B is the merge of the two databases, which is now known as Extended Yalefacedatabase B.
3 数据准备的格式和方法
用CSV文件存储下载的人脸数据的路径和标签,路径和标签用分号(;)隔开,格式如下:
/path/to/image.ext;0
其中/path/to/image.ext为图片的路径,标签0为人的序号标签。
下载AT&T的数据库和对应的CSV文件,格式是这样的:
./at/s1/1.pgm;0
./at/s1/2.pgm;0
...
./at/s2/1.pgm;1
./at/s2/2.pgm;1
...
./at/s40/1.pgm;39
./at/s40/2.pgm;39
CSV文件的创建可以用OpenCV提供的脚本create_csv.py完成。
例如;数据的存储路径数如下:
philipp@mango:~/facerec/data/at$ tree
.
|-- s1
|   |-- 1.pgm
|   |-- ...
|   |-- 10.pgm
|-- s2
|   |-- 1.pgm
|   |-- ...
|   |-- 10.pgm
...
|-- s40
|   |-- 1.pgm
|   |-- ...
|   |-- 10.pgm
那么创建CSV文件的方式如下:
philipp@mango:~/facerec/data$ python create_csv.py
at/s13/2.pgm;0
at/s13/7.pgm;0
at/s13/6.pgm;0
at/s13/9.pgm;0
at/s13/5.pgm;0
at/s13/3.pgm;0
at/s13/4.pgm;0
at/s13/10.pgm;0
at/s13/8.pgm;0
at/s13/1.pgm;0
at/s17/2.pgm;1
at/s17/7.pgm;1
at/s17/6.pgm;1
at/s17/9.pgm;1
at/s17/5.pgm;1
at/s17/3.pgm;1
[...]
4 Eigenfaces
4.1 算法描述
令
表示一个随机特征,其中
.
1) 计算均值向量
2) 计算协方差矩阵 S
3) 计算S的特征值
和对应的特征向量
4)对特征值进行递减排序,特征向量和它顺序一致. K个主成分也就是k个最大的特征值对应的特征向量。
x的K个主成份:
其中
.
PCA基的重构:
其中
.
然后特征脸通过下面的方式进行人脸识别:
A. 把所有的训练数据投影到PCA子空间
B. 把待识别图像投影到PCA子空间
C. 找到训练数据投影后的向量和待识别图像投影后的向量最近的那个。
仍然有一个问题有待解决。假设给定400张100*100像素大小的图像,PCA需要解决协方差矩阵
的求解,而X的大小是10000*400,那么将会得到10000*10000大小的矩阵,大概0.8GB的内存。解决这个问题不容易,所以我们需要另一个计策,就是转置一下再求,特征向量不变化,描述如下:
线性代数课程中讲到。对于一个
的矩阵,如果
你只能得到
个非零的奇异值. So it’s possible to take the eigenvalue decomposition
of size
instead:
and
get the original eigenvectors of
with a left multiplication of the data matrix:
最终的结果奇异值向量是正交的, 要得到单位正交向量需要归一化为单位长度.文献 [Duda01]中有描述。
代码:
/*
* Copyright (c) 2011. Philipp Wagner <bytefish[at]gmx[dot]de>.
* Released to public domain under terms of the BSD Simplified license.
*
* Redistribution and use in source and binary forms, with or without
* modification, are permitted provided that the following conditions are met:
*   * Redistributions of source code must retain the above copyright
*     notice, this list of conditions and the following disclaimer.
*   * Redistributions in binary form must reproduce the above copyright
*     notice, this list of conditions and the following disclaimer in the
*     documentation and/or other materials provided with the distribution.
*   * Neither the name of the organization nor the names of its contributors
*     may be used to endorse or promote products derived from this software
*     without specific prior written permission.
*
*   See <http://www.opensource.org/licenses/bsd-license>
*/

#include "opencv2/core/core.hpp"
#include "opencv2/contrib/contrib.hpp"
#include "opencv2/highgui/highgui.hpp"

#include <iostream>
#include <fstream>
#include <sstream>

using namespace cv;
using namespace std;

static Mat norm_0_255(InputArray _src) {
Mat src = _src.getMat();
// Create and return normalized image:
Mat dst;
switch(src.channels()) {
case 1:
cv::normalize(_src, dst, 0, 255, NORM_MINMAX, CV_8UC1);
break;
case 3:
cv::normalize(_src, dst, 0, 255, NORM_MINMAX, CV_8UC3);
break;
default:
src.copyTo(dst);
break;
}
return dst;
}

static void read_csv(const string& filename, vector<Mat>& images, vector<int>& labels, char separator = ';') {
std::ifstream file(filename.c_str(), ifstream::in);
if (!file) {
string error_message = "No valid input file was given, please check the given filename.";
CV_Error(CV_StsBadArg, error_message);
}
string line, path, classlabel;
while (getline(file, line)) {
stringstream liness(line);
getline(liness, path, separator);
getline(liness, classlabel);
if(!path.empty() && !classlabel.empty()) {
images.push_back(imread(path, 0));
labels.push_back(atoi(classlabel.c_str()));
}
}
}

int main(int argc, const char *argv[]) {
// Check for valid command line arguments, print usage
// if no arguments were given.
if (argc < 2) {
cout << "usage: " << argv[0] << " <csv.ext> <output_folder> " << endl;
exit(1);
}
string output_folder = ".";
if (argc == 3) {
output_folder = string(argv[2]);
}
// Get the path to your CSV.
string fn_csv = string(argv[1]);
// These vectors hold the images and corresponding labels.
vector<Mat> images;
vector<int> labels;
// Read in the data. This can fail if no valid
// input filename is given.
try {
read_csv(fn_csv, images, labels);
} catch (cv::Exception& e) {
cerr << "Error opening file \"" << fn_csv << "\". Reason: " << e.msg << endl;
// nothing more we can do
exit(1);
}
// Quit if there are not enough images for this demo.
if(images.size() <= 1) {
string error_message = "This demo needs at least 2 images to work. Please add more images to your data set!";
CV_Error(CV_StsError, error_message);
}
// Get the height from the first image. We'll need this
// later in code to reshape the images to their original
// size:
int height = images[0].rows;
// The following lines simply get the last images from
// your dataset and remove it from the vector. This is
// done, so that the training data (which we learn the
// cv::FaceRecognizer on) and the test data we test
// the model with, do not overlap.
Mat testSample = images[images.size() - 1];
int testLabel = labels[labels.size() - 1];
images.pop_back();
labels.pop_back();
// The following lines create an Eigenfaces model for
// face recognition and train it with the images and
// labels read from the given CSV file.
// This here is a full PCA, if you just want to keep
// 10 principal components (read Eigenfaces), then call
// the factory method like this:
//
//      cv::createEigenFaceRecognizer(10);
//
// If you want to create a FaceRecognizer with a
// confidence threshold (e.g. 123.0), call it with:
//
//      cv::createEigenFaceRecognizer(10, 123.0);
//
// If you want to use _all_ Eigenfaces and have a threshold,
// then call the method like this:
//
//      cv::createEigenFaceRecognizer(0, 123.0);
//
Ptr<FaceRecognizer> model = createEigenFaceRecognizer();
model->train(images, labels);
// The following line predicts the label of a given
// test image:
int predictedLabel = model->predict(testSample);
//
// To get the confidence of a prediction call the model with:
//
//      int predictedLabel = -1;
//      double confidence = 0.0;
//      model->predict(testSample, predictedLabel, confidence);
//
string result_message = format("Predicted class = %d / Actual class = %d.", predictedLabel, testLabel);
cout << result_message << endl;
// Here is how to get the eigenvalues of this Eigenfaces model:
Mat eigenvalues = model->getMat("eigenvalues");
// And we can do the same to display the Eigenvectors (read Eigenfaces):
Mat W = model->getMat("eigenvectors");
// Get the sample mean from the training data
Mat mean = model->getMat("mean");
// Display or save:
if(argc == 2) {
imshow("mean", norm_0_255(mean.reshape(1, images[0].rows)));
} else {
imwrite(format("%s/mean.png", output_folder.c_str()), norm_0_255(mean.reshape(1, images[0].rows)));
}
// Display or save the Eigenfaces:
for (int i = 0; i < min(10, W.cols); i++) {
string msg = format("Eigenvalue #%d = %.5f", i, eigenvalues.at<double>(i));
cout << msg << endl;
// get eigenvector #i
Mat ev = W.col(i).clone();
// Reshape to original size & normalize to [0...255] for imshow.
Mat grayscale = norm_0_255(ev.reshape(1, height));
// Show the image & apply a Jet colormap for better sensing.
Mat cgrayscale;
applyColorMap(grayscale, cgrayscale, COLORMAP_JET);
// Display or save:
if(argc == 2) {
imshow(format("eigenface_%d", i), cgrayscale);
} else {
imwrite(format("%s/eigenface_%d.png", output_folder.c_str(), i), norm_0_255(cgrayscale));
}
}

// Display or save the image reconstruction at some predefined steps:
for(int num_components = min(W.cols, 10); num_components < min(W.cols, 300); num_components+=15) {
// slice the eigenvectors from the model
Mat evs = Mat(W, Range::all(), Range(0, num_components));
Mat projection = subspaceProject(evs, mean, images[0].reshape(1,1));
Mat reconstruction = subspaceReconstruct(evs, mean, projection);
// Normalize the result:
reconstruction = norm_0_255(reconstruction.reshape(1, images[0].rows));
// Display or save:
if(argc == 2) {
imshow(format("eigenface_reconstruction_%d", num_components), reconstruction);
} else {
imwrite(format("%s/eigenface_reconstruction_%d.png", output_folder.c_str(), num_components), reconstruction);
}
}
// Display if we are not writing to an output folder:
if(argc == 2) {
waitKey(0);
}
return 0;
}
#include "opencv2/core/core.hpp"
#include "opencv2/contrib/contrib.hpp"
#include "opencv2/highgui/highgui.hpp"
#include <iostream>
#include <fstream>
#include <sstream>
usingnamespace cv;
usingnamespace std;
static Mat norm_0_255(InputArray _src)
{
Mat src = _src.getMat();
// 创建和返回一个归一化后的图像矩阵:
Mat dst;
switch(src.channels())
{
case1:
cv::normalize(_src, dst, 0,255, NORM_MINMAX, CV_8UC1);
break;
case3:
cv::normalize(_src, dst, 0,255, NORM_MINMAX, CV_8UC3);
break;
default:
src.copyTo(dst);
break;
}
return dst;
}
//使用CSV文件去读图像和标签,主要使用stringstream和getline方法
staticvoid read_csv(const string& filename, vector<Mat>& images, vector<int>& labels, char separator =';')
{
std::ifstream file(filename.c_str(), ifstream::in);
if (!file)
{
string error_message ="No valid input file was given, please check the given filename.";
CV_Error(CV_StsBadArg, error_message);
}
string line, path, classlabel;
while (getline(file, line))
{
stringstream liness(line);
getline(liness, path, separator);
getline(liness, classlabel);
if(!path.empty()&&!classlabel.empty()) {
images.push_back(imread(path, 0));
labels.push_back(atoi(classlabel.c_str()));
}
}
}
int main(int argc, constchar*argv[]) {
// 检测合法的命令,显示用法
// 如果没有参数输入则退出!.
if (argc <2)
{
cout <<"usage: "<< argv[0]<<" <csv.ext> <output_folder> "<< endl;
exit(1);
}
string output_folder;
if (argc ==3)
{
output_folder = string(argv[2]);
}
//读取你的CSV文件路径.
string fn_csv = string(argv[1]);
// 2个容器来存放图像数据和对应的标签
vector<Mat> images;
vector<int> labels;
// 读取数据. 如果文件不合法就会出错
// 输入的文件名已经有了.
try {
read_csv(fn_csv, images, labels);
} catch (cv::Exception& e) {
cerr <<"Error opening file \""<< fn_csv <<"\". Reason: "<< e.msg << endl;
// 文件有问题,我们啥也做不了了,退出了
exit(1);
}
// 如果没有读取到足够图片,我们也得退出.
if(images.size()<=1) {
string error_message ="This demo needs at least 2 images to work. Please add more images to your data set!";
CV_Error(CV_StsError, error_message);
}
// 得到第一张照片的高度. 在下面对图像
// 变形到他们原始大小时需要
int height = images[0].rows;
// 下面的几行代码仅仅是从你的数据集中移除最后一张图片
//[gm:自然这里需要根据自己的需要修改,他这里简化了很多问题]
Mat testSample = images[images.size() -1];
int testLabel = labels[labels.size() -1];
images.pop_back();
labels.pop_back();
// 下面几行创建了一个特征脸模型用于人脸识别,
// 通过CSV文件读取的图像和标签训练它。
// T这里是一个完整的PCA变换
//如果你只想保留10个主成分,使用如下代码
// cv::createEigenFaceRecognizer(10);
//
// 如果你还希望使用置信度阈值来初始化,使用以下语句:
// cv::createEigenFaceRecognizer(10, 123.0);
//
// 如果你使用所有特征并且使用一个阈值,使用以下语句:
// cv::createEigenFaceRecognizer(0, 123.0);
//
Ptr<FaceRecognizer> model = createEigenFaceRecognizer();
model->train(images, labels);
// 下面对测试图像进行预测,predictedLabel是预测标签结果
int predictedLabel = model->predict(testSample);
//
// 还有一种调用方式,可以获取结果同时得到阈值:
// int predictedLabel = -1;
// double confidence = 0.0;
// model->predict(testSample, predictedLabel, confidence);
//
string result_message = format("Predicted class = %d / Actual class = %d.", predictedLabel, testLabel);
cout << result_message << endl;
// 这里是如何获取特征脸模型的特征值的例子,使用了getMat方法:
Mat eigenvalues = model->getMat("eigenvalues");
// 同样可以获取特征向量:
Mat W = model->getMat("eigenvectors");
// 得到训练图像的均值向量
Mat mean = model->getMat("mean");
// 显示还是保存:
if(argc==2)
{
imshow("mean", norm_0_255(mean.reshape(1, images[0].rows)));
}
else
{
imwrite(format("%s/mean.png", output_folder.c_str()), norm_0_255(mean.reshape(1, images[0].rows)));
}
// 显示还是保存特征脸:
for (int i =0; i < min(10, W.cols); i++) {
string msg = format("Eigenvalue #%d = %.5f", i, eigenvalues.at<double>(i));
cout << msg << endl;
// 得到第 #i个特征
Mat ev = W.col(i).clone();
//把它变成原始大小,为了把数据显示归一化到0~255.
Mat grayscale = norm_0_255(ev.reshape(1, height));
// 使用伪彩色来显示结果,为了更好的感受.
Mat cgrayscale;
applyColorMap(grayscale, cgrayscale, COLORMAP_JET);
// 显示或者保存:
if(argc==2) {
imshow(format("eigenface_%d", i), cgrayscale);
} else {
imwrite(format("%s/eigenface_%d.png", output_folder.c_str(), i), norm_0_255(cgrayscale));
}
}
// 在一些预测过程中,显示还是保存重建后的图像:
for(int num_components =10; num_components <300; num_components+=15) {
// 从模型中的特征向量截取一部分
Mat evs = Mat(W, Range::all(), Range(0, num_components));
Mat projection = subspaceProject(evs, mean, images[0].reshape(1,1));
Mat reconstruction = subspaceReconstruct(evs, mean, projection);
// 归一化结果,为了显示:
reconstruction = norm_0_255(reconstruction.reshape(1, images[0].rows));
// 显示或者保存:
if(argc==2) {
imshow(format("eigenface_reconstruction_%d", num_components), reconstruction);
} else {
imwrite(format("%s/eigenface_reconstruction_%d.png", output_folder.c_str(), num_components), reconstruction);
}
}
// 如果我们不是存放到文件中,就显示他,这里使用了暂定等待键盘输入:
if(argc==2) {
waitKey(0);
}
return0;
}OpenCV中代码路径: src/facerec_eigenfaces.cpp
因为使用了伪彩色图像(jet colormap),所以可以看到在特征脸中灰度值是如何分布的。可以看到特征脸不但对人脸特征进行编码,还对图像中的光照进行编码。(看第四张图像是左侧的光照,而第五张是右侧的光照):
备注:PCA对光照变化图像识别效果很差
We’ve already seen, that we can reconstruct a face from its lower dimensional approximation. So let’s see how many Eigenfaces are needed for a good reconstruction. I’ll do a subplot with
Eigenfaces(可以利用低维近似来重构人脸,对于一个好的重构,看一下需要多少特征脸。将依次画出10,30,。。310张特征脸时的效果):
// Display or save the image reconstruction at some predefined steps:
for(int num_components = 10; num_components < 300; num_components+=15) {
// slice the eigenvectors from the model
Mat evs = Mat(W, Range::all(), Range(0, num_components));
Mat projection = subspaceProject(evs, mean, images[0].reshape(1,1));
Mat reconstruction = subspaceReconstruct(evs, mean, projection);
// Normalize the result:
reconstruction = norm_0_255(reconstruction.reshape(1, images[0].rows));
// Display or save:
if(argc == 2) {
imshow(format("eigenface_reconstruction_%d", num_components), reconstruction);
} else {
imwrite(format("%s/eigenface_reconstruction_%d.png", output_folder.c_str(), num_components), reconstruction);
}
}
显然10个特征向量(备注: 1个特征向量可以变形成一个特征脸,这里特征向量和特征脸概念有些近似)是不够的,50个特征向量可以有效的编码出重要的人脸特征。在AT&T数据库中,当使用300个特征向量时,可以获取一个比较好的和重构结果。有定理可以给出出重构需要选择多少特征脸才合适,但它严重依赖于输入数据。文献[Zhao03]是一个好的开始研究起点。
5 Fisherfaces
5.1 算法描述
令x是一个来自c个类中的随机向量,
散度矩阵
和S_{W}如下计算:
, 其中
是全部数据的均值
:
而
是某个类
的均值:
Fisher的分类算法可以看出一个投影矩阵
, 使得类的可分性最大:
根据
[BHK97], 一个解决这个普通特征值优化问题的方法被提出:
还有一个问题要解决: Sw的秩最多为 (N-c), 包含N 个样本和c个类别。在模式识别中,样本数据个数N的一般小于输入数据的维数(像素的数量)。 (例如。图片数量N=400,而大小100x100=10000就是数据维数)。那么,散度矩阵Sw就是奇异的(文献[RJ91])。在文献[BHK97]中,使用PCA把数据投影到(N-c)维的子空间来解决,然后再使用线性鉴别分析(A
Linear Discriminant Analysis),因为Sw不是奇异矩阵了(可逆矩阵)。
然后优化问题可以写成:
可以把样本投影到(c-1)维的空间的变换矩阵W,可以表示为
代码:
/*
* Copyright (c) 2011. Philipp Wagner <bytefish[at]gmx[dot]de>.
* Released to public domain under terms of the BSD Simplified license.
*
* Redistribution and use in source and binary forms, with or without
* modification, are permitted provided that the following conditions are met:
*   * Redistributions of source code must retain the above copyright
*     notice, this list of conditions and the following disclaimer.
*   * Redistributions in binary form must reproduce the above copyright
*     notice, this list of conditions and the following disclaimer in the
*     documentation and/or other materials provided with the distribution.
*   * Neither the name of the organization nor the names of its contributors
*     may be used to endorse or promote products derived from this software
*     without specific prior written permission.
*
*   See <http://www.opensource.org/licenses/bsd-license>
*/

#include "opencv2/core/core.hpp"
#include "opencv2/contrib/contrib.hpp"
#include "opencv2/highgui/highgui.hpp"

#include <iostream>
#include <fstream>
#include <sstream>

using namespace cv;
using namespace std;

static Mat norm_0_255(InputArray _src) {
Mat src = _src.getMat();
// Create and return normalized image:
Mat dst;
switch(src.channels()) {
case 1:
cv::normalize(_src, dst, 0, 255, NORM_MINMAX, CV_8UC1);
break;
case 3:
cv::normalize(_src, dst, 0, 255, NORM_MINMAX, CV_8UC3);
break;
default:
src.copyTo(dst);
break;
}
return dst;
}

static void read_csv(const string& filename, vector<Mat>& images, vector<int>& labels, char separator = ';') {
std::ifstream file(filename.c_str(), ifstream::in);
if (!file) {
string error_message = "No valid input file was given, please check the given filename.";
CV_Error(CV_StsBadArg, error_message);
}
string line, path, classlabel;
while (getline(file, line)) {
stringstream liness(line);
getline(liness, path, separator);
getline(liness, classlabel);
if(!path.empty() && !classlabel.empty()) {
images.push_back(imread(path, 0));
labels.push_back(atoi(classlabel.c_str()));
}
}
}

int main(int argc, const char *argv[]) {
// Check for valid command line arguments, print usage
// if no arguments were given.
if (argc < 2) {
cout << "usage: " << argv[0] << " <csv.ext> <output_folder> " << endl;
exit(1);
}
string output_folder = ".";
if (argc == 3) {
output_folder = string(argv[2]);
}
// Get the path to your CSV.
string fn_csv = string(argv[1]);
// These vectors hold the images and corresponding labels.
vector<Mat> images;
vector<int> labels;
// Read in the data. This can fail if no valid
// input filename is given.
try {
read_csv(fn_csv, images, labels);
} catch (cv::Exception& e) {
cerr << "Error opening file \"" << fn_csv << "\". Reason: " << e.msg << endl;
// nothing more we can do
exit(1);
}
// Quit if there are not enough images for this demo.
if(images.size() <= 1) {
string error_message = "This demo needs at least 2 images to work. Please add more images to your data set!";
CV_Error(CV_StsError, error_message);
}
// Get the height from the first image. We'll need this
// later in code to reshape the images to their original
// size:
int height = images[0].rows;
// The following lines simply get the last images from
// your dataset and remove it from the vector. This is
// done, so that the training data (which we learn the
// cv::FaceRecognizer on) and the test data we test
// the model with, do not overlap.
Mat testSample = images[images.size() - 1];
int testLabel = labels[labels.size() - 1];
images.pop_back();
labels.pop_back();
// The following lines create an Fisherfaces model for
// face recognition and train it with the images and
// labels read from the given CSV file.
// If you just want to keep 10 Fisherfaces, then call
// the factory method like this:
//
//      cv::createFisherFaceRecognizer(10);
//
// However it is not useful to discard Fisherfaces! Please
// always try to use _all_ available Fisherfaces for
// classification.
//
// If you want to create a FaceRecognizer with a
// confidence threshold (e.g. 123.0) and use _all_
// Fisherfaces, then call it with:
//
//      cv::createFisherFaceRecognizer(0, 123.0);
//
Ptr<FaceRecognizer> model = createFisherFaceRecognizer();
model->train(images, labels);
// The following line predicts the label of a given
// test image:
int predictedLabel = model->predict(testSample);
//
// To get the confidence of a prediction call the model with:
//
//      int predictedLabel = -1;
//      double confidence = 0.0;
//      model->predict(testSample, predictedLabel, confidence);
//
string result_message = format("Predicted class = %d / Actual class = %d.", predictedLabel, testLabel);
cout << result_message << endl;
// Here is how to get the eigenvalues of this Eigenfaces model:
Mat eigenvalues = model->getMat("eigenvalues");
// And we can do the same to display the Eigenvectors (read Eigenfaces):
Mat W = model->getMat("eigenvectors");
// Get the sample mean from the training data
Mat mean = model->getMat("mean");
// Display or save:
if(argc == 2) {
imshow("mean", norm_0_255(mean.reshape(1, images[0].rows)));
} else {
imwrite(format("%s/mean.png", output_folder.c_str()), norm_0_255(mean.reshape(1, images[0].rows)));
}
// Display or save the first, at most 16 Fisherfaces:
for (int i = 0; i < min(16, W.cols); i++) {
string msg = format("Eigenvalue #%d = %.5f", i, eigenvalues.at<double>(i));
cout << msg << endl;
// get eigenvector #i
Mat ev = W.col(i).clone();
// Reshape to original size & normalize to [0...255] for imshow.
Mat grayscale = norm_0_255(ev.reshape(1, height));
// Show the image & apply a Bone colormap for better sensing.
Mat cgrayscale;
applyColorMap(grayscale, cgrayscale, COLORMAP_BONE);
// Display or save:
if(argc == 2) {
imshow(format("fisherface_%d", i), cgrayscale);
} else {
imwrite(format("%s/fisherface_%d.png", output_folder.c_str(), i), norm_0_255(cgrayscale));
}
}
// Display or save the image reconstruction at some predefined steps:
for(int num_component = 0; num_component < min(16, W.cols); num_component++) {
// Slice the Fisherface from the model:
Mat ev = W.col(num_component);
Mat projection = subspaceProject(ev, mean, images[0].reshape(1,1));
Mat reconstruction = subspaceReconstruct(ev, mean, projection);
// Normalize the result:
reconstruction = norm_0_255(reconstruction.reshape(1, images[0].rows));
// Display or save:
if(argc == 2) {
imshow(format("fisherface_reconstruction_%d", num_component), reconstruction);
} else {
imwrite(format("%s/fisherface_reconstruction_%d.png", output_folder.c_str(), num_component), reconstruction);
}
}
// Display if we are not writing to an output folder:
if(argc == 2) {
waitKey(0);
}
return 0;
}
#include "opencv2/core/core.hpp"
#include "opencv2/contrib/contrib.hpp"
#include "opencv2/highgui/highgui.hpp"
#include <iostream>
#include <fstream>
#include <sstream>
usingnamespace cv;
usingnamespace std;
static Mat norm_0_255(InputArray _src) {
Mat src = _src.getMat();
// 创建和返回归一化的图像:
Mat dst;
switch(src.channels()) {
case1:
cv::normalize(_src, dst, 0,255, NORM_MINMAX, CV_8UC1);
break;
case3:
cv::normalize(_src, dst, 0,255, NORM_MINMAX, CV_8UC3);
break;
default:
src.copyTo(dst);
break;
}
return dst;
}
staticvoid read_csv(const string& filename, vector<Mat>& images, vector<int>& labels, char separator =';') {
std::ifstream file(filename.c_str(), ifstream::in);
if (!file) {
string error_message ="No valid input file was given, please check the given filename.";
CV_Error(CV_StsBadArg, error_message);
}
string line, path, classlabel;
while (getline(file, line)) {
stringstream liness(line);
getline(liness, path, separator);
getline(liness, classlabel);
if(!path.empty()&&!classlabel.empty()) {
images.push_back(imread(path, 0));
labels.push_back(atoi(classlabel.c_str()));
}
}
}
int main(int argc, constchar*argv[]) {
// 判断输入命令是否有效,输出用法
// 如果没有输入参数.
if (argc <2) {
cout <<"usage: "<< argv[0]<<" <csv.ext> <output_folder> "<< endl;
exit(1);
}
string output_folder;
if (argc ==3) {
output_folder = string(argv[2]);
}
// 获取CSV文件的路径.
string fn_csv = string(argv[1]);
// 这些容器存放图片和标签.
vector<Mat> images;
vector<int> labels;
// 载入数据.如果不合理,会出错
// 输入文件名fn_csv已经有了.
try {
read_csv(fn_csv, images, labels);
} catch (cv::Exception& e) {
cerr <<"Error opening file \""<< fn_csv <<"\". Reason: "<< e.msg << endl;
// 什么也不能做了
exit(1);
}
// 如果没有足够图像就退出掉.
if(images.size()<=1) {
string error_message ="This demo needs at least 2 images to work. Please add more images to your data set!";
CV_Error(CV_StsError, error_message);
}
int height = images[0].rows;
Mat testSample = images[images.size() -1];
int testLabel = labels[labels.size() -1];
images.pop_back();
labels.pop_back();
// 如果想保存10个fisherfaces
// cv::createFisherFaceRecognizer(10);
//
// 如果要以123.0作为置信阈值
// cv::createFisherFaceRecognizer(0, 123.0);
//
Ptr<FaceRecognizer> model = createFisherFaceRecognizer();
model->train(images, labels);
int predictedLabel = model->predict(testSample);
//
// model->predict(testSample, predictedLabel, confidence);
//
string result_message = format("Predicted class = %d / Actual class = %d.", predictedLabel, testLabel);
cout << result_message << endl;
Mat eigenvalues = model->getMat("eigenvalues");
Mat W = model->getMat("eigenvectors");
Mat mean = model->getMat("mean");
if(argc==2) {
imshow("mean", norm_0_255(mean.reshape(1, images[0].rows)));
} else {
imwrite(format("%s/mean.png", output_folder.c_str()), norm_0_255(mean.reshape(1, images[0].rows)));
}
//显示还是保存, 最多16 Fisherfaces:
for (int i =0; i < min(16, W.cols); i++) {
string msg = format("Eigenvalue #%d = %.5f", i, eigenvalues.at<double>(i));
cout << msg << endl;
Mat ev = W.col(i).clone();
Mat grayscale = norm_0_255(ev.reshape(1, height));
// 使用Bone伪彩色图像来显示.
Mat cgrayscale;
applyColorMap(grayscale, cgrayscale, COLORMAP_BONE);
if(argc==2) {
imshow(format("fisherface_%d", i), cgrayscale);
} else {
imwrite(format("%s/fisherface_%d.png", output_folder.c_str(), i), norm_0_255(cgrayscale));
}
}
for(int num_component =0; num_component < min(16, W.cols); num_component++) {
Mat ev = W.col(num_component);
Mat projection = subspaceProject(ev, mean, images[0].reshape(1,1));
Mat reconstruction = subspaceReconstruct(ev, mean, projection);
reconstruction = norm_0_255(reconstruction.reshape(1, images[0].rows));
if(argc==2) {
imshow(format("fisherface_reconstruction_%d", num_component), reconstruction);
} else {
imwrite(format("%s/fisherface_reconstruction_%d.png", output_folder.c_str(), num_component), reconstruction);
}
}
if(argc==2) {
waitKey(0);
}
return0;
}OpenCV中代码的路径:src/facerec_fisherfaces.cpp
为显示更好些,在这个例子使用了YaleA人脸数据库。每一个Fisherface都和原始图像有同样长度,因此它可以被排列显示在一幅图像上。下面显示了16张Fisherfaces图像。
Fisherfaces方法学习一个正对标签的转换矩阵(class-specific transformation matrix),所依它不会如特征脸那样capture illumination那样明显。鉴别分析是寻找可以区分人的面部特征。需要特别说明的是,Fisherfaces的性能严重依赖于输入数据。实际上,如果用光照好的图片训练学习Fisherfaces,对光照不好的图片进行识别,那么他可能会找到错误的主元(因为在光照不好的图片上,这些特征不优越)。这是符合逻辑的,因为这个方法没有机会去学习光照。(备注:那么采集图像时就要考虑光照变化,训练时考虑所有光照情况,数据库multi-pie就考虑很多种光照)。
和特征脸一样,Fisherfaces允许对投影图像进行重建。由于我们仅仅使用这些特征来区分不同的类别,所以无法期待对原图像有一个好的重建效果。(备注:也就是特征脸把每个图片看成一个个体,重建时效果也有保证,而Fisherfaces把一个人的照片看成一个整体,那么重建时重建的效果则不是很好)。对于Fisherfaces方法我们将把样本图像逐个投影到Fisherfaces上。因此你可以获得一个好的可视效果,每个Fisherfaces特征可以被描述为:
// Display or save the image reconstruction at some predefined steps:
for(int num_component = 0; num_component < min(16, W.cols); num_component++) {
// Slice the Fisherface from the model:
Mat ev = W.col(num_component);
Mat projection = subspaceProject(ev, mean, images[0].reshape(1,1));
Mat reconstruction = subspaceReconstruct(ev, mean, projection);
// Normalize the result:
reconstruction = norm_0_255(reconstruction.reshape(1, images[0].rows));
// Display or save:
if(argc == 2) {
imshow(format("fisherface_reconstruction_%d", num_component), reconstruction);
} else {
imwrite(format("%s/fisherface_reconstruction_%d.png", output_folder.c_str(), num_component), reconstruction);
}
}
对于人眼来说,差异比较微妙,但是任然可以看到一些差异的。
6 Local Binary Patterns Histograms
Eigenfaces和Fisherfaces使用整体方法来进行人脸识别[gm:直接使用所有的像素]。你把你的数据当作图像空间的高维向量。我们都知道高维数据是糟糕的,所以一个低维子空间被确定,对于信息保存可能很好。Eigenfaces是最大化总的散度,这样可能导致,当方差由外部条件产生时,最大方差的主成分不适合用来分类。所以为使用一些鉴别分析,我们使用了LDA方法来优化。Fisherfaces方法可以很好的运作,至少在我们假设的模型的有限情况下。
现实生活是不完美的。你无法保证在你的图像中光照条件是完美的,或者说1个人的10张照片。所以,如果每人仅仅只有一张照片呢?我们的子空间的协方差估计方法可能完全错误,所以识别也可能错误。是否记得Eigenfaces在AT&T数据库上达到了96%的识别率?对于这样有效的估计,我们需要多少张训练图像呢?下图是Eigenfaces和Fisherfaces方法在AT&T数据库上的首选识别率,这是一个简单的数据库:
因此,若你想得到好的识别率,你大约需要每个人有8(7~9)张图像,而Fisherfaces在这里并没有好的帮助。以上的实验是10个图像的交叉验证结果,使用了facerec框架: https://github.com/bytefish/facerec。这不是一个刊物,所以我不会用高深的数学分析来证明这个图像。 当遇到小的训练数据集时,可以看一下文献[KM01],了解二种方法的细节分析。
一些研究专注于图像局部特征的提取。主意是我们不把整个图像看成一个高维向量,仅仅用局部特征来描述一个物体。通过这种方式提取特征,你将获得一个低维隐式。一个好主意!但是你很快发现这种图像表示方法不仅仅遭受光照变化。你想想图像中的尺度变化、形变、旋转—我们的局部表示方式起码对这些情况比较稳健。正如SIFT,LBP方法在2D纹理分析中举足轻重。LBP的基本思想是对图像的像素和它局部周围像素进行对比后的结果进行求和。把这个像素作为中心,对相邻像素进行阈值比较。如果中心像素的亮度大于等于他的相邻像素,把他标记为1,否则标记为0。你会用二进制数字来表示每个像素,比如11001111。因此,由于周围相邻8个像素,你最终可能获取2^8个可能组合,被称为局部二值模式,有时被称为LBP码。第一个在文献中描述的LBP算子实际使用的是3*3的邻域。
6.1 算法描述
一个更加正式的LBP操作可以被定义为
其中
是中心像素,亮度是
;而
则是相邻像素的亮度。s是一个符号函数:
这种描述方法使得你可以很好的捕捉到图像中的细节。实际上,研究者们可以用它在纹理分类上得到最先进的水平。正如刚才描述的方法被提出后,固定的近邻区域对于尺度变化的编码失效。所以,使用一个变量的扩展方法,在文献[AHP04]中有描述。主意是使用可变半径的圆对近邻像素进行编码,这样可以捕捉到如下的近邻:
对一个给定的点
,他的近邻点
可以由如下计算:
其中,R是圆的半径,而P是样本点的个数。
这个操作是对原始LBP算子的扩展,所以有时被称为扩展LBP(又称为圆形LBP)。如果一个在圆上的点不在图像坐标上,我们使用他的内插点。计算机科学有一堆聪明的插值方法,而OpenCV使用双线性插值。
LBP算子,对于灰度的单调变化很稳健。我们可以看到手工改变后的图像的LBP图像(你可以看到LBP图像是什么样子的!)
那么剩下来的就是如何合并空间信息用于人脸识别模型。Ahonenet. Al在文献 [AHP04]中提出表示方法,对LBP图像成m个块,每个块提取直方图。通过连接局部特直方图(而不是合并)然后就能得到空间增强的特征向量。这些直方图被称为局部二值模式直方图。
代码:
/*
* Copyright (c) 2011. Philipp Wagner <bytefish[at]gmx[dot]de>.
* Released to public domain under terms of the BSD Simplified license.
*
* Redistribution and use in source and binary forms, with or without
* modification, are permitted provided that the following conditions are met:
*   * Redistributions of source code must retain the above copyright
*     notice, this list of conditions and the following disclaimer.
*   * Redistributions in binary form must reproduce the above copyright
*     notice, this list of conditions and the following disclaimer in the
*     documentation and/or other materials provided with the distribution.
*   * Neither the name of the organization nor the names of its contributors
*     may be used to endorse or promote products derived from this software
*     without specific prior written permission.
*
*   See <http://www.opensource.org/licenses/bsd-license>
*/

#include "opencv2/core/core.hpp"
#include "opencv2/contrib/contrib.hpp"
#include "opencv2/highgui/highgui.hpp"

#include <iostream>
#include <fstream>
#include <sstream>

using namespace cv;
using namespace std;

static void read_csv(const string& filename, vector<Mat>& images, vector<int>& labels, char separator = ';') {
std::ifstream file(filename.c_str(), ifstream::in);
if (!file) {
string error_message = "No valid input file was given, please check the given filename.";
CV_Error(CV_StsBadArg, error_message);
}
string line, path, classlabel;
while (getline(file, line)) {
stringstream liness(line);
getline(liness, path, separator);
getline(liness, classlabel);
if(!path.empty() && !classlabel.empty()) {
images.push_back(imread(path, 0));
labels.push_back(atoi(classlabel.c_str()));
}
}
}

int main(int argc, const char *argv[]) {
// Check for valid command line arguments, print usage
// if no arguments were given.
if (argc != 2) {
cout << "usage: " << argv[0] << " <csv.ext>" << endl;
exit(1);
}
// Get the path to your CSV.
string fn_csv = string(argv[1]);
// These vectors hold the images and corresponding labels.
vector<Mat> images;
vector<int> labels;
// Read in the data. This can fail if no valid
// input filename is given.
try {
read_csv(fn_csv, images, labels);
} catch (cv::Exception& e) {
cerr << "Error opening file \"" << fn_csv << "\". Reason: " << e.msg << endl;
// nothing more we can do
exit(1);
}
// Quit if there are not enough images for this demo.
if(images.size() <= 1) {
string error_message = "This demo needs at least 2 images to work. Please add more images to your data set!";
CV_Error(CV_StsError, error_message);
}
// Get the height from the first image. We'll need this
// later in code to reshape the images to their original
// size:
int height = images[0].rows;
// The following lines simply get the last images from
// your dataset and remove it from the vector. This is
// done, so that the training data (which we learn the
// cv::FaceRecognizer on) and the test data we test
// the model with, do not overlap.
Mat testSample = images[images.size() - 1];
int testLabel = labels[labels.size() - 1];
images.pop_back();
labels.pop_back();
// The following lines create an LBPH model for
// face recognition and train it with the images and
// labels read from the given CSV file.
//
// The LBPHFaceRecognizer uses Extended Local Binary Patterns
// (it's probably configurable with other operators at a later
// point), and has the following default values
//
//      radius = 1
//      neighbors = 8
//      grid_x = 8
//      grid_y = 8
//
// So if you want a LBPH FaceRecognizer using a radius of
// 2 and 16 neighbors, call the factory method with:
//
//      cv::createLBPHFaceRecognizer(2, 16);
//
// And if you want a threshold (e.g. 123.0) call it with its default values:
//
//      cv::createLBPHFaceRecognizer(1,8,8,8,123.0)
//
Ptr<FaceRecognizer> model = createLBPHFaceRecognizer();
model->train(images, labels);
// The following line predicts the label of a given
// test image:
int predictedLabel = model->predict(testSample);
//
// To get the confidence of a prediction call the model with:
//
//      int predictedLabel = -1;
//      double confidence = 0.0;
//      model->predict(testSample, predictedLabel, confidence);
//
string result_message = format("Predicted class = %d / Actual class = %d.", predictedLabel, testLabel);
cout << result_message << endl;
// Sometimes you'll need to get/set internal model data,
// which isn't exposed by the public cv::FaceRecognizer.
// Since each cv::FaceRecognizer is derived from a
// cv::Algorithm, you can query the data.
//
// First we'll use it to set the threshold of the FaceRecognizer
// to 0.0 without retraining the model. This can be useful if
// you are evaluating the model:
//
model->set("threshold", 0.0);
// Now the threshold of this model is set to 0.0. A prediction
// now returns -1, as it's impossible to have a distance below
// it
predictedLabel = model->predict(testSample);
cout << "Predicted class = " << predictedLabel << endl;
// Show some informations about the model, as there's no cool
// Model data to display as in Eigenfaces/Fisherfaces.
// Due to efficiency reasons the LBP images are not stored
// within the model:
cout << "Model Information:" << endl;
string model_info = format("\tLBPH(radius=%i, neighbors=%i, grid_x=%i, grid_y=%i, threshold=%.2f)",
model->getInt("radius"),
model->getInt("neighbors"),
model->getInt("grid_x"),
model->getInt("grid_y"),
model->getDouble("threshold"));
cout << model_info << endl;
// We could get the histograms for example:
vector<Mat> histograms = model->getMatVector("histograms");
// But should I really visualize it? Probably the length is interesting:
cout << "Size of the histograms: " << histograms[0].total() << endl;
return 0;
}
#include "opencv2/core/core.hpp"
#include "opencv2/contrib/contrib.hpp"
#include "opencv2/highgui/highgui.hpp"
#include <iostream>
#include <fstream>
#include <sstream>
usingnamespace cv;
usingnamespace std;
staticvoid read_csv(const string& filename, vector<Mat>& images, vector<int>& labels, char separator =';') {
std::ifstream file(filename.c_str(), ifstream::in);
if (!file) {
string error_message ="No valid input file was given, please check the given filename.";
CV_Error(CV_StsBadArg, error_message);
}
string line, path, classlabel;
while (getline(file, line)) {
stringstream liness(line);
getline(liness, path, separator);
getline(liness, classlabel);
if(!path.empty()&&!classlabel.empty()) {
images.push_back(imread(path, 0));
labels.push_back(atoi(classlabel.c_str()));
}
}
}
int main(int argc, constchar*argv[]) {
if (argc !=2) {
cout <<"usage: "<< argv[0]<<" <csv.ext>"<< endl;
exit(1);
}
string fn_csv = string(argv[1]);
vector<Mat> images;
vector<int> labels;
try {
read_csv(fn_csv, images, labels);
} catch (cv::Exception& e) {
cerr <<"Error opening file \""<< fn_csv <<"\". Reason: "<< e.msg << endl;
// nothing more we can do
exit(1);
}
if(images.size()<=1) {
string error_message ="This demo needs at least 2 images to work. Please add more images to your data set!";
CV_Error(CV_StsError, error_message);
}
int height = images[0].rows;
Mat testSample = images[images.size() -1];
int testLabel = labels[labels.size() -1];
images.pop_back();
labels.pop_back();
// TLBPHFaceRecognizer 使用了扩展的LBP
// 在其他的算子中他可能很容易被扩展
// 下面是默认参数
// radius = 1
// neighbors = 8
// grid_x = 8
// grid_y = 8
//
// 如果你要创建 LBPH FaceRecognizer 半径是2,16个邻域
// cv::createLBPHFaceRecognizer(2, 16);
//
// 如果你需要一个阈值,并且使用默认参数:
// cv::createLBPHFaceRecognizer(1,8,8,8,123.0)
//
Ptr<FaceRecognizer> model = createLBPHFaceRecognizer();
model->train(images, labels);
int predictedLabel = model->predict(testSample);
// int predictedLabel = -1;
// double confidence = 0.0;
// model->predict(testSample, predictedLabel, confidence);
//
string result_message = format("Predicted class = %d / Actual class = %d.", predictedLabel, testLabel);
cout << result_message << endl;
// 有时你需要设置或者获取内部数据模型,
// 他不能被暴露在 cv::FaceRecognizer类中.
//
// 首先我们对FaceRecognizer的阈值设置到0.0,而不是重写训练模型
// 当你重新估计模型时很重要
//
model->set("threshold",0.0);
predictedLabel = model->predict(testSample);
cout <<"Predicted class = "<< predictedLabel << endl;
// 由于确保高效率,LBP图没有被存储在模型里面。D
cout <<"Model Information:"<< endl;
string model_info = format("\tLBPH(radius=%i, neighbors=%i, grid_x=%i, grid_y=%i, threshold=%.2f)",
model->getInt("radius"),
model->getInt("neighbors"),
model->getInt("grid_x"),
model->getInt("grid_y"),
model->getDouble("threshold"));
cout << model_info << endl;
// 我们可以获取样本的直方图:
vector<Mat> histograms = model->getMatVector("histograms");
// 我需要现实它吗? 或许它的长度才是我们感兴趣的:
cout <<"Size of the histograms: "<< histograms[0].total()<< endl;
return0;
}参考文献: http://docs.opencv.org/2.4/modules/contrib/doc/facerec/facerec_tutorial.html
http://www.cnblogs.com/guoming0000/archive/2012/09/27/2706019.html

相关文章推荐
- 使用OpenCV进行人脸识别的三种算法(官方网翻译)
- Java使用OpenCV进行人脸识别
- opencv3.0使用Eigen方法进行人脸识别的方法
- 使用OpenCV进行人脸检测(Viola-Jones人脸检测方法)
- 用opencv自带的haar方法进行人脸识别并切割
- 怎样使用OpenCV进行人脸识别
- 怎样使用OpenCV进行人脸识别 [停止更新]
- python使用opencv进行人脸识别
- 使用OpenCV+PCA+KNN/SVM进行人脸检测和识别-Python
- 怎样使用OpenCV进行人脸识别
- 利用OpenCV的Haar特征目标检测方法进行人脸识别的尝试(一)
- 怎样使用OpenCV进行人脸识别
- 使用opencv进行人脸识别
- 使用opencv进行人脸识别
- 怎样使用OpenCV进行人脸识别
- 怎样使用OpenCV进行人脸识别 [停止更新]
- OpenCV 使用FaceRecognizer类来进行人脸识别
- OpenCV中使用Eigenfaces 或 Fisherfaces进行人脸识别
- OpenCV学习记录(一):使用haar分类器进行人脸识别 标签: opencv脸部识别c++ 2017-07-03 15:59 26人阅读
- python使用opencv进行人脸识别