Android基础02--Android布局
2016-10-05 23:19
176 查看
Android应用软件的文件目录结构:
1. src文件夹:java源代码2. gen目录:自动生成的文件夹 ,里面保存的是res资源文件的引用
3. android4.1.2 代表的是引用的jar包
4. libs文件夹: 代码的三方jar包。会自动的被添加到dependencies目录下
5. android dependencies 开发依赖的jar包
6. bin: 编译生成的临时文件和二进制文件
7. res目录
- drawable-ldpi low 低分辨率 小图
- drawable-mdpi middle 中等分辨率
- drawable-hdpi high高分辨率
- drawable-xhdpi x加大高分辨率
- drawable-xxhdpi 加大再加大的分辨率
- layout 用xml文件编写的布局
- menu 菜单文件夹
8. AndroidManifest.xml:清单文件,配置应用程序的版本,图标,名称等重要信息。
Android常见布局:
常用的五大布局:线性布局(LinearLayout):按照垂直或者水平方向布局的组件。
帧布局(FrameLayout):组件从屏幕左上方布局组件。
表格布局(TableLayout):按照行列方式布局组件。
相对布局(RelativeLayout):相对其它组件的布局方式。
绝对布局(AbsoluteLayout):按照绝对坐标来布局组件。
1.线性布局:
线性布局是Android开发中最常见的一种布局方式,它是按照垂直或者水平方向来布局,通过“android:orientation”属性可以设置线性布局的方向。属性值有垂直(vertical)和水平(horizontal)两种。
常用的属性:
android:orientation:可以设置布局的方向
android:gravity:用来控制组件的对齐方式
layout_weight:控制各个组件在布局中的相对大小
示例:
实现这样的布局可以使用线性布局,代码如下:
<LinearLayout xmlns:android="http://schemas.android.com/apk/res/android"
xmlns:tools="http://schemas.android.com/tools"
android:layout_width="match_parent"
android:layout_height="match_parent"
android:orientation="vertical"
tools:context=".MainActivity" >
<Button
android:layout_width="match_parent"
android:layout_height="wrap_content"
android:background="#00f"
android:text="按钮1"
/>
<Button
android:layout_width="match_parent"
android:layout_height="wrap_content"
android:background="#ff0"
android:text="按钮2"
/>
<Button
android:layout_width="match_parent"
android:layout_height="wrap_content"
android:background="#f0f"
android:text="按钮3"
/>
</LinearLayout>
2. 帧布局
帧布局是从屏幕的左上角(0,0)坐标开始布局,多个组件层叠排列,第一个添加的组件放到最底层,最后添加到框架中的视图显示在最上面。上一层的会覆盖下一层的控件。
示例:
代码:
<FrameLayout xmlns:android="http://schemas.android.com/apk/res/android"
xmlns:tools="http://schemas.android.com/tools"
android:layout_width="match_parent"
android:layout_height="match_parent"
tools:context=".MainActivity" >

<TextView
android:layout_width="300dp"
android:layout_height="300dp"
android:background="#00BFFF"
/>
<TextView
android:layout_width="260dp"
android:layout_height="260dp"
android:background="#FFC0CB"
/>
<TextView
android:layout_width="220dp"
android:layout_height="220dp"
android:background="#0000FF"
/>
</FrameLayout>
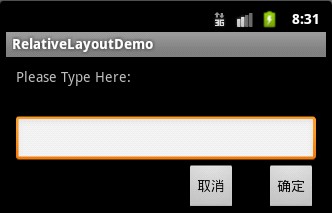
相对布局:
相对布局是按照组件之间的相对位置来布局,比如在某个组件的左边,右边,上面和下面等。
实例:
代码:
<?xml version="1.0" encoding="utf-8"?>
<RelativeLayout xmlns:android="http://schemas.android.com/apk/res/android"
android:layout_width="fill_parent"
android:layout_height="wrap_content"
android:padding="10px"
>
<TextView
android:id="@+id/tev1"
android:layout_width="wrap_content"
android:layout_height="wrap_content"
android:layout_marginBottom="30dp"
android:text="Please Type Here:"
/>
<EditText
android:id="@+id/tx1"
android:layout_width="match_parent"
android:layout_height="wrap_content"
android:layout_below="@id/tev1"
/>
<Button
android:id="@+id/btn1"
android:layout_height="wrap_content"
android:layout_width="wrap_content"
android:layout_below="@id/tx1"
android:layout_alignParentRight="true"
android:text="确定"
/>
<Button
android:id="@+id/btn2"
android:layout_height="wrap_content"
android:layout_width="wrap_content"
android:layout_below="@id/tx1"
android:layout_toLeftOf="@id/btn1"
android:layout_marginRight="30dp"
android:text="取消"
/>
</RelativeLayout>
绝对布局:
绝对布局通过指定子组件的确切X,Y坐标来确定组件的位置,在Android2.0 API文档中标明该类已经过期,可以使用FrameLayout或者RelativeLayout来代替。所以这里不再详细介绍。
表格布局:
表格布局是一个ViewGroup以表格显示它的子视图(view)元素,即行和列标识一个视图的位置。
表格布局常用的属性如下:
android:collapseColumns:隐藏指定的列
android:shrinkColumns:收缩指定的列以适合屏幕,不会挤出屏幕
android:stretchColumns:尽量把指定的列填充空白部分
android:layout_column:控件放在指定的列
android:layout_span:该控件所跨越的列数
实例:

代码:
<?xml version="1.0" encoding="utf-8"?>
<TableLayout xmlns:android="http://schemas.android.com/apk/res/android"
android:layout_width="fill_parent"
android:layout_height="fill_parent"
>
<TableRow>
<Button
android:text="Button1"
/>
<Button
android:text="Button2"
/>
<Button
android:text="Button3"
/>
</TableRow>
<TableRow>
<Button
android:text="Button4"
/>
<Button
android:layout_span="2"
android:text="Button5"
/>
</TableRow>
</TableLayout>
文章借鉴了该前辈的文章:文章出处

相关文章推荐
- 【Android核心基础02】 - 界面布局、测试、数据存储访问、权限控制、XML
- 【Android基础笔记02】 API Guide学习和常用布局及基本UI控件
- Android基础教程之五大布局对象
- Android基础之LinearLayout与RelativeLayout的布局属性
- Android基础之UI布局篇(待完善)
- Android程序开发基础之——页面布局
- android基础知识03——事件处理02:事件流顺序
- Android基础教程(二)之五大布局对象---FrameLayout,LinearLayout ,AbsoluteLayout,RelativeLayout,TableLayout.
- Android界面设计基础:控件焦点4个步骤_12点圆形布局
- 【android基础学习之八】——页面布局
- android布局基础及范例(二):人人android九宫格布局
- android开发基础知识(3) ---五大布局
- android2.2官方开发手册(02-01)-Declaring Layout-设计布局
- 可动态布局的Android抽屉之基础
- Android基础之UI布局和参数
- android布局之基础布局
- Android基础(六) ListView - 复杂布局
- Android基础之相关布局和参数
- 可动态布局的Android抽屉之基础
- android基础——界面布局(二) 线性布局