A Beginner Tutorial for Writing Simple COM/ATL DLL and Using it with .NET
2016-09-29 17:20
726 查看
Introduction
During discussions in forums, I come across many people who want to write COM/ATL DLL, but don't know how to create properties, methods or raise events from component or strive for fundamental knowledge to create them. For them, I had written this articlein VC++ 6.0. Since Visual Studio 6 is now out of support, many beginners requested me for the same article using Visual Studio 2005/2008 as there
is much GUI difference between the two.
So, I am presenting the same article using Visual Studio 2005 and as it’s a new article, I have to provide readers with something new, otherwise they will reject this article. .NET application is slowly eating into Visual C++ share of applications. So to follow
popular demand, I will show how to use COM component in .NET application instead of Unmanaged Application. As it is a beginner article, I am included a few extra screenshots in the article. Please don't
flame for using the same.
Table of Contents
Creating ATL ComponentUsing it in Visual C# Application (.NET 2005)
Creating ATL Component
Let us go step by step to create an ATL component in Visual Studio 2005:Open Visual Studio 2005, and Click on File| New | Project menu, which will show you the following File-Save
dialog box, where you can provide a name for your new project. Here I put the name as
SimpleATLComand
it is advisable to choose the destination folder, where you want to create your project, otherwise it will clutter your Document Folder. Press OK to confirm your changes. This will create a blank ATL
component.
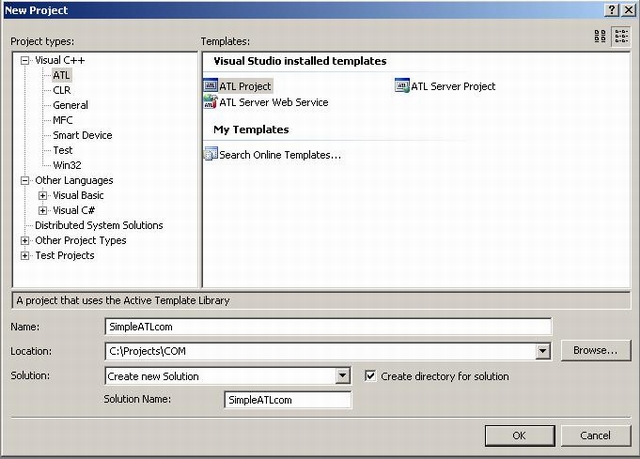
Figure 1: File Open Dialog
Now, in the next dialog box (ATL Project wizard), choose default setting and press Finish. If you need MFC Support, check Support MFC checkbox.

Figure 2: ATL Project Wizard
Now insert ATL Object in Project which I will show in the next step.
Choose Project | Add Class. The following dialog box will appear:

Figure 3: Add Simple ATL Object
Choose ATL|ATL Simple Object and Press ADD button.
Enter new Interface name in ATL Simple Object Wizard. You will see rest of the details are auto filled by Visual Studio development
environment when you begin typing the interface name. Also check the Connection Point check box in the Option Tab which provides component ability to fire events.

Figure 4: ATL Simple Object

Figure 5: Select Connection Point Check Box
Now if you check the following IDL (Interface Definition Language) will be generated and included into your project:
Hide Shrink
Copy
Code
1.    // SimpleATLcom.idl : IDL source for SimpleATLcom
2.    //
3.    // This file will be processed by the MIDL tool to
4.    // produce the type library (SimpleATLcom.tlb) and marshalling code.
5.
6.    import "oaidl.idl";
7.    import "ocidl.idl";
8.
9.    [
10.     object,
11.     uuid(8F4FEC76-F1F6-4D69-A2E8-FFF4F316C101),
12.     dual,
13.     nonextensible,
14.     helpstring("ISimpleCom Interface"),
15.     pointer_default(unique)
16.   ]
17.   interface ISimpleCom : IDispatch{
18.    };
19.    [
20.    uuid(2CA18A17-D157-4D1E-A2C7-3D69EBD87250),
21.    version(1.0),
22.    helpstring("SimpleATLcom 1.0 Type Library")
23.    ]
24.    Library SimpleATLcomLib
25.    {
26.      importlib("stdole2.tlb");
27.      [
28.        uuid(85D35B5B-8DBF-4562-96B0-66A4C4718DD5),
29.         helpstring("_ISimpleComEvents Interface")
30.      ]
31       dispinterface _ISimpleComEvents
32        {
33.         properties:
34.         methods:
35.      };
36.      [
37.        uuid(A7657FC5-D63C-49C3-AEE5-D8799F412C74),
38.        helpstring("SimpleCom Class")
39.      ]
40.       coclass SimpleCom
41.       {
42          [default] interface ISimpleCom;
43.         [default, source] dispinterface _ISimpleComEvents;
44.       };
45.    };
At Line 11: This is default UUID (Unique ID) generated by Dev environment, this makes the component uniquely identifiable.
At line 17: That’s our component name and UUID, its contents can be used to uniquely identify a component, you can use this id to create component.
At Line 31: Our dis-interface i.e. event function.
Now Add Property and method using Add Property and Add Method Wizard. This can be found in class view, right click on ISimpleCom interface
then ADD->Add Method or Add Property:

Figure 6: Add Method/Add Property
Add method Calculate with Long as OUT, RETVAL parameter like this:

Figure 7: Add Method
Add Property ComMark of type Long as shown in the example:

Figure 8: Add Property
Similarly add property AtlMarks as long and StudentName as BSTR yourself.
Sorry I forgot to mention about IN, OUT and RETVAL type in parameter.
Propget– stands for property
for getting the value from Component
PropPut– stands for property
for putting property to Component. This can be optional and if you remove it, this can make your property readonly
Method— simple function to
perform some calculation
[in]- means data is going
in or you are putting some value to Component
[out,retval]- Notation states
that argument using this will return with data
HRESULT- Standard Error reporting
variable
Now add Event almost in the same way, we add method in interface. Now right click on
_ISimpleComEventsand
Add | Add method.

Figure 9: Add Event
Once everything is done, modified IDL File would look like this:
Hide Copy Code
1.  interface ISimpleCom : IDispatch
2.  {
3.   [id(1), helpstring("method Calculate")] HRESULT Calculate([out,retval]
4.           LONG* a_lTotalMarks);
5.   [propget, id(2), helpstring("property ComMarks")] HRESULT ComMarks([out,
6.           retval] LONG* pVal);
7.   [propput, id(2), helpstring("property ComMarks")] HRESULT ComMarks([in]
8.            LONG newVal);
9.   [propget, id(3), helpstring("property AtlMarks")] HRESULT AtlMarks([out,
10.            retval] LONG* pVal);
11.  [propput, id(3), helpstring("property AtlMarks")] HRESULT AtlMarks([in]
12.            LONG newVal);
13.  [propget, id(4), helpstring("property StudentName")]
HRESULT StudentName([out,
14.            retval] BSTR* pVal);
15.  [propput, id(4), helpstring("property StudentName")]
HRESULT StudentName([in]
16.            BSTR newVal);
17.  };
18.
19.  dispinterface _ISimpleComEvents
20.  {
21.    properties:
22.    methods:
23.    [id(1), helpstring("method TotalMarks")] HRESULT TotalMarks([in] LONG
24.            a_lTotalMark);
25.  };
Now add connection points into the main interface. For adding it, right click on CSimpleCom and clickADD | Add Connection Point. The
following screenshot will appear:

Figure 10: Chose Add Connection Point
Choose > button to move _ISimpleComEvents source interface to implement connection point and click on finish. A new function Fire_TotalMarks is
added to CSimpleCom class which can be used to raise event.

Figure 11: Add Connection Wizard
Now code all properties and functions present in
CSimpleComclass,
i.e. Add Class Variable for
ComMarks,
ATLMarksand
StudentNamefor
storing information coming from the outer world. After coding, our class would look like this:
Hide Shrink
Copy
Code
1.   //// Declare following private variable in Header File
2.  long m_lComMarks,m_lAtlMarks;
3.      CComBSTR m_bstName;
4.
5.  ////  Source File
6.  STDMETHODIMP CSimpleCom::Calculate(LONG* a_lTotalMarks)
7.  {
8.    long lTotalMarks = m_lAtlMarks + m_lComMarks;
9.    * a_lTotalMarks = lTotalMarks;
10.       Fire_TotalMarks(lTotalMarks); //Fire Event
11.       return S_OK;
12. }
13. /// Return Com marks
14. STDMETHODIMP CSimpleCom::get_ComMarks(LONG* pVal)
15. {
16.     * pVal = m_lComMarks;
17.     return S_OK;
18.     }
19. // Store Com Marks in Local Storage
20. STDMETHODIMP CSimpleCom::put_ComMarks(LONG newVal)
21. {
22.     m_lComMarks = newVal;
23.     return S_OK;
24. }
25. // return ATL Marks
26. STDMETHODIMP CSimpleCom::get_AtlMarks(LONG* pVal)
27. {
28.  * pVal = m_lAtlMarks;
29.  return S_OK;
30.  }
31. //Store ATL marks in local storage
32. STDMETHODIMP CSimpleCom::put_AtlMarks(LONG newVal)
33. {
34.  m_lAtlMarks = newVal;
35.  return S_OK;
36. }
37.  //return Student Name
38. STDMETHODIMP CSimpleCom::get_StudentName(BSTR* pVal)
39. {
40.  *pVal = m_bstName.Copy();
41.  return S_OK;
42. }
43. //Store Student name in local Storage.
44. STDMETHODIMP CSimpleCom::put_StudentName(BSTR newVal)
45. {
46.  m_bstName = newVal;
47.  return S_OK;
48. }
Now Build the solution, your DLL would be registered automatically, when the build process is over.
Using it in Visual C# Application
Now again move forward step by step to create a project in C#.NET and include support of COM component in project.Add a new C# Window application Project (
SimpleATLcomTest)
in the same solution and click to accept default configuration to create a test project.

Figure 12: Add a New C# Project
Design the interface as shown in the screenshot given below; add three
Textboxes
for putting values into the Component and four boxes for retrieving all values including the calculated value.

Figure 13: Test Application Design
Now, add a reference for SimpleATLCom.dll into your project, by right clicking on Project name and clicking on Add Reference menu item.

Figure 14: Add Reference Menu
Click on COM Tab item and select SimpleATLCom.dll to add reference of Component into the project.

Figure 15: Add Reference
Now, write the following code to use the component into your project.
Hide Shrink
Copy
Code
1.  // Include SimpleAtlComLib
2.  using SimpleATLcomLib;
3.  namespace SimpleAtlComTest
4.  {
5.  public partial class SimpleATLCom : Form
6.  {
7.  // Create Object of Main Component Interface
8.  ISimpleCom objSimpleCom = new SimpleComClass();
9.  // Also declare Event variable
10. _ISimpleComEvents_Event event1 = null;
11. public SimpleATLCom()
12. {
13. InitializeComponent();
14. // Initialize event1 variable with object of simplecom
15. event1 = (_ISimpleComEvents_Event)objSimpleCom;
16.
17. // Add Event to listen event raised by Component
18. event1.TotalMarks += new _ISimpleComEvents_TotalMarksEventHandler
(ISimpleCom_TotalMarksEvent);
19.
20. }
21. // this function will put the values back to Component
22. private void btnPutValues_Click(object sender, EventArgs e)
23. {
24. objSimpleCom.AtlMarks = int.Parse(txtPATLMarks.Text);
25. objSimpleCom.ComMarks = int.Parse(txtPComMarks.Text);
26. objSimpleCom.StudentName = txtPName.Text;
27. }
28. // this function will bring values stored into Component
29. // and populate into TextBox present on Form
30. private void btnGetDetails_Click(object sender, EventArgs e)
31. {
32. txtGAtlMarks.Text = objSimpleCom.AtlMarks.ToString();
33. txtGComMarks.Text = objSimpleCom.ComMarks.ToString();
34. txtGName.Text = objSimpleCom.StudentName;
35. objSimpleCom.Calculate();
36. }
37. // this Event will called, when invoke method Calculate
// of simpleATLCom.
38. void ISimpleCom_TotalMarksEvent(int lTotalMarks)
39. {
40. txtTotalMarks.Text = lTotalMarks.ToString();
41. MessageBox.Show("Total Marks is " + txtTotalMarks.Text);
42. }
43. }
44. }
Run the Test application, and you will see the result:

Figure 16: Running Application

相关文章推荐
- iOS常用代码
- Linux 开发板4G转WiFi热点 手机连接热点上网(一 思路)
- JQ--transform旋转焦点轮播图
- Ionic— Cordova 插件开发
- centos6.8 下面设置硬件时间等于UTC或者本地时间
- Terminator快捷键汇总
- 键盘事件keydown、keypress、keyup随笔整理总结
- Lambda表达式使用汇总
- 关于将post方式提交的数据转换成javabean来拿取数据
- Java中编译期、运行期、堆内存和栈内存详解
- Android 6.0 https 访问报错
- hihocoder1386 Pick Your Players(dp)
- php-fpm参数调优
- 安装openssh 到 am5728 板子上
- 不常见的数学函数
- 【Bash百宝箱】shell历史命令(history)
- 程序员的技术崇拜
- Launcher中WorkSpace图标的位置固定
- linux中shell变量$#,$@,$0,$1,$2的含义解释
- jquery根据id取不到textarea对象,无法给textarea赋值