RecyclerView自定义LayoutManager,打造不规则布局
2016-09-27 01:19
363 查看
本文已授权微信公众号:鸿洋(hongyangAndroid)在微信公众号平台原创首发。
当然了, 效果不是很优雅, 主要是配色问题, 配色都是随机的, 所以肯定没有UI上好看. 原始需求是一个死的布局, 当然用自定义View的形式可以完成, 但是我认为那样不利于扩展, 例如效果图上的从每组3个变成每组9个, 还有一点很重要, 就是用
定义完成后, android studio会提醒我们去实现一下
这样, 其实一个最简单的
ok, 在完成准备工作后, 我们就开始着手准备进行item的布局操作了, 在
这里的代码很长, 我们一点点的来分析, 首先一个
接下来我们通过一下代码来获取第一个item view并测量它.
为什么只测量第一个view呢? 这里是因为在我们的这个效果中所有的item大小都是一样的, 所以我们只要获取第一个的大小, 就知道所有的item的大小了. 另外还有个方法
继续代码
这两句主要是来获取每一组中第一行和第二行中item的个数.
这几行代码的作用是
接下来的一个
再往下, 我们记录了item的总宽度和总高度, 并且调用了
在这里面, 我们首先定义了一个
接下来, 我们通过
ok, 继续代码, 又一个for循环, 这里是循环的
好了, 我们来回顾一下这个
现在我们来到
然后大家就可以看到上面的效果了, 高兴ing… 不过手指在屏幕上滑动的一瞬间, 高兴就会变成纳闷了. 纳尼? 怎么不能滑动呢? 好吧, 是因为我们的
同样的, 因为我们的
我们先来看看竖直方向上的滑动处理.
第一个方法返回true代表着可以在这个方法进行滑动, 我们主要是来看第二个方法.
首先我们还是先调用
这里面的逻辑还算简单, 横向滑动的处理逻辑也相同, 下面给出代码, 就不再赘述了.
ok, 现在我们再次运行程序, 发现
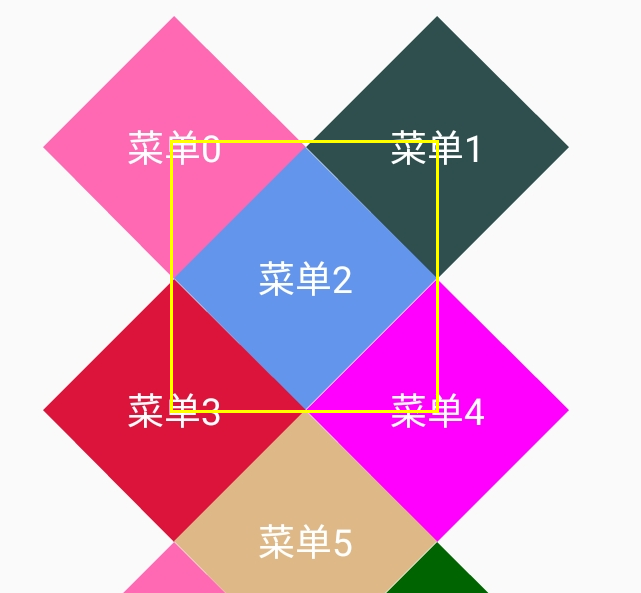
大家看黄色框部分, 其实第三个view的布局是在黄色框里面的, 那如果我们点击第一个view的黄色框里面的区域是不是就点击到第三个view上了? 而我们的感觉确是点击在了第一个上, 所以一个普通的view在这里是不适用的. 根据这个问题, 我们再来想想自定义这个view的思路, 是不是
下面我们根据这个思路来实现这么个view.
代码并不长, 首先我们通过
我们还是重点来关注一下
通过上面的分析, 我们发现其实重点是在
判断点是不是在某一个区域内, 我们是通过
到现在为止, 整体的效果我们已经实现完成了, 而且点击事件我们处理的也非常棒, 如果大家有这种需求, 可以直接copy该代码使用, 如果没有就当让大家来熟悉一下如何自定义
参考链接: https://github.com/hehonghui/android-tech-frontier/
最后给出github地址: https://github.com/qibin0506/CardLayoutManager
RecyclerView的时代
自从google推出了RecyclerView这个控件, 铺天盖地的一顿叫好, 开发者们也都逐渐从
ListView,
GridView等控件上转移到了
RecyclerView上, 那为什么
RecyclerView这么受开发者的青睐呢? 一个主要的原因它的高灵活性, 我们可以自定义点击事件, 随意切换显示方式, 自定义item动画, 甚至连它的布局方式我们都可以自定义.
吐吐嘈
夸完了RecyclerView, 我们再来吐槽一下大家在工作中各种奇葩需求, 大家在日常工作中肯定会遇到各种各种的奇葩需求, 这里没就包括奇形怪状的需求的UI. 站在我们开发者的角度, 看到这些奇葩的UI, 心中无数只草泥马呼啸崩腾而过, 在愤愤不平的同时还不得不老老实实的去找解决方案… 好吧, 吐槽这么多, 其实大家都没有错, 站在开发者的角度, 这样的需求无疑增加了我们很多工作量, 不加班怎么能完成? 但是站在老板的角度, 他也是希望将产品做好, 所以才会不断的思考改需求.
效果展示
开始进入正题, 今天我们的主要目的还是来自定义一个LayoutManager, 实现一个奇葩的UI, 这样的一个布局我也是从我的一个同学的需求那看到的, 我们先来看看效果.
当然了, 效果不是很优雅, 主要是配色问题, 配色都是随机的, 所以肯定没有UI上好看. 原始需求是一个死的布局, 当然用自定义View的形式可以完成, 但是我认为那样不利于扩展, 例如效果图上的从每组3个变成每组9个, 还有一点很重要, 就是用
RecyclerView我们还得轻松的利用
View的复用机制. 好了, UI我们就先介绍到这, 下面我们开始一步步的实现这个效果.
自定义LayoutManager
前面说了, 我们这个效果是利用自定义RecyclerView的
LayoutManager实现的, 所以, 首先我们要准备一个类让它继承
RecyclerView.LayoutManager.
public class CardLayoutManager extends RecyclerView.LayoutManager {}定义完成后, android studio会提醒我们去实现一下
RecyclerView.LayoutManager里的一个抽象方法,
public class CardLayoutManager extends RecyclerView.LayoutManager {
@Override
public RecyclerView.LayoutParams generateDefaultLayoutParams() {
return new RecyclerView.LayoutParams(ViewGroup.LayoutParams.WRAP_CONTENT,
ViewGroup.LayoutParams.WRAP_CONTENT);
}
}
这样, 其实一个最简单的
LayoutManager我们就完成了, 不过现在在界面上是什么也没有的, 因为我们还没有对item view进行布局. 在开始布局之前, 还有几个参数需要我们从构造传递, 一个是每组需要显示几个, 一个当每组的总宽度小于
RecyclerView总宽度的时候是否要居中显示, 来重写一下构造方法.
public class CardLayoutManager extends RecyclerView.LayoutManager {
public static final int DEFAULT_GROUP_SIZE = 5;
// ...
public CardLayoutManager(boolean center) {
this(DEFAULT_GROUP_SIZE, center);
}

public CardLayoutManager(int groupSize, boolean center) {
mGroupSize = groupSize;
isGravityCenter = center;
mItemFrames = new Pool<>(new Pool.New<Rect>() {
@Override
public Rect get() { return new Rect();}
});
}
// ...
}
ok, 在完成准备工作后, 我们就开始着手准备进行item的布局操作了, 在
RecyclerView.LayoutManager中布局的入口是一个叫
onLayoutChildren的方法. 我们来重写这个方法.
@Override
public void onLayoutChildren(RecyclerView.Recycler recycler, RecyclerView.State state) {
if (getItemCount() <= 0 || state.isPreLayout()) { return;}

detachAndScrapAttachedViews(recycler);
View first = recycler.getViewForPosition(0);
measureChildWithMargins(first, 0, 0);
int itemWidth = getDecoratedMeasuredWidth(first);
int itemHeight = getDecoratedMeasuredHeight(first);

int firstLineSize = mGroupSize / 2 + 1;
int secondLineSize = firstLineSize + mGroupSize / 2;
if (isGravityCenter && firstLineSize * itemWidth < getHorizontalSpace()) {
mGravityOffset = (getHorizontalSpace() - firstLineSize * itemWidth) / 2;
} else {
mGravityOffset = 0;
}

for (int i = 0; i < getItemCount(); i++) {
Rect item = mItemFrames.get(i);
float coefficient = isFirstGroup(i) ? 1.5f : 1.f;
int offsetHeight = (int) ((i / mGroupSize) * itemHeight * coefficient);

// 每一组的第一行
if (isItemInFirstLine(i)) {
int offsetInLine = i < firstLineSize ? i : i % mGroupSize;
item.set(mGravityOffset + offsetInLine * itemWidth, offsetHeight, mGravityOffset + offsetInLine * itemWidth + itemWidth,
itemHeight + offsetHeight);
}else {
int lineOffset = itemHeight / 2;
int offsetInLine = (i < secondLineSize ? i : i % mGroupSize) - firstLineSize;
item.set(mGravityOffset + offsetInLine * itemWidth + itemWidth / 2,
offsetHeight + lineOffset, mGravityOffset + offsetInLine * itemWidth + itemWidth  + itemWidth / 2,
itemHeight + offsetHeight + lineOffset);
}
}

mTotalWidth = Math.max(firstLineSize * itemWidth, getHorizontalSpace());
int totalHeight = getGroupSize() * itemHeight;
if (!isItemInFirstLine(getItemCount() - 1)) { totalHeight += itemHeight / 2;}
mTotalHeight = Math.max(totalHeight, getVerticalSpace());
fill(recycler, state);
}
这里的代码很长, 我们一点点的来分析, 首先一个
detachAndScrapAttachedViews方法, 这个方法是
RecyclerView.LayoutManager的, 它的作用是将界面上的所有item都detach掉, 并缓存在scrap中,以便下次直接拿出来显示.
接下来我们通过一下代码来获取第一个item view并测量它.
View first = recycler.getViewForPosition(0);
measureChildWithMargins(first, 0, 0);
int itemWidth = getDecoratedMeasuredWidth(first);
int itemHeight = getDecoratedMeasuredHeight(first);
为什么只测量第一个view呢? 这里是因为在我们的这个效果中所有的item大小都是一样的, 所以我们只要获取第一个的大小, 就知道所有的item的大小了. 另外还有个方法
getDecoratedMeasuredWidth, 这个方法是什么意思? 其实类似的还有很多, 例如
getDecoratedMeasuredHeight,
getDecoratedLeft… 这个
getDecoratedXXX的作用就是获取该view以及他的
decoration的值, 大家都知道
RecyclerView是可以设置
decoration的.
继续代码
int firstLineSize = mGroupSize / 2 + 1;
int secondLineSize = firstLineSize + mGroupSize / 2;
这两句主要是来获取每一组中第一行和第二行中item的个数.
if (isGravityCenter && firstLineSize * itemWidth < getHorizontalSpace()) {
mGravityOffset = (getHorizontalSpace() - firstLineSize * itemWidth) / 2;
} else {
mGravityOffset = 0;
}
这几行代码的作用是
当设置了isGravityCenter为true, 并且每组的宽度小于recyclerView的宽度时居中显示.
接下来的一个
if...else...在if中的是判断当前item是否在它所在组的第一行. 为什么要加这个判断? 大家看效果就知道了, 因为第二行的view的起始会有一个二分之一的item宽度的偏移, 而且相对于第一行, 第二行的高度是偏移了二分之一的item高度. 至于这里面具体的逻辑大家可以对照着效果图去看代码, 这里就不一一解释了.
再往下, 我们记录了item的总宽度和总高度, 并且调用了
fill方法, 其实在这个
onLayoutChildren方法中我们仅仅记录了所有的item view所在的位置, 并没有真正的去layout它, 那真正的layout肯定是在这个
fill方法中了,
private void fill(RecyclerView.Recycler recycler, RecyclerView.State state) {
if (getItemCount() <= 0 || state.isPreLayout()) { return;}
Rect displayRect = new Rect(mHorizontalOffset, mVerticalOffset,
getHorizontalSpace() + mHorizontalOffset,
getVerticalSpace() + mVerticalOffset);

// Rect rect = new Rect();
// for (int i = 0; i < getChildCount(); i++) {
// View item = getChildAt(i);
// rect.left = getDecoratedLeft(item);
// rect.top = getDecoratedTop(item);
// rect.right = getDecoratedRight(item);
// rect.bottom = getDecoratedBottom(item);
// if (!Rect.intersects(displayRect, rect)) {
// removeAndRecycleView(item, recycler);
// }
// }

for (int i = 0; i < getItemCount(); i++) {
Rect frame = mItemFrames.get(i);
if (Rect.intersects(displayRect, frame)) {
View scrap = recycler.getViewForPosition(i);
addView(scrap);
measureChildWithMargins(scrap, 0, 0);
layoutDecorated(scrap, frame.left - mHorizontalOffset, frame.top - mVerticalOffset,
frame.right - mHorizontalOffset, frame.bottom - mVerticalOffset);
}
}
}
在这里面, 我们首先定义了一个
displayRect, 他的作用就是标记当前显示的区域, 因为
RecyclerView是可滑动的, 所以这个区域不能简单的是0~高度/宽度这么一个值, 我们还要加上当前滑动的偏移量.
接下来, 我们通过
getChildCount获取
RecyclerView中的所有子view, 并且依次判断这些view是否在当前显示范围内, 如果不再, 我们就通过
removeAndRecycleView将它移除并回收掉,
recycle的作用是回收一个view, 并等待下次使用, 这里可能会被重新绑定新的数据. 而
scrap的作用是缓存一个view, 并等待下次显示, 这里的view会被直接显示出来.
ok, 继续代码, 又一个for循环, 这里是循环的
getItemCount, 也就是所有的item个数, 这里我们依然判断它是不是在显示区域, 如果在, 则我们通过
recycler.getViewForPosition(i)拿到这个view, 并且通过
addView添加到
RecyclerView中, 添加进去了还没完, 我们还需要调用
measureChildWithMargins方法对这个view进行测量. 最后的最后我们调用
layoutDecorated对item view进行layout操作.
好了, 我们来回顾一下这个
fill方法都是干了什么工作, 首先是回收操作, 这保证了
RecyclerView的子view仅仅保留可显示范围内的那几个, 然后就是将这几个view进行布局.
现在我们来到
MainActivity中,
mRecyclerView = (RecyclerView) findViewById(R.id.list);
mRecyclerView.setLayoutManager(new CardLayoutManager(mGroupSize, true));
mRecyclerView.setAdapter(mAdapter);
然后大家就可以看到上面的效果了, 高兴ing… 不过手指在屏幕上滑动的一瞬间, 高兴就会变成纳闷了. 纳尼? 怎么不能滑动呢? 好吧, 是因为我们的
LayoutManager没有处理滑动操作, 是的, 滑动操作需要我们自己来处理…
让RecyclerView动起来
要想让RecyclerView能滑动, 我们需要重写几个方法.public boolean canScrollVertically() {}
public int scrollVerticallyBy(int dy, RecyclerView.Recycler recycler, RecyclerView.State state) {}同样的, 因为我们的
LayoutManager还支持横向滑动, 所以还有
public boolean canScrollHorizontally() {}
public int scrollHorizontallyBy(int dx, RecyclerView.Recycler recycler, RecyclerView.State state) {}
我们先来看看竖直方向上的滑动处理.
public boolean canScrollVertically() {
return true;
}

public int scrollVerticallyBy(int dy, RecyclerView.Recycler recycler, RecyclerView.State state) {
detachAndScrapAttachedViews(recycler);
if (mVerticalOffset + dy < 0) {
dy = -mVerticalOffset;
} else if (mVerticalOffset + dy > mTotalHeight - getVerticalSpace()) {
dy = mTotalHeight - getVerticalSpace() - mVerticalOffset;
}

offsetChildrenVertical(-dy);
fill(recycler, state);
mVerticalOffset += dy;
return dy;
}
第一个方法返回true代表着可以在这个方法进行滑动, 我们主要是来看第二个方法.
首先我们还是先调用
detachAndScrapAttachedViews将所有的子view缓存起来, 然后一个
if...else...判断是做边界检测, 接着我们调用
offsetChildrenVertical来做偏移, 主要代码中这里的参数, 是对
scrollVerticallyBy取反, 因为在
scrollVerticallyBy参数中这个
dy在我们手指往左滑动的时候是正值, 可能是google感觉这个做更加直观吧. 接着我们还是调用
fill方法来做新的子view的布局, 最后我们记录偏移量并返回.
这里面的逻辑还算简单, 横向滑动的处理逻辑也相同, 下面给出代码, 就不再赘述了.
public boolean canScrollHorizontally() {
return true;
}

public int scrollHorizontallyBy(int dx, RecyclerView.Recycler recycler, RecyclerView.State state) {
detachAndScrapAttachedViews(recycler);
if (mHorizontalOffset + dx < 0) {
dx = -mHorizontalOffset;
} else if (mHorizontalOffset + dx > mTotalWidth - getHorizontalSpace()) {
dx = mTotalWidth - getHorizontalSpace() - mHorizontalOffset;
}

offsetChildrenHorizontal(-dx);
fill(recycler, state);
mHorizontalOffset += dx;
return dx;
}
ok, 现在我们再次运行程序, 发现
RecyclerView真的可以滑动了. 到现在位置我们的自定义
LayoutManager已经实现了. 不过那个菱形咋办呢? 算了, 直接搞一张图片上去就行了. 其实刚开始我也是这么想的, 不过仔细想想, 一个普通的图片是有问题的. 我们还是要通过自定义view的方式去实现.
来搞一搞那个菱形
上面提到了, 那个菱形用图片是有问题的, 问题出在哪呢? 先来说答案吧: 点击事件. 说到这可能有些同学已经明白了, 也有一部分还在纳闷中… 我们来具体分析一下. 首先来张图.大家看黄色框部分, 其实第三个view的布局是在黄色框里面的, 那如果我们点击第一个view的黄色框里面的区域是不是就点击到第三个view上了? 而我们的感觉确是点击在了第一个上, 所以一个普通的view在这里是不适用的. 根据这个问题, 我们再来想想自定义这个view的思路, 是不是
只要我们在dispatchTouchEvent方法中来判断点击的位置是不是在那个菱形中, 如果不在就返回false, 让事件可以继续在RecyclerView往下分发就可以了?
下面我们根据这个思路来实现这么个view.
public class CardItemView extends View {

private int mSize;
private Paint mPaint;
private Path mDrawPath;
private Region mRegion;

public CardItemView(Context context) {
this(context, null, 0);
}

public CardItemView(Context context, AttributeSet attrs) {
this(context, attrs, 0);
}

public CardItemView(Context context, AttributeSet attrs, int defStyleAttr) {
super(context, attrs, defStyleAttr);
mPaint = new Paint(Paint.ANTI_ALIAS_FLAG);
mPaint.setStyle(Paint.Style.FILL);
TypedArray ta = context.obtainStyledAttributes(attrs, R.styleable.Card, defStyleAttr, 0);
mSize = ta.getDimensionPixelSize(R.styleable.Card_size, 10);
mPaint.setColor(ta.getColor(R.styleable.Card_bgColor, 0));
ta.recycle();

mRegion = new Region();
mDrawPath = new Path();

mDrawPath.moveTo(0, mSize / 2);
mDrawPath.lineTo(mSize / 2, 0);
mDrawPath.lineTo(mSize, mSize / 2);
mDrawPath.lineTo(mSize / 2, mSize);
mDrawPath.close();
}

@Override
protected void onMeasure(int widthMeasureSpec, int heightMeasureSpec) {
setMeasuredDimension(mSize, mSize);
}

@Override
public boolean dispatchTouchEvent(MotionEvent event) {
if (event.getAction() == MotionEvent.ACTION_DOWN) {
if (!isEventInPath(event)) { return false;}
}

return super.dispatchTouchEvent(event);
}

private boolean isEventInPath(MotionEvent event) {
RectF bounds = new RectF();
mDrawPath.computeBounds(bounds, true);
mRegion.setPath(mDrawPath, new Region((int)bounds.left,
(int)bounds.top, (int)bounds.right, (int)bounds.bottom));
return mRegion.contains((int) event.getX(), (int) event.getY());
}

@Override
protected void onDraw(Canvas canvas) {
canvas.drawColor(Color.TRANSPARENT);
canvas.drawPath(mDrawPath, mPaint);
}

public void setCardColor(int color) {
mPaint.setColor(color);
invalidate();
}
}
代码并不长, 首先我们通过
Path来规划好我们要绘制的菱形的路径, 然后在
onDraw方法中将这个
Path绘制出来, 这样, 那个菱形就出来了.
我们还是重点来关注一下
dispatchTouchEvent方法, 这个方法中我们通过一个
isEventInPath来判断是不是
DOWN事件发生在了菱形内, 如果不是则直接返回false, 不处理事件.
通过上面的分析, 我们发现其实重点是在
isEventInPath中, 这个方法咋写的呢?
private boolean isEventInPath(MotionEvent event) {
RectF bounds = new RectF();
mDrawPath.computeBounds(bounds, true);
mRegion.setPath(mDrawPath, new Region((int)bounds.left,
(int)bounds.top, (int)bounds.right, (int)bounds.bottom));
return mRegion.contains((int) event.getX(), (int) event.getY());
}
判断点是不是在某一个区域内, 我们是通过
Region来实现的, 首先我们通过
Path.computeBounds方法来获取到这个
path的边界, 然后通过
Region.contains来判断这个点是不是在该区域内.
到现在为止, 整体的效果我们已经实现完成了, 而且点击事件我们处理的也非常棒, 如果大家有这种需求, 可以直接copy该代码使用, 如果没有就当让大家来熟悉一下如何自定义
LayoutManager了.
参考链接: https://github.com/hehonghui/android-tech-frontier/
最后给出github地址: https://github.com/qibin0506/CardLayoutManager

相关文章推荐
- 《从入门到精通云服务器》-6
- 人为构建电子电路的本质
- Python新路程(3)Python中的注释等小TIPS
- WindowManger
- C盘根目录下只能创建文件夹不能新建文件的解决办法
- spring框架学习(一)
- 扩展欧几里得算法(不爽的裁判,uva 12169)
- [Angular2 Router] Programmatic Router Navigation via the Router API - Relative And Absolute Router Navigation
- Select removing dropdown arrow
- 前端知识框架总结
- 源计划--Tomcat计划(一)
- 1003. 中缀表达式转后缀表达式
- 20145313张雪纯《信息安全系统设计基础》第3周学习总结
- 基于struts2的文件上传下载
- Cocos2dx-3.x 中CCCamera相机类详解及源码分析
- 《从入门到精通云服务器》-4
- JDK8新特性
- JMeter学习-037-JMeter调试工具之四-BeanShell+jmeter.log
- Make autofill background transparent
- 《从入门到精通云服务器》-3