使用RemoteViews自定义通知栏样式 Notification
2016-09-23 17:01
387 查看
使用RemoteViews自定义通知栏样式
标签(空格分隔): 菜鸟Android
使用RemoteViews自定义通知栏样式
一普通通知栏
处理点击事件
二使用RemoteViews替换普通通知栏
处理点击事件
三RemoteViews如何更新View
一、普通通知栏
首先我们来演示一下最简单的通知发送方式val Activity.notificationManager: NotificationManager
get() = getSystemService(Context.NOTIFICATION_SERVICE) as NotificationManager
class MainActivity : AppCompatActivity() {
private var viewHolder = MainViewHolder()
override fun onCreate(savedInstanceState: Bundle?) {
super.onCreate(savedInstanceState)
setContentView(R.layout.activity_main)
viewHolder.bind(this)
//send是一个button
viewHolder.send?.setOnClickListener { view ->
sendNotification()
}
}
private fun sendNotification() {
val manager = notificationManager
val builder = NotificationCompat.Builder(this)
builder.setContentTitle("title").setContentText("text").setSmallIcon(R.drawable.ic_launcher)
.setDefaults(0)
.setAutoCancel(true)
val notification = builder.build()
manager.notify(0, notification)
}
}处理点击事件
假如我们想要点击通知消息之后处理某些事件,比如打开浏览器之类的,这里我们选择演示点击通知后使用浏览器打开我的博客主页val intent = Intent()
intent.action = "android.intent.action.VIEW"
val uri = Uri.parse("http://blog.csdn.net/qq_32583189/")
intent.data = uri
val pIntent = PendingIntent.getActivity(this, 0, intent, PendingIntent.FLAG_ONE_SHOT)
builder.setContentIntent(pIntent)二、使用RemoteViews替换普通通知栏
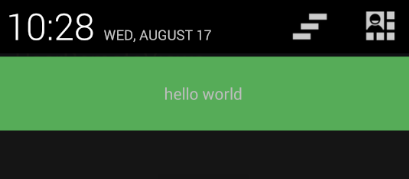
首先,我们要先定义一个用于在通知栏展示的布局文件<LinearLayout xmlns:android="http://schemas.android.com/apk/res/android" android:layout_width="match_parent" android:layout_height="match_parent" android:background="#56ac58" android:gravity="center" android:orientation="vertical"> <TextView android:id="@+id/tv" android:layout_width="match_parent" android:layout_height="100dp" android:gravity="center" android:text="hello world" /> </LinearLayout>
以下为修改后的发送通知的代码(注意:所有类型的通知都必须设置小图标)
private fun sendNotification() {
val manager = notificationManager
val builder = NotificationCompat.Builder(this)
val view = RemoteViews(packageName, R.layout.notification_layout)

builder.setSmallIcon(R.drawable.ic_launcher)
.setDefaults(0)
.setAutoCancel(true)
.setContent(view)
val notification = builder.build()
manager.notify(0, notification)
}
这是弹出的对话框的样子
处理点击事件
现在我们如何达到上述点击后打开浏览器的效果呢private fun sendNotification() {
val manager = notificationManager
val builder = NotificationCompat.Builder(this)
val view = RemoteViews(packageName, R.layout.notification_layout)
builder.setSmallIcon(R.drawable.ic_launcher)
.setDefaults(0)
.setAutoCancel(true)
.setContent(view)
val intent = Intent()
intent.action = "android.intent.action.VIEW"
val uri = Uri.parse("http://blog.csdn.net/qq_32583189/")
intent.data = uri
val pIntent = PendingIntent.getActivity(this, 0, intent, PendingIntent.FLAG_ONE_SHOT)
view.setOnClickPendingIntent(R.id.tv, pIntent)
val notification = builder.build()
manager.notify(0, notification)
}这里解释一下view.setOnClickPendingIntent(R.id.tv, pIntent)里面第一个参数的意思是该点击事件的接收控件,这里设置的是当TextView被点击的时候打开浏览器。
三、RemoteViews如何更新View
假如我们向每点通知后更新其中的UI应该怎么办?其实通知和我们的应用是两个不同的进程,也就是说通知和我们的进程的内存是不能共享的,而RemoteViews的作用就是用来跨进程发送View,所以我们不能通过直接操作通知栏的内存来修改View,只能通过RemoteViews提供的操作方法来更新这是更新后的java代码,注意此时需要将配置文件中的启动模式设计为单例模式
<activity android:launchMode="singleInstance">
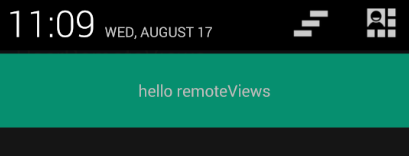
下面代码所做的工作就是当点击TextView的使用重新显示当前Activity并调用onNewIntent方法,于是就产生了两种效果,一种是Activity已经退出,此时重新打开Activity并不会调用onNewIntent方法所以显示的字仍是
Hello World,如果Activity没有退出,则会显示新字符串
hello remoteViews
val Activity.notificationManager: NotificationManager
get() = getSystemService(Context.NOTIFICATION_SERVICE) as NotificationManager

class MainActivity : AppCompatActivity() {
private var viewHolder = MainViewHolder()

override fun onCreate(savedInstanceState: Bundle?) {
super.onCreate(savedInstanceState)
setContentView(R.layout.activity_main)
viewHolder.bind(this)

viewHolder.send?.setOnClickListener { view ->
sendNotification("hello world")
}
}

private fun sendNotification(message: String) {
val manager = notificationManager
val builder = NotificationCompat.Builder(this)
val view = RemoteViews(packageName, R.layout.notification_layout)

builder.setSmallIcon(R.drawable.ic_launcher)
.setDefaults(0)
.setAutoCancel(true)
.setContent(view)

val intent = Intent()
intent.setClass(this, MainActivity::class.java)
val pIntent = PendingIntent.getActivity(this, 0, intent, PendingIntent.FLAG_ONE_SHOT)
view.setTextViewText(R.id.tv, message)
view.setOnClickPendingIntent(R.id.tv, pIntent)
val notification = builder.build()
manager.notify(0, notification)
}

override fun onNewIntent(intent: Intent?) {
sendNotification("hello remoteViews")
}
}

相关文章推荐
- 使用RemoteViews自定义通知栏样式
- 使用RemoteViews自定义Notification
- Android 通知栏Notification,NotificationManager,RemoteViews使用流程,自定义通知栏样式简介
- 通知栏发送消息Notification(可以使用自定义的布局)
- 通知栏Notification使用自定义视图方法(显示一个进度条ProgressBar)
- 使用NotificationCompat.Builder创建通知和自定义通知
- 通知栏发送消息Notification(可以使用自定义的布局)
- Android 自定义Notification通知样式并设置按钮监听.
- Android Notification自定义通知样式你要知道的事
- Android Notification自定义通知样式你要知道的事
- Android之利用RemoteViews自定义Notification
- Android 自定义Notification消息通知样式并实现与Activity简单交互
- Android种使用Notification实现通知管理以及自定义通知栏(Notification示例四)
- 自定义通知Remoteviews踩坑
- Android种使用Notification实现通知管理以及自定义通知栏实例(示例四)
- Android Notification自定义通知样式你要知道的事
- 使用 Android 自定义通知Notification时遇到的问题
- 【WPF】右下角弹出自定义通知样式(Notification)——简单教程
- 通知栏Notification使用自定义视图方法(显示一个进度条ProgressBar)
- Android种使用Notification实现通知管理以及自定义通知栏(Notification示例四)