EventBus使用与源码解析
2016-09-17 20:34
309 查看
EventBus使用与源码解析
EventBus的基本原理EventBus的基本使用
EventBus的源码分析
总结
EventBus的基本原理
EventBus模型图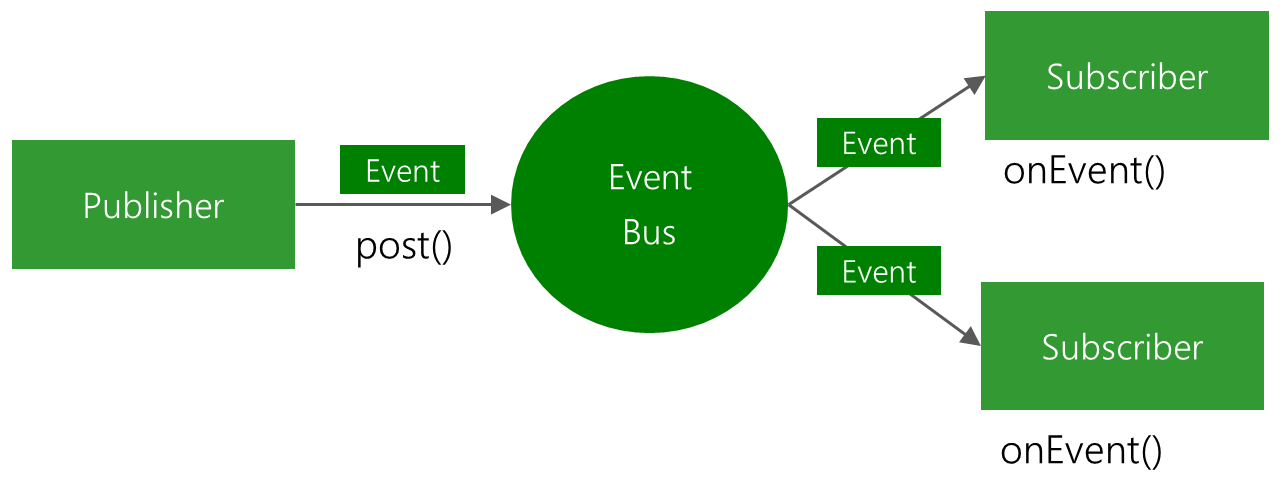
从结构图可以看出,EventBus主要采用观察者模式
Publisher:事件的发送者。
EventBus:事件的中转中心,查找监听了相应事件的观察者,然后将事件传递过去
Subscriber:观察者,接受到监听事件的发生
Event:事件的载体
EventBus的基本使用
注册监听:EventBus.getDefault().register(this)
自定义一个Event
public class FirstEvent {
public FirstEvent(String message){
mMessage = message;
}
public String mMessage;
}
声明监听方法
@Subscribe
public void onEventMainThread(FirstEvent event){
Log.d(TAG, “onEventMainThread——->” + event.mMessage);
}
@Subscribe
public void onEventBackgroundThread(FirstEvent event){
Log.d(TAG, “onEventBackgroundThread——->” + event.mMessage);
}
@Subscribe
public void onEventAsync(FirstEvent event){
Log.d(TAG, “onEventAsync——->” + event.mMessage);
}
通知
EventBus.getDefault().post(new FirstEvent(“发送消息”));
EventBus的使用就完成了,就是这么简单。
EventBus使用时注意事项:
注册了监听的的时候一定要在适当的时候反注册监听
EventBus.getDefault().unregister(this);
声明监听时间的时候一定要选择合适的方法
在上面的代码例子中,我们生命了三种监听方法:
@Subscribe(threadMode = ThreadMode.MAIN)
public void onEventMainThread(FirstEvent event){
Log.d(TAG, "onEventMainThread------->" + event.mMessage);
}

@Subscribe(threadMode = ThreadMode.BACKGROUND)
public void onEventBackgroundThread(FirstEvent event){
Log.d(TAG, "onEventBackgroundThread------->" + event.mMessage);
}

@Subscribe(threadMode = ThreadMode.ASYNC)
public void onEventAsync(FirstEvent event){
Log.d(TAG, "onEventAsync------->" + event.mMessage);
}
(1) onEventMainThread:表示该方法将在主线程中执行
(2) onEventBackgroundThread:表示该方法将在后台线程中执行
(3) onEventAsyn:表示将要创建一个线程来执行该方法
(4) 注意上面方法的注解,这这注解表示将在哪个线程中执行
如果对与一个Event,声明多个线程,则都会执行,如上例,三个方法都会监听到.
EventBus的源码分析
1.注解监听者public void register(Object subscriber) {
Class<?> subscriberClass = subscriber.getClass();
List<SubscriberMethod> subscriberMethods = subscriberMethodFinder.findSubscriberMethods(subscriberClass);
synchronized (this) {
for (SubscriberMethod subscriberMethod : subscriberMethods) {
subscribe(subscriber, subscriberMethod);
}
}
}注意其中重要的一个方法:
subscriberMethodFinder.findSubscriberMethods(subscriberClass);
这个方法就是找到你当前注册的这个观察者中所有添加@SubScrib这个注解的方法。我们看下其中一段关键代码:
private void findUsingReflectionInSingleClass(FindState findState) {
Method[] methods;
try {
// This is faster than getMethods, especially when subscribers are fat classes like Activities
methods = findState.clazz.getDeclaredMethods();
} catch (Throwable th) {
// Workaround for java.lang.NoClassDefFoundError, see https://github.com/greenrobot/EventBus/issues/149 methods = findState.clazz.getMethods();
findState.skipSuperClasses = true;
}
for (Method method : methods) {
int modifiers = method.getModifiers();
if ((modifiers & Modifier.PUBLIC) != 0 && (modifiers & MODIFIERS_IGNORE) == 0) {
Class<?>[] parameterTypes = method.getParameterTypes();
if (parameterTypes.length == 1) {
Subscribe subscribeAnnotation = method.getAnnotation(Subscribe.class);
if (subscribeAnnotation != null) {
Class<?> eventType = parameterTypes[0];
if (findState.checkAdd(method, eventType)) {
ThreadMode threadMode = subscribeAnnotation.threadMode();
findState.subscriberMethods.add(new SubscriberMethod(method, eventType, threadMode,
subscribeAnnotation.priority(), subscribeAnnotation.sticky()));
}
}
} else if (strictMethodVerification && method.isAnnotationPresent(Subscribe.class)) {
String methodName = method.getDeclaringClass().getName() + "." + method.getName();
throw new EventBusException("@Subscribe method " + methodName +
"must have exactly 1 parameter but has " + parameterTypes.length);
}
} else if (strictMethodVerification && method.isAnnotationPresent(Subscribe.class)) {

4000
String methodName = method.getDeclaringClass().getName() + "." + method.getName();
throw new EventBusException(methodName +
" is a illegal @Subscribe method: must be public, non-static, and non-abstract");
}
}
}
上面的代码主要是找到这个观察者中所用添加@SubScrib注解的方法,然后判断这个方法是否是Public修饰的并且参数的个数为1,然后从该注解中获取被标注的方法将在哪个线程中执行也就是注解中的ThreadMode。
2.Post
发送事件,在EventBus中代码如下:
public void post(Object event) {
PostingThreadState postingState = currentPostingThreadState.get();
List<Object> eventQueue = postingState.eventQueue;
eventQueue.add(event);

if (!postingState.isPosting) {
postingState.isMainThread = Looper.getMainLooper() == Looper.myLooper();
postingState.isPosting = true;
if (postingState.canceled) {
throw new EventBusException("Internal error. Abort state was not reset");
}
try {
while (!eventQueue.isEmpty()) {
postSingleEvent(eventQueue.remove(0), postingState);
}
} finally {
postingState.isPosting = false;
postingState.isMainThread = false;
}
}
}
上面一段代码的意思是在post事件的代码,主要的意思是将该事件加到队列里面,然后取出,然后再调用postSingleEvent(Object object, ThreadLocal threadlocal),这里用到ThreadLocal。
最后看下具体执行的方法:
void invokeSubscriber(Subscription subscription, Object event) {
try {
subscription.subscriberMethod.method.invoke(subscription.subscriber, event);
} catch (InvocationTargetException e) {
handleSubscriberException(subscription, event, e.getCause());
} catch (IllegalAccessException e) {
throw new IllegalStateException("Unexpected exception", e);
}
}
这里是直接调用反射来执行。
总结
EventBus通过注解的方式注册监听的方法和参数EventBus默认在你调用Post的线程中执行
注册的方法名可以随便写,只要注解的ThreadMode写好就可以,但是为了可读性,最好不要随便命名方法
凡是注册了同一个Event的观察者,不管在注册到哪个线程,只要Post,都会执行。

相关文章推荐
- Android EventBus 3.0 使用及源码解析一
- EventBus使用及源码解析
- EventBus的使用和源码解析
- EventBus的使用和源码解析
- Java 集合系列11之 Hashtable详细介绍(源码解析)和使用示例
- <自己动手写操作系统>第三章——pmtest3源码解析:使用LDT
- Java 集合系列03之 ArrayList详细介绍(源码解析)和使用示例
- Java 集合系列06之 Vector详细介绍(源码解析)和使用示例
- 关于thinkphp 中 使用 token_get_all() 源码解析
- Java 集合系列05之 LinkedList详细介绍(源码解析)和使用示例
- 使用JavaParser进行java源码解析
- STL源码解析-02配置器-01使用
- Java 集合系列07之 Stack详细介绍(源码解析)和使用示例
- Java 集合系列 09 HashMap详细介绍(源码解析)和使用示例
- Java 集合系列 10 Hashtable详细介绍(源码解析)和使用示例
- Java 集合系列 04 LinkedList详细介绍(源码解析)和使用示例
- 使用Android自带Gallery组件实现CoverFlow,源码+解析
- android源码解析 ---- Mms 短信息,如何使用系统浮动搜索框
- Java 集合系列13之 WeakHashMap详细介绍(源码解析)和使用示例
- Java 集合系列 05 Vector详细介绍(源码解析)和使用示例