android 商城左边菜单,右边联动
2016-09-17 11:41
393 查看
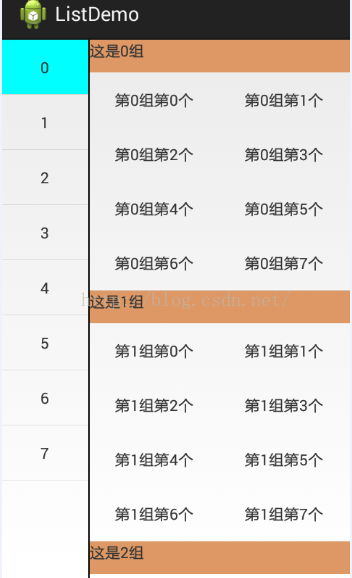
项目的需要,类似于大多数商城一样的左菜单,右内容的。实现左右联动的效果。在网上也找了些Demo 但是效果都不理想,所以就自己手动写了一个,虽然也没有太多的技术含量,但是效果还是不错的。
实现的原理就是两个Listview 进行绑定。根据滑动的位置进行相应的左右联动。直接上效果图:
下面是核心代码MainActicity,主要是使用了ListViewde的滑动监听 setOnScrollListener和ListView的滑动跳转方法: setSelection()和 smoothScrollToPositionFromTop()
下面是Demo 的链接: 点击打开链接
实现的原理就是两个Listview 进行绑定。根据滑动的位置进行相应的左右联动。直接上效果图:
下面是核心代码MainActicity,主要是使用了ListViewde的滑动监听 setOnScrollListener和ListView的滑动跳转方法: setSelection()和 smoothScrollToPositionFromTop()
public class MainActivity extends Activity {
private ListView titleList, conList;
private List<String> list = new ArrayList<String>();
private Map<String, List<String>> map = new HashMap<String, List<String>>();
private ContAdapter adapter2;
private ImageView point;
public static int POSITION=0;
private ListtitleAdapter adapter;
private boolean flag=false;
private int CURRENTID=0;
@Override
protected void onCreate(Bundle savedInstanceState) {
super.onCreate(savedInstanceState);
setContentView(R.layout.activity_main);
titleList = (ListView) findViewById(R.id.title);
conList = (ListView) findViewById(R.id.content);
for (int i = 0; i < 8; ++i) {
list.add(i + "");
}
adapter = new ListtitleAdapter(this, list);
titleList.setAdapter(adapter);
for (int k = 0; k < 8; k++) {
List<String> list = new ArrayList<String>();
for (int j = 0; j < 8; j++) {
list.add("第"+k+"组"+"第" + j+ "个");
}
map.put(String.valueOf(k), list);
}
adapter2 = new ContAdapter(MainActivity.this, map);
conList.setAdapter(adapter2);
adapter2.notifyDataSetChanged();
conList.setOnScrollListener(new OnScrollListener() {
@Override
public void onScrollStateChanged(AbsListView view, int scrollState) {
// TODO Auto-generated method stub

}

@Override
public void onScroll(AbsListView view, int firstVisibleItem,
int visibleItemCount, int totalItemCount) {
if(firstVisibleItem!=CURRENTID){
CURRENTID=firstVisibleItem;
if(CURRENTID!=POSITION)
POSITION=CURRENTID;
adapter.notifyDataSetChanged();
}
}
});

titleList.setOnItemClickListener(new OnItemClickListener() {
@Override
public void onItemClick(AdapterView<?> parent, View view,
int position, long id) {
POSITION=position;
adapter.notifyDataSetChanged();
adapter2.notifyDataSetChanged();
conList.setSelection(position);
conList.smoothScrollToPositionFromTop(position, 0, 100);
}
});
}
}布局代码:< 4000 ;LinearLayout xmlns:android="http://schemas.android.com/apk/res/android" xmlns:tools="http://schemas.android.com/tools" android:layout_width="match_parent" android:layout_height="match_parent" android:orientation="horizontal" tools:context="com.example.listdemo.MainActivity" > <ListView android:id="@+id/title" android:layout_width="0dp" android:layout_height="match_parent" android:layout_weight="1" android:scrollbars="none" > </ListView> <View android:layout_width="1dp" android:background="@android:color/black" android:layout_height="match_parent"/> <ListView android:id="@+id/content" android:layout_width="0dp" android:layout_height="match_parent" android:layout_weight="3" android:scrollbars="none" > </ListView> </LinearLayout>内容的填充就是自定义的BaseAdapter ,右边的内容区就是两个Adapter的嵌套
下面是Demo 的链接: 点击打开链接

相关文章推荐
- android 商城左边菜单,右边联动
- Android 树形菜单的 实现 ,类似美团左边是树,右边 展 ...
- Android导航菜单横向左右滑动并和下方的控件实现联动
- [ExtJS4]ExtJS4左边菜单面板收缩展开,右边TabPanel内容动态更新(解决宽度不能自适应问题)
- Android中如何设置RadioButton在文字的右边,图标在左边
- android的activity界面的切换动画----从右边进,左边退出。
- android:点击左边按钮增加数值,点击右边按钮减小数值
- 左边菜单,右边内容
- android listview+fragment实现仿京东左边分类名右边分类内容
- [Android实例] Android界面设计(左侧隐藏菜单右边显示content)demo
- iframe异步加载(点击左边菜单加载右边内容)
- Android导航菜单横向左右滑动并和下方的控件实现联动
- Android颜色对照表 (左边是颜色示例,右边是颜色对应的16进制代码)---Android开发必备!!!
- Android界面设计(左侧隐藏菜单右边显示content)demo
- Android导航菜单横向左右滑动并和下方的控件实现联动
- Android实现导航菜单随着ListView联动,当导航菜单遇到顶部菜单时停止在哪里,并且listview仍能滑动
- Android导航菜单横向左右滑动并和下方的控件实现联动
- 深入浅出android/ophone UI实现水平布局的Tab控件 Tabwidget在左边/右边
- iframe异步加载(点击左边菜单加载右边内容)
- Android导航菜单横向左右滑动并和下方的控件实现联动