Python+OpenCV--图像特征匹配连线
2016-09-09 22:48
1401 查看
利用Python学习OpenCV,个人感觉比较方便。函数的形式与C++基本相同,所以切换过来还是比较好的,对于像我这种对python不太熟练的人,使用python的集成开发环境PyCharm进行学习,可以设置断点调试,有助于我这类初学者理解掌握。
下面是利用python语言结合OpenCV进行SIFT特征进行匹配的代码:
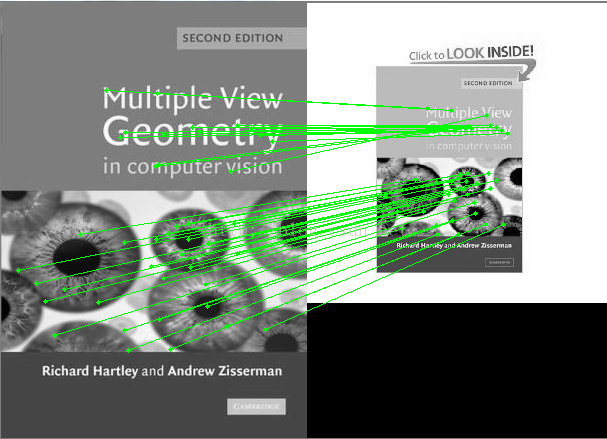
运行结果为:
转自:http://blog.csdn.net/firemicrocosm/article/details/48446973
下面是利用python语言结合OpenCV进行SIFT特征进行匹配的代码:
# -*- coding:utf-8 -*-
__author__ = 'Microcosm'

import cv2
#from find_obj import filter_matches,explore_match
import numpy as np

def filter_matches(kp1, kp2, matches, ratio = 0.75):
mkp1, mkp2 = [], []
for m in matches:
if len(m) == 2 and m[0].distance < m[1].distance * ratio:
m = m[0]
mkp1.append( kp1[m.queryIdx] )
mkp2.append( kp2[m.trainIdx] )
p1 = np.float32([kp.pt for kp in mkp1])
p2 = np.float32([kp.pt for kp in mkp2])
kp_pairs = zip(mkp1, mkp2)
return p1, p2, kp_pairs

def explore_match(win, img1, img2, kp_pairs, status = None, H = None):
h1, w1 = img1.shape[:2]
h2, w2 = img2.shape[:2]
vis = np.zeros((max(h1, h2), w1+w2), np.uint8)
vis[:h1, :w1] = img1
vis[:h2, w1:w1+w2] = img2
vis = cv2.cvtColor(vis, cv2.COLOR_GRAY2BGR)

if H is not None:
corners = np.float32([[0, 0], [w1, 0], [w1, h1], [0, h1]])
corners = np.int32( cv2.perspectiveTransform(corners.reshape(1, -1, 2), H).reshape(-1, 2) + (w1, 0) )
cv2.polylines(vis, [corners], True, (255, 255, 255))

if status is None:
status = np.ones(len(kp_pairs), np.bool)
p1 = np.int32([kpp[0].pt for kpp in kp_pairs])
p2 = np.int32([kpp[1].pt for kpp in kp_pairs]) + (w1, 0)

green = (0, 255, 0)
red = (0, 0, 255)
white = (255, 255, 255)
kp_color = (51, 103, 236)
for (x1, y1), (x2, y2), inlier in zip(p1, p2, status):
if inlier:
col = green
cv2.circle(vis, (x1, y1), 2, col, -1)
cv2.circle(vis, (x2, y2), 2, col, -1)
else:
col = red
r = 2
thickness = 3
cv2.line(vis, (x1-r, y1-r), (x1+r, y1+r), col, thickness)
cv2.line(vis, (x1-r, y1+r), (x1+r, y1-r), col, thickness)
cv2.line(vis, (x2-r, y2-r), (x2+r, y2+r), col, thickness)
cv2.line(vis, (x2-r, y2+r), (x2+r, y2-r), col, thickness)
vis0 = vis.copy()
for (x1, y1), (x2, y2), inlier in zip(p1, p2, status):
if inlier:
cv2.line(vis, (x1, y1), (x2, y2), green)

cv2.imshow(win, vis)

img1 = cv2.imread("E:\python\Python Project\opencv_showimage\images\multi_view_big.jpg")
img2 = cv2.imread("E:\python\Python Project\opencv_showimage\images\multi_view_small.jpg")

img1_gray = cv2.cvtColor(img1, cv2.COLOR_BGR2GRAY)
img2_gray = cv2.cvtColor(img2, cv2.COLOR_BGR2GRAY)

sift = cv2.SIFT()

kp1,des1 = sift.detectAndCompute(img1_gray, None)
kp2,des2 = sift.detectAndCompute(img2_gray, None)

# BFmatcher with default parms
bf = cv2.BFMatcher(cv2.NORM_L2)
matches = bf.knnMatch(des1, des2, k=2)

p1,p2,kp_pairs = filter_matches(kp1,kp2,matches,ratio=0.5)
explore_match('matches', img1_gray,img2_gray,kp_pairs)
#img3 = cv2.drawMatchesKnn(img1_gray,kp1,img2_gray,kp2,good[:10],flag=2)

cv2.waitKey(0)
cv2.destroyAllWindows()
运行结果为:
转自:http://blog.csdn.net/firemicrocosm/article/details/48446973

相关文章推荐
- python-opencv-特征点匹配连线(画线)drawMatches
- Feature Matching by using opencv(Python)-使用opencv进行图像特征匹配
- OpenCV_局部图像特征的提取与匹配_源代码
- OpenCV: Features2D Features FrameWork 图像二维特征检测、描述以及匹配框架的层次解析
- OpenCV特征点检测匹配图像-----添加包围盒
- 特征点匹配应用——图像拼接的原理与基于OpenCV的实现
- OpenCV成长之路(9):特征点检测与图像匹配
- OpenCV_局部图像特征的提取与匹配_源代码
- OpenCV成长之路(9):特征点检测与图像匹配
- OpenCV成长之路(9):特征点检测与图像匹配
- opencv3.1.0 特征点检测与图像匹配(features2d、xfeatures2d)
- 对OpenCV Tutorial 2.4.9 图像特征匹配的补充
- OpenCV:特征点检测与图像匹配
- OpenCV_局部图像特征的提取与匹配_源代码
- OpenCV成长之路:特征点检测与图像匹配
- OpenCV_局部图像特征的提取与匹配_源代码
- OpenCV匹配图像的特征向量
- opencv-计算图像的SIFT特征及匹配
- OpenCV特征点检测匹配图像-----添加包围盒
- OpenCV成长之路(9):特征点检测与图像匹配