How to install OpenCV 3.x in Linux
2016-09-04 20:13
423 查看
Installation in Linux
依赖包安装
GCC 4.4.x or laterCMake 2.8.7 or higher
Git
GTK+2.x or higher, including headers (libgtk2.0-dev)
pkg-config
Python 2.6 or later and Numpy 1.5 or later with developer packages (python-dev, python-numpy)
ffmpeg or libav development packages: libavcodec-dev, libavformat-dev, libswscale-dev
[optional] libtbb2 libtbb-dev
[optional] libdc1394 2.x
[optional] libjpeg-dev, libpng-dev, libtiff-dev, libjasper-dev, libdc1394-22-dev
以上包可以使用终端,按照下面的命令安装;或者使用Synaptic Manager安装:
[compiler] sudo apt-get install build-essential
[required] sudo apt-get install cmake git libgtk2.0-dev pkg-config libavcodec-dev libavformat-dev libswscale-dev
[optional] sudo apt-get install python-dev python-numpy libtbb2 libtbb-dev libjpeg-dev libpng-dev libtiff-dev libjasper-dev libdc1394-22-dev
OpenCV源代码下载
可以使用 sourceforge 上最新稳定版的OpenCV,或者 从Git repository上下载.
下载最近稳定版OpenCV下载
Go to our pageon Sourceforge;
Download the source tarball and unpack it.
Git分支下载OpenCV
Launch Git client and clone OpenCV repository If you need modules from OpenCV contrib repository then
clone it too.
In Linux it can be achieved with the following command in Terminal:
cd ~/<my_working _directory> git clone https://github.com/Itseez/opencv.git git clone https://github.com/Itseez/opencv_contrib.git [/code]Create a temporary directory, which we denote as <cmake_build_dir>, where you want to put the generated Makefiles, project files as well the object files and output binaries and enter there.
CMake命令行模式编译
For example
1 cd
~/opencv
2 mkdir
build
3 cd
build
Configuring. Run cmake [<some optional parameters>] <path to the OpenCV source directory>
For example
1 cmake
-D CMAKE_BUILD_TYPE=Release -D CMAKE_INSTALL_PREFIX=/usr/local ..
or cmake-gui
set full path to OpenCV source code, e.g. /home/user/opencv
set full path to <cmake_build_dir>, e.g. /home/user/opencv/build
set optional parameters
run: “Configure”
run: “Generate”
Description of some parameters
build type:CMAKE_BUILD_TYPE=Release\Debug
to build with modules from opencv_contrib set OPENCV_EXTRA_MODULES_PATH to <path to opencv_contrib/modules/>
set BUILD_DOCS for building documents
set BUILD_EXAMPLES to build all examples
[optional] Building python. Set the following python parameters:
PYTHON2(3)_EXECUTABLE = <path to python>
PYTHON_INCLUDE_DIR = /usr/include/python<version>
PYTHON_INCLUDE_DIR2 = /usr/include/x86_64-linux-gnu/python<version>
PYTHON_LIBRARY = /usr/lib/x86_64-linux-gnu/libpython<version>.so
PYTHON2(3)_NUMPY_INCLUDE_DIRS = /usr/lib/python<version>/dist-packages/numpy/core/include/
[optional] Building java.
Unset parameter: BUILD_SHARED_LIBS
It is useful also to unset BUILD_EXAMPLES, BUILD_TESTS, BUILD_PERF_TESTS - as they all will be statically linked with OpenCV and can take a lot of memory.
Build. From build directory execute make, recomend to do it in several threads
For example
1 make
-j7 # runs 7 jobs in parallel
[optional] Building documents. Enter <cmake_build_dir/doc/> and run make with target "html_docs"
For example
1 cd
~/opencv/build/doc/
2 make
-j7 html_docs
To install libraries, from build directory execute
1 sudo
make install
[optional] Running tests
Get the required test data from OpenCV extra repository.
For example
1 git
clone https://github.com/Itseez/opencv_extra.git
set OPENCV_TEST_DATA_PATH environment variable to <path to opencv_extra/testdata>.
execute tests from build directory.
For example
1 <cmake_build_dir>/bin/opencv_test_core
Note
If the size of the created library is a critical issue (like in case of an Android build) you can use the install/strip command to get the smallest size as possible. The stripped version
appears to be twice as small. However, we do not recommend using this unless those extra megabytes do really matter.
方式2
编译工具安装
终端下, root 权限执行以下命令:
apt-get install cmake cmake-gui
启动cmake-gui
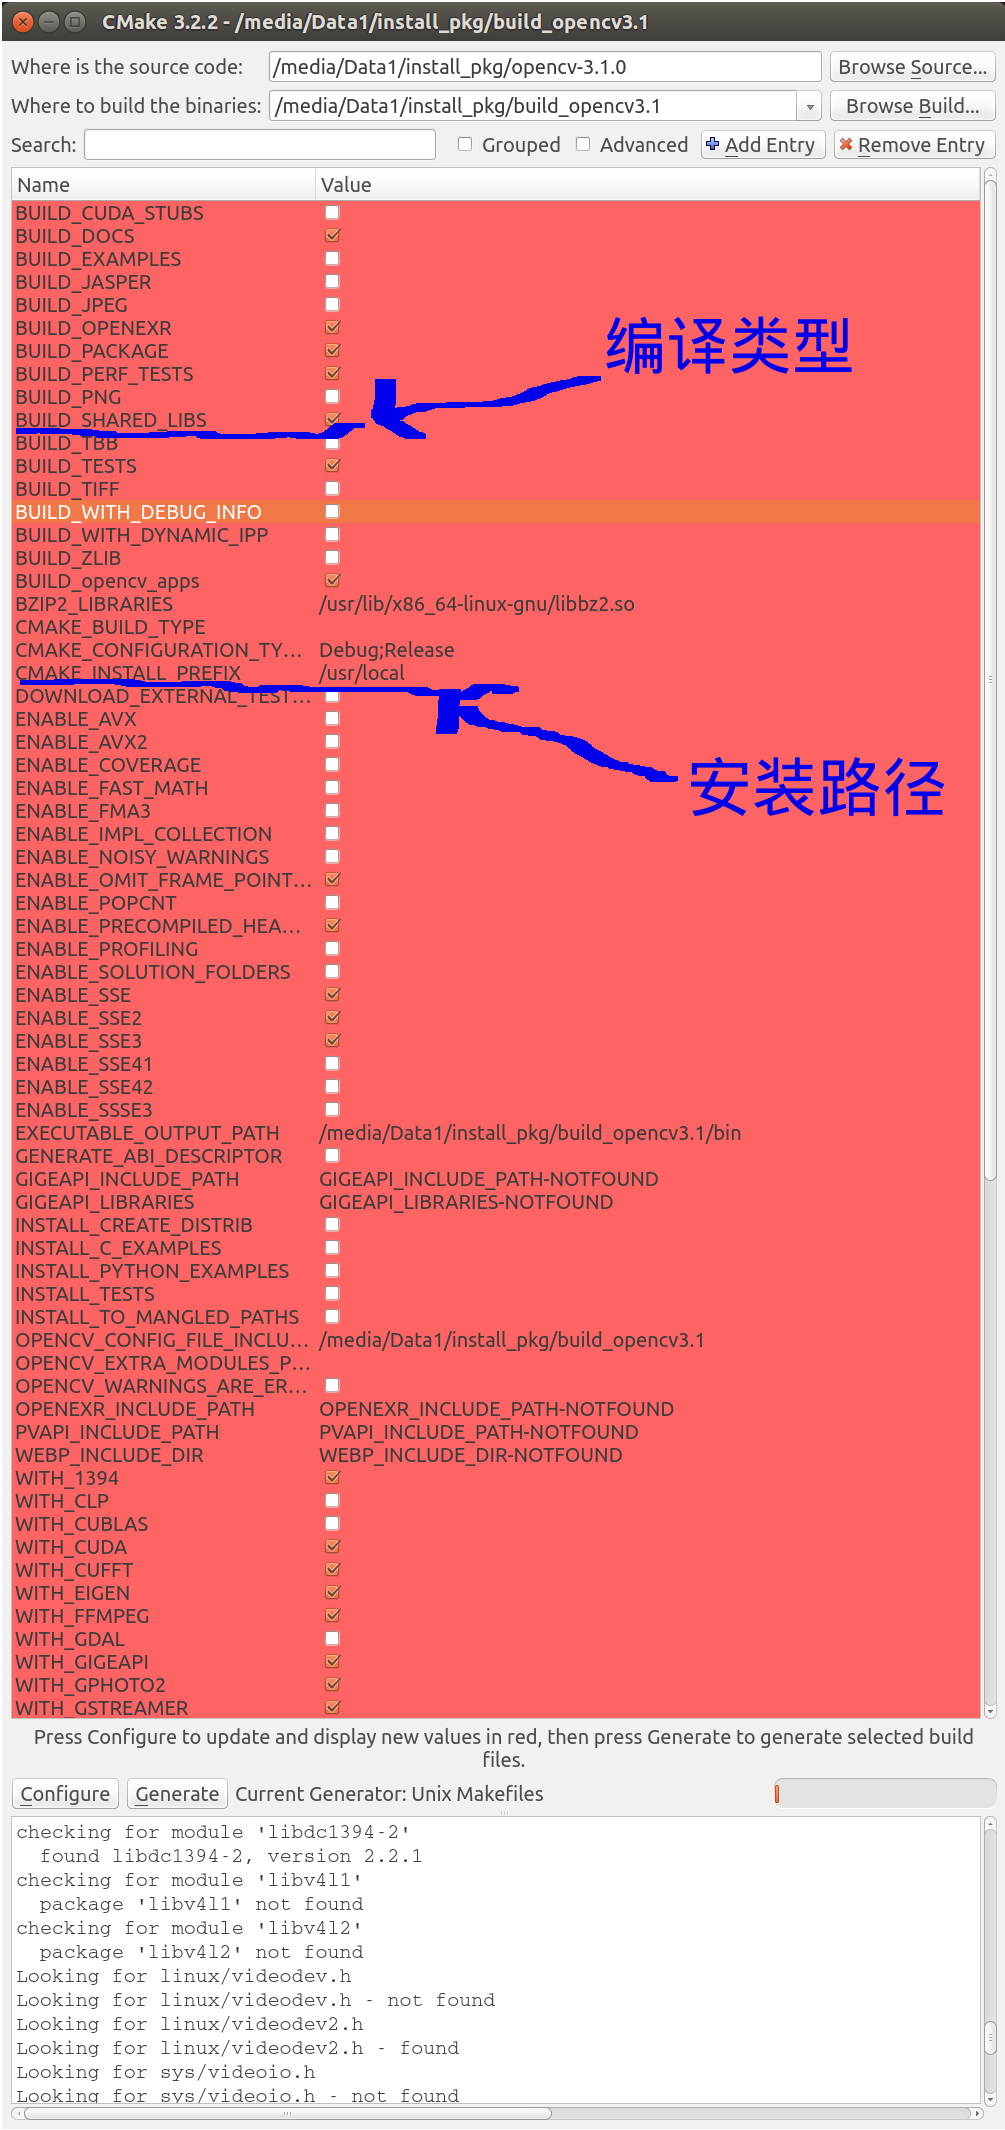
以OpenCV3.1为例子,如上图设置源代码路径(比如:/media/Data1/install_pkg/opencv-3.1.0)和编译结果路径(比如:/media/Data1/install_pkg/build_opencv3.1)。
然后点击“Configure”按钮。选择使用Makefile生成的系统平台。
点击“Finish”,等待(中间可能存在下载依赖包的过程,会比较慢)环境测试完成,进行编译配置设置。
根据需要设置:
1)编译后的安装路径
2)编译的类型,静态库或者动态库形式
3)选择需要安装的包或者模块,是否支持GPU等
点击“generate”生成Makefile。
然后,终端下转到/media/Data1/install_pkg/build_opencv3.1下,执行以下命令:make进行编译;然后,执行make install 进行安装(root目录的话需要root权限)。


相关文章推荐
- How to install opencv in Ubuntu
- [OpenCV] How to install opencv by compiling source code
- [OpenCV] How to install opencv by compiling source code
- How to install and use OpenCV 2.0 in Visual Studio2008(VS2008)
- How to install Homebrew, OpenCV and Python for OS X El Capitan (10.11)
- How to Install JDK6 or JDK7 in Linux
- How to install opencv in python
- how to install opencv in ubuntu
- How to install OpenCV
- How to Install OpenCV (3.3.0) on Jetson TX2
- How to install pip3 for python 3.x
- How to Install OpenCV 3.0 and Python 3.4+ on Ubuntu
- How To Install Linux, nginx, MySQL, PHP (LEMP) stack on CentOS 6
- How to install Nvidia driver on a Xen kernel, CentOS 5.5(Final)
- How to make dpk to install into BCB by DCC32
- how to install Matlab API in caffe
- How to install Redmine
- How to install oracle 10g for Linux in ubuntu
- How to Install and Use JRebel with WebLogic and Eclipse
- How To Install VNC Server On Ubuntu 14.04