基于centos6.8配置多网卡绑定
2016-09-01 21:49
495 查看
Linux 自带的软件bonding 可以把多个网络接口设备捆绑为单个的网络接口设置来使用,用于网络负载均衡及网络冗余。其中网络负载均衡常用于我们的文件服务器中,文件服务器在多用户同时使用的情况下,网络压力非常大的,所以为了解决同一个IP突破流量的限制,使用多网卡绑定是一个极好的办法。网络冗余在生产环境中也特别重要,特别是在网卡在可能发生物理性质损坏而无法同时使用同一IP快速响应的情况下多网卡绑定就显得特别重要了,bonding为网卡提供了冗余的支持,把多网卡绑定到一个IP,即使其中一块网卡发生物理损坏的情况下,另一块网卡自动启用,并且提供正常服务。
下面我们先来了解一下bonding的常用mode种类:mode=0 ,即:(balance-rr) Round-robin policy(平衡抡循环策略)数据包的传输方式轮询传输,第一个包传输给eth0 ,第二个包传输给eth1,就这样循环下去,直到传输完毕,这里需要注意的是mode0能作为负载均衡作用,不提供容错功能,如果第一张网卡出现故障网络将面临瘫痪。 mode=1,即: (active-backup) Active-backup policy(主-备份策略)只有一个处于活动状态,当主网卡出现故障时,备网卡马上由备转变成主。这个模式提供了较高的容错能力。但是资源利用率较低。 mode=3,即:broadcast(广播策略)在每个slave接口上传输每个数据包,此模式提供了容错能力 演示环境:VMware 11 版本 ,系统centos 6.8
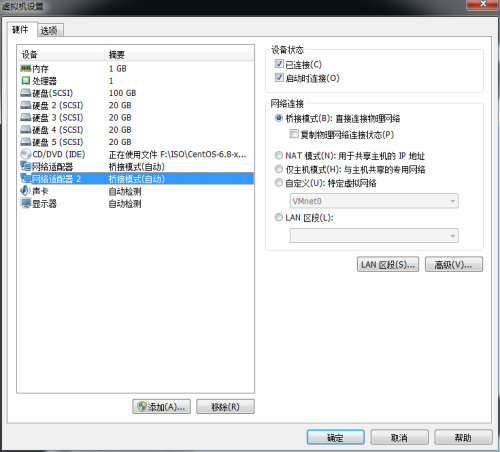
第一步:
首先我们新添加一张网卡,重启并生效
第二步:关闭NetworkManager服务(在centos6系列版本中开启NetworkManager与bonding会产生冲突)
[root@centos6 ~]# service NetworkManager stop
Stopping NetworkManager daemon:                            [  OK  ]
[root@centos6 ~]# chkconfig NetworkManager off
第三步:创建虚拟网卡bond0,在/etc/sysconfig/network-scripts目录下新建虚拟网卡band0,在这里使用的mode是1,文件内容如图所示
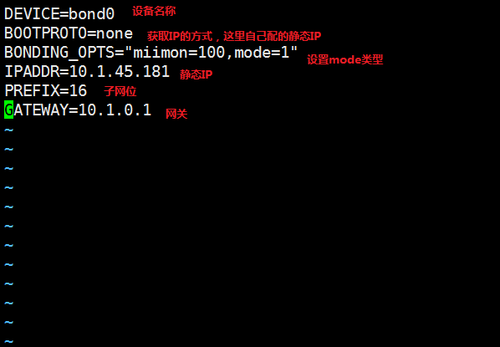
[root@centos6 ~]# vim /etc/sysconfig/network-scripts/ifcfg-bond0
DEVICE=bond0
BOOTPROTO=none
BONDING_OPTS="miimon=100,mode=1"
IPADDR=10.1.45.181
PREFIX=16
GATEWAY=10.1.0.1
第四步:配置网卡参数,网卡参数中需要标注网卡名,网卡的角色及虚拟主卡名称。
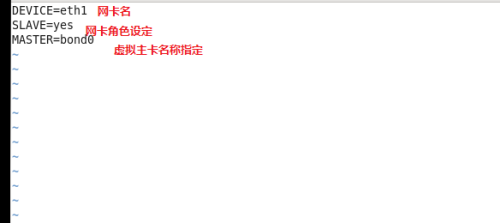
[root@centos6 ~]# vim /etc/sysconfig/network-scripts/ifcfg-eth0
DEVICE=eth0
SLAVE=yes
MASTER=bond0
[root@centos6 ~]# vim /etc/sysconfig/network-scripts/ifcfg-eth1
DEVICE=eth1
SLAVE=yes
MASTER=bond0
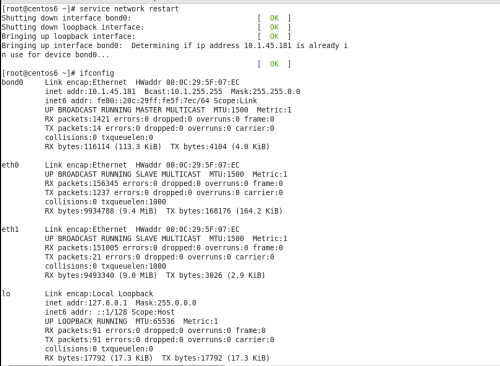
第五步:重启网卡,查看状态
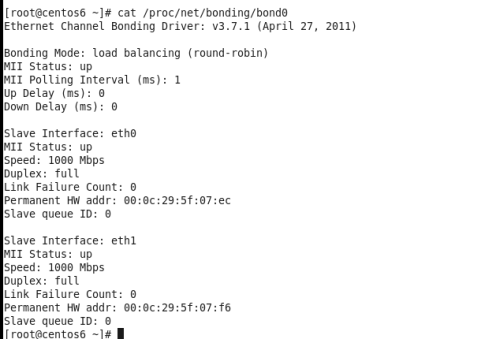
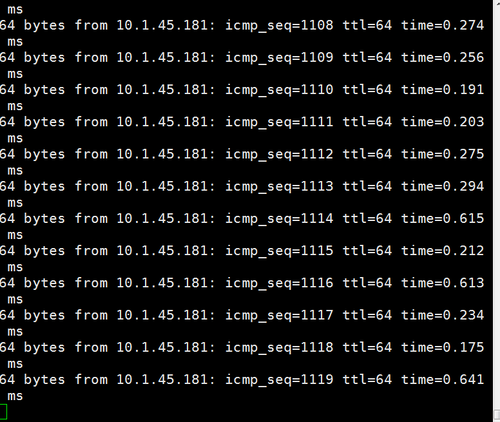
Connecting to 10.1.45.180:22...
Connection established.
To escape to local shell, press 'Ctrl+Alt+]'.

Last login: Thu Sep  1 14:51:24 2016 from 10.1.250.31
Welcome to the home of snowbamboo ^ ^
[root@localhost ~]# ping 10.1.45.181
PING 10.1.45.181 (10.1.45.181) 56(84) bytes of data.
64 bytes from 10.1.45.181: icmp_seq=1 ttl=64 time=1.63 ms
64 bytes from 10.1.45.181: icmp_seq=2 ttl=64 time=0.354 ms
64 bytes from 10.1.45.181: icmp_seq=3 ttl=64 time=0.250 ms
64 bytes from 10.1.45.181: icmp_seq=4 ttl=64 time=0.514 ms
64 bytes from 10.1.45.181: icmp_seq=5 ttl=64 time=0.282 ms
64 bytes from 10.1.45.181: icmp_seq=6 ttl=64 time=0.252 ms
64 bytes from 10.1.45.181: icmp_seq=7 ttl=64 time=0.361 ms
64 bytes from 10.1.45.181: icmp_seq=8 ttl=64 time=0.310 ms
64 bytes from 10.1.45.181: icmp_seq=9 ttl=64 time=0.426 ms
64 bytes from 10.1.45.181: icmp_seq=10 ttl=64 time=0.439 ms
64 bytes from 10.1.45.181: icmp_seq=11 ttl=64 time=0.506 ms
64 bytes from 10.1.45.181: icmp_seq=12 ttl=64 time=0.502 ms
64 bytes from 10.1.45.181: icmp_seq=13 ttl=64 time=0.423 ms
64 bytes from 10.1.45.181: icmp_seq=14 ttl=64 time=0.230 ms
64 bytes from 10.1.45.181: icmp_seq=15 ttl=64 time=0.494 ms
64 bytes from 10.1.45.181: icmp_seq=16 ttl=64 time=0.417 ms
64 bytes from 10.1.45.181: icmp_seq=17 ttl=64 time=0.522 ms
现在我关闭一张网卡,看网络是否有波动

总结:
在使用bonding的mode1时,必须至少要有两块网卡,一张为活动网卡,另一张为备用状态,当主卡发生故障时备卡马上接替工作,继续完成数据传输。mode0模式时需要注意的是,mode0只支持负载均衡,加速网络数据包传输,没有容错功能。

相关文章推荐
- centos 6.4系统双网卡绑定配置详解
- centOS6.8 ftp服务 安装配置 基于本地用户和虚拟用户
- Centos7,Ubuntu14.04多网卡配置bond,将多网卡绑定在一起
- 基于VMware为CentOS 6.5配置两个网卡
- 使用 vm linux(centos6) 配置网卡 (基于win7平台)
- centos 7 下多网卡绑定+ vlan 网卡配置
- CentOS6.2网卡绑定配置
- CentOS 6.8 Bonding技术实现和网卡功能配置基础
- CentOS6.5系统双网卡绑定配置详解
- CentOS6.5系统双网卡绑定配置详解
- centos 7 双网卡绑定配置
- CentOS 6.8 ftp服务安装配置 基于本地用户和虚拟用户
- 基于CentOS 6.8的OpenStack手动安装-环境配置
- 基于CentOS的Linux基本网络配置,包括网卡eth0、DNS、Host等
- 基于CentOS的Linux基本网络配置,包括网卡eth0、DNS、Host等
- 感觉比较全的 linux(CentOS) 配置网卡的 手册
- Redhat Linux网卡配置与绑定
- Linux网卡配置与绑定
- 关于Centos单网卡多IP配置
- win7 CentOS 6.0 无法访问网络,使用ifconfig发现eth0网卡并没有IP等相关配置