2
2016-09-01 15:05
399 查看
在Caffe中定义一个网络是通过编辑一个prototxt文件来完成的,一个简单的网络定义文件如下:
这个网络定义了一个
Caffe中定义了丰富的layer类型,每个类型都有对应的一些参数来描述这一个layer。为了说明的方便,接下来将通过一个简单的例子来展示Caffe是如何使用
首先我们需要了解
第2行的
encoding中这个
类似地在
在定义好了data schema之后,需要使用
protoc -I=/protofile/directory –cpp_out=/output/directory /path/to/protofile
schema定义,有这样的一些接口函数:
每个类都有对应的
官网上的tutorial是通过
读取和解析数据的代码:
这一段代码将input解析为我们设计的数据格式,写入到
上面的文件的解析结果如图所示:
1 name: "ExampleNet"
2 layer {
3   name: "data"
4   type: "Data"
5   top: "data"
6   top: "label"
7   data_param {
8     source: "path/to/train_database"
9     batch_size: 64
10     backend: LMDB
11   }
12 }
13 layer {
14   name: "conv1"
15   type: "Convolution"
16   bottom: "data"
17   top: "conv1"
18   convolution_param {
19     num_output: 20
20     kernel_size: 5
21     stride: 1
22   }
23 }
24 layer {
25   name: "ip1"
26   type: "InnerProduct"
27   bottom: "conv1"
28   top: "ip1"
29   inner_product_param {
30     num_output: 500
31   }
32 }
33 layer {
34   name: "loss"
35   type: "SoftmaxWithLoss"
36   bottom: "ip1"
37   bottom: "label"
38   top: "loss"
39 }
这个网络定义了一个
name为
ExampleNet的网络,这个网络的输入数据是
LMDB数据,
batch_size为64,包含了一个卷积层和一个全连接层,训练的loss function为
SoftmaxWithLoss。通过这种简单的
key: value描述方式,用户可以很方便的定义自己的网络,利用Caffe来训练和测试网络,验证自己的想法。
Caffe中定义了丰富的layer类型,每个类型都有对应的一些参数来描述这一个layer。为了说明的方便,接下来将通过一个简单的例子来展示Caffe是如何使用
Google Protocol Buffer来完成
Solver和
Net的定义。
首先我们需要了解
Google Protocol Buffer定义data schema的方式,
Google Protocol Buffer通过一种类似于C++的语言来定义数据结构,下面是官网上一个典型的AddressBook例子:
1 // AddressBook.proto
2 package tutorial;
3
4 message Person {
5   required string name = 1;
6   required int32 id = 2;
7   optional string email = 3;
8
9   enum PhoneType {
10     MOBILE = 0;
11     HOME = 1;
12     WORK = 2;
13   }
14
15   message PhoneNumber {
16     required string number = 1;
17     optional PhoneType type = 2 [default = HOME];
18   }
19
20   repeated PhoneNumber phone = 4;
21 }
22
23 message AddressBook {
24   repeated Person person = 1;
25 }
第2行的
package tutorial类似于C++里的
namespace,
message可以简单的理解为一个
class,
message可以嵌套定义。每一个
field除了一般的
int32和
string等类型外,还有一个属性来表明这个
field是
required,
optional或者’repeated’。
required的
field必须存在,相对应的
optional的就可以不存在,
repeated的
field可以出现0次或者多次。这一点对于
Google
Protocol Buffer
的兼容性很重要,比如新版本的
AddressBook添加了一个
string类型的
field,只有把这个
field的属性设置为
optional,就可以保证新版本的代码读取旧版本的数据也不会出错,新版本只会认为旧版本的数据没有提供这个
optional field,会直接使用
default。同时我们也可以定义
enum类型的数据。每个
field等号右侧的数字可以理解为在实际的binary
encoding中这个
field对应的key值,通常的做法是将经常使用的
field定义为0-15的数字,可以节约存储空间(涉及到具体的encoding细节,感兴趣的同学可以看看官网的解释),其余的
field使用较大的数值。
类似地在
caffe/src/caffe/proto/中有一个
caffe.proto文件,其中对layer的部分定义为:
1 message LayerParameter {
2   optional string name = 1; // the layer name
3   optional string type = 2; // the layer type
4   repeated string bottom = 3; // the name of each bottom blob
5   repeated string top = 4; // the name of each top blob
6 //  other fields
7 }
在定义好了data schema之后,需要使用
protoc compiler来编译定义好的
proto文件。常用的命令为:
protoc -I=/protofile/directory –cpp_out=/output/directory /path/to/protofile
-I之后为
proto文件的路径,
--cpp_out为编译生成的
.h和
.cc文件的路径,最后是
proto文件的路径。编译之后会生成
AddressBook.pb.h和
AddressBook/pb.cc文件,其中包含了大量的接口函数,用户可以利用这些接口函数获取和改变某个
field的值。对应上面的data
schema定义,有这样的一些接口函数:
1 // name
2 inline bool has_name() const;
3 inline void clear_name();
4 inline const ::std::string& name() const;  //getter
5 inline void set_name(const ::std::string& value);  //setter
6 inline void set_name(const char* value);  //setter
7 inline ::std::string* mutable_name();
8
9 // email
10 inline bool has_email() const;
11 inline void clear_email();
12 inline const ::std::string& email() const; //getter
13 inline void set_email(const ::std::string& value);  //setter
14 inline void set_email(const char* value);  //setter
15 inline ::std::string* mutable_email();
16
17 // phone
18 inline int phone_size() const;
19 inline void clear_phone();
20 inline const ::google::protobuf::RepeatedPtrField< ::tutorial::Person_PhoneNumber >& phone() const;
21 inline ::google::protobuf::RepeatedPtrField< ::tutorial::Person_PhoneNumber >* mutable_phone();
22 inline const ::tutorial::Person_PhoneNumber& phone(int index) const;
23 inline ::tutorial::Person_PhoneNumber* mutable_phone(int index);
24 inline ::tutorial::Person_PhoneNumber* add_phone();
每个类都有对应的
setter和
getter,因为
phone是
repeated类型的,所以还多了通过
index来获取和改变某一个元素的
setter和
getter,
phone还有一个获取数量的
phone_size函数。
官网上的tutorial是通过
bool ParseFromIstream(istream* input);来从binary的数据文件里解析数据,为了更好地说明Caffe中读取数据的方式,我稍微修改了代码,使用了和
Caffe一样的方式通过
TextFormat::Parse来解析文本格式的数据。具体的代码如下:
#include <iostream>
#include <fstream>
#include <string>
#include <algorithm>
#include <stdint.h>
#include <fcntl.h>
#include <unistd.h>
#include <google/protobuf/io/coded_stream.h>
#include <google/protobuf/io/zero_copy_stream_impl.h>
#include <google/protobuf/text_format.h>
#include "addressBook.pb.h"

using namespace std;
using google::protobuf::io::FileInputStream;
using google::protobuf::io::FileOutputStream;
using google::protobuf::io::ZeroCopyInputStream;
using google::protobuf::io::CodedInputStream;
using google::protobuf::io::Zer
faf0
oCopyOutputStream;
using google::protobuf::io::CodedOutputStream;
using google::protobuf::Message;

// Iterates though all people in the AddressBook and prints info about them.
void ListPeople(const tutorial::AddressBook& address_book) {
for (int i = 0; i < address_book.person_size(); i++) {
const tutorial::Person& person = address_book.person(i);

cout << "Person ID: " << person.id() << endl;
cout << "  Name: " << person.name() << endl;
if (person.has_email()) {
cout << "  E-mail address: " << person.email() << endl;
}

for (int j = 0; j < person.phone_size(); j++) {
const tutorial::Person::PhoneNumber& phone_number = person.phone(j);

switch (phone_number.type()) {
case tutorial::Person::MOBILE:
cout << "  Mobile phone #: ";
break;
case tutorial::Person::HOME:
cout << "  Home phone #: ";
break;
case tutorial::Person::WORK:
cout << "  Work phone #: ";
break;
}
cout << phone_number.number() << endl;
}
}
}

// Main function:  Reads the entire address book from a file and prints all
//   the information inside.
int main(int argc, char* argv[]) {
// Verify that the version of the library that we linked against is
// compatible with the version of the headers we compiled against.
GOOGLE_PROTOBUF_VERIFY_VERSION;

if (argc != 2) {
cerr << "Usage:  " << argv[0] << " ADDRESS_BOOK_FILE" << endl;
return -1;
}

tutorial::AddressBook address_book;

{
// Read the existing address book.
int fd = open(argv[1], O_RDONLY);
FileInputStream* input = new FileInputStream(fd);
if (!google::protobuf::TextFormat::Parse(input, &address_book)) {
cerr << "Failed to parse address book." << endl;
delete input;
close(fd);
return -1;
}
}

ListPeople(address_book);

// Optional:  Delete all global objects allocated by libprotobuf.
google::protobuf::ShutdownProtobufLibrary();

return 0;
}
读取和解析数据的代码:
1 int fd = open(argv[1], O_RDONLY);
2 FileInputStream* input = new FileInputStream(fd);
3 if (!google::protobuf::TextFormat::Parse(input, &address_book)) {
4   cerr << "Failed to parse address book." << endl;
5 }
这一段代码将input解析为我们设计的数据格式,写入到
address_book中。之后再调用
ListPeople函数输出数据,来验证数据确实是按照我们设计的格式来存储和读取的。
ListPeople函数中使用了之前提到的各个
getter接口函数。
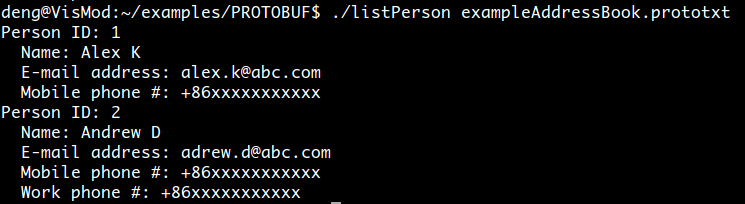
1 # ExampleAddressBook.prototxt
2 person {
3   name: "Alex K"
4   id: 1
5   email: "kongming.liang@abc.com"
6   phone {
7     number: "+86xxxxxxxxxxx"
8     type: MOBILE
9   }
10 }
11
12 person {
13   name: "Andrew D"
14   id: 2
15   email: "xuesong.deng@vipl.ict.ac.cn"
16   phone {
17     number: "+86xxxxxxxxxxx"
18     type: MOBILE
19   }
20   phone {
21     number: "+86xxxxxxxxxxx"
22     type: WORK
23   }
24 }
上面的文件的解析结果如图所示:

相关文章推荐
- iOS 保持界面流畅的技巧
- 前端小工具
- Qt之进程间通信(共享内存)
- leetcode:sort:Maximum Gap(164)
- C++中typename关键字的使用方法和注意事项
- 报错 Error: Permission denied to access property "href"
- 选择有益于性能的列类型
- Rabbitmq梳理
- RxJava 与 Retrofit 结合的最佳实践
- bitMap处理工具类
- selenium 安装与 chromedriver安装
- 元数据
- iOS:使用Github托管自己本地的项目代码方式三(命令行方式: Terminal Line)
- 网络存储技术介绍(1) ( based on zt)
- 提取多个excel某一列,合并到一个新的exce
- CALayer与UIView的关系
- 12款Java工具:源代码优化与分析
- openfire 接受消息流程
- Android 消息处理机制(Looper、Handler、MessageQueue,Message)
- AndroidStudio插件GsonFormat使用