(第3讲)开发servlet的三种方法
2016-08-28 19:15
363 查看
开发servlet的三种方法(利用JCreator)
1、实现servlet接口
2、继承GenericServlet
3、继承 HttpServlet
问题:编写一个servlet,完成一个非常简单的功能,向浏览器回送hello world!
1、实现servlet接口
(1)开发流程
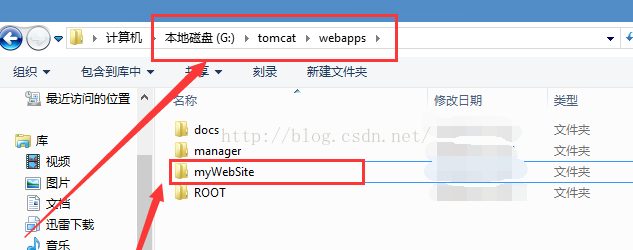
1)在tomcat的安装目录下,找到一个webapps的文件夹,在这个文件夹下建立一个自己的文件夹(名字可以随意),比如说命名为myWebSite,如图:
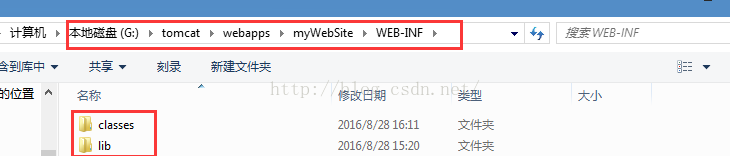
在 这个myWebSite下建立一个文件夹,名字必须为WEB-INF,
在这个文件夹下再建立2个文件夹,分别为:classes文件夹 和 lib文件夹,如图:
2)在JCreator中开发servlet,需要引入一个包:javax.servlet.*;并且这个.java文件要建立在WEB-INF中的classes文件夹中,
在JCreator中点击configure-----options----JDK Profiles-----如果没有JDK,就添加你的JDK进去,添加好之后双击----
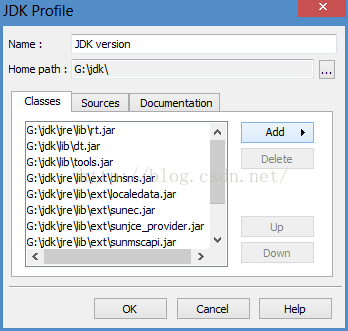
然后点击Add----Add Archie...----然后在tomcat安装文件夹中选择lib----然后把(servlet-api.jar)这个包选进来就行了
然后实现Servlet这个接口就行了,具体程序如下:
package com.weiya;
import javax.servlet.*;
import java.io.*;
import javax.servlet.ServletConfig;
import javax.servlet.ServletException;
import javax.servlet.ServletRequest;
import javax.servlet.ServletResponse;
import java.io.IOException;
public class Hello implements Servlet{
//该函数用于初始化该servlet(类似于类的构造函数)
//该函数只会被调用一次(当用户第一次访问该servlet时被调用)
public void init(ServletConfig parm1) throws ServletException {
System.out.println("init it");
}
/** Method getServletConfig */
public ServletConfig getServletConfig() {
return null;
}
//这个函数用于处理业务逻辑,业务逻辑写在这里
//当用户每访问该servlet都会被调用
//request用于获得客户端(浏览器)的信息
//response用于向客户端返回信息
public void service(ServletRequest parm1, ServletResponse parm2) throws ServletException, IOException {
System.out.println("servlet");//向控制台打印
//从response得到PrintWriter
PrintWriter pw = parm2.getWriter();
pw.println("hello world");//向浏览器打印
}
public String getServletInfo() {
return "";
}
//销毁servlet实例(释放内存)一下三种情况都会销毁
//1.reload该servlet(webApps)
//2.关闭tomcat
//3.关机
public void destroy() {
System.out.println("销毁");
}
}
3)部署自己的Servlet
具体是在刚才添加的WEB-INF文件夹中,新建一个文件或者从webapps其他文件夹中copy一个web.xml 文件
然后在里边添加自己的部署,web.xml文件程序如下:
<?xml version="1.0" encoding="ISO-8859-1"?>
<!--
Licensed to the Apache Software Foundation (ASF) under one or more
contributor license agreements. See the NOTICE file distributed with
this work for additional information regarding copyright ownership.
The ASF licenses this file to You under the Apache License, Version 2.0
(the "License"); you may not use this file except in compliance with
the License. You may obtain a copy of the License at
http://www.apache.org/licenses/LICENSE-2.0
Unless required by applicable law or agreed to in writing, software
distributed under the License is distributed on an "AS IS" BASIS,
WITHOUT WARRANTIES OR CONDITIONS OF ANY KIND, either express or implied.
See the License for the specific language governing permissions and
limitations under the License.
-->
<web-app xmlns="http://java.sun.com/xml/ns/javaee"
xmlns:xsi="http://www.w3.org/2001/XMLSchema-instance"
xsi:schemaLocation="http://java.sun.com/xml/ns/javaee
http://java.sun.com/xml/ns/javaee/web-app_3_0.xsd"
version="3.0"
metadata-complete="true">
<display-name>Welcome to Tomcat</display-name>
<description>
Welcome to Tomcat
</description>
<!--JSP servlet mapping start 一个servlet的部署-->
<!--每写一个servlet都要部署-->
<servlet>
<servlet-name>Hello</servlet-name> <!--给你的servlet取名字,名字是任意的,且不是必须的-->
<servlet-class>com.weiya.Hello</servlet-class> <!-- 指明servlet路径,即包名+类名-->
</servlet>
<servlet-mapping>
<servlet-name>Hello</servlet-name> <!-- 与上边的映射,复制下来-->
<url-pattern>/sp</url-pattern> <!-- 这是在浏览器中输入的访问该servlet的URL-->
</servlet-mapping>
<!--JSP servlet mapping end-->
</web-app>
4)启动tomcat,访问自己的Servlet就行了
在浏览器中输入 http://localhost:8080/myWebSite/sp即可看到hello world!
2、继承GenericServlet类
1)在webapps文件夹下的WEB_INF文件夹中的classes文件夹中建立.java文件
2)开发servlet
//这是第二种开发Servlet的方法(继承GenericServlet类)
package com.weiya;
import javax.servlet.GenericServlet;
import javax.servlet.*;
import java.io.*;
public class Gene extends GenericServlet{
//重写service方法即可
public void service(ServletRequest req,ServletResponse res){
//返回hello world! genetic
try{
PrintWriter pw = res.getWriter();
pw.println("hello world!genetic");
}catch(Exception e){
e.printStackTrace();
}
}
}
3)在web.xml文件中部署servlet
4)启动tomcat,访问自己的Servlet就行了
3、继承 HttpServlet类
1)在webapps文件夹下的WEB_INF文件夹中的classes文件夹中建立.java文件
2)开发servlet
//这是第三种开发Servlet的方法(继承HttpServlet类)
,需要重写doGet 和doPost方法
package com.weiya;
import javax.servlet.http.*;
import java.io.*;
//一般将post 和 get方法合体
public class Http extends HttpServlet{
//处理get 请求
//req:用于获得客户端的信息
//res:用于向客户端返回信息
public void doGet(HttpServletRequest req,HttpServletResponse res ){
//业务逻辑在这里写
//也可以在这里写 this.doPost(req,res);在doPost写业务逻辑
try{
PrintWriter pw = res.getWriter();
pw.println("hello world! HttpServlet");
}catch(Exception e){
e.printStackTrace();
}
}
//处理post请求
//req:用于获得客户端的信息
//res:用于向客户端返回信息
public void doPost(HttpServletRequest req,HttpServletResponse res ){
this.doGet(req,res);
}
}
3)在web.xml文件中部署servlet
4)启动tomcat,访问自己的Servlet就行了
1、实现servlet接口
2、继承GenericServlet
3、继承 HttpServlet
问题:编写一个servlet,完成一个非常简单的功能,向浏览器回送hello world!
1、实现servlet接口
(1)开发流程
1)在tomcat的安装目录下,找到一个webapps的文件夹,在这个文件夹下建立一个自己的文件夹(名字可以随意),比如说命名为myWebSite,如图:
在 这个myWebSite下建立一个文件夹,名字必须为WEB-INF,
在这个文件夹下再建立2个文件夹,分别为:classes文件夹 和 lib文件夹,如图:
2)在JCreator中开发servlet,需要引入一个包:javax.servlet.*;并且这个.java文件要建立在WEB-INF中的classes文件夹中,
在JCreator中点击configure-----options----JDK Profiles-----如果没有JDK,就添加你的JDK进去,添加好之后双击----
然后点击Add----Add Archie...----然后在tomcat安装文件夹中选择lib----然后把(servlet-api.jar)这个包选进来就行了
然后实现Servlet这个接口就行了,具体程序如下:
package com.weiya;
import javax.servlet.*;
import java.io.*;
import javax.servlet.ServletConfig;
import javax.servlet.ServletException;
import javax.servlet.ServletRequest;
import javax.servlet.ServletResponse;
import java.io.IOException;
public class Hello implements Servlet{
//该函数用于初始化该servlet(类似于类的构造函数)
//该函数只会被调用一次(当用户第一次访问该servlet时被调用)
public void init(ServletConfig parm1) throws ServletException {
System.out.println("init it");
}
/** Method getServletConfig */
public ServletConfig getServletConfig() {
return null;
}
//这个函数用于处理业务逻辑,业务逻辑写在这里
//当用户每访问该servlet都会被调用
//request用于获得客户端(浏览器)的信息
//response用于向客户端返回信息
public void service(ServletRequest parm1, ServletResponse parm2) throws ServletException, IOException {
System.out.println("servlet");//向控制台打印
//从response得到PrintWriter
PrintWriter pw = parm2.getWriter();
pw.println("hello world");//向浏览器打印
}
public String getServletInfo() {
return "";
}
//销毁servlet实例(释放内存)一下三种情况都会销毁
//1.reload该servlet(webApps)
//2.关闭tomcat
//3.关机
public void destroy() {
System.out.println("销毁");
}
}
3)部署自己的Servlet
具体是在刚才添加的WEB-INF文件夹中,新建一个文件或者从webapps其他文件夹中copy一个web.xml 文件
然后在里边添加自己的部署,web.xml文件程序如下:
<?xml version="1.0" encoding="ISO-8859-1"?>
<!--
Licensed to the Apache Software Foundation (ASF) under one or more
contributor license agreements. See the NOTICE file distributed with
this work for additional information regarding copyright ownership.
The ASF licenses this file to You under the Apache License, Version 2.0
(the "License"); you may not use this file except in compliance with
the License. You may obtain a copy of the License at
http://www.apache.org/licenses/LICENSE-2.0
Unless required by applicable law or agreed to in writing, software
distributed under the License is distributed on an "AS IS" BASIS,
WITHOUT WARRANTIES OR CONDITIONS OF ANY KIND, either express or implied.
See the License for the specific language governing permissions and
limitations under the License.
-->
<web-app xmlns="http://java.sun.com/xml/ns/javaee"
xmlns:xsi="http://www.w3.org/2001/XMLSchema-instance"
xsi:schemaLocation="http://java.sun.com/xml/ns/javaee
http://java.sun.com/xml/ns/javaee/web-app_3_0.xsd"
version="3.0"
metadata-complete="true">
<display-name>Welcome to Tomcat</display-name>
<description>
Welcome to Tomcat
</description>
<!--JSP servlet mapping start 一个servlet的部署-->
<!--每写一个servlet都要部署-->
<servlet>
<servlet-name>Hello</servlet-name> <!--给你的servlet取名字,名字是任意的,且不是必须的-->
<servlet-class>com.weiya.Hello</servlet-class> <!-- 指明servlet路径,即包名+类名-->
</servlet>
<servlet-mapping>
<servlet-name>Hello</servlet-name> <!-- 与上边的映射,复制下来-->
<url-pattern>/sp</url-pattern> <!-- 这是在浏览器中输入的访问该servlet的URL-->
</servlet-mapping>
<!--JSP servlet mapping end-->
</web-app>
4)启动tomcat,访问自己的Servlet就行了
在浏览器中输入 http://localhost:8080/myWebSite/sp即可看到hello world!
2、继承GenericServlet类
1)在webapps文件夹下的WEB_INF文件夹中的classes文件夹中建立.java文件
2)开发servlet
//这是第二种开发Servlet的方法(继承GenericServlet类)
package com.weiya;
import javax.servlet.GenericServlet;
import javax.servlet.*;
import java.io.*;
public class Gene extends GenericServlet{
//重写service方法即可
public void service(ServletRequest req,ServletResponse res){
//返回hello world! genetic
try{
PrintWriter pw = res.getWriter();
pw.println("hello world!genetic");
}catch(Exception e){
e.printStackTrace();
}
}
}
3)在web.xml文件中部署servlet
4)启动tomcat,访问自己的Servlet就行了
3、继承 HttpServlet类
1)在webapps文件夹下的WEB_INF文件夹中的classes文件夹中建立.java文件
2)开发servlet
//这是第三种开发Servlet的方法(继承HttpServlet类)
,需要重写doGet 和doPost方法
package com.weiya;
import javax.servlet.http.*;
import java.io.*;
//一般将post 和 get方法合体
public class Http extends HttpServlet{
//处理get 请求
//req:用于获得客户端的信息
//res:用于向客户端返回信息
public void doGet(HttpServletRequest req,HttpServletResponse res ){
//业务逻辑在这里写
//也可以在这里写 this.doPost(req,res);在doPost写业务逻辑
try{
PrintWriter pw = res.getWriter();
pw.println("hello world! HttpServlet");
}catch(Exception e){
e.printStackTrace();
}
}
//处理post请求
//req:用于获得客户端的信息
//res:用于向客户端返回信息
public void doPost(HttpServletRequest req,HttpServletResponse res ){
this.doGet(req,res);
}
}
3)在web.xml文件中部署servlet
4)启动tomcat,访问自己的Servlet就行了

相关文章推荐
- 代码片-1】 Servlet学习(一)----Servlet的生命周期以及开发Servlet的三种方法
- 开发servlet的三种方法
- Servlet学习(一)----Servlet的生命周期以及开发Servlet的三种方法
- Java Web -- Servlet(5) 开发Servlet的三种方法、配置Servlet具体解释、Servlet的生命周期(2)
- day_2 servlet 三种开发方法
- 开发servlet的三种方法
- Servlet——开发Servlet三种方法详解
- 开发 Servlet 三种方法
- 开发servlet的三种方法
- 传统JSP,JSP+JavaBean,JSP+Servlet+JavaBean三种开发javaweb的方法比较
- Servlet学习之一开发Servlet的三种方法
- 开发servlet的三种方法
- servlet 第二讲 笔记2 第二、三种开发方法 简单的登录
- 开发Servlet的三种方法
- 开发Servlet的三种方法
- Android开发中完全退出程序的三种方法
- Android开发之XML文件的解析的三种方法
- 【Hibernate框架开发之五】Hibernate对象的三种状态&&Session的常用方法
- Java Web开发Tomcat中三种部署项目的方法
- Android开发之XML文件的解析的三种方法