IOS实现左右两个TableView联动效果
2016-08-23 16:02
811 查看
一、先来看看要实现的效果图

二、小解析,可以先看看后面的!
三、实现 tableView联动 主要分两种状况
1、点击 左侧 cell 让右侧 tableView 滚到对应位置
2、滑动 右侧 tableView 让左侧 tableView 滚到对应位置
1.先实现简单的:点击 左侧 cell 让右侧 tableView 滚到对应位置
//MARK: - 点击 cell 的代理方法
- (void)tableView:(UITableView *)tableView didSelectRowAtIndexPath:(NSIndexPath *)indexPath {
// 判断是否为 左侧 的 tableView
if (tableView == self.leftTableView) {
// 计算出 右侧 tableView 将要 滚动的 位置
NSIndexPath *moveToIndexPath = [NSIndexPath indexPathForRow:0 inSection:indexPath.row];
// 将右侧 tableView 移动到指定位置
[self.rightTableView selectRowAtIndexPath:moveToIndexPath animated:YES scrollPosition:UITableViewScrollPositionTop];
// 取消选中效果
[self.rightTableView deselectRowAtIndexPath:moveToIndexPath animated:YES];
}
}
左侧 按钮点击的联动 搞定!
2.滑动 右侧 tableView 让左侧 tableView 滚到对应位置
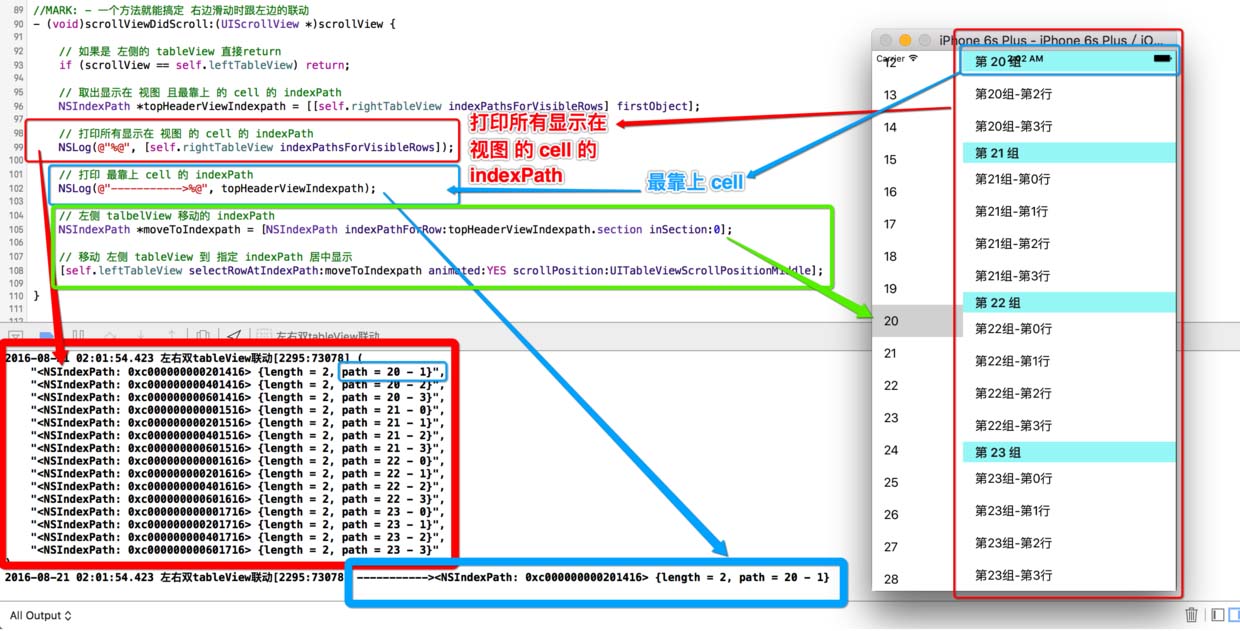
[self.rightTableView indexPathsForVisibleRows]返回 所有显示在界面的 cell 的 indexPath
//MARK: - 一个方法就能搞定 右边滑动时跟左边的联动
- (void)scrollViewDidScroll:(UIScrollView *)scrollView {
// 如果是 左侧的 tableView 直接return
if (scrollView == self.leftTableView) return;
// 取出显示在 视图 且最靠上 的 cell 的 indexPath
NSIndexPath *topHeaderViewIndexpath = [[self.rightTableView indexPathsForVisibleRows] firstObject];
// 左侧 talbelView 移动到的位置 indexPath
NSIndexPath *moveToIndexpath = [NSIndexPath indexPathForRow:topHeaderViewIndexpath.section inSection:0];
// 移动 左侧 tableView 到 指定 indexPath 居中显示
[self.leftTableView selectRowAtIndexPath:moveToIndexpath animated:YES scrollPosition:UITableViewScrollPositionMiddle];
}
第二步 右侧 滑动 跟左侧 的联动 搞定! 对的 就是这么简单!!!
四、警告
看到别人通过这两个方法判断!!! 勿用!!!
会导致 tableView 的联动 不准确
#pragma mark - UITableViewDelegate 代理方法 -
- (void)tableView:(UITableView *)tableView willDisplayHeaderView:(UIView *)view forSection:(NSInteger)section {
//
// headerView 将要显示
// 这两个方法都不准确
}
- (void)tableView:(UITableView *)tableView didEndDisplayingHeaderView:(UIView *)view forSection:(NSInteger)section {
//
// headerView 已经显示
// 这两个方法都不准确
}
五、以下是所有示例代码
//
// ViewController.m
// 左右双tableView联动
//
// Created by 阿酷 on 16/8/20.
// Copyright © 2016年 AkuApp. All rights reserved.
//
#import "ViewController.h"
#define leftTableWidth [UIScreen mainScreen].bounds.size.width * 0.3
#define rightTableWidth [UIScreen mainScreen].bounds.size.width * 0.7
#define ScreenWidth  [UIScreen mainScreen].bounds.size.width
#define ScreenHeight [UIScreen mainScreen].bounds.size.height
#define leftCellIdentifier @"leftCellIdentifier"
#define rightCellIdentifier @"rightCellIdentifier"
@interface ViewController () <UITableViewDataSource, UITableViewDelegate>
@property (nonatomic, weak) UITableView *leftTableView;
@property (nonatomic, weak) UITableView *rightTableView;
@end
@implementation ViewController
- (void)viewDidLoad {
[super viewDidLoad];
[self.view addSubview:self.leftTableView];
[self.view addSubview:self.rightTableView];
}
#pragma mark - tableView 数据源代理方法 -
- (NSInteger)tableView:(UITableView *)tableView numberOfRowsInSection:(NSInteger)section {
if (tableView == self.leftTableView) return 40;
return 8;
}
- (NSInteger)numberOfSectionsInTableView:(UITableView *)tableView {
if (tableView == self.leftTableView) return 1;
return 40;
}
- (UITableViewCell *)tableView:(UITableView *)tableView cellForRowAtIndexPath:(NSIndexPath *)indexPath {
UITableViewCell *cell;
// 左边的 view
if (tableView == self.leftTableView) {
cell = [tableView dequeueReusableCellWithIdentifier:leftCellIdentifier forIndexPath:indexPath];
cell.textLabel.text = [NSString stringWithFormat:@"%ld", indexPath.row];
// 右边的 view
} else {
cell = [tableView dequeueReusableCellWithIdentifier:rightCellIdentifier forIndexPath:indexPath];
cell.textLabel.text = [NSString stringWithFormat:@"第%ld组-第%ld行", indexPath.section, indexPath.row];
}
return cell;
}
- (NSString *)tableView:(UITableView *)tableView titleForHeaderInSection:(NSInteger)section {
if (tableView == self.rightTableView) return [NSString stringWithFormat:@"第 %ld 组", section];
return nil;
}
#pragma mark - UITableViewDelegate 代理方法 -
//- (void)tableView:(UITableView *)tableView didEndDisplayingHeaderView:(UIView *)view forSection:(NSInteger)section {
//
// 这两个方法都不准确
//}
//
//- (void)tableView:(UITableView *)tableView willDisplayHeaderView:(UIView *)view forSection:(NSInteger)section {
//
// 这两个方法都不准确
//}
//MARK: - 一个方法就能搞定 右边滑动时跟左边的联动
- (void)scrollViewDidScroll:(UIScrollView *)scrollView {
// 如果是 左侧的 tableView 直接return
if (scrollView == self.leftTableView) return;
// 取出显示在 视图 且最靠上 的 cell 的 indexPath
NSIndexPath *topHeaderViewIndexpath = [[self.rightTableView indexPathsForVisibleRows] firstObject];
// 左侧 talbelView 移动的 indexPath
NSIndexPath *moveToIndexpath = [NSIndexPath indexPathForRow:topHeaderViewIndexpath.section inSection:0];
// 移动 左侧 tableView 到 指定 indexPath 居中显示
[self.leftTableView selectRowAtIndexPath:moveToIndexpath animated:YES scrollPosition:UITableViewScrollPositionMiddle];
}
//MARK: - 点击 cell 的代理方法
- (void)tableView:(UITableView *)tableView didSelectRowAtIndexPath:(NSIndexPath *)indexPath {
// 选中 左侧 的 tableView
if (tableView == self.leftTableView) {
NSIndexPath *moveToIndexPath = [NSIndexPath indexPathForRow:0 inSection:indexPath.row];
// 将右侧 tableView 移动到指定位置
[self.rightTableView selectRowAtIndexPath:moveToIndexPath animated:YES scrollPosition:UITableViewScrollPositionTop];
// 取消选中效果
[self.rightTableView deselectRowAtIndexPath:moveToIndexPath animated:YES];
}
}
#pragma mark - 懒加载 tableView -
// MARK: - 左边的 tableView
- (UITableView *)leftTableView {
if (!_leftTableView) {
UITableView *tableView = [[UITableView alloc] initWithFrame:CGRectMake(0, 0, leftTableWidth, ScreenHeight)];
[self.view addSubview:tableView];
_leftTableView = tableView;
tableView.dataSource = self;
tableView.delegate = self;
[tableView registerClass:[UITableViewCell class] forCellReuseIdentifier:leftCellIdentifier];
tableView.backgroundColor = [UIColor redColor];
tableView.tableFooterView = [[UIView alloc] init];
}
return _leftTableView;
}
// MARK: - 右边的 tableView
- (UITableView *)rightTableView {
if (!_rightTableView) {
UITableView *tableView = [[UITableView alloc] initWithFrame:CGRectMake(leftTableWidth, 0, rightTableWidth, ScreenHeight)];
[self.view addSubview:tableView];
_rightTableView = tableView;
tableView.dataSource = self;
tableView.delegate = self;
[tableView registerClass:[UITableViewCell class] forCellReuseIdentifier:rightCellIdentifier];
tableView.backgroundColor = [UIColor cyanColor];
tableView.tableFooterView = [[UIView alloc] init];
}
return _rightTableView;
}
@end
六、总结
IOS实现左右两个TableView联动效果的内容到这就结束了,这种的效果在我们平常的时候还是挺常见的,感兴趣的朋友们可以自己动手操作起来,希望对大家的学习工作能有所帮助。
您可能感兴趣的文章:

相关文章推荐
- iOS 类似美团外卖 app 两个 tableView 联动效果实现
- iOS 类似美团外卖app两个tableView联动效果实现
- iOS 类似美团外卖 app 两个 tableView 联动效果实现
- iOS 类似美团外卖 app 两个 tableView 联动效果实现
- iOS 类似美团外卖 app 两个 tableView 联动效果实现
- iOS 类似美团外卖 app 两个 tableView 联动效果实现
- iOS 类似美团外卖 app 两个 tableView 联动效果实现
- 8-20学习练习[用两个tableview实现类似省市联动选择效果]
- 8-20学习练习[用两个tableview实现类似省市联动选择效果]
- ios实现两个tableview联动
- IOS 两个tableview的联动效果
- IOS之左右滑动效果的实现——利用SWRevealViewController
- iOS 使用tableview,实现两个页面跳转及使用协议时错误记录
- iOS 类似外卖 两个tableView联动
- iOS下拉tableView实现上面的图片放大效果
- iOS二级tabView,左右两个tableView,点左边,刷新右边
- iOS 两个tableview 实现 瀑布流
- iOS 类似于礼物说分类栏TableView,CollectionView联动的实现
- ios之TableView实现上下拉动刷新效果