javascript基础之拖拽
2016-08-08 17:26
92 查看
javascript基础之拖拽
因为之前自学过一些web的东西,深感网上搜罗代码还要抓虫子的艰辛,所以打算将学习中遇到的重难点po出来,也算是复习一下,同时希望能给后来人提供一些帮助。如果您发现文中有错误的地方,烦请指出

,如果觉得文章对您有帮助,也请您点一个赞支持一下。
拖拽是我们在学习javascript面向对象的时候的一个典型的例子。首先按照学习面向对象的基本路径,先写出面向过程的代码,然后更改为面向对象。
先把HTML结构布局好,就一句简单的代码即可。
<div id="div1"></div>
然后使用CSS添加样式。
js代码如下:
里面有很多我没有讲到的细节,大家可以看一下智能社Blue老师的视频,我觉得Blue老师讲的真心不错。点击这里观看。
附件:http://down.51cto.com/data/2368034
因为之前自学过一些web的东西,深感网上搜罗代码还要抓虫子的艰辛,所以打算将学习中遇到的重难点po出来,也算是复习一下,同时希望能给后来人提供一些帮助。如果您发现文中有错误的地方,烦请指出
,如果觉得文章对您有帮助,也请您点一个赞支持一下。
拖拽是我们在学习javascript面向对象的时候的一个典型的例子。首先按照学习面向对象的基本路径,先写出面向过程的代码,然后更改为面向对象。
先把HTML结构布局好,就一句简单的代码即可。
<div id="div1"></div>
然后使用CSS添加样式。
#div1{
width: 200px;
height: 200px;
background: #3fa;
position: absolute;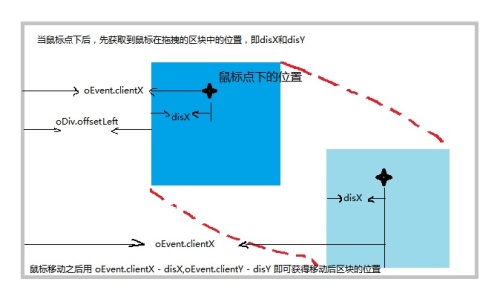
}接着使用面向过程的方法来实现拖拽的效果。原理如下:js代码如下:
window.onload = function () {
var oDiv = document.getElementById("div1");
var disX = 0;
var disY = 0;
oDiv.|| event;
disX = oEvent.clientX - oDiv.offsetLeft;
disY = oEvent.clientY - oDiv.offsetTop;
document.|| event;
var oLeft = oEvent.clientX - disX;
var oTop = oEvent.clientY - disY;
oDiv.style.left = oLeft + "px";
oDiv.style.top = oTop + "px";
}
document.onmouseup = function () {
document.onmousemove = null;
document.onmouseup = null;
}

}
};接下来将面向过程改为面向对象,将全局变量变换为属性,代码如下:function Drag(id) {
this.disX = 0;
this.disY = 0;
var _this = this;
this.oDiv = document.getElementById(id);
this.oDiv.onmousedown = function (ev) {
_this.FnDown(ev);
return false; /*阻止默认时间*/
}
}
Drag.prototype.FnUp = function () {
document.onmousemove = null;
document.onmouseup = null;
};
Drag.prototype.FnMove = function (ev) {
var oEvent = ev || event;
var oLeft = oEvent.clientX - this.disX;
var oTop = oEvent.clientY - this.disY;
this.oDiv.style.left = oLeft + "px";
this.oDiv.style.top = oTop + "px";
};
Drag.prototype.FnDown = function (ev) {
var _this = this;
var oEvent = ev || event;
this.disX = oEvent.clientX - this.oDiv.offsetLeft;
this.disY = oEvent.clientY - this.oDiv.offsetTop;
document.onmousemove = function (ev) {
_this.FnMove(ev);
};
document.onmouseup = function () {
_this.FnUp();
};
};下面是一个受限制的拖拽,拖拽的区块只能在可是区内拖动,不能超出范围。代码如下:function LimitedDrag(id){
Drag.call(this,id);
}
for(var i in Drag.prototype){
LimitedDrag.prototype[i] = Drag.prototype[i];
}
LimitedDrag.prototype.FnMove = function (ev) {
var oEvent = ev || event;
var oLeft = oEvent.clientX - this.disX;
var oTop = oEvent.clientY - this.disY;
if(oLeft < 0){ /*左右不能越过窗口*/
oLeft = 0;
}else if(oLeft > document.documentElement.clientWidth - this.oDiv.offsetWidth){
oLeft = document.documentElement.clientWidth - this.oDiv.offsetWidth;
}
if(oTop < 0){ /*上下不能越过窗口*/
oTop = 0;
}else if (oTop > document.documentElement.clientHeight - this.oDiv.offsetHeight){
oTop = document.documentElement.clientHeight - this.oDiv.offsetHeight;
}
this.oDiv.style.left = oLeft + "px";
this.oDiv.style.top = oTop + "px";
};完整的代码在附件中。里面有很多我没有讲到的细节,大家可以看一下智能社Blue老师的视频,我觉得Blue老师讲的真心不错。点击这里观看。
附件:http://down.51cto.com/data/2368034

相关文章推荐
- javascript基础(鼠标事件拖拽,setCapture()方法)(三十六)
- javascript基础练习-拖拽练习
- javaScript基础拖拽
- javascript 鼠标拖拽盒子--基础功能版
- JavaScript基础 鼠标拖拽
- [JS基础]JavaScript精简学习2:浏览器输出
- JavaScript基础 简单的二级联动下拉列表
- JavaScript 开发者经常忽略或误用的七个基础知识点
- JavaScript基础_13事件绑定函数+监听函数+冒泡事件流
- 锋利的JQuery----JavaScript基础知识(二)
- javascript基础修炼(2)——What's this(上)
- javascript 基础
- 05 JavaScript基础之--数组小案例
- Javascript 拖拽雏形中的一些问题——逐行分析代码,让你轻松了解拖拽的原理
- JavaScript实现文字与图片拖拽效果的方法
- javascript基础:prototype对象的继承
- 一系列JavaScript的基础工具
- JavaScript之js的一些基础方法
- JavaScript实现拖拽预览,AJAX小文件上传
- JavaScript:基础扩展(1)——JSON