Android自定义简单时间轴的实现
2016-08-07 22:45
288 查看
时间轴,顾名思义就是将发生的事件按照时间顺序罗列起来,给用户带来一种更加直观的体验。物流顺序就是一个时间轴
其实,整个时间轴还是可以当做一个ListView处理,只是在Adapter中的布局要花点心思。好了,废话不说,看代码。
1、整个效果就是一个ListView,ListView的每个条目的布局如下
2、TimelineAdapter 的代码如下:
3、listview_item的布局如下:
4、MainActivity实现代码:
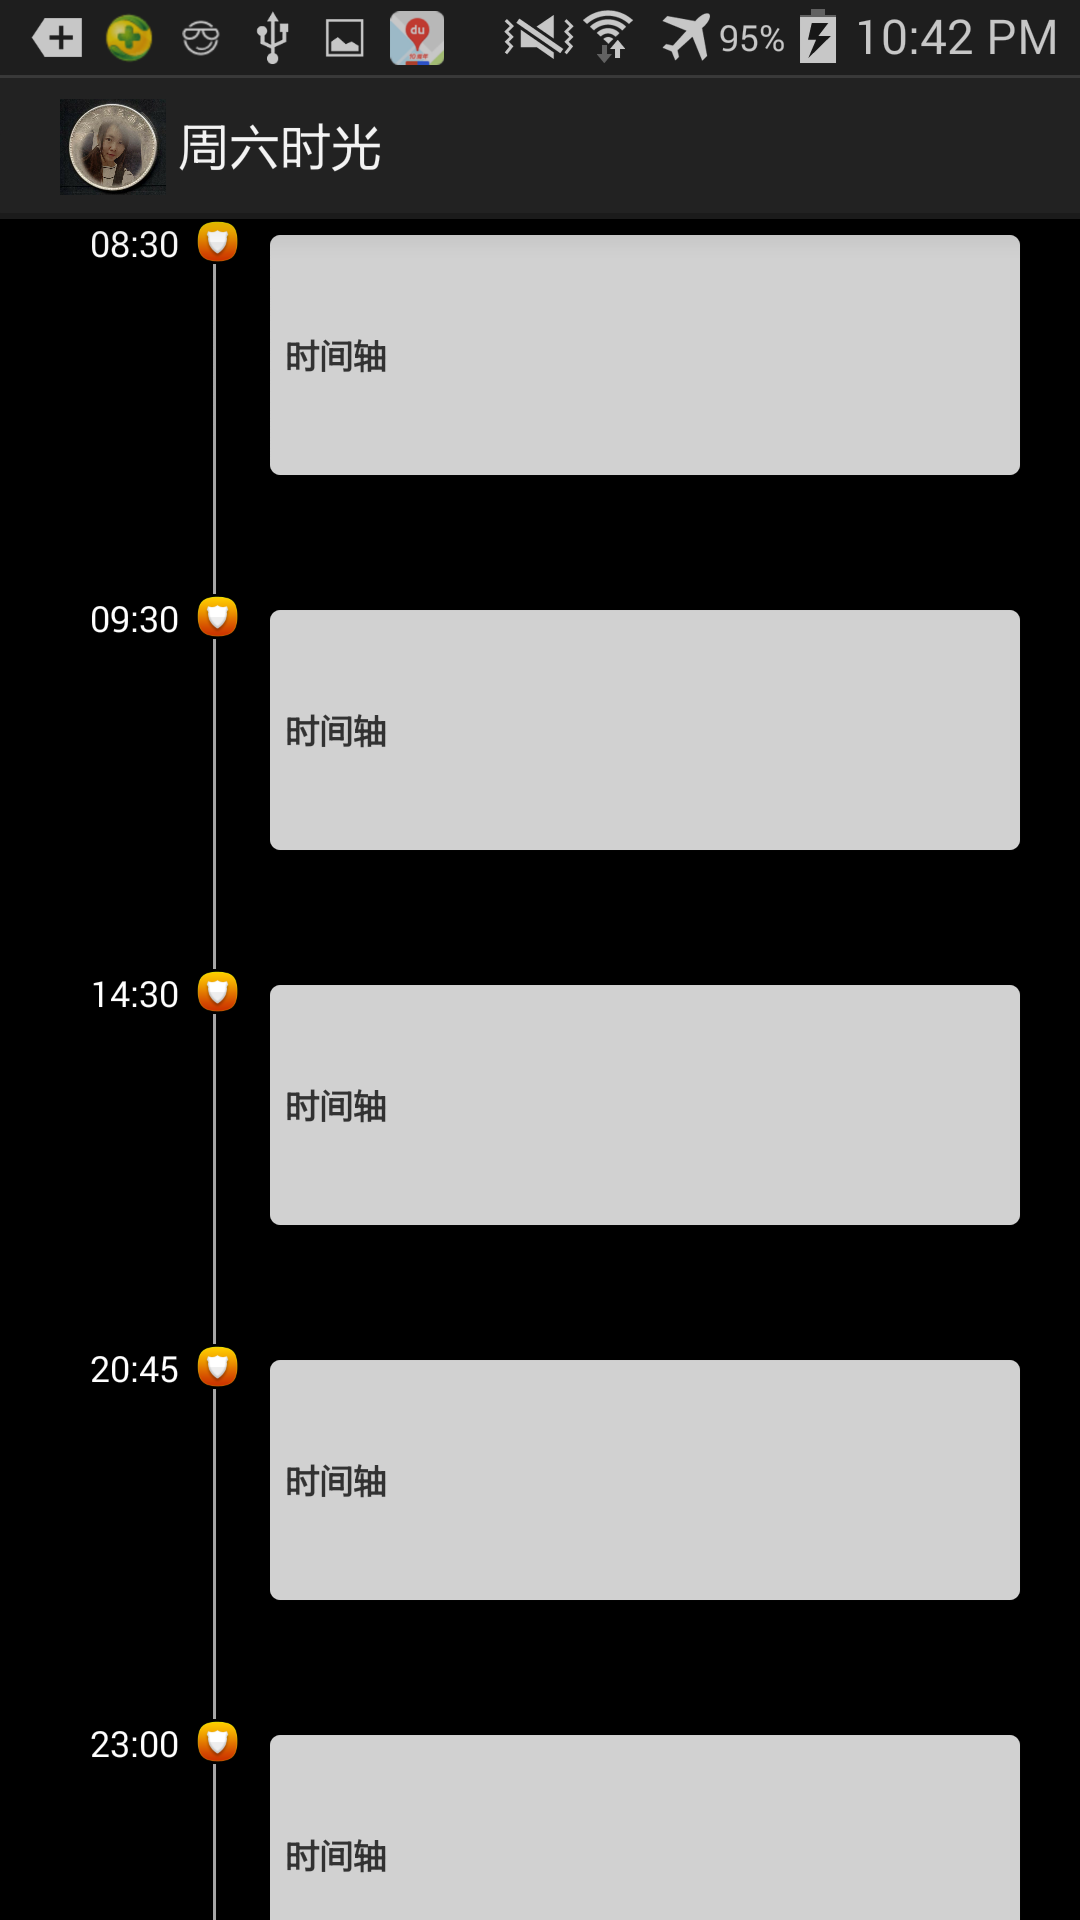
实现效果如下图
其实,整个时间轴还是可以当做一个ListView处理,只是在Adapter中的布局要花点心思。好了,废话不说,看代码。
1、整个效果就是一个ListView,ListView的每个条目的布局如下
<?xml version="1.0" encoding="utf-8"?>
<LinearLayout xmlns:android="http://schemas.android.com/apk/res/android"
android:layout_width="match_parent"
android:layout_height="match_parent"
android:orientation="vertical" >

<ListView
android:layout_width="match_parent"
android:layout_height="match_parent"
android:id="@+id/listview"
android:cacheColorHint="@null"
android:divider="@null"
></ListView>
</LinearLayout>
2、TimelineAdapter 的代码如下:
public class TimelineAdapter extends BaseAdapter {
private Context context;
private List<Map<String, Object>> list;
private LayoutInflater inflater;

public TimelineAdapter(Context context, List<Map<String, Object>> list) {
super();
this.context = context;
this.list = list;
}

@Override
public int getCount() {

return list.size();
}

@Override
public Object getItem(int position) {
return position;
}

@Override
public long getItemId(int position) {
return position;
}

@Override
public View getView(int position, View convertView, ViewGroup parent) {
ViewHolder viewHolder = null;
if (convertView == null) {
inflater = LayoutInflater.from(parent.getContext());
convertView = inflater.inflate(R.layout.listview_item, null);
viewHolder = new ViewHolder();

viewHolder.title = (TextView) convertView.findViewById(R.id.title);
viewHolder.show_time = (TextView) convertView.findViewById(R.id.show_time);
viewHolder.image=(ImageView) convertView.findViewById(R.id.image);
viewHolder.view_1= convertView.findViewById(R.id.view_1);

convertView.setTag(viewHolder);
} else {
viewHolder = (ViewHolder) convertView.getTag();
}

String titleStr = list.get(position).get("title").toString();
String timeStr = list.get(position).get("show_time").toString();

viewHolder.title.setText(titleStr);
viewHolder.show_time.setText(timeStr);
if (position==0) {
viewHolder.view_1.setVisibility(View.GONE);
}

return convertView;
}

static class ViewHolder {
public TextView year;
public TextView month;
public ImageView image;
public TextView title;
View view_2;
View view_1;

public  TextView show_time;
}
}
3、listview_item的布局如下:
<?xml version="1.0" encoding="utf-8"?>
<RelativeLayout xmlns:android="http://schemas.android.com/apk/res/android"
android:layout_width="match_parent"
android:layout_height="match_parent"
android:background="#000000"
android:orientation="vertical"
android:paddingRight="20dp" >

<View
android:id="@+id/view_1"
android:layout_width="1dp"
android:layout_height="20dp"
android:layout_marginLeft="71dp"
android:background="#A6A6A6" />

<TextView
android:id="@+id/show_time"
android:layout_width="wrap_content"
android:layout_height="wrap_content"
android:layout_below="@+id/view_1"
android:layout_marginLeft="30dp"
android:text="06:00"
android:textColor="#ffffff"

4000
android:textSize="12dp" />

<ImageView
android:id="@+id/image"
android:layout_width="15dp"
android:layout_height="15dp"
android:layout_below="@+id/view_1"
android:layout_marginLeft="65dp"
android:src="@drawable/callmsgsafe" />

<View
android:id="@+id/view_2"
android:layout_width="1dp"
android:layout_height="90dp"
android:layout_below="@+id/image"
android:layout_marginLeft="71dp"
android:background="#A6A6A6" />

<RelativeLayout
android:id="@+id/relative"
android:layout_width="fill_parent"
android:layout_height="80dp"
android:layout_below="@+id/image"
android:layout_marginTop="-10dp"
android:layout_toRightOf="@+id/image"
android:background="@drawable/reg_shape"
android:layout_marginLeft="10dp" >

<TextView
android:id="@+id/title"
android:layout_width="wrap_content"
android:layout_height="wrap_content"
android:layout_centerVertical="true"
android:paddingLeft="5dp"
android:textStyle="bold"
android:text="19:00"
android:textSize="12sp" />

</RelativeLayout>

</RelativeLayout>
4、MainActivity实现代码:
public class MainActivity extends Activity {

private ListView listView;
List<String> data ;
private TimelineAdapter timelineAdapter;

@Override
protected void onCreate(Bundle savedInstanceState) {
super.onCreate(savedInstanceState);
setContentView(R.layout.activity_listview);
listView = (ListView) this.findViewById(R.id.listview);
listView.setDividerHeight(0);
timelineAdapter = new TimelineAdapter(this, getData());
listView.setAdapter(timelineAdapter);

}

private List<Map<String, Object>> getData() {
List<Map<String, Object>> list = new ArrayList<Map<String, Object>>();

Map<String, Object> map = new HashMap<String, Object>();
map.put("title", "时间轴");
map.put("show_time", "08:30");
list.add(map);

map = new HashMap<String, Object>();
map.put("title", "时间轴");
map.put("show_time", "09:30");
list.add(map);

map = new HashMap<String, Object>();
map.put("title", "时间轴");
map.put("show_time", "14:30");
list.add(map);

map = new HashMap<String, Object>();
map.put("title", "时间轴");
map.put("show_time", "20:45");
list.add(map);

map = new HashMap<String, Object>();
map.put("title", "时间轴");
map.put("show_time", "23:00");
list.add(map);

map = new HashMap<String, Object>();
map.put("title", "时间轴");
map.put("show_time", "00:30");
list.add(map);
return list;
}

}
实现效果如下图

相关文章推荐
- android:最简单的方式实现自定义选择时间分钟间隔,非滚轮方式
- 基于百度地图 Android SDKv1.3.5实现简单的定位功能,自定义标题栏
- android自定义简单Adapter-实现每列按钮事件
- Android自定义ListView,轻松实现上下拉刷新,一看就懂,一学就会,超简单。
- Android简单对话框、输入对话框、单选对话框、复选对话框、列表对话框、自定义对话框、时间对话框
- android自定义日期和时间选择对话框得实现
- Android实现自定义的 时间日期 控件
- android使用NumberPicker实现自定义带时间的对话框
- Android时间选择器的简单实现
- 高德地图Android自定义路线规划的简单实现
- Android自定义ViewGroup:实现简单的垂直方向线性布局(2)
- Android记录14--自定义Comparator,实现List按时间排序
- android自定义SlideMenu源码详解之最简单侧滑实现
- 简单谈谈android自定义相机的实现(上 android.hardware.Camera)
- Android实现自定义的 时间日期 控件
- android 通过回调实现 完全自定义Dialog 简单易用
- Android自定义Comparator,实现List按时间排序
- android:滑动挂断自定义View的简单实现
- Android自定义dialog简单实现方法
- 菜鸟初学android体验之——实现自定义简单标题栏的两种简单方法