Android类似QQ左划出现删除按钮点击效果的ListView
2016-07-29 17:11
609 查看
当下对listview的item进行左划的操作,实现删除按钮的划出并且点击删除的功能是比较流行的。在开发的过程中,本人也使用到了这部分的内容,写一些自己的心得,希望能对大家有所帮助。
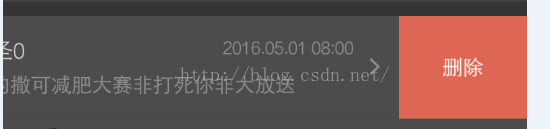
实现的效果图如下(只是截图了一部分):
首先,我们先自定义一个SwipeListView的Listview的类,这个类在我们的布局文件的引用中要用到。
废话不多说,SwipeListView.class代码如下,可以直接复用:
然后要定义我们的item项,SwipItemLayout.class的代码如下:
而我们要出现的左划删除的按钮效果,是在listview中的,需要定义我们listview的适配器,我们适配器SwipeAdapter的代码如下:
adapter的编写还是比较简单的,大家主要看一下viewHolder的容器和getViewa()就Ok啦。然后说一下view01和view02中用到的两个layout,分别代表我们的一个item的layout和删除按钮的layout。
然后item的layout和删除按钮的layout的xml分别如下:
item的xml:
删除按钮的xml的布局:
这些准备完事以后,就是最后的调用的一步了,在我们需要用到这个左划删除的activity中,声明以下,然后setAdapter等操作即可完成我们的界面,具体代码如下:
声明部分:
onCreate()部分:
然后getListItems()的代码:
实现的效果图如下(只是截图了一部分):
首先,我们先自定义一个SwipeListView的Listview的类,这个类在我们的布局文件的引用中要用到。
废话不多说,SwipeListView.class代码如下,可以直接复用:
import android.content.Context;
import android.support.v4.view.MotionEventCompat;
import android.util.AttributeSet;
import android.util.TypedValue;
import android.view.MotionEvent;
import android.view.View;
import android.view.animation.Interpolator;
import android.widget.ListView;

public class SwipeListView extends ListView {

private static final int TOUCH_STATE_NONE = 0;
private static final int TOUCH_STATE_X = 1;
private static final int TOUCH_STATE_Y = 2;

private int MAX_Y = 5;
private int MAX_X = 3;
private float mDownX;
private float mDownY;
private int mTouchState;
private int mTouchPosition;
private SwipeItemLayout mTouchView;
private Interpolator mCloseInterpolator;
private Interpolator mOpenInterpolator;

public SwipeListView(Context context, AttributeSet attrs, int defStyle) {
super(context, attrs, defStyle);
// TODO Auto-generated constructor stub
init();
}

public SwipeListView(Context context, AttributeSet attrs) {
super(context, attrs);
// TODO Auto-generated constructor stub
init();
}

public SwipeListView(Context context) {
super(context);
// TODO Auto-generated constructor stub
init();
}

private void init() {
MAX_X = dp2px(MAX_X);
MAX_Y = dp2px(MAX_Y);
mTouchState = TOUCH_STATE_NONE;
}

public void setCloseInterpolator(Interpolator interpolator) {
mCloseInterpolator = interpolator;
}

public void setOpenInterpolator(Interpolator interpolator) {
mOpenInterpolator = interpolator;
}

public Interpolator getOpenInterpolator() {
return mOpenInterpolator;
}

public Interpolator getCloseInterpolator() {
return mCloseInterpolator;
}

@Override
public boolean onInterceptTouchEvent(MotionEvent ev) {
return super.onInterceptTouchEvent(ev);
}

@Override
public boolean onTouchEvent(MotionEvent ev) {
if (ev.getAction() != MotionEvent.ACTION_DOWN && mTouchView == null)
return super.onTouchEvent(ev);
int action = MotionEventCompat.getActionMasked(ev);
action = ev.getAction();
switch (action) {
case MotionEvent.ACTION_DOWN:
int oldPos = mTouchPosition;
mDownX = ev.getX();
mDownY = ev.getY();
mTouchState = TOUCH_STATE_NONE;

mTouchPosition = pointToPosition((int) ev.getX(), (int) ev.getY());

if (mTouchPosition == oldPos && mTouchView != null
&& mTouchView.isOpen()) {
mTouchState = TOUCH_STATE_X;
mTouchView.onSwipe(ev);
return true;
}

View view = getChildAt(mTouchPosition - getFirstVisiblePosition());

if (mTouchView != null && mTouchView.isOpen()) {
mTouchView.smoothCloseMenu();
mTouchView = null;
return super.onTouchEvent(ev);
}
if (view instanceof SwipeItemLayout) {
mTouchView = (SwipeItemLayout) view;
}
if (mTouchView != null) {
mTouchView.onSwipe(ev);
}
break;
case MotionEvent.ACTION_MOVE:
float dy = Math.abs((ev.getY() - mDownY));
float dx = Math.abs((ev.getX() - mDownX));
if (mTouchState == TOUCH_STATE_X) {
if (mTouchView != null) {
mTouchView.onSwipe(ev);
}
getSelector().setState(new int[] { 0 });
ev.setAction(MotionEvent.ACTION_CANCEL);
super.onTouchEvent(ev);
return true;
} else if (mTouchState == TOUCH_STATE_NONE) {
if (Math.abs(dy) > MAX_Y) {
mTouchState = TOUCH_STATE_Y;
} else if (dx > MAX_X) {
mTouchState = TOUCH_STATE_X;
}
}
break;
case MotionEvent.ACTION_UP:
if (mTouchState == TOUCH_STATE_X) {
if (mTouchView != null) {
mTouchView.onSwipe(ev);
if (!mTouchView.isOpen()) {
mTouchPosition = -1;
mTouchView = null;
}
}
ev.setAction(MotionEvent.ACTION_CANCEL);
super.onTouchEvent(ev);
return true;
}
break;
}
return super.onTouchEvent(ev);
}

public void smoothOpenMenu(int position) {
if (position >= getFirstVisiblePosition()
&& position <= getLastVisiblePosition()) {
View view = getChildAt(position - getFirstVisiblePosition());
if (view instanceof SwipeItemLayout) {
mTouchPosition = position;
if (mTouchView != null && mTouchView.isOpen()) {
mTouchView.smoothCloseMenu();
}
mTouchView = (SwipeItemLayout) view;
mTouchView.smoothOpenMenu();
}
}
}

private int dp2px(int dp) {
return (int) TypedValue.applyDimension(TypedValue.COMPLEX_UNIT_DIP, dp,
getContext().getResources().getDisplayMetrics());
}
}
然后要定义我们的item项,SwipItemLayout.class的代码如下:
import android.support.v4.widget.ScrollerCompat;
import android.view.MotionEvent;
import android.view.View;
import android.view.animation.Interpolator;
import android.widget.AbsListView;
import android.widget.FrameLayout;

public class SwipeItemLayout extends FrameLayout {
private View contentView = null;
private View menuView = null;
private Interpolator closeInterpolator = null;
private Interpolator openInterpolator = null;

private ScrollerCompat mOpenScroller;
private ScrollerCompat mCloseScroller;

private int mBaseX;
private int mDownX;
private int state = STATE_CLOSE;

private static final int STATE_CLOSE = 0;
private static final int STATE_OPEN = 1;

public SwipeItemLayout(View contentView,View menuView,Interpolator closeInterpolator, Interpolator openInterpolator){
super(contentView.getContext());
this.contentView = contentView;
this.menuView = menuView;
this.closeInterpolator = closeInterpolator;
this.openInterpolator = openInterpolator;

init();
}

private void init(){
setLayoutParams(new AbsListView.LayoutParams(LayoutParams.MATCH_PARENT,
LayoutParams.WRAP_CONTENT));

if (closeInterpolator != null) {
mCloseScroller = ScrollerCompat.create(getContext(),
closeInterpolator);
} else {
mCloseScroller = ScrollerCompat.create(getContext());
}
if (openInterpolator != null) {
mOpenScroller = ScrollerCompat.create(getContext(),
openInterpolator);
} else {
mOpenScroller = ScrollerCompat.create(getContext());
}

LayoutParams contentParams = new LayoutParams(
LayoutParams.MATCH_PARENT, LayoutParams.WRAP_CONTENT);
contentView.setLayoutParams(contentParams);

menuView.setLayoutParams(new LayoutParams(LayoutParams.WRAP_CONTENT,
LayoutParams.WRAP_CONTENT));

addView(contentView);
addView(menuView);
}

public boolean onSwipe(MotionEvent event) {
switch (event.getAction()) {
case MotionEvent.ACTION_DOWN:
mDownX = (int) event.getX();
break;
case MotionEvent.ACTION_MOVE:
// Log.i("byz", "downX = " + mDownX + ", moveX = " + event.getX());
int dis = (int) (mDownX - event.getX());
if (state == STATE_OPEN) {
dis += menuView.getWidth();
}
swipe(dis);
break;
case MotionEvent.ACTION_UP:
if ((mDownX - event.getX()) > (menuView.getWidth() / 2)) {
// open
smoothOpenMenu();
} else {
// close
smoothCloseMenu();
return false;
}
break;
}
return true;
}

public boolean isOpen() {
return state == STATE_OPEN;
}

private void swipe(int dis) {
if (dis > menuView.getWidth()) {
dis = menuView.getWidth();
}
if (dis < 0) {
dis = 0;
}
contentView.layout(-dis, contentView.getTop(),
contentView.getWidth() - dis, getMeasuredHeight());
menuView.layout(contentView.getWidth() - dis, menuView.getTop(),
contentView.getWidth() + menuView.getWidth() - dis,
menuView.getBottom());
}

@Override
public void computeScroll() {
if (state == STATE_OPEN) {
if (mOpenScroller.computeScrollOffset()) {
swipe(mOpenScroller.getCurrX());
postInvalidate();
}
} else {
if (mCloseScroller.computeScrollOffset()) {
swipe(mBaseX - mCloseScroller.getCurrX());
postInvalidate();
}
}
}

public void smoothCloseMenu() {
state = STATE_CLOSE;
mBaseX = -contentView.getLeft();
System.out.println(mBaseX);
mCloseScroller.startScroll(0, 0, mBaseX, 0, 350);
postInvalidate();
}

public void smoothOpenMenu() {
state = STATE_OPEN;
mOpenScroller.startScroll(-contentView.getLeft(), 0,
menuView.getWidth(), 0, 350);
postInvalidate();
}
public void closeMenu() {
if (mCloseScroller.computeScrollOffset()) {
mCloseScroller.abortAnimation();
}
if (state == STATE_OPEN) {
state = STATE_CLOSE;
swipe(0);
}
}

public void openMenu() {
if (state == STATE_CLOSE) {
state = STATE_OPEN;
swipe(menuView.getWidth());
}
}

public View getContentView() {
return contentView;
}

public View getMenuView() {
return menuView;
}

@Override
protected void onMeasure(int widthMeasureSpec, int heightMeasureSpec) {
super.onMeasure(widthMeasureSpec, heightMeasureSpec);
menuView.measure(MeasureSpec.makeMeasureSpec(0,
MeasureSpec.UNSPECIFIED), MeasureSpec.makeMeasureSpec(
getMeasuredHeight(), MeasureSpec.EXACTLY));
}

@Override
protected void onLayout(boolean changed, int l, int t, int r, int b) {
contentView.layout(0, 0, getMeasuredWidth(),
contentView.getMeasuredHeight());
menuView.layout(getMeasuredWidth(), 0,
getMeasuredWidth() + menuView.getMeasuredWidth(),
contentView.getMeasuredHeight());
// setMenuHeight(mContentView.getMeasuredHeight());
// bringChildToFront(mContentView);
}
}
而我们要出现的左划删除的按钮效果,是在listview中的,需要定义我们listview的适配器,我们适配器SwipeAdapter的代码如下:
public class SwipeAdapter extends BaseAdapter {
private Context mContext = null;
private List<Map<String, Object>> listItems;    //评论回复集合

public SwipeAdapter(Context context, List<Map<String, Object>> listItems) {
this.mContext = context;
this.listItems = listItems;
}

@Override
public int getCount() {
// TODO Auto-generated method stub
return listItems.size();
}

@Override
public Object getItem(int arg0) {
// TODO Auto-generated method stub
return null;
}

@Override
public long getItemId(int arg0) {
// TODO Auto-generated method stub
return arg0;
}

@Override
public View getView(int position, View contentView, ViewGroup arg2) {
ViewHolder holder = null;
if (contentView == null) {
holder = new ViewHolder();
View view01 = LayoutInflater.from(mContext).inflate(R.layout.list_message_item, null);
View view02 = LayoutInflater.from(mContext).inflate(R.layout.btn_delete, null);
holder.btn = (Button) view02.findViewById(R.id.btn_delete);
holder.img_icon = (ImageView) view01.findViewById(R.id.img_icon);
holder.text_type = (TextView) view01.findViewById(R.id.text_type);
holder.text_title = (TextView) view01.findViewById(R.id.text_title);
holder.text_time = (TextView) view01.findViewById(R.id.text_time);
holder.text_content = (TextView) view01.findViewById(R.id.text_content);
contentView = new SwipeItemLayout(view01, view02, null, null);
contentView.setTag(holder);
} else {
holder = (ViewHolder) contentView.getTag();
}

holder.btn.setOnClickListener(new View.OnClickListener() {

@Override
public void onClick(View arg0) {
// TODO Auto-generated method stub
Toast.makeText(mContext, "click", Toast.LENGTH_LONG).show();
}
});
holder.text_title.setText((String) listItems.get(position).get("title"));
return contentView;
}

class ViewHolder {
public Button btn;
public ImageView img_icon;
public TextView text_type, text_title, text_time, text_content;
}
}
adapter的编写还是比较简单的,大家主要看一下viewHolder的容器和getViewa()就Ok啦。然后说一下view01和view02中用到的两个layout,分别代表我们的一个item的layout和删除按钮的layout。
然后item的layout和删除按钮的layout的xml分别如下:
item的xml:
<?xml version="1.0" encoding="utf-8"?>
<RelativeLayout xmlns:android="http://schemas.android.com/apk/res/android"
android:layout_width="match_parent"
android:layout_height="match_parent"
android:background="#353535"
android:orientation="horizontal">

<RelativeLayout
android:id="@+id/rela_list_message"
android:layout_width="match_parent"
android:layout_height="70dp"
android:background="#4c4c4c">

<RelativeLayout
android:id="@+id/rela_msg_left"
android:layout_width="wrap_content"
android:layout_height="wrap_content"
android:layout_centerVertical="true"
android:layout_marginLeft="15dp">

<com.kegoal.view.CircleImageView
android:id="@+id/img_msg_icon"
android:layout_width="40dp"
android:layout_height="40dp"
android:src="@mipmap/ic_launcher" />

<TextView
android:id="@+id/text_type"
android:layout_width="wrap_content"
android:layout_height="wrap_content"
android:layout_below="@id/img_msg_icon"
android:layout_centerHorizontal="true"
android:layout_marginTop="3dp"
android:text="文本测试"
android:textColor="#de6654"
android:textSize="9sp" />
</RelativeLayout>

<RelativeLayout
android:id="@+id/rela_msg_center"
android:layout_width="match_parent"
android:layout_height="wrap_content"
android:layout_centerVertical="true"
android:layout_marginLeft="10dp"
android:layout_marginRight="31dp"
android:layout_toRightOf="@id/rela_msg_left">

<RelativeLayout
android:id="@+id/rela_msg_right_top"
android:layout_width="wrap_content"
android:layout_height="wrap_content"
android:orientation="horizontal">

<TextView
android:id="@+id/text_title"
android:layout_width="wrap_content"
android:layout_height="wrap_content"
android:text="反馈"
android:textColor="#cccccc"
android:textSize="15sp" />

<TextView
android:id="@+id/text_time"
android:layout_width="wrap_content"
android:layout_height="wrap_content"
android:layout_alignParentRight="true"
android:text="2016.05.01 08:00"
android:textColor="#8e8e8e"
android:textSize="12sp" />
</RelativeLayout>

<RelativeLayout
android:layout_width="wrap_content"
android:layout_height="wrap_content"
android:layout_below="@id/rela_msg_right_top"
android:layout_marginTop="4dp">

<TextView
android:id="@+id/text_content"
android:layout_width="wrap_content"
android:layout_height="wrap_content"
android:text="发的撒可减肥大赛非打死你非大放送"
android:textColor="#8e8e8e"
android:textSize="14sp" />
</RelativeLayout>

</RelativeLayout>

<RelativeLayout
android:layout_width="wrap_content"
android:layout_height="wrap_content"
android:layout_alignParentRight="true"
android:layout_centerInParent="true"
android:layout_marginRight="13dp">

<ImageView
android:layout_width="wrap_content"
android:layout_height="wrap_content"
android:background="@mipmap/icon_right" />
</RelativeLayout>
</RelativeLayout>
</RelativeLayout>
删除按钮的xml的布局:
<?xml version="1.0" encoding="utf-8"?>
<LinearLayout xmlns:android="http://schemas.android.com/apk/res/android"
android:layout_width="match_parent"
android:layout_height="match_parent"
android:background="#de6654"
android:orientation="vertical">

<Button
android:id="@+id/btn_delete"
android:layout_width="wrap_content"
android:layout_height="match_parent"
android:background="#de6654"
android:text="删除"
android:textColor="#ffffff" />
</LinearLayout>
这些准备完事以后,就是最后的调用的一步了,在我们需要用到这个左划删除的activity中,声明以下,然后setAdapter等操作即可完成我们的界面,具体代码如下:
声明部分:
private SwipeListView lv_message = null;
private List<Map<String, Object>> listItems;
onCreate()部分:
/**
* 对listview的处理适配
* */
lv_message = (SwipeListView) findViewById(R.id.lv_message);
listItems = getListItems();
SwipeAdapter adapter = new SwipeAdapter(this, listItems);
lv_message.setAdapter(adapter);
然后getListItems()的代码:
/**
* 初始化item信息
*/
private List<Map<String, Object>> getListItems() {
List<Map<String, Object>> listItems = new ArrayList<Map<String, Object>>();
for (int i = 0; i < 5; i++) {
Map<String, Object> map = new HashMap<String, Object>();
map.put("", "");
//            map.put("image", imgeIDs[i]);               //图片资源
map.put("title", "大大" + i);              //title
//            map.put("info", goodsNames[i]);     //物品名称
//            map.put("detail", goodsDetails[i]); //物品详情
listItems.add(map);
}
return listItems;
}

相关文章推荐
- Android 防止OOM的一种方法
- 翻译:no more findViewById
- AndroidJNI 通过C++调用JAVA
- Android触摸事件总结
- 面向对象六大原则----里氏替换原则,依赖倒置原则
- Android Studio打包及引用aar
- 安卓中使用ThreadPoolExcutor
- Android之TextView控件的学习
- 【Android】炫酷的MaterialDesign Ripple 水波纹触摸动画
- android框架-final
- android下载, 断点续传, 在关闭activity或杀进程后,可继续下载,保证android下载速度
- 【Android】 XML布局文件中,使用自定义属性不提示和不生效
- Android Studio没有导包快捷键怎么办
- Android静态安全检测 -> 证书弱校验
- Android 第三方库使用实例——编写.so库文件
- Android系统性能调优工具介绍
- Android View的事件分发机制
- Android Studio 使用git
- 百度语音合成(TTS) 在Android的使用方法
- android高效ORM数据库框架greenDao使用