自定义组合控件——TitleBar
2016-07-26 17:28
344 查看
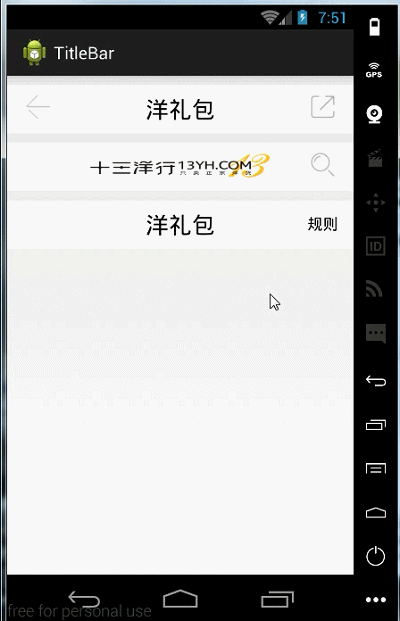
在自定义组合控件——TitleTextView这篇博客里,我写了一个非常简单的控件,但真正的实际作用不大,算是抛砖引玉吧,但是真正的项目中也是有很多自定义组合控件的,比如电商项目中的头布局,几个页面的头布局格式基本一样,用一个组合控件可以帮我们节省很多时间和代码量。今天模拟了一个电商应用的头布局,废话不多说,先上效果图:
主要功能
设置左中右显示为字体或是图片
设置字体的大小,颜色以及内容
设置左右显示或隐藏以及两边的回调点击事件
设置整体的背景颜色
实现过程
1.先看一下attr文件
2.直接在代码中生成完成布局,没有用到布局文件,基本注释了一下,这里就不再多说了
3.控件引用
这个就比较简单了,不过只写了第一个的点击事件,其他的都一样
activity_main.xml
MainActivity.java
OK!终于写完了!献上源码源码下载
最后吐槽一下,在帝都找一份Android实习工作真的好难……
主要功能
设置左中右显示为字体或是图片
设置字体的大小,颜色以及内容
设置左右显示或隐藏以及两边的回调点击事件
设置整体的背景颜色
实现过程
1.先看一下attr文件
<?xml version="1.0" encoding="utf-8"?>
<resources>

<declare-styleable name="TitleBar">
<attr name="titleBarBackgroundColor" format="color" />

<attr name="leftText" format="string" />
<attr name="leftTextSize" format="dimension" />
<attr name="leftTextColor" format="color" />
<attr name="leftBackground" format="reference|color" />

<attr name="centerText" format="string" />
<attr name="centerTextSize" format="dimension" />
<attr name="centerTextColor" format="color" />
<attr name="centerBackground" format="reference|color" />

<attr name="rightText" format="string" />
<attr name="rightTextSize" format="dimension" />
<attr name="rightTextColor" format="color" />
<attr name="rightBackground" format="reference|color" />
</declare-styleable>

</resources>
2.直接在代码中生成完成布局,没有用到布局文件,基本注释了一下,这里就不再多说了
public class TitleBar extends RelativeLayout {

private TitleBarClickListener listener;
private Button leftButton;
private Button rightButton;

public TitleBar(Context context, AttributeSet attrs, int defStyle) {
super(context, attrs, defStyle);
}

public TitleBar(Context context) {
this(context, null, 0);
}

public TitleBar(Context context, AttributeSet attrs) {
this(context, attrs, 0);
//获取declare-styleable集合
TypedArray typedArray = context.obtainStyledAttributes(attrs, R.styleable.TitleBar);
//从集合中取出相对应的值
String leftText = typedArray.getString(R.styleable.TitleBar_leftText);
float leftTextSize = typedArray.getDimension(R.styleable.TitleBar_leftTextSize, 0);
int leftTextColor = typedArray.getColor(R.styleable.TitleBar_leftTextColor, 0);
Drawable leftBackground = typedArray.getDrawable(R.styleable.TitleBar_leftBackground);
//创建Button控件并设置相对应属性
leftButton = new Button(context);
leftButton.setText(leftText);
leftButton.setTextSize(leftTextSize);
leftButton.setTextColor(leftTextColor);
leftButton.setBackgroundColor(Color.TRANSPARENT);//设置Button背景为透明
if(leftBackground != null){
leftBackground.setBounds(0, 0, 58, 58);//设置图片大小
leftButton.setCompoundDrawables(null, leftBackground, null, null);//添加图片
}
LayoutParams leftParams = new RelativeLayout.LayoutParams(LayoutParams.WRAP_CONTENT, LayoutParams.WRAP_CONTENT);
leftParams.addRule(RelativeLayout.ALIGN_PARENT_LEFT, TRUE);//设置位置在父控件左边
this.addView(leftButton, leftParams);//添加Button
//下面两个基本一样就不写注释了
String rightText = typedArray.getString(R.styleable.TitleBar_rightText);
float rightTextSize = typedArray.getDimension(R.styleable.TitleBar_rightTextSize, 0);
int rightTextColor = typedArray.getColor(R.styleable.TitleBar_rightTextColor, 0);
Drawable rightBackground = typedArray.getDrawable(R.styleable.TitleBar_rightBackground);
rightButton = new Button(context);
rightButton.setText(rightText);
rightButton.setTextSize(rightTextSize);
rightButton.setTextColor(rightTextColor);
rightButton.setBackgroundColor(Color.TRANSPARENT);
if(rightBackground != null){
rightBackground.setBounds(0, 0, 58, 58);
rightButton.setCompoundDrawables(null, rightBackground, null, null);
}
LayoutParams rightParams = new RelativeLayout.LayoutParams(LayoutParams.WRAP_CONTENT, LayoutParams.WRAP_CONTENT);
rightParams.addRule(RelativeLayout.ALIGN_PARENT_RIGHT, TRUE);
this.addView(rightButton, rightParams);

String centerText = typedArray.getString(R.styleable.TitleBar_centerText);
float centerTextSize = typedArray.getDimension(R.styleable.TitleBar_centerTextSize, 0);
int centerTextColor = typedArray.getColor(R.styleable.TitleBar_centerTextColor, 0);
Drawable centerBackground = typedArray.getDrawable(R.styleable.TitleBar_centerBackground);
Button centerButton = new Button(context);
centerButton.setText(centerText);
centerButton.setTextSize(centerTextSize);
centerButton.setTextColor(centerTextColor);
centerButton.setBackgroundColor(Color.TRANSPARENT);
if(centerBackground != null){
centerBackground.setBounds(0, 0, 374, 60);
centerButton.setCompoundDrawables(null, centerBackground, null, null);
}
LayoutParams centerParams = new RelativeLayout.LayoutParams(LayoutParams.WRAP_CONTENT, LayoutParams.WRAP_CONTENT);
centerParams.addRule(RelativeLayout.CENTER_IN_PARENT, TRUE);
this.addView(centerButton, centerParams);

int titleBarBackgroundColor = typedArray.getColor(R.styleable.TitleBar_titleBarBackgroundColor, 0);
setBackgroundColor(titleBarBackgroundColor);
//关闭资源
typedArray.recycle();

leftButton.setOnClickListener(new OnClickListener() {

@Override
public void onClick(View v) {
listener.leftClick();
}
});
rightButton.setOnClickListener(new OnClickListener() {

@Override
public void onClick(View v) {
listener.rightClick();
}
});
}
//自定义一个回调方法,左右两边点击事件
public interface TitleBarClickListener{
public void leftClick();
public void rightClick();
}
//创建Set方法
public void setTitleBarClickListener(TitleBarClickListener listener){
this.listener = listener;
}
//显示或隐藏左右两边控件的方法
public void setLeftVisible(boolean flag) {
if (flag) {
this.leftButton.setVisibility(View.VISIBLE);
} else {
this.leftButton.setVisibility(View.GONE);
}
}
public void setRightVisible(boolean flag) {
if (flag) {
this.rightButton.setVisibility(View.VISIBLE);
} else {
this.rightButton.setVisibility(View.GONE);
}
}

}
3.控件引用
这个就比较简单了,不过只写了第一个的点击事件,其他的都一样
activity_main.xml
<LinearLayout xmlns:android="http://schemas.android.com/apk/res/android"
xmlns:titleBar="http://schemas.android.com/apk/res/com.monster.titlebar"
xmlns:tools="http://schemas.android.com/tools"
android:layout_width="match_parent"
android:layout_height="match_parent"
android:orientation="vertical" >

<com.monster.titlebar.view.TitleBar
android:id="@+id/titleBar"
android:layout_width="match_parent"
android:layout_height="50dp"
android:layout_marginTop="10dp"
titleBar:centerText="洋礼包"
titleBar:centerTextColor="#000"
titleBar:centerTextSize="12sp"
titleBar:leftBackground="@drawable/back"
titleBar:rightBackground="@drawable/share"
titleBar:titleBarBackgroundColor="#fff" >
</com.monster.titlebar.view.TitleBar>

<com.monster.titlebar.view.TitleBar
android:layout_width="match_parent"
android:layout_height="50dp"
android:layout_marginTop="10dp"
titleBar:centerBackground="@drawable/title"
titleBar:rightBackground="@drawable/search"
titleBar:titleBarBackgroundColor="#fff" >
</com.monster.titlebar.view.TitleBar>

<com.monster.titlebar.view.TitleBar
android:layout_width="match_parent"
android:layout_height="50dp"
android:layout_marginTop="10dp"
titleBar:centerText="洋礼包"
titleBar:centerTextColor="#000"
titleBar:centerTextSize="12sp"
titleBar:rightText="规则"
titleBar:rightTextColor="#000"
titleBar:rightTextSize="8sp"
titleBar:titleBarBackgroundColor="#fff" >
</com.monster.titlebar.view.TitleBar>

</LinearLayout>
MainActivity.java
public class MainActivity extends Activity {
private TitleBar titleBar;

@Override
protected void onCreate(Bundle savedInstanceState) {
super.onCreate(savedInstanceState);
setContentView(R.layout.activity_main);
titleBar = (TitleBar) findViewById(R.id.titleBar);
titleBar.setTitleBarClickListener(new TitleBarClickListener() {

@Override
public void rightClick() {
Toast.makeText(MainActivity.this, "分享", Toast.LENGTH_SHORT).show();
}

@Override
public void leftClick() {
Toast.makeText(MainActivity.this, "返回", Toast.LENGTH_SHORT).show();
}
});
}
}OK!终于写完了!献上源码源码下载
最后吐槽一下,在帝都找一份Android实习工作真的好难……

相关文章推荐
- 盘点2020中国电商平台TOP10
- Android布局的小窍门?
- Web布局连载——两栏固定布局(五)
- 深度好文:2018,世界在拼多多发生折叠
- 深度好文:2018,世界在拼多多发生折叠
- C位出道后却遇前狼后虎,生鲜电商多点如何突围?
- flex 控件的重要属性
- 学习Winform文本类控件(Label、Button、TextBox)
- Delphi控件ListView的属性及使用方法详解
- 样式表CSS布局经验
- 在winform下实现左右布局多窗口界面的方法之续篇
- web下载的ActiveX控件自动更新
- WinForm实现按名称递归查找控件的方法
- css网页布局中注意的几个问题小结
- DL.DT.DD实现左右的布局简单例子第1/2页
- 使用CSS框架布局的缺点和优点小结
- div+CSS网页布局的意义与副作用原因小结第1/2页
- C#中父窗口和子窗口之间控件互操作实例
- 在winform下实现左右布局多窗口界面的方法
- C#编写ActiveX网页截图控件