UITableView之一分组简单使用
2016-07-25 20:46
363 查看
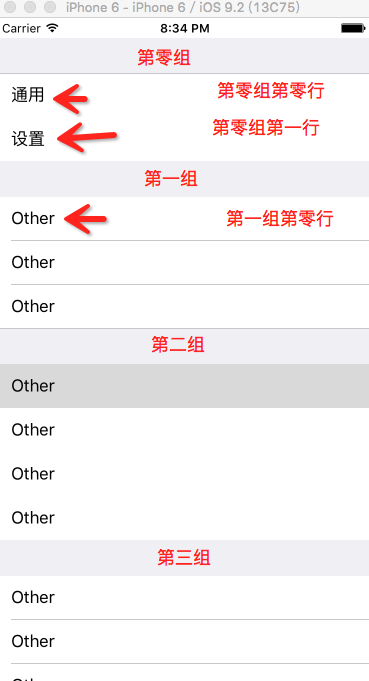
分组也就是类似设置界面中的界面展示
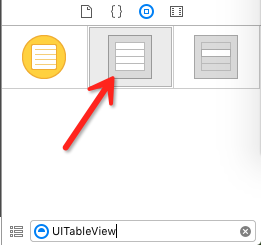
1.首先在Storyboard中拖一个UITableView
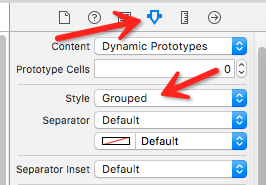
2.其次设置分组属性默认是Plain我们选择Grouped
3.最后在将控件拖到代码中设置代理如下代码:
//
//  ViewController.m
//  TableView分组
//
//  Created by gaocai on 16/7/25.
//  Copyright © 2016年 gaocai. All rights reserved.
//

#import "ViewController.h"

@interface ViewController ()<UITableViewDataSource>
@property (weak, nonatomic) IBOutlet UITableView *tableView;

@end

@implementation ViewController

- (void)viewDidLoad {
[super viewDidLoad];
//设置代理
_tableView.dataSource = self;
}

#pragma mark - UITableViewDataSource代理方法

//显示多少组
- (NSInteger)numberOfSectionsInTableView:(UITableView *)tableView {

return 4;
}

//每一组有多少行
- (NSInteger)tableView:(UITableView *)tableView numberOfRowsInSection:(NSInteger)section {

if (section == 0) { //section组
return 2;
} else if (section == 1) {
return 3;
} else if (section == 2) {
return 4;
} else {
return 5;
}
}

//每一组的每一行都是一个UITableViewCell
- (UITableViewCell *)tableView:(UITableView *)tableView cellForRowAtIndexPath:(NSIndexPath *)indexPath {

UITableViewCell *cell = [[UITableViewCell alloc] init];
NSInteger section = indexPath.section;
NSInteger row = indexPath.row;
if (section == 0) {
if (row == 0) {
cell.textLabel.text = @"通用";
} else if(row == 1) {
cell.textLabel.text = @"设置";
}
} else {

cell.textLabel.text = @"Other";
}
return cell;
}

@end

相关文章推荐
- 第一个Java SWing GUI程序
- Uva 7363 -- A rational Sequence(简单)
- CodeForces 289A Polo the Penguin and Segments
- 【POJ2533】Longest Ordered Subsequence(LIS-最长上升子序列/DP)
- 【HDU1159】Common Subsequence(LCS/DP)
- LeetCode Permutation Sequence(求排列中的第k个排列是什么)
- 1085. Perfect Sequence (25)
- UINavigationBar 透明颜色后下方还有一个1像素的黑线
- easyui combo选中事件
- hdu 3530 Subsequence
- hdu-5749 Colmerauer(单调栈)
- LeetCode:357. Count Numbers with Unique Digits
- RequestDispatcher的forward方法
- codreforces C. Replace To Make Regular Bracket Sequence(栈)
- CodeForces 288A Polo the Penguin and Strings
- Java多线程之BlockingQueue深入分析
- Android MVPBuilder第一篇
- CodeForces 612C Replace To Make Regular Bracket Sequence (栈)
- 草蛋的Android studio 居然让我搞了好几天 真是智障啊non-zero exit value 2
- 自定义控件的使用流程