使用OAuth、Identity创建WebApi认证接口供客户端调用
2016-07-24 21:18
609 查看
前言
现在的web app基本上都是前后端分离,之前接触的大部分应用场景最终产品都是部署在同一个站点下,那么随着WebApi(Restful api)的发展前后端实现的完全分离,前端不在后端框架的页面基础上开发,也就告别传统上的Session判断客户端登陆用户的情况。OAuth已发布很久,Asp.Net Identity也发布很久。看了几篇朋友写的博客才把这几个sample写完,也解决了之前我对前后端完全分离产生的一些疑惑。OAuth2.0的4种角色
resource owner资源所有者:比如twitter用户,他在twitter的数据就是资源,他自己就是这些资源的所有者resource server资源服务器:保存资源的服务器,别人要访问受限制的资源就要出示 Access Token(访问另牌)
client客户端:一个经过授权后,可以代表资源所有者访问资源服务器上受限制资源的一方。比如 开发者开发的应用
authorization server授权服务器:对 资源所有者进行认证,认证通过后,向 客户端发放 Access Token(访问另牌
OAuth2.0取得Access Token的4种方式
授权码模式(authorization code)简化模式(implicit)
密码模式(resource owner password credentials)
客户端模式(client credentials)
使用Owin实现密码模式(OAuth2.0密码模式)
1、使用VS2015创建一个Empty WebApi项目。2、使用Nuget导入核心命名空间。
Install-Package Microsoft.AspNet.WebApi.Owin
Install-Package Microsoft.Owin.Host.SystemWeb
3、添加Owin入口类
Startup类上增加了OwinStartup属性,代表这个类作为Owin的入口。
[assembly:OwinStartup(typeof(AspNet_Identity_Demo.Startup))]
namespace AspNet_Identity_Demo
{
public class Startup
{
public void Configuration(IAppBuilder app)
{
HttpConfiguration config = new HttpConfiguration();
WebApiConfig.Register(config);
app.UseWebApi(config);
}
}
}
4、修改WebApiConfig。修改最后两句代码,主要以CamelCase命名法序列化webApi的返回结果。
namespace AspNet_Identity_Demo
{
public static class WebApiConfig
{
public static void Register(HttpConfiguration config)
{
// Web API 配置和服务

// Web API 路由
config.MapHttpAttributeRoutes();

config.Routes.MapHttpRoute(
name: "DefaultApi",
routeTemplate: "api/{controller}/{id}",
defaults: new { id = RouteParameter.Optional }
);

//用json的方式返回webapi接口返回值
var jsonFormatter = config.Formatters.OfType<JsonMediaTypeFormatter>().First();
jsonFormatter.SerializerSettings.ContractResolver = new CamelCasePropertyNamesContractResolver();
}
}
}
5、删除Global.asax。添加Startup类后暂时用不到这个类。
6、添加Asp.Net Identity。先添加Identity类库。
Install-Package Microsoft.AspNet.Identity.Owin
Install-Package Microsoft.AspNet.Identity.EntityFramework
第一个包提供Asp.Net Identity Owin支持,第二个则提供了基于EF SQL Server的Owin实现。这里要提下Microsoft.AspNet.Identity.Core包,这里主要是Asp.net Identity实现的相关接口,比如IUser、IRole、IPasswordHasher、IUserStore<TUser>、IUseRoleStore<TUser>、IRoleStore<TUser>、IClamisIdentityFactory<TUser>、UserManager<TUser>、IdentiyResult。
在第二个包中我们会首先看到IdentityDbContext<TUser>、IdentityUser、IdentityRole、UserStore。你想基于自己的用户系统扩展创建用户类继承IUser或者IdentityUser. 如果想换其他数据库则自定义DbContext。
7、创建AuthContext。
namespace AspNet_Identity_Demo.Models
{
public class AuthContext:IdentityDbContext<IdentityUser>
{
public AuthContext() : base("AuthContext")
{ }
}
}
Web.config中增加connectionString
<add name="AuthContext" connectionString="Data Source=.;User Id=sa;password=111111;Initial Catalog=AspNet_Identity;Integrated Security=SSPI;" providerName="System.Data.SqlClient" />
8、在Models文件夹中创建UserModel.cs
public class UserModel
{
[Required]
[Display(Name ="User Name")]
public string UserName { get; set; }
[Required]
[DataType(DataType.Password)]
[StringLength(100,ErrorMessage ="The {0} must be at least {2} characters long",MinimumLength =6)]
public string Password { get; set; }

[Required]
[DataType(DataType.Password)]
[Compare("Password",ErrorMessage ="The password and confirmpassword are not matched...")]
public string ConfirmPassword { get; set; }
}
9、添加Asp.Net Identity 仓储支持类。
这里用到了策略模式,把你实现的UserStore.cs作为参数传进UserManager构造函数中。
namespace AspNet_Identity_Demo.Models
{
public class AuthRepository : IDisposable
{
private AuthContext _ctx;
private UserManager<IdentityUser> _userManager;
public AuthRepository()
{
_ctx = new AuthContext();
_userManager = new UserManager<IdentityUser>(new UserStore<IdentityUser>(_ctx));
}

public async Task<IdentityResult> Register(UserModel model)
{
IdentityUser user = new IdentityUser()
{
UserName = model.UserName
};

IdentityResult result = await _userManager.CreateAsync(user,model.Password);

return result;
}

public async Task<IdentityUser> FindUser(UserModel model)
{
IdentityUser user = await _userManager.FindAsync(model.UserName, model.Password);

return user;
}

public async Task<IdentityUser> FindUserByName(string username)
{
IdentityUser user = await _userManager.FindByNameAsync(username);
return user;
}

public void Dispose()
{
_ctx.Dispose();
_userManager.Dispose();
}
}
}
10、添加AccountController.cs
给Controller添加webapi访问前缀,我的是apix,访问时也就是http://localhost:8083/apix/account/register。
namespace AspNet_Identity_Demo.Controllers
{
[RoutePrefix("apix/Account")]
public class AccountController : ApiController
{
private AuthRepository _authRepo;
public AccountController()
{
_authRepo = new AuthRepository();
}

[AllowAnonymous]
[Route("Register")]
public async Task<IHttpActionResult> Register(UserModel model)
{
if (!ModelState.IsValid)
{
return BadRequest(ModelState);
}

IdentityResult result = await _authRepo.Register(model);
IHttpActionResult errorResult = GetError(result);
if (errorResult != null)
{
return errorResult;
}
return Ok();
}

private IHttpActionResult GetError(IdentityResult result)
{
if (result == null)
{
return InternalServerError();
}

if (!result.Succeeded)
{
foreach (string err in result.Errors)
{
ModelState.AddModelError("", err);
}

if (ModelState.IsValid)
{
return BadRequest();
}

return BadRequest(ModelState);
}

return null;
}
}
}
OK,到了这一步就可以在你的视线之上注册用户了,使用Postman调用接口并调用接口http://localhost:8080/apix/account/register。post方式调用。参数传UserName、Password。 调用成功返回接口返回200.打开你的SQL Server。调用成功的话数据库用到的几张表都会生成。用户表是dbo.AspNetUsers.

11、添加一个数据访问controller,OrdersController。
namespace AspNet_Identity_Demo.Controllers
{
[Authorize]
[RoutePrefix("apix/orders")]
public class OrdersController : ApiController
{
[Route]
public IHttpActionResult Get()
{
return Ok(Order.CreateOrders());
}
}
public class Order
{
public int OrderID { get; set; }
public string CustomerName { get; set; }
public string ShipperCity { get; set; }
public Boolean IsShipped { get; set; }
public static List<Order> CreateOrders()
{
List<Order> OrderList = new List<Order>
{
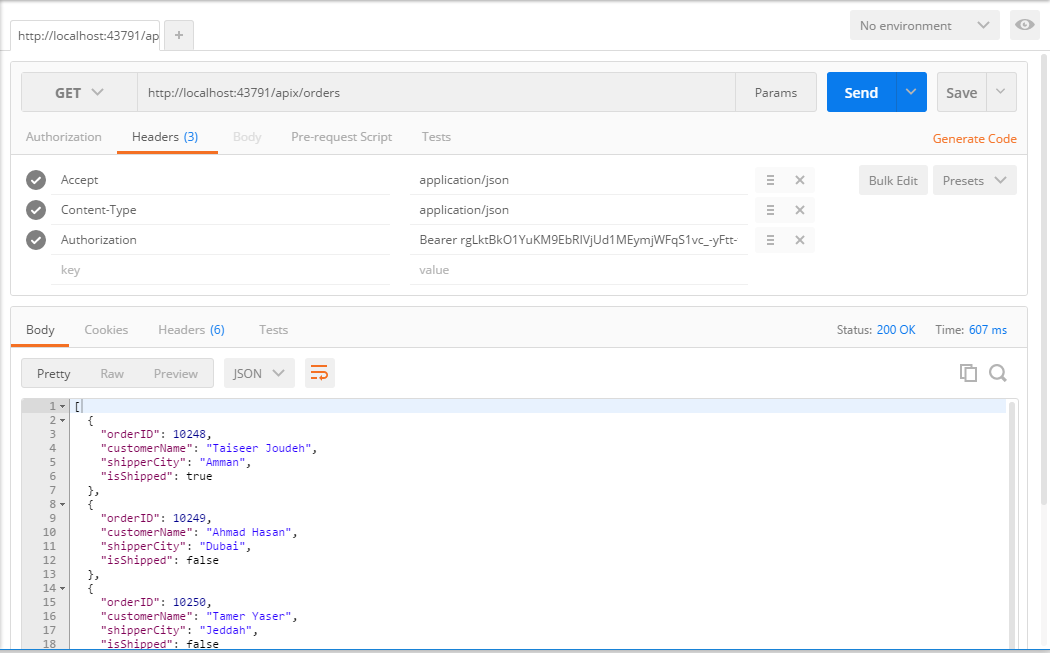
new Order {OrderID = 10248, CustomerName = "Taiseer Joudeh", ShipperCity = "Amman", IsShipped = true },
new Order {OrderID = 10249, CustomerName = "Ahmad Hasan", ShipperCity = "Dubai", IsShipped = false},
new Order {OrderID = 10250,CustomerName = "Tamer Yaser", ShipperCity = "Jeddah", IsShipped = false },
new Order {OrderID = 10251,CustomerName = "Lina Majed", ShipperCity = "Abu Dhabi", IsShipped = false},
new Order {OrderID = 10252,CustomerName = "Yasmeen Rami", ShipperCity = "Kuwait", IsShipped = true}
};
return OrderList;
}
}
}12、添加OAuth Bearer Token支持类库 Install-Package Microsoft.Owin.Security.OAuth
13、回到Startup。添加创建token方法,主要涉及到了两个类SimpleAuthorizationServerProvider、OAuthAuthorizationServerOptions。
[assembly:OwinStartup(typeof(AspNet_Identity_Demo.Startup))]
namespace AspNet_Identity_Demo
{
public class Startup
{
public void Configuration(IAppBuilder app)
{
HttpConfiguration config = new HttpConfiguration();
ConfigAuth(app);
WebApiConfig.Register(config);
app.UseCors(CorsOptions.AllowAll);
app.UseWebApi(config);
}
public void ConfigAuth(IAppBuilder app)
{
OAuthAuthorizationServerOptions option = new OAuthAuthorizationServerOptions()
{
AllowInsecureHttp=true,
TokenEndpointPath=new PathString("/token"),
AccessTokenExpireTimeSpan=TimeSpan.FromDays(1),
Provider=new SimpleAuthorizationServerProvider()
};
app.UseOAuthAuthorizationServer(option);
app.UseOAuthBearerAuthentication(new OAuthBearerAuthenticationOptions());
}
}
public class SimpleAuthorizationServerProvider : OAuthAuthorizationServerProvider
{
public override async Task ValidateClientAuthentication(OAuthValidateClientAuthenticationContext context)
{
context.Validated();
}
public override async Task GrantResourceOwnerCredentials(OAuthGrantResourceOwnerCredentialsContext context)
{
context.OwinContext.Response.Headers.Add("Access-Control-Allow-Origin", new[] { "*" });
using (AuthRepository _repo = new AuthRepository())
{
IdentityUser user =await _repo.FindUser(
new UserModel() { UserName=context.UserName,Password=context.Password});
if (user == null)
{
context.SetError("invalid_grant", "The username or password is incorrect");
return;
}
}
var identity = new ClaimsIdentity(context.Options.AuthenticationType);
identity.AddClaim(new Claim("sub", context.UserName));
identity.AddClaim(new Claim("role", "user"));
context.Validated(identity);
}
}
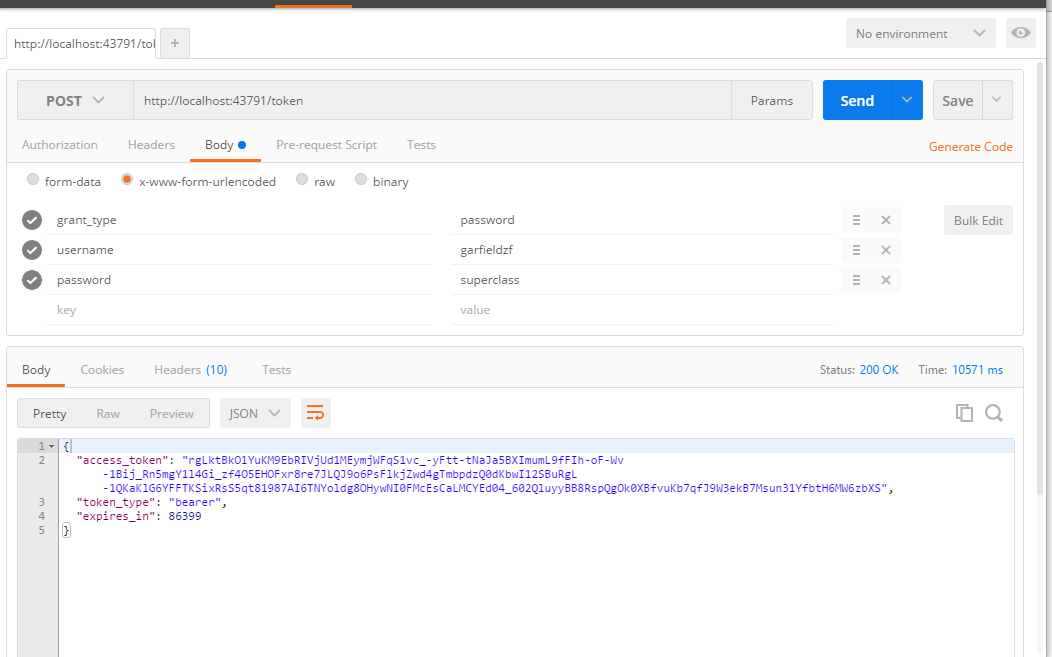
}访问http://localhost:8083/token http接口生成token。过期时间24小时。SimpleAuthorizationServerProvider 在该类中实现用户验证和口令生成。 注意这里的ClamisIdentity。该类在命名空间:System.Security.Claims。 生成token主要是context.Validated(identity);这句代码。
OK,现在可以注册用户,也可以生成token了。那么现在有个问题来了,前后端完全分离后,那么肯定要实现跨域访问(CORS)。所以你看到重写GrantResourceOwnerCredentials第一句就是添加Access-Control-Allow-Origin支持。
13、添加Asp.Net WebApi Install-Package Microsoft.Owin.Cors。在Startup.cs Configuration方法中添加app.UseCors(CorsOptions.AllowAll);
14、生成客户端token。
15、拿到token后,访问数据接口。注意参数Authorization值有前缀Bearer。
总结
总的来说Owin和Identity的设计还是有点复杂的,约定的东西多一些。相比微软早起的Membership则要优雅很多,原理和实现背后的细节还要多多挖掘,才能体会到其中的魅力。比如ClamisIdentity、 UserManager、UserStore。Demo下载地址:https://yunpan.cn/c6yNPKhzpQgmx (提取码:0575)
参考资料
http://www.cnblogs.com/richieyang/p/4918819.htmlhttp://bitoftech.net/2014/06/01/token-based-authentication-asp-net-web-api-2-owin-asp-net-identity/
http://www.haomou.net/2014/08/13/2014_bare_token/
http://www.cnblogs.com/pengyingh/articles/2377968.html
http://www.cnblogs.com/keepfool/p/5665953.html

相关文章推荐
- 教训 Mac下装windows系统 失败后 磁盘空间丢失
- Java中的排序
- 【算法导论32-Java中如何覆写Hashcode()函数】
- 杨辉三角(利用二维数组)
- java学习之路 之 基本语法-特殊的流程控制语句-练习题
- 杭电ACM—HDU2087 剪花布条
- 最近的学习总结
- android底层库libutils之string8,string16研究
- 训练第二周之BFS例题
- 【Java】——Json反序列化为Java对象
- Xcode7 编译出错---does not contain bitcode
- Cannot forward after response has been committed
- 杂记:Atmel sama5d3 DMA Controller (DMAC)
- 杂记:Atmel sama5d3 DMA Controller (DMAC)
- 杂记:Atmel sama5d3 DMA Controller (DMAC)
- 杂记:Atmel sama5d3 DMA Controller (DMAC)
- 杂记:Atmel sama5d3 DMA Controller (DMAC)
- 杂记:Atmel sama5d3 DMA Controller (DMAC)
- 杂记:Atmel sama5d3 DMA Controller (DMAC)
- 杂记:Atmel sama5d3 DMA Controller (DMAC)