android学习之ListView如何使用
2016-07-23 10:43
387 查看
原创作品,允许转载,转载时请务必以超链接形式标明文章 原始出处 、作者信息和本声明。否则将追究法律责任。http://jackxlee.blog.51cto.com/2493058/684428
ListView是Android一系列组件之一,它以垂直列表的方式列出所需的列表项。实现方式有两种:
* 第一种:使用ListView组件
* 第二种:当前的Activity继承ListActivity
ListView是需要绑定数据源的----->ArrayAdapter、SimpleAdapter、SimpleCursorAdapter
需要注意的是SimpleCursorAdapter要以数据库作为数据源的时候才使用。
来自SDK的描述:
A view that shows items in a vertically scrolling list. The items come from the
接下来就三种不同的数据源我写了一个例子,和大家一起来好好学习一下ListView。
首先,新建一个Android项目--->取名ListViewDemo
MainActivity.java的代码如下:
public class MainActivity extends Activity implements OnClickListener{
private Button btnArray,btnSimple,btnSimpleCursor;
/** Called when the activity is first created. */
@Override
public void onCreate(Bundle savedInstanceState) {
super.onCreate(savedInstanceState);
setContentView(R.layout.main);
getWidgetInstance();
btnArray.setOnClickListener(this);
btnSimple.setOnClickListener(this);
btnSimpleCursor.setOnClickListener(this);
}
public void getWidgetInstance() {
btnArray = (Button)findViewById(R.id.btnArray);
btnSimple = (Button)findViewById(R.id.btnSimple);
btnSimpleCursor = (Button)findViewById(R.id.btnSimpleCursor);
}
@Override
public void onClick(View v) {
int id = v.getId();
switch(id) {
case R.id.btnArray:
Intent intent_array = new Intent(MainActivity.this,ArrayAdapterActivity.class);
MainActivity.this.startActivity(intent_array);
break;
case R.id.btnSimple:
Intent intent_simple = new Intent(MainActivity.this,SimpleAdapterActivity.class);
MainActivity.this.startActivity(intent_simple);
break;
case R.id.btnSimpleCursor:
Intent intent_cursor = new Intent(MainActivity.this,SimpleCursorAdapterActivity.class);
MainActivity.this.startActivity(intent_cursor);
break;
}
}
}
main.xml的布局:
<?xml version="1.0" encoding="utf-8"?>
<LinearLayout xmlns:android="http://schemas.android.com/apk/res/android"
android:orientation="vertical"
android:layout_width="fill_parent"
android:layout_height="fill_parent"
>
<TextView
android:layout_width="fill_parent"
android:layout_height="wrap_content"
android:text="ListView使用示例"
android:gravity="center"
android:textColor="#EEE"
android:textStyle="bold"
android:textSize="25sp"
/>
<Button
android:id="@+id/btnArray"
android:layout_width="wrap_content"
android:layout_height="wrap_content"
android:text="show ArrayAdapter"
/>
<Button
android:id="@+id/btnSimple"
android:layout_width="wrap_content"
android:layout_height="wrap_content"
android:text="show SimpleAdapter"
/>
<Button
android:id="@+id/btnSimpleCursor"
android:layout_width="wrap_content"
android:layout_height="wrap_content"
android:text="show SimpleCursorAdapter"
/>
</LinearLayout>
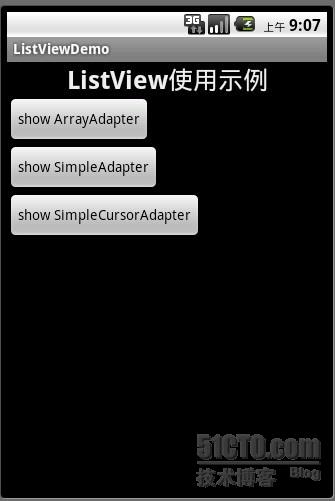
主界面有三个Button,每一个Button对应相应的数据源,显示出ListActivity。
主界面截图:
接着,编写三个不同数据源的Activity
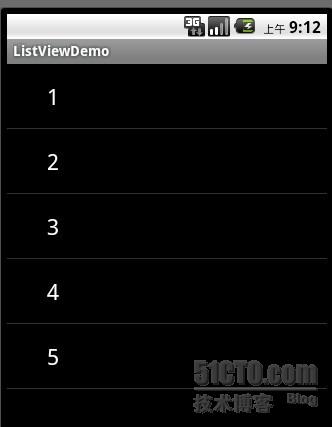
第一种:ArrayAdapter
ArrayAdapter是三种数据源中最简单的Adapter,只能显示一行文字
ArrayAdapter.java的代码如下:
public class ArrayAdapterActivity extends ListActivity {
@Override
public void onCreate(Bundle savedInstanceState) {
super.onCreate(savedInstanceState);
//列表项的数据
String[] strs = {"1","2","3","4","5"};
ArrayAdapter<String> adapter = new ArrayAdapter<String>(this,android.R.layout.simple_expandable_list_item_1,strs);
setListAdapter(adapter);
}
}
运行结果:
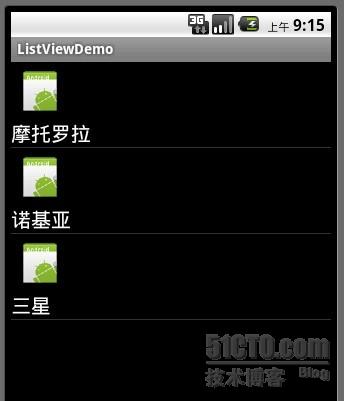
第二种:SimpleAdapterActivity
SimpleAdapterActivity需要自定义每一项显示的布局方式:
所以simple.xml的代码如下:
<?xml version="1.0" encoding="utf-8"?>
<LinearLayout xmlns:android="http://schemas.android.com/apk/res/android"
android:orientation="vertical"
android:layout_width="fill_parent"
android:layout_height="fill_parent"
>
<ImageView
android:id="@+id/img"
android:layout_width="wrap_content"
android:layout_height="wrap_content"
android:layout_margin="5dp"
/>
<TextView
android:id="@+id/title"
android:layout_width="wrap_content"
android:layout_height="wrap_content"
android:textColor="#ffffff"
android:textSize="20sp"
/>
</LinearLayout>
SimpleAdapterActivity.java代码如下:
public class SimpleAdapterActivity extends ListActivity {
@Override
public void onCreate(Bundle savedInstanceState) {
super.onCreate(savedInstanceState);
SimpleAdapter adapter = new SimpleAdapter(this, getData(), R.layout.simple, new String[] { "title", "img" }, new int[] { R.id.title, R.id.img });
setListAdapter(adapter);
}
private List<Map<String, Object>> getData() {
//map.put(参数名字,参数值)
List<Map<String, Object>> list = new ArrayList<Map<String, Object>>();
Map<String, Object> map = new HashMap<String, Object>();
map.put("title", "摩托罗拉");
map.put("img", R.drawable.icon);
list.add(map);
map = new HashMap<String, Object>();
map.put("title", "诺基亚");
map.put("img", R.drawable.icon);
list.add(map);
map = new HashMap<String, Object>();
map.put("title", "三星");
map.put("img", R.drawable.icon);
list.add(map);
return list;
}
}
运行结果如下:
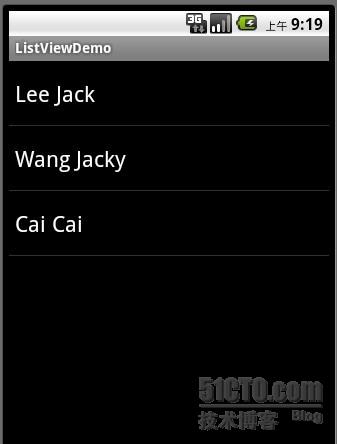
第三种:SimpleCursorAdapterActivity
SimpleCursorAdapterActivity是依赖于数据库的一种数据源,这里为了方便我就不重新建一个数据库,然后插入数据了,我就用读取联系人姓名的方式为例和大家做一个简单的介绍。
SimpleCursorAdapterActivity.xml代码如下:
public class SimpleCursorAdapterActivity extends ListActivity {
@Override
public void onCreate(Bundle savedInstanceState) {
super.onCreate(savedInstanceState);
//获得一个指向系统通讯录数据库的Cursor对象获得数据来源
Cursor cur = getContentResolver().query(People.CONTENT_URI, null, null, null, null);
startManagingCursor(cur);
//实例化列表适配器
ListAdapter adapter = new SimpleCursorAdapter(this, android.R.layout.simple_list_item_1, cur, new String[] {People.NAME}, new int[] {android.R.id.text1});
setListAdapter(adapter);
}
}
这里特别需要注意的一点是:不要忘了在AndroidManifest.xml文件中加入权限
<uses-permission android:name="android.permission.READ_CONTACTS"></uses-permission>
运行结果如下图:
至此所有关于ListView的简单知识点介绍完毕。欢迎大家留言交流。
本文出自 “这一秒不放弃” 博客,请务必保留此出处http://jackxlee.blog.51cto.com/2493058/684428
ListView是Android一系列组件之一,它以垂直列表的方式列出所需的列表项。实现方式有两种:
* 第一种:使用ListView组件
* 第二种:当前的Activity继承ListActivity
ListView是需要绑定数据源的----->ArrayAdapter、SimpleAdapter、SimpleCursorAdapter
需要注意的是SimpleCursorAdapter要以数据库作为数据源的时候才使用。
来自SDK的描述:
A view that shows items in a vertically scrolling list. The items come from the
ListAdapterassociated with this view.
接下来就三种不同的数据源我写了一个例子,和大家一起来好好学习一下ListView。
首先,新建一个Android项目--->取名ListViewDemo
MainActivity.java的代码如下:
public class MainActivity extends Activity implements OnClickListener{
private Button btnArray,btnSimple,btnSimpleCursor;
/** Called when the activity is first created. */
@Override
public void onCreate(Bundle savedInstanceState) {
super.onCreate(savedInstanceState);
setContentView(R.layout.main);
getWidgetInstance();
btnArray.setOnClickListener(this);
btnSimple.setOnClickListener(this);
btnSimpleCursor.setOnClickListener(this);
}
public void getWidgetInstance() {
btnArray = (Button)findViewById(R.id.btnArray);
btnSimple = (Button)findViewById(R.id.btnSimple);
btnSimpleCursor = (Button)findViewById(R.id.btnSimpleCursor);
}
@Override
public void onClick(View v) {
int id = v.getId();
switch(id) {
case R.id.btnArray:
Intent intent_array = new Intent(MainActivity.this,ArrayAdapterActivity.class);
MainActivity.this.startActivity(intent_array);
break;
case R.id.btnSimple:
Intent intent_simple = new Intent(MainActivity.this,SimpleAdapterActivity.class);
MainActivity.this.startActivity(intent_simple);
break;
case R.id.btnSimpleCursor:
Intent intent_cursor = new Intent(MainActivity.this,SimpleCursorAdapterActivity.class);
MainActivity.this.startActivity(intent_cursor);
break;
}
}
}
main.xml的布局:
<?xml version="1.0" encoding="utf-8"?>
<LinearLayout xmlns:android="http://schemas.android.com/apk/res/android"
android:orientation="vertical"
android:layout_width="fill_parent"
android:layout_height="fill_parent"
>
<TextView
android:layout_width="fill_parent"
android:layout_height="wrap_content"
android:text="ListView使用示例"
android:gravity="center"
android:textColor="#EEE"
android:textStyle="bold"
android:textSize="25sp"
/>
<Button
android:id="@+id/btnArray"
android:layout_width="wrap_content"
android:layout_height="wrap_content"
android:text="show ArrayAdapter"
/>
<Button
android:id="@+id/btnSimple"
android:layout_width="wrap_content"
android:layout_height="wrap_content"
android:text="show SimpleAdapter"
/>
<Button
android:id="@+id/btnSimpleCursor"
android:layout_width="wrap_content"
android:layout_height="wrap_content"
android:text="show SimpleCursorAdapter"
/>
</LinearLayout>
主界面有三个Button,每一个Button对应相应的数据源,显示出ListActivity。
主界面截图:
接着,编写三个不同数据源的Activity
第一种:ArrayAdapter
ArrayAdapter是三种数据源中最简单的Adapter,只能显示一行文字
ArrayAdapter.java的代码如下:
public class ArrayAdapterActivity extends ListActivity {
@Override
public void onCreate(Bundle savedInstanceState) {
super.onCreate(savedInstanceState);
//列表项的数据
String[] strs = {"1","2","3","4","5"};
ArrayAdapter<String> adapter = new ArrayAdapter<String>(this,android.R.layout.simple_expandable_list_item_1,strs);
setListAdapter(adapter);
}
}
运行结果:
第二种:SimpleAdapterActivity
SimpleAdapterActivity需要自定义每一项显示的布局方式:
所以simple.xml的代码如下:
<?xml version="1.0" encoding="utf-8"?>
<LinearLayout xmlns:android="http://schemas.android.com/apk/res/android"
android:orientation="vertical"
android:layout_width="fill_parent"
android:layout_height="fill_parent"
>
<ImageView
android:id="@+id/img"
android:layout_width="wrap_content"
android:layout_height="wrap_content"
android:layout_margin="5dp"
/>
<TextView
android:id="@+id/title"
android:layout_width="wrap_content"
android:layout_height="wrap_content"
android:textColor="#ffffff"
android:textSize="20sp"
/>
</LinearLayout>
SimpleAdapterActivity.java代码如下:
public class SimpleAdapterActivity extends ListActivity {
@Override
public void onCreate(Bundle savedInstanceState) {
super.onCreate(savedInstanceState);
SimpleAdapter adapter = new SimpleAdapter(this, getData(), R.layout.simple, new String[] { "title", "img" }, new int[] { R.id.title, R.id.img });
setListAdapter(adapter);
}
private List<Map<String, Object>> getData() {
//map.put(参数名字,参数值)
List<Map<String, Object>> list = new ArrayList<Map<String, Object>>();
Map<String, Object> map = new HashMap<String, Object>();
map.put("title", "摩托罗拉");
map.put("img", R.drawable.icon);
list.add(map);
map = new HashMap<String, Object>();
map.put("title", "诺基亚");
map.put("img", R.drawable.icon);
list.add(map);
map = new HashMap<String, Object>();
map.put("title", "三星");
map.put("img", R.drawable.icon);
list.add(map);
return list;
}
}
运行结果如下:
第三种:SimpleCursorAdapterActivity
SimpleCursorAdapterActivity是依赖于数据库的一种数据源,这里为了方便我就不重新建一个数据库,然后插入数据了,我就用读取联系人姓名的方式为例和大家做一个简单的介绍。
SimpleCursorAdapterActivity.xml代码如下:
public class SimpleCursorAdapterActivity extends ListActivity {
@Override
public void onCreate(Bundle savedInstanceState) {
super.onCreate(savedInstanceState);
//获得一个指向系统通讯录数据库的Cursor对象获得数据来源
Cursor cur = getContentResolver().query(People.CONTENT_URI, null, null, null, null);
startManagingCursor(cur);
//实例化列表适配器
ListAdapter adapter = new SimpleCursorAdapter(this, android.R.layout.simple_list_item_1, cur, new String[] {People.NAME}, new int[] {android.R.id.text1});
setListAdapter(adapter);
}
}
这里特别需要注意的一点是:不要忘了在AndroidManifest.xml文件中加入权限
<uses-permission android:name="android.permission.READ_CONTACTS"></uses-permission>
运行结果如下图:
至此所有关于ListView的简单知识点介绍完毕。欢迎大家留言交流。
本文出自 “这一秒不放弃” 博客,请务必保留此出处http://jackxlee.blog.51cto.com/2493058/684428

相关文章推荐
- 使用C++实现JNI接口需要注意的事项
- Android IPC进程间通讯机制
- Android Manifest 用法
- [转载]Activity中ConfigChanges属性的用法
- Android之获取手机上的图片和视频缩略图thumbnails
- Android之使用Http协议实现文件上传功能
- Android学习笔记(二九):嵌入浏览器
- android string.xml文件中的整型和string型代替
- i-jetty环境搭配与编译
- android之定时器AlarmManager
- android wifi 无线调试
- Android Native 绘图方法
- Android java 与 javascript互访(相互调用)的方法例子
- android 代码实现控件之间的间距
- android FragmentPagerAdapter的“标准”配置
- Android"解决"onTouch和onClick的冲突问题
- android:installLocation简析
- android searchView的关闭事件
- SourceProvider.getJniDirectories