实现web数据同步的四种方式
2016-07-23 00:42
453 查看
实现web数据同步的四种方式
=======================================
1、nfs实现web数据共享
2、rsync +inotify实现web数据同步
3、rsync+sersync更快更节约资源实现web数据同步
4、unison+inotify实现web数据双向同步
=======================================
一、nfs实现web数据共享

nfs能实现数据同步是通过NAS(网络附加存储),在服务器上共享一个文件,且服务器需要设置文件系统的权限和配置文件设置的权限,权限两者之间取交集,然后客户端把共享的文件挂载到本地,客户端对文件有读写权限,则实现数据的同步。
nfs+web:服务器端的配置:
1)、安装相关软件,httpd提供web服务,nfs-utils提供nfs服务
[root@jie1 ~]# yum -y install httpd nfs-utils
2)、设置web的相关配置,使得web能够提供web服务
复制代码代码如下:
[root@jie1 ~]# vim /etc/httpd/conf/httpd.conf
########################################
ServerName 172.16.22.1:80
#DocumentRoot "/var/www/html" #提供虚拟主机,注释默认存放网页文件的路径
<VirtualHost *:80>
ServerName www.jie.com
DocumentRoot /web/htdocs
</VirtualHost>
#######################################
[root@jie1 ~]# mkdir -pv /web/htdocs #创建存放网页的目录
[root@jie1 ~]# cd /web/htdocs/
[root@jie1 htdocs]# touch index.html test.html test.php
[root@jie1 htdocs]# ls
index.html test.html test.php
[root@jie1 htdocs]# echo "This is Jie1 Web+nfs Server" >index.html
[root@jie1 htdocs]# httpd -t #检查web的配置文件是否有语法错误
Syntax OK
[root@jie1 htdocs]# service httpd start #开启web服务
Starting httpd: [ OK ]
3)、设置nfs的相关配置,共享网页文件
复制代码代码如下:
[root@jie1 htdocs]# id apache #安装httpd软件后,系统会创建apache用户,查看apache的id号
uid=48(apache) gid=48(apache) groups=48(apache)
[root@jie1 htdocs]# vim /etc/exports
######################################
/web/htdocs 172.16.22.3(rw,sync,root_squash,anonuid=48,anongid=48)
#nfs是以id号来确定是否能访问共享的文件的,因为两个服务器都安装了httpd软件,都会有apache用户,所以apache用户的id号能访问共享的文件
#/web/htdocs 共享的目录
#172.16.22.3 指定客户端能共享此文件,多个客户端用逗号隔开
#rw,读写权限
#sync,同步方式
#root_squash,压缩root用户的权限
#anonuid=48,指定此用户的id能访问共享文件
#anongid=48指定此组的id能访问共享文件
######################################
[root@jie1 htdocs]# service nfs start #开启nfs服务
Starting NFS services: [ OK ]
Starting NFS quotas: [ OK ]
Starting NFS mountd: [ OK ]
Stopping RPC idmapd: [ OK ]
Starting RPC idmapd: [ OK ]
Starting NFS daemon: [ OK ]
[root@jie1 htdocs]#
web:客户端的配置
1)、安装httpd的软件
复制代码代码如下:
[root@jie3 /]# yum -y install httpd
2)、设置web的相关配置,使得web能够提供web服务
复制代码代码如下:
[root@jie3 /]# vim /etc/httpd/conf/httpd.conf
########################################
ServerName 172.16.22.3:80
#DocumentRoot "/var/www/html"
<VirtualHost *:80>
ServerName www.jie.com
DocumentRoot /website #存放网页文件的路径
</VirtualHost>
#######################################
[root@jie3 /]# mkdir /website
[root@jie3 /]# httpd -t
Syntax OK
[root@jie3 /]# service httpd start
Starting httpd: [ OK ]
[root@jie3 ~]# cd /website/
[root@jie3 website]# ls #现在查看是没有任何文件
[root@jie3 website]#
实现同步:
1)服务器端设置apache用户对共享的文件有读写权限
复制代码代码如下:
[root@jie1 htdocs]#setfacl -R -m u:apache:rwx /web/ #设置apache用户对此中所有文件有读写可执行权限
2)客户端挂载服务器的共享文件,查看客户端是否已经同步服务器端的文件
复制代码代码如下:
[root@jie3 website]#cd /root
[root@jie3 ~]# mount -t nfs 172.16.22.1:/web/htdocs /website/ #通过nfs挂载服务器端的文件
[root@jie3 /]#echo "172.16.22.1:/web/htdocs /website nfs defaults,_netdev 0 0" >>/etc/fstab #实现开机挂载
[root@jie3 ~]# cd /website/
[root@jie3 website]# ls #查看文件已经同步过来
index.html test.html test.php
[root@jie3 website]#
3)客户端在共享的文件中新增文件,查看服务器端是否同步文件
复制代码代码如下:
[root@jie3 ~]# cd /website/
[root@jie3 website]# ls
index.html test.html test.php
[root@jie3 website]# touch website.html #在客户端创建此文件
[root@jie3 website]# ls
index.html test.html test.php website.html
[root@jie1 htdocs]# ls #服务器端,可以查看来着客户端上传的文件
index.html test.html test.php website.html
所有的数据其实都保存到了nfs服务器,不论用户访问哪台Web服务器,都要来nfs服务器获取数据,这样势必照成nfs服务器的性能下降,而且客户端对nfs服务器的依赖性较大,如果nfs服务器down掉之后,客户端的web服务器就无法工作了。(动态的那种数据,而且数据量很大的数据,就不要用nfs服务器来实现数据共享了,一般适应于,静态页面和数据较小的文件)
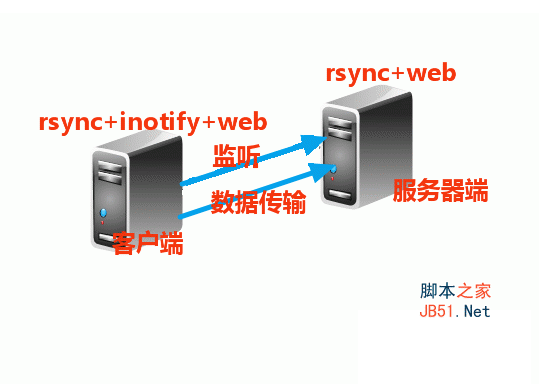
二、rsync +inotify实现web数据同步
rsync(remote sync)的特性:
可以镜像保存整个目录树和文件系统
可以同步增量同步数据,文件传输效率高,因而同步时间很短
可以保持原有文件的权限、时间等属性
加密传输数据,保证了数据的安全性
支持匿名传输
rsync也能实现同步,但是需要自己手动的去同步数据,当数据量非常的频繁时,无疑是加大了运维人员的工作,inotify是一种强大的、细粒度的、异步的文件系统事件监控机制,inotify-tools工具的出现,解决了这种工作,安装inotify软件的主机会监听服务器端的主机是否数据和本机不一样,(因为在上传数据时,运维人员先上传到安装inotify主机上),不一样就用rsync命令直接把数据传输过去。客户端安装rsync软件是为了调用rsync的命令,安装inotify软件是监听和数据是否发生改变,服务器端安装rsync软件时为了提供rsync服务。
rsync+web服务端的配置:
1)、安装相关软件
复制代码代码如下:
[root@jie1 ~]# yum -y install rsync xinetd httpd
#rsync服务通常基于超级守护进程xinetd管理的方式来实现,因此需要事先安装rysnc和xinetd
2)、web的相关配置,使得web能够提供服务
复制代码代码如下:
[root@jie1 ~]# vim /etc/httpd/conf/httpd.conf
########################################
ServerName 172.16.22.1:80
#DocumentRoot "/var/www/html"
<VirtualHost *:80>
ServerName www.jie.com
DocumentRoot /web/htdocs
</VirtualHost>
#######################################
[root@jie1 ~]# mkdir -pv /web/htdocs
[root@jie1 ~]# cd /web/htdocs #服务器端,没有任何的网页文件
[root@jie1 ~]# ls
[root@jie1 ~]#
3)、rsync服务的相关配置
*****建立rsync的配置文件和密码文件************
touch /etc/rsyncd.conf(rsync的配置文件)
touch /etc/rsyncd.pwd(用户的密码文件)
chmod 600 /etc/rsyncd.pwd(权限要设置为600,否则无法备份成功)
复制代码代码如下:
[root@jie1 ~]# vim /etc/rsyncd.conf
############vim /etc/rsyncd.conf########################################
uid = nobody #备份以什么身份进行,用户ID
gid = nobody #备份以什么身份进行,组ID
use chroot = no #禁锢在源目录
max connections = 3 #最大连接数,0代表没有限制
strict modes = yes #是否检查口令文件的权限
pid file = /var/run/rsyncd.pid #运行进程的pid文件
log file = /var/log/rsyncd.log #日志记录文件
[htdocs] #指定认证的备份模块名
path = /web/htdocs #需要备份的目录的路径
ignore errors = yes #忽略一些无关的IO错误
read only = no #设置为no,即可以传至服务器的相应目录。
write only = no #设置为no,表示客户端可以下载文件
hosts allow = 172.16.22.3 #可以连接rsync服务器的主机的IP地址
hosts deny = * #设置禁止连接rsync服务器的主机地址,*表示 拒绝所有除了hosts allow定义的
uid = root
gid = root
auth users = backuper #连接模块的用户名
secrets file = /etc/rsyncd.pwd #连接模块用户名的密码文件存放路径
#####################################################################
[root@jie1 ~]#vim /etc/rsyncd.pwd #用户的密码文件
#####################################################################
backuper:pwd123 #用户名:密码
#####################################################################
[root@jie1 ~]# chmod 600 /etc/rsyncd.pwd #权限给600
[root@jie1 ~]# chkconfig rsync on
[root@jie1 ~]# chkconfig xinetd on
[root@jie1 ~]# service xinetd start
Starting xinetd: [ OK ]
[root@jie1 ~]# netstat -pant | grep 873
tcp 0 0 :::873 :::* LISTEN 19876/xinetd
rsync+inotify+web客户端的配置:
1)、inotify-tools软件的安装及设置
复制代码代码如下:
[root@jie3 ~]#wget http://cloud.github.com/downloads/rvoicilas/inotify-tools/inotify-tools-3.14.tar.gz #下载inotify-tools软件
[root@jie3 ~]# ls
anaconda-ks.cfg install.log
inotify-tools-3.14.tar.gz install.log.syslog
[root@jie3 ~]# tar xf inotify-tools-3.14.tar.gz #解压软件
[root@jie3 ~]# cd inotify-tools-3.14
[root@jie3 inotify-tools-3.14]# ./configure --prefix=/usr/local/inotify && make && make install #编译安装软件
[root@jie3 ~]#cd /usr/local/inotify/
[root@jie3 inotify]# echo "PATH=/usr/local/inotify/bin:$PATH" >>/etc/profile.d/inotify.sh #设置能与系统关联的path路径
[root@jie3 inotify]# source /etc/profile.d/inotify.sh
[root@jie3 inotify]# echo "/usr/local/inotify/lib" >/etc/ld.so.conf.d/inotify.conf #设置系统能识别软件的库文件
[root@jie3 inotify]# ldconfig -v | grep inotify
/usr/local/inotify/lib:
libinotifytools.so.0 -> libinotifytools.so.0.4.1
[root@jie3 inotify]# ln -sv /usr/local/inotify/include/ /usr/include/inotify #链接头文件到系统能识别的路径下
`/usr/include/inotify' -> `/usr/local/inotify/include/'
[root@jie3 inotify]#
2)、web的相关配置,使得web能够提供服务
复制代码代码如下:
[root@jie3 /]# vim /etc/httpd/conf/httpd.conf
########################################
ServerName 172.16.22.3:80
#DocumentRoot "/var/www/html"
<VirtualHost *:80>
ServerName www.jie.com
DocumentRoot /website
</VirtualHost>
#######################################
[root@jie3 /]# mkdir /website
[root@jie3 /]# httpd -t
Syntax OK
[root@jie3 /]# service httpd start
Starting httpd: [ OK ]
[root@jie3 ~]# cd /website/
[root@jie3 website]# ls
[root@jie3 website]#
[root@jie3 ~]#
3)、配置能连接rsync的密码文件和传输数据的脚本
复制代码代码如下:
[root@jie3 ~]# vim /etc/rsyncd.pwd
#############################################
pwd123 #密码与rsync服务器的密码相同
###############################################
[root@jie3 ~]# chmod 600 /etc/rsyncd.pwd
[root@jie3 ~]# vim rsync.sh
#####################################################################
#!/bin/bash
host=172.16.22.1
src=/website
des=htdocs
inotifywait -mrq --timefmt '%d/%m/%y %H:%M' --format '%T %w%f%e' -e modify,delete,create,attrib $src \
| while read files
do
/usr/bin/rsync -vzrtopg --progress --password-file=/etc/rsyncd.secrets $src backuper@$host::$des
echo "${files} was rsynced" >>/tmp/rsync.log 2>&1
done
####################################################################
验证实现同步:
复制代码代码如下:
##1、先开启监控的脚本(inotify主机上)
[root@jie3 ~]# bash -x rsync.sh &
#不放在后台可以查看同步的详细过程,生成环境中,建议把此脚本放到后台执行,此脚本会监控客户端数据是否方式变化,如果变化脚本就运行,数据不变化,脚本就会等待着用户的输入
##2、在开一个终端,在此目录创建文件(inotify主机上)
[root@jie3 ~]# cd /website/
[root@jie3 website]# touch index.html test.php testdb.php inotify.php
[root@jie3 website]# ls
index.html testdb.php test.php inotify.php
[root@jie3 website]#
##3、看服务器端,数据是否已经同步过去
[root@jie1 ~]# cd /web/htdocs/
[root@jie1 htdocs]# ls
index.html testdb.php test.php inotify.php #数据已经被同步过来
[root@jie1 htdocs]#
rsync +inotify这种能实现数据的同步,但是当网络很繁忙,且文件变化比较频繁时,而且需要同步的rsync服务器端比较多时,rsync+inotify肯定是满足不了需求的,于是rsync+sersync这种更快更节约资源实现web数据同步可以弥补rsync+inotify带来的不足,rsync+inotify还有一个重大的缺点就是数据传输只是单向的,当运维人员由于“粗心”把数据直接传输rsync服务器端时,inotify主机是得不到rsync服务器端的数据,于是unison+inotify实现web数据双向同步,解决了rsync+inotify的这一缺点。
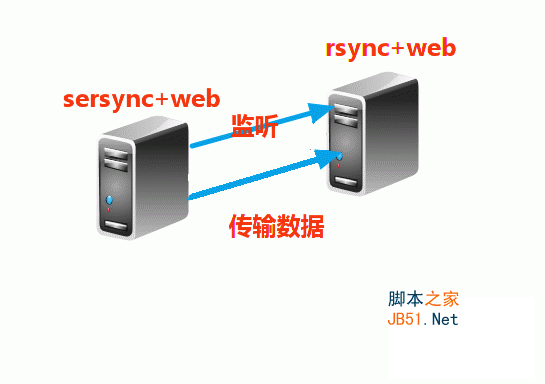
三、rsync+sersync更快更节约资源实现web数据同步
sersync与inotify相比有以下优点:
sersync是使用c++编写,而且对linux系统文件系统产生的临时文件和重复的文件操作进行过滤,所以在结合rsync同步的时候,节省了运行时耗和网络资源。因此更快。
sersync配置起来很简单,其中bin目录下已经有基本上静态编译的2进制文件,配合bin目录下的xml配置文件直接使用即可。
sersync使用多线程进行同步,尤其在同步较大文件时,能够保证多个服务器实时保持同步状态。
sersync有出错处理机制,通过失败队列对出错的文件重新同步,如果仍旧失败,则按设定时长对同步失败的文件重新同步。
sersync自带crontab功能,只需在xml配置文件中开启,即可按您的要求,隔一段时间整体同步一次。无需再额外配置crontab功能。
rsync+web服务器端的配置:
1)、安装相关软件
复制代码代码如下:
[root@jie1 ~]# yum -y install rsync xinetd httpd
#rsync服务通常基于超级守护进程xinetd管理的方式来实现,因此需要事先安装rysnc和xinetd
2)、web的相关配置,使得web能够提供服务
复制代码代码如下:
[root@jie1 ~]# vim /etc/httpd/conf/httpd.conf
########################################
ServerName 172.16.22.1:80
#DocumentRoot "/var/www/html"
<VirtualHost *:80>
ServerName www.jie.com
DocumentRoot /web/htdocs
</VirtualHost>
#######################################
[root@jie1 ~]# mkdir -pv /web/htdocs
[root@jie1 ~]# cd /web/htdocs #服务器端,没有任何的网页文件
[root@jie1 ~]# ls
[root@jie1 ~]#
3)、rsync服务的相关配置
复制代码代码如下:
###====此配置文件的解释,在rsync+inotify中已经解释了=====####
[root@jie1 ~]# vim /etc/rsyncd.conf
############vim /etc/rsyncd.conf###############
uid = nobody
gid = nobody
use chroot = no
max connections = 3
strict modes = yes
pid file= /var/run/rsyncd.pid
log file= /var/log/rsyncd.log
[htdocs]
path = /web/htdocs
ignore errors = yes
readonly = no
write only = no
hosts allow = 172.16.22.3
hosts deny = *
list = false
uid = root
gid = root
auth users= backuper
secrets file= /etc/rsyncd.pwd
##############################################
[root@jie1 ~]#vim /etc/rsyncd.pwd
backuper:pwd123
[root@jie1 ~]# chmod 600 /etc/rsyncd.pwd
[root@jie1 ~]# chkconfig rsync on
[root@jie1 ~]# chkconfig xinetd on
[root@jie1 ~]# service xinetd start
Starting xinetd: [ OK ]
[root@jie1 ~]# netstat -pant | grep 873
tcp 0 0 :::873 :::* LISTEN 19876/xinetd
sersync+web客户端的配置:
1)、先下载安装sersync软件,做初始设置
复制代码代码如下:
[root@jie3 ~]#wget --no-check-certificate https://sersync.googlecode.com/files/sersync2.5_64bit_binary_stable_final.tar.gz
[root@jie3 ~]# ls
anaconda-ks.cfg install.log.syslog
install.log sersync2.5_64bit_binary_stable_final.tar.gz
mkdir /usr/local/sersync
[root@jie3 ~]#mkdir -pv /usr/local/sersync/{conf,bin,log}
mkdir: created directory `/usr/local/sersync'
mkdir: created directory `/usr/local/sersync/conf'
mkdir: created directory `/usr/local/sersync/bin'
mkdir: created directory `/usr/local/sersync/log'
[root@jie3 ~]# tar xf sersync2.5_64bit_binary_stable_final.tar.gz
[root@jie3 ~]# cd GNU-Linux-x86/
[root@jie3 GNU-Linux-x86]# ls
confxml.xml sersync2
[root@jie3 GNU-Linux-x86]# mv confxml.xml /usr/local/sersync/conf/
[root@jie3 GNU-Linux-x86]# mv sersync2 /usr/local/sersync/bin/
[root@jie3 GNU-Linux-x86]# cd /usr/local/sersync/
[root@jie3 sersync]# echo "PATH=/usr/local/sersync/bin:$PATH" >>/etc/profile.d/sersync.sh
[root@jie3 sersync]# source /etc/profile.d/sersync.sh
[root@jie3 sersync]# echo "pwd123" >/usr/local/sersync/sersync.pwd
[root@jie3 sersync]# chmod 600 /usr/local/sersync/sersync.pwd
2)、修改sersync的配置文件
复制代码代码如下:
[root@jie3 sersync]# vim /usr/local/sersync/conf/confxml.xml
#########################################################################<?xml version="1.0" encoding="ISO-8859-1"?>
<head version="2.5">
#设置本地的ip地址和监听的端口
<host hostip="172.16.22.3" port="8008"></host>
#debug模式是否开启
<debug start="false"/>
#xfs文件系统是否开启
<fileSystem xfs="false"/>
#同步时,是否支持正则表达式,默认关闭
<filter start="false">
<exclude expression="(.*)\.svn"></exclude>
<exclude expression="(.*)\.gz"></exclude>
<exclude expression="^info/*"></exclude>
<exclude expression="^static/*"></exclude>
</filter>
# 设置要监控的事件
<inotify>
<delete start="true"/>
<createFolder start="true"/>
<createFile start="false"/>
<closeWrite start="true"/>
<moveFrom start="true"/>
<moveTo start="true"/>
<attrib start="false"/>
<modify start="false"/>
</inotify>
#同步的设置
<sersync>
#同步的路径,本地的目录
<localpath watch="/website">
#rsync服务器的ip地址和rsync配置文件里面定义的模块
<remote ip="172.16.22.1" name="htdocs"/>
#<!-- -->括起来表示注释
<!--<remote ip="192.168.8.39" name="tongbu"/>-->
<!--<remote ip="192.168.8.40" name="tongbu"/>-->
</localpath>
<rsync>
#rsync指令参数
<commonParams params="-artuz"/>
#rsync同步认证设置的内容,user指定用户名,password指定存放密码的文件路径
<auth start="true" users="backuper" passwordfile="/usr/local/sersync/sersync.pwd"/>
#设置rsync远程服务端口
<userDefinedPort start="false" port="874"/><!-- port=874 -->
#设置超时时间
<timeout start="true" time="100"/><!-- timeout=100 -->
#设置ssh加密传输模式,默认关闭
<ssh start="false"/>
</rsync>
#设置sersync传输失败日志脚本路径
<failLog path="/tmp/rsync_fail_log.sh" timeToExecute="60"/><!--default every 60mins execute once-->
#设置rsync+crontab定时传输,默认关闭
<crontab start="false" schedule="600"><!--600mins-->
<crontabfilter start="false">
<exclude expression="*.php"></exclude>
<exclude expression=\'#\'" /*"></exclude>
</crontabfilter>
</crontab>
#设置sersync传输后调用name指定的插件脚本,默认关闭
<plugin start="false" name="command"/>
</sersync>
#插件脚本范例
<plugin name="command">
<param prefix="/bin/sh" suffix="" ignoreError="true"/> <!--prefix /opt/tongbu/mmm.sh suffix-->
<filter start="false">
<include expression="(.*)\.php"/>
<include expression="(.*)\.sh"/>
</filter>
</plugin>
</head>
#######################################################################
验证实现同步:
复制代码代码如下:
###sersync客户端的,开启同步机制,进行监控,然后创建文件
[root@jie3 website]# sersync2 -r -d &
[root@jie3 ~]# cd /website/
[root@jie3 website]# touch index.html testdb.php test.html test.php
###rsync服务器端,查看可以来着sersync客户端的同步文件
[root@jie1 ~]# cd /web/htdocs/
[root@jie1 htdocs]# ls
index.html testdb.php test.html test.php
[root@jie1 htdocs]#
四、unison+inotify实现web数据双向同步

Unison是一款跨平台的文件同步对象,不仅支撑本地对本地同步,也支撑经由过程SSH、RSH和Socket等收集和谈进行同步。
Unison支撑双向同步操纵,你既可以从A同步到B,也可以从B同步到A,这些都不须要额外的设定。
1)、两个服务器都编译安装这三个源码包:(在此我只写一台服务器的编译安装过程)
复制代码代码如下:
[root@jie1 ~]#wget ftp://distro.ibiblio.org/slitaz/sources/packages-2.0/o/ocaml-3.10.2.tar.gz
[root@jie1~]#wget http://freebsd.ntu.edu.tw/FreeBSD/ports/distfiles/unison-2.32.52/unison-2.32.52.tar.gz
[root@jie1~]#wget http://cloud.github.com/downloads/rvoicilas/inotify-tools/inotify-tools-3.14.tar.gz
[root@jie1 ~]# ls
anaconda-ks.cfg install.log ocaml-3.10.2.tar.gz
inotify-tools-3.14.tar.gz install.log.syslog unison-2.32.52.tar.gz
[root@jie1 ~]# tar xf inotify-tools-3.14.tar.gz
[root@jie1 ~]# tar xf ocaml-3.10.2.tar.gz
[root@jie1 ~]# tar xf unison-2.32.52.tar.gz
##编译安装inotify
[root@jie1 ~]# cd inotify-tools-3.14
[root@jie1 inotify-tools-3.14]# ./configure --prefix=/usr/local/inotify && make && make install
[root@jie1 inotify-tools-3.14]# cd /usr/local/inotify/
##修改PATH环境变量
[root@jie1 inotify]# echo "PATH=/usr/local/inotify/bin:$PATH" >/etc/profile.d/inotify.sh
[root@jie1 inotify]# source /etc/profile.d/inotify.sh
##添加库文件到系统识别的路径
[root@jie1 inotify]# echo "/usr/local/inotify/lib" >/etc/ld.so.conf.d/inotify.conf
[root@jie1 inotify]# ldconfig -v | grep inotify
/usr/local/inotify/lib:
libinotifytools.so.0 -> libinotifytools.so.0.4.1
##链接库文件到系统识别的路径
[root@jie1 inotify]# ln -sv /usr/local/inotify/include/ /usr/include/inotify
`/usr/include/inotify' -> `/usr/local/inotify/include/'
##编译安装ocaml,unison依赖于ocaml
[root@jie1 inotify]#cd /root/ocaml-3.10.2
[root@jie1 ocaml-3.10.2]#./configure
[root@jie1 ocaml-3.10.2]#make world opt
[root@jie1 ocaml-3.10.2]#make install
##编译安装unison
[root@jie1 ocaml-3.10.2]# cd /root/unison-2.32.52
##安装依赖性包
[root@jie1 unison-2.32.52]#yum -y install ctags-etags
[root@jie1 unison-2.32.52]# make UISTYLE=text
##make install会提示错误,此错误就是要你cp unison /usr/local/bin,复制即可
[root@jie1 unison-2.32.52]# make install
[root@jie1 unison-2.32.52]# cp unison /usr/local/bin
2)、服务器A生成的公钥传到服务器B上:
复制代码代码如下:
##把服务器A生成的公钥传到服务器B上####
[root@jie1 ~]# ssh-keygen -t rsa #生成ssh的密钥对
[root@jie1 ~]# scp ~/.ssh/id_rsa.pub 172.16.22.3:/root #生成的密钥在家目录的ssh文件中,ssh文件为隐藏文件,通过scp复制到服务器B上
[root@jie3 ~]# mv id_rsa.pub .ssh/authorized_keys #在服务器B上把服务器A传来的公钥文件改名并存放到ssh目录下
[root@jie3 ~]# chmod 600 .ssh/authorized_keys #给公钥文件改权限为600
[root@jie1 ~]# service sshd restart #重启sshd服务
Stopping sshd: [ OK ]
Starting sshd: [ OK ]
[root@jie1 ~]#
3)、服务器B生成的公钥传到服务器A上:
复制代码代码如下:
##把服务器B生成的公钥传到服务器A上####
[root@jie3 ~]# ssh-keygen -t rsa #生成ssh的密钥对
[root@jie3 ~]# scp ~/.ssh/id_rsa.pub 172.16.22.1:/root #生成的密钥在家目录的ssh文件中,ssh文件为隐藏文件,通过scp复制到服务器B上
[root@jie1 ~]# mv id_rsa.pub .ssh/authorized_keys #在服务器A上把服务器B传来的公钥文件改名并存放到ssh目录下
[root@jie1 ~]# chmod 600 .ssh/authorized_keys #给公钥文件改权限为600
[root@jie3 ~]# service sshd restart #重启sshd服务
Stopping sshd: [ OK ]
Starting sshd: [ OK ]
[root@jie3 ~]#
4)、分别搭建web服务,服务器A的网页文件存放路径为/web/htdocs,服务器B的网页存放路径为/website
复制代码代码如下:
##服务器A搭建web的配置
[root@jie1 /]# vim /etc/httpd/conf/httpd.conf
########################################
ServerName 172.16.22.1:80
#DocumentRoot "/var/www/html"
<VirtualHost *:80>
ServerName www.jie.com
DocumentRoot /web/htdocs
</VirtualHost>
#######################################
[root@jie1 ~]# mkdir -pv /web/htdocs
[root@jie1 ~]# cd /web/htdocs/
[root@jie1 htdocs]# ls
[root@jie1 htdocs]#
##服务器B搭建web的配置
[root@jie3 /]# vim /etc/httpd/conf/httpd.conf
########################################
ServerName 172.16.22.3:80
#DocumentRoot "/var/www/html"
<VirtualHost *:80>
ServerName www.jie.com
DocumentRoot /website
</VirtualHost>
#######################################
[root@jie3 /]# mkdir /website
[root@jie3 /]# httpd -t
Syntax OK
[root@jie3 /]# service httpd start
Starting httpd: [ OK ]
[root@jie3 ~]# cd /website/
[root@jie3 website]# ls
[root@jie3 website]#
5)、编unison同步的脚本进行测试
复制代码代码如下:
##服务器A的脚本
[root@jie1 ~]# vim serA.sh
######################################################################
#/bin/bash
ipB="172.16.22.3"
srcA="/web/htdocs"
dstB="/website"
/usr/local/inotify/bin/inotifywait -mrq -e create,delete,modify,move $srcA | while read line; do
/usr/local/bin/unison -batch $srcA ssh://$ipB/$dstB
echo -n "$line " >> /var/log/inotify.log
echo `date | cut -d " " -f1-4` >> /var/log/inotify.log
done
#####################################################################
##服务器B的脚本
[root@jie3 ~]# vim serB.sh
#####################################################################
#/bin/bash
ipA="172.16.22.1"
srcB="/website"
dstA="/web/htdocs"
/usr/local/inotify/bin/inotifywait -mrq -e create,delete,modify,move $srcB | while read line; do
/usr/local/bin/unison -batch $srcB ssh://$ipA/$dstA
echo -n "$line " >> /var/log/inotify.log
echo `date | cut -d " " -f1-4` >> /var/log/inotify.log
done
#####################################################################
##服务器A的测试
[root@jie1 ~]# sh -x serA.sh #先运行unison同步脚本,查看过程
[root@jie1 ~]# cd /web/htdocs/
[root@jie1 htdocs]# touch serA.txt SerA.html SerA.php #然后创建文件
[root@jie1 htdocs]# ls
SerA.html SerA.php serA.txt SerB.html SerB.php SerB.txt
##服务器B的测试
[root@jie3 ~]# sh -x serB.sh
[root@jie3 ~]# cd /website/
[root@jie3 website]# touch SerB.txt SerB.html SerB.php
[root@jie3 website]# ls
SerA.html SerA.php serA.txt SerB.html SerB.php SerB.txt
###=====可以把脚本设置开机自启,放到rc.local文件中,且放在后台运行
=======================================
1、nfs实现web数据共享
2、rsync +inotify实现web数据同步
3、rsync+sersync更快更节约资源实现web数据同步
4、unison+inotify实现web数据双向同步
=======================================
一、nfs实现web数据共享
nfs能实现数据同步是通过NAS(网络附加存储),在服务器上共享一个文件,且服务器需要设置文件系统的权限和配置文件设置的权限,权限两者之间取交集,然后客户端把共享的文件挂载到本地,客户端对文件有读写权限,则实现数据的同步。
nfs+web:服务器端的配置:
1)、安装相关软件,httpd提供web服务,nfs-utils提供nfs服务
[root@jie1 ~]# yum -y install httpd nfs-utils
2)、设置web的相关配置,使得web能够提供web服务
复制代码代码如下:
[root@jie1 ~]# vim /etc/httpd/conf/httpd.conf
########################################
ServerName 172.16.22.1:80
#DocumentRoot "/var/www/html" #提供虚拟主机,注释默认存放网页文件的路径
<VirtualHost *:80>
ServerName www.jie.com
DocumentRoot /web/htdocs
</VirtualHost>
#######################################
[root@jie1 ~]# mkdir -pv /web/htdocs #创建存放网页的目录
[root@jie1 ~]# cd /web/htdocs/
[root@jie1 htdocs]# touch index.html test.html test.php
[root@jie1 htdocs]# ls
index.html test.html test.php
[root@jie1 htdocs]# echo "This is Jie1 Web+nfs Server" >index.html
[root@jie1 htdocs]# httpd -t #检查web的配置文件是否有语法错误
Syntax OK
[root@jie1 htdocs]# service httpd start #开启web服务
Starting httpd: [ OK ]
3)、设置nfs的相关配置,共享网页文件
复制代码代码如下:
[root@jie1 htdocs]# id apache #安装httpd软件后,系统会创建apache用户,查看apache的id号
uid=48(apache) gid=48(apache) groups=48(apache)
[root@jie1 htdocs]# vim /etc/exports
######################################
/web/htdocs 172.16.22.3(rw,sync,root_squash,anonuid=48,anongid=48)
#nfs是以id号来确定是否能访问共享的文件的,因为两个服务器都安装了httpd软件,都会有apache用户,所以apache用户的id号能访问共享的文件
#/web/htdocs 共享的目录
#172.16.22.3 指定客户端能共享此文件,多个客户端用逗号隔开
#rw,读写权限
#sync,同步方式
#root_squash,压缩root用户的权限
#anonuid=48,指定此用户的id能访问共享文件
#anongid=48指定此组的id能访问共享文件
######################################
[root@jie1 htdocs]# service nfs start #开启nfs服务
Starting NFS services: [ OK ]
Starting NFS quotas: [ OK ]
Starting NFS mountd: [ OK ]
Stopping RPC idmapd: [ OK ]
Starting RPC idmapd: [ OK ]
Starting NFS daemon: [ OK ]
[root@jie1 htdocs]#
web:客户端的配置
1)、安装httpd的软件
复制代码代码如下:
[root@jie3 /]# yum -y install httpd
2)、设置web的相关配置,使得web能够提供web服务
复制代码代码如下:
[root@jie3 /]# vim /etc/httpd/conf/httpd.conf
########################################
ServerName 172.16.22.3:80
#DocumentRoot "/var/www/html"
<VirtualHost *:80>
ServerName www.jie.com
DocumentRoot /website #存放网页文件的路径
</VirtualHost>
#######################################
[root@jie3 /]# mkdir /website
[root@jie3 /]# httpd -t
Syntax OK
[root@jie3 /]# service httpd start
Starting httpd: [ OK ]
[root@jie3 ~]# cd /website/
[root@jie3 website]# ls #现在查看是没有任何文件
[root@jie3 website]#
实现同步:
1)服务器端设置apache用户对共享的文件有读写权限
复制代码代码如下:
[root@jie1 htdocs]#setfacl -R -m u:apache:rwx /web/ #设置apache用户对此中所有文件有读写可执行权限
2)客户端挂载服务器的共享文件,查看客户端是否已经同步服务器端的文件
复制代码代码如下:
[root@jie3 website]#cd /root
[root@jie3 ~]# mount -t nfs 172.16.22.1:/web/htdocs /website/ #通过nfs挂载服务器端的文件
[root@jie3 /]#echo "172.16.22.1:/web/htdocs /website nfs defaults,_netdev 0 0" >>/etc/fstab #实现开机挂载
[root@jie3 ~]# cd /website/
[root@jie3 website]# ls #查看文件已经同步过来
index.html test.html test.php
[root@jie3 website]#
3)客户端在共享的文件中新增文件,查看服务器端是否同步文件
复制代码代码如下:
[root@jie3 ~]# cd /website/
[root@jie3 website]# ls
index.html test.html test.php
[root@jie3 website]# touch website.html #在客户端创建此文件
[root@jie3 website]# ls
index.html test.html test.php website.html
[root@jie1 htdocs]# ls #服务器端,可以查看来着客户端上传的文件
index.html test.html test.php website.html
所有的数据其实都保存到了nfs服务器,不论用户访问哪台Web服务器,都要来nfs服务器获取数据,这样势必照成nfs服务器的性能下降,而且客户端对nfs服务器的依赖性较大,如果nfs服务器down掉之后,客户端的web服务器就无法工作了。(动态的那种数据,而且数据量很大的数据,就不要用nfs服务器来实现数据共享了,一般适应于,静态页面和数据较小的文件)
二、rsync +inotify实现web数据同步
rsync(remote sync)的特性:
可以镜像保存整个目录树和文件系统
可以同步增量同步数据,文件传输效率高,因而同步时间很短
可以保持原有文件的权限、时间等属性
加密传输数据,保证了数据的安全性
支持匿名传输
rsync也能实现同步,但是需要自己手动的去同步数据,当数据量非常的频繁时,无疑是加大了运维人员的工作,inotify是一种强大的、细粒度的、异步的文件系统事件监控机制,inotify-tools工具的出现,解决了这种工作,安装inotify软件的主机会监听服务器端的主机是否数据和本机不一样,(因为在上传数据时,运维人员先上传到安装inotify主机上),不一样就用rsync命令直接把数据传输过去。客户端安装rsync软件是为了调用rsync的命令,安装inotify软件是监听和数据是否发生改变,服务器端安装rsync软件时为了提供rsync服务。
rsync+web服务端的配置:
1)、安装相关软件
复制代码代码如下:
[root@jie1 ~]# yum -y install rsync xinetd httpd
#rsync服务通常基于超级守护进程xinetd管理的方式来实现,因此需要事先安装rysnc和xinetd
2)、web的相关配置,使得web能够提供服务
复制代码代码如下:
[root@jie1 ~]# vim /etc/httpd/conf/httpd.conf
########################################
ServerName 172.16.22.1:80
#DocumentRoot "/var/www/html"
<VirtualHost *:80>
ServerName www.jie.com
DocumentRoot /web/htdocs
</VirtualHost>
#######################################
[root@jie1 ~]# mkdir -pv /web/htdocs
[root@jie1 ~]# cd /web/htdocs #服务器端,没有任何的网页文件
[root@jie1 ~]# ls
[root@jie1 ~]#
3)、rsync服务的相关配置
*****建立rsync的配置文件和密码文件************
touch /etc/rsyncd.conf(rsync的配置文件)
touch /etc/rsyncd.pwd(用户的密码文件)
chmod 600 /etc/rsyncd.pwd(权限要设置为600,否则无法备份成功)
复制代码代码如下:
[root@jie1 ~]# vim /etc/rsyncd.conf
############vim /etc/rsyncd.conf########################################
uid = nobody #备份以什么身份进行,用户ID
gid = nobody #备份以什么身份进行,组ID
use chroot = no #禁锢在源目录
max connections = 3 #最大连接数,0代表没有限制
strict modes = yes #是否检查口令文件的权限
pid file = /var/run/rsyncd.pid #运行进程的pid文件
log file = /var/log/rsyncd.log #日志记录文件
[htdocs] #指定认证的备份模块名
path = /web/htdocs #需要备份的目录的路径
ignore errors = yes #忽略一些无关的IO错误
read only = no #设置为no,即可以传至服务器的相应目录。
write only = no #设置为no,表示客户端可以下载文件
hosts allow = 172.16.22.3 #可以连接rsync服务器的主机的IP地址
hosts deny = * #设置禁止连接rsync服务器的主机地址,*表示 拒绝所有除了hosts allow定义的
uid = root
gid = root
auth users = backuper #连接模块的用户名
secrets file = /etc/rsyncd.pwd #连接模块用户名的密码文件存放路径
#####################################################################
[root@jie1 ~]#vim /etc/rsyncd.pwd #用户的密码文件
#####################################################################
backuper:pwd123 #用户名:密码
#####################################################################
[root@jie1 ~]# chmod 600 /etc/rsyncd.pwd #权限给600
[root@jie1 ~]# chkconfig rsync on
[root@jie1 ~]# chkconfig xinetd on
[root@jie1 ~]# service xinetd start
Starting xinetd: [ OK ]
[root@jie1 ~]# netstat -pant | grep 873
tcp 0 0 :::873 :::* LISTEN 19876/xinetd
rsync+inotify+web客户端的配置:
1)、inotify-tools软件的安装及设置
复制代码代码如下:
[root@jie3 ~]#wget http://cloud.github.com/downloads/rvoicilas/inotify-tools/inotify-tools-3.14.tar.gz #下载inotify-tools软件
[root@jie3 ~]# ls
anaconda-ks.cfg install.log
inotify-tools-3.14.tar.gz install.log.syslog
[root@jie3 ~]# tar xf inotify-tools-3.14.tar.gz #解压软件
[root@jie3 ~]# cd inotify-tools-3.14
[root@jie3 inotify-tools-3.14]# ./configure --prefix=/usr/local/inotify && make && make install #编译安装软件
[root@jie3 ~]#cd /usr/local/inotify/
[root@jie3 inotify]# echo "PATH=/usr/local/inotify/bin:$PATH" >>/etc/profile.d/inotify.sh #设置能与系统关联的path路径
[root@jie3 inotify]# source /etc/profile.d/inotify.sh
[root@jie3 inotify]# echo "/usr/local/inotify/lib" >/etc/ld.so.conf.d/inotify.conf #设置系统能识别软件的库文件
[root@jie3 inotify]# ldconfig -v | grep inotify
/usr/local/inotify/lib:
libinotifytools.so.0 -> libinotifytools.so.0.4.1
[root@jie3 inotify]# ln -sv /usr/local/inotify/include/ /usr/include/inotify #链接头文件到系统能识别的路径下
`/usr/include/inotify' -> `/usr/local/inotify/include/'
[root@jie3 inotify]#
2)、web的相关配置,使得web能够提供服务
复制代码代码如下:
[root@jie3 /]# vim /etc/httpd/conf/httpd.conf
########################################
ServerName 172.16.22.3:80
#DocumentRoot "/var/www/html"
<VirtualHost *:80>
ServerName www.jie.com
DocumentRoot /website
</VirtualHost>
#######################################
[root@jie3 /]# mkdir /website
[root@jie3 /]# httpd -t
Syntax OK
[root@jie3 /]# service httpd start
Starting httpd: [ OK ]
[root@jie3 ~]# cd /website/
[root@jie3 website]# ls
[root@jie3 website]#
[root@jie3 ~]#
3)、配置能连接rsync的密码文件和传输数据的脚本
复制代码代码如下:
[root@jie3 ~]# vim /etc/rsyncd.pwd
#############################################
pwd123 #密码与rsync服务器的密码相同
###############################################
[root@jie3 ~]# chmod 600 /etc/rsyncd.pwd
[root@jie3 ~]# vim rsync.sh
#####################################################################
#!/bin/bash
host=172.16.22.1
src=/website
des=htdocs
inotifywait -mrq --timefmt '%d/%m/%y %H:%M' --format '%T %w%f%e' -e modify,delete,create,attrib $src \
| while read files
do
/usr/bin/rsync -vzrtopg --progress --password-file=/etc/rsyncd.secrets $src backuper@$host::$des
echo "${files} was rsynced" >>/tmp/rsync.log 2>&1
done
####################################################################
验证实现同步:
复制代码代码如下:
##1、先开启监控的脚本(inotify主机上)
[root@jie3 ~]# bash -x rsync.sh &
#不放在后台可以查看同步的详细过程,生成环境中,建议把此脚本放到后台执行,此脚本会监控客户端数据是否方式变化,如果变化脚本就运行,数据不变化,脚本就会等待着用户的输入
##2、在开一个终端,在此目录创建文件(inotify主机上)
[root@jie3 ~]# cd /website/
[root@jie3 website]# touch index.html test.php testdb.php inotify.php
[root@jie3 website]# ls
index.html testdb.php test.php inotify.php
[root@jie3 website]#
##3、看服务器端,数据是否已经同步过去
[root@jie1 ~]# cd /web/htdocs/
[root@jie1 htdocs]# ls
index.html testdb.php test.php inotify.php #数据已经被同步过来
[root@jie1 htdocs]#
rsync +inotify这种能实现数据的同步,但是当网络很繁忙,且文件变化比较频繁时,而且需要同步的rsync服务器端比较多时,rsync+inotify肯定是满足不了需求的,于是rsync+sersync这种更快更节约资源实现web数据同步可以弥补rsync+inotify带来的不足,rsync+inotify还有一个重大的缺点就是数据传输只是单向的,当运维人员由于“粗心”把数据直接传输rsync服务器端时,inotify主机是得不到rsync服务器端的数据,于是unison+inotify实现web数据双向同步,解决了rsync+inotify的这一缺点。
三、rsync+sersync更快更节约资源实现web数据同步
sersync与inotify相比有以下优点:
sersync是使用c++编写,而且对linux系统文件系统产生的临时文件和重复的文件操作进行过滤,所以在结合rsync同步的时候,节省了运行时耗和网络资源。因此更快。
sersync配置起来很简单,其中bin目录下已经有基本上静态编译的2进制文件,配合bin目录下的xml配置文件直接使用即可。
sersync使用多线程进行同步,尤其在同步较大文件时,能够保证多个服务器实时保持同步状态。
sersync有出错处理机制,通过失败队列对出错的文件重新同步,如果仍旧失败,则按设定时长对同步失败的文件重新同步。
sersync自带crontab功能,只需在xml配置文件中开启,即可按您的要求,隔一段时间整体同步一次。无需再额外配置crontab功能。
rsync+web服务器端的配置:
1)、安装相关软件
复制代码代码如下:
[root@jie1 ~]# yum -y install rsync xinetd httpd
#rsync服务通常基于超级守护进程xinetd管理的方式来实现,因此需要事先安装rysnc和xinetd
2)、web的相关配置,使得web能够提供服务
复制代码代码如下:
[root@jie1 ~]# vim /etc/httpd/conf/httpd.conf
########################################
ServerName 172.16.22.1:80
#DocumentRoot "/var/www/html"
<VirtualHost *:80>
ServerName www.jie.com
DocumentRoot /web/htdocs
</VirtualHost>
#######################################
[root@jie1 ~]# mkdir -pv /web/htdocs
[root@jie1 ~]# cd /web/htdocs #服务器端,没有任何的网页文件
[root@jie1 ~]# ls
[root@jie1 ~]#
3)、rsync服务的相关配置
复制代码代码如下:
###====此配置文件的解释,在rsync+inotify中已经解释了=====####
[root@jie1 ~]# vim /etc/rsyncd.conf
############vim /etc/rsyncd.conf###############
uid = nobody
gid = nobody
use chroot = no
max connections = 3
strict modes = yes
pid file= /var/run/rsyncd.pid
log file= /var/log/rsyncd.log
[htdocs]
path = /web/htdocs
ignore errors = yes
readonly = no
write only = no
hosts allow = 172.16.22.3
hosts deny = *
list = false
uid = root
gid = root
auth users= backuper
secrets file= /etc/rsyncd.pwd
##############################################
[root@jie1 ~]#vim /etc/rsyncd.pwd
backuper:pwd123
[root@jie1 ~]# chmod 600 /etc/rsyncd.pwd
[root@jie1 ~]# chkconfig rsync on
[root@jie1 ~]# chkconfig xinetd on
[root@jie1 ~]# service xinetd start
Starting xinetd: [ OK ]
[root@jie1 ~]# netstat -pant | grep 873
tcp 0 0 :::873 :::* LISTEN 19876/xinetd
sersync+web客户端的配置:
1)、先下载安装sersync软件,做初始设置
复制代码代码如下:
[root@jie3 ~]#wget --no-check-certificate https://sersync.googlecode.com/files/sersync2.5_64bit_binary_stable_final.tar.gz
[root@jie3 ~]# ls
anaconda-ks.cfg install.log.syslog
install.log sersync2.5_64bit_binary_stable_final.tar.gz
mkdir /usr/local/sersync
[root@jie3 ~]#mkdir -pv /usr/local/sersync/{conf,bin,log}
mkdir: created directory `/usr/local/sersync'
mkdir: created directory `/usr/local/sersync/conf'
mkdir: created directory `/usr/local/sersync/bin'
mkdir: created directory `/usr/local/sersync/log'
[root@jie3 ~]# tar xf sersync2.5_64bit_binary_stable_final.tar.gz
[root@jie3 ~]# cd GNU-Linux-x86/
[root@jie3 GNU-Linux-x86]# ls
confxml.xml sersync2
[root@jie3 GNU-Linux-x86]# mv confxml.xml /usr/local/sersync/conf/
[root@jie3 GNU-Linux-x86]# mv sersync2 /usr/local/sersync/bin/
[root@jie3 GNU-Linux-x86]# cd /usr/local/sersync/
[root@jie3 sersync]# echo "PATH=/usr/local/sersync/bin:$PATH" >>/etc/profile.d/sersync.sh
[root@jie3 sersync]# source /etc/profile.d/sersync.sh
[root@jie3 sersync]# echo "pwd123" >/usr/local/sersync/sersync.pwd
[root@jie3 sersync]# chmod 600 /usr/local/sersync/sersync.pwd
2)、修改sersync的配置文件
复制代码代码如下:
[root@jie3 sersync]# vim /usr/local/sersync/conf/confxml.xml
#########################################################################<?xml version="1.0" encoding="ISO-8859-1"?>
<head version="2.5">
#设置本地的ip地址和监听的端口
<host hostip="172.16.22.3" port="8008"></host>
#debug模式是否开启
<debug start="false"/>
#xfs文件系统是否开启
<fileSystem xfs="false"/>
#同步时,是否支持正则表达式,默认关闭
<filter start="false">
<exclude expression="(.*)\.svn"></exclude>
<exclude expression="(.*)\.gz"></exclude>
<exclude expression="^info/*"></exclude>
<exclude expression="^static/*"></exclude>
</filter>
# 设置要监控的事件
<inotify>
<delete start="true"/>
<createFolder start="true"/>
<createFile start="false"/>
<closeWrite start="true"/>
<moveFrom start="true"/>
<moveTo start="true"/>
<attrib start="false"/>
<modify start="false"/>
</inotify>
#同步的设置
<sersync>
#同步的路径,本地的目录
<localpath watch="/website">
#rsync服务器的ip地址和rsync配置文件里面定义的模块
<remote ip="172.16.22.1" name="htdocs"/>
#<!-- -->括起来表示注释
<!--<remote ip="192.168.8.39" name="tongbu"/>-->
<!--<remote ip="192.168.8.40" name="tongbu"/>-->
</localpath>
<rsync>
#rsync指令参数
<commonParams params="-artuz"/>
#rsync同步认证设置的内容,user指定用户名,password指定存放密码的文件路径
<auth start="true" users="backuper" passwordfile="/usr/local/sersync/sersync.pwd"/>
#设置rsync远程服务端口
<userDefinedPort start="false" port="874"/><!-- port=874 -->
#设置超时时间
<timeout start="true" time="100"/><!-- timeout=100 -->
#设置ssh加密传输模式,默认关闭
<ssh start="false"/>
</rsync>
#设置sersync传输失败日志脚本路径
<failLog path="/tmp/rsync_fail_log.sh" timeToExecute="60"/><!--default every 60mins execute once-->
#设置rsync+crontab定时传输,默认关闭
<crontab start="false" schedule="600"><!--600mins-->
<crontabfilter start="false">
<exclude expression="*.php"></exclude>
<exclude expression=\'#\'" /*"></exclude>
</crontabfilter>
</crontab>
#设置sersync传输后调用name指定的插件脚本,默认关闭
<plugin start="false" name="command"/>
</sersync>
#插件脚本范例
<plugin name="command">
<param prefix="/bin/sh" suffix="" ignoreError="true"/> <!--prefix /opt/tongbu/mmm.sh suffix-->
<filter start="false">
<include expression="(.*)\.php"/>
<include expression="(.*)\.sh"/>
</filter>
</plugin>
</head>
#######################################################################
验证实现同步:
复制代码代码如下:
###sersync客户端的,开启同步机制,进行监控,然后创建文件
[root@jie3 website]# sersync2 -r -d &
[root@jie3 ~]# cd /website/
[root@jie3 website]# touch index.html testdb.php test.html test.php
###rsync服务器端,查看可以来着sersync客户端的同步文件
[root@jie1 ~]# cd /web/htdocs/
[root@jie1 htdocs]# ls
index.html testdb.php test.html test.php
[root@jie1 htdocs]#
四、unison+inotify实现web数据双向同步
Unison是一款跨平台的文件同步对象,不仅支撑本地对本地同步,也支撑经由过程SSH、RSH和Socket等收集和谈进行同步。
Unison支撑双向同步操纵,你既可以从A同步到B,也可以从B同步到A,这些都不须要额外的设定。
1)、两个服务器都编译安装这三个源码包:(在此我只写一台服务器的编译安装过程)
复制代码代码如下:
[root@jie1 ~]#wget ftp://distro.ibiblio.org/slitaz/sources/packages-2.0/o/ocaml-3.10.2.tar.gz
[root@jie1~]#wget http://freebsd.ntu.edu.tw/FreeBSD/ports/distfiles/unison-2.32.52/unison-2.32.52.tar.gz
[root@jie1~]#wget http://cloud.github.com/downloads/rvoicilas/inotify-tools/inotify-tools-3.14.tar.gz
[root@jie1 ~]# ls
anaconda-ks.cfg install.log ocaml-3.10.2.tar.gz
inotify-tools-3.14.tar.gz install.log.syslog unison-2.32.52.tar.gz
[root@jie1 ~]# tar xf inotify-tools-3.14.tar.gz
[root@jie1 ~]# tar xf ocaml-3.10.2.tar.gz
[root@jie1 ~]# tar xf unison-2.32.52.tar.gz
##编译安装inotify
[root@jie1 ~]# cd inotify-tools-3.14
[root@jie1 inotify-tools-3.14]# ./configure --prefix=/usr/local/inotify && make && make install
[root@jie1 inotify-tools-3.14]# cd /usr/local/inotify/
##修改PATH环境变量
[root@jie1 inotify]# echo "PATH=/usr/local/inotify/bin:$PATH" >/etc/profile.d/inotify.sh
[root@jie1 inotify]# source /etc/profile.d/inotify.sh
##添加库文件到系统识别的路径
[root@jie1 inotify]# echo "/usr/local/inotify/lib" >/etc/ld.so.conf.d/inotify.conf
[root@jie1 inotify]# ldconfig -v | grep inotify
/usr/local/inotify/lib:
libinotifytools.so.0 -> libinotifytools.so.0.4.1
##链接库文件到系统识别的路径
[root@jie1 inotify]# ln -sv /usr/local/inotify/include/ /usr/include/inotify
`/usr/include/inotify' -> `/usr/local/inotify/include/'
##编译安装ocaml,unison依赖于ocaml
[root@jie1 inotify]#cd /root/ocaml-3.10.2
[root@jie1 ocaml-3.10.2]#./configure
[root@jie1 ocaml-3.10.2]#make world opt
[root@jie1 ocaml-3.10.2]#make install
##编译安装unison
[root@jie1 ocaml-3.10.2]# cd /root/unison-2.32.52
##安装依赖性包
[root@jie1 unison-2.32.52]#yum -y install ctags-etags
[root@jie1 unison-2.32.52]# make UISTYLE=text
##make install会提示错误,此错误就是要你cp unison /usr/local/bin,复制即可
[root@jie1 unison-2.32.52]# make install
[root@jie1 unison-2.32.52]# cp unison /usr/local/bin
2)、服务器A生成的公钥传到服务器B上:
复制代码代码如下:
##把服务器A生成的公钥传到服务器B上####
[root@jie1 ~]# ssh-keygen -t rsa #生成ssh的密钥对
[root@jie1 ~]# scp ~/.ssh/id_rsa.pub 172.16.22.3:/root #生成的密钥在家目录的ssh文件中,ssh文件为隐藏文件,通过scp复制到服务器B上
[root@jie3 ~]# mv id_rsa.pub .ssh/authorized_keys #在服务器B上把服务器A传来的公钥文件改名并存放到ssh目录下
[root@jie3 ~]# chmod 600 .ssh/authorized_keys #给公钥文件改权限为600
[root@jie1 ~]# service sshd restart #重启sshd服务
Stopping sshd: [ OK ]
Starting sshd: [ OK ]
[root@jie1 ~]#
3)、服务器B生成的公钥传到服务器A上:
复制代码代码如下:
##把服务器B生成的公钥传到服务器A上####
[root@jie3 ~]# ssh-keygen -t rsa #生成ssh的密钥对
[root@jie3 ~]# scp ~/.ssh/id_rsa.pub 172.16.22.1:/root #生成的密钥在家目录的ssh文件中,ssh文件为隐藏文件,通过scp复制到服务器B上
[root@jie1 ~]# mv id_rsa.pub .ssh/authorized_keys #在服务器A上把服务器B传来的公钥文件改名并存放到ssh目录下
[root@jie1 ~]# chmod 600 .ssh/authorized_keys #给公钥文件改权限为600
[root@jie3 ~]# service sshd restart #重启sshd服务
Stopping sshd: [ OK ]
Starting sshd: [ OK ]
[root@jie3 ~]#
4)、分别搭建web服务,服务器A的网页文件存放路径为/web/htdocs,服务器B的网页存放路径为/website
复制代码代码如下:
##服务器A搭建web的配置
[root@jie1 /]# vim /etc/httpd/conf/httpd.conf
########################################
ServerName 172.16.22.1:80
#DocumentRoot "/var/www/html"
<VirtualHost *:80>
ServerName www.jie.com
DocumentRoot /web/htdocs
</VirtualHost>
#######################################
[root@jie1 ~]# mkdir -pv /web/htdocs
[root@jie1 ~]# cd /web/htdocs/
[root@jie1 htdocs]# ls
[root@jie1 htdocs]#
##服务器B搭建web的配置
[root@jie3 /]# vim /etc/httpd/conf/httpd.conf
########################################
ServerName 172.16.22.3:80
#DocumentRoot "/var/www/html"
<VirtualHost *:80>
ServerName www.jie.com
DocumentRoot /website
</VirtualHost>
#######################################
[root@jie3 /]# mkdir /website
[root@jie3 /]# httpd -t
Syntax OK
[root@jie3 /]# service httpd start
Starting httpd: [ OK ]
[root@jie3 ~]# cd /website/
[root@jie3 website]# ls
[root@jie3 website]#
5)、编unison同步的脚本进行测试
复制代码代码如下:
##服务器A的脚本
[root@jie1 ~]# vim serA.sh
######################################################################
#/bin/bash
ipB="172.16.22.3"
srcA="/web/htdocs"
dstB="/website"
/usr/local/inotify/bin/inotifywait -mrq -e create,delete,modify,move $srcA | while read line; do
/usr/local/bin/unison -batch $srcA ssh://$ipB/$dstB
echo -n "$line " >> /var/log/inotify.log
echo `date | cut -d " " -f1-4` >> /var/log/inotify.log
done
#####################################################################
##服务器B的脚本
[root@jie3 ~]# vim serB.sh
#####################################################################
#/bin/bash
ipA="172.16.22.1"
srcB="/website"
dstA="/web/htdocs"
/usr/local/inotify/bin/inotifywait -mrq -e create,delete,modify,move $srcB | while read line; do
/usr/local/bin/unison -batch $srcB ssh://$ipA/$dstA
echo -n "$line " >> /var/log/inotify.log
echo `date | cut -d " " -f1-4` >> /var/log/inotify.log
done
#####################################################################
##服务器A的测试
[root@jie1 ~]# sh -x serA.sh #先运行unison同步脚本,查看过程
[root@jie1 ~]# cd /web/htdocs/
[root@jie1 htdocs]# touch serA.txt SerA.html SerA.php #然后创建文件
[root@jie1 htdocs]# ls
SerA.html SerA.php serA.txt SerB.html SerB.php SerB.txt
##服务器B的测试
[root@jie3 ~]# sh -x serB.sh
[root@jie3 ~]# cd /website/
[root@jie3 website]# touch SerB.txt SerB.html SerB.php
[root@jie3 website]# ls
SerA.html SerA.php serA.txt SerB.html SerB.php SerB.txt
###=====可以把脚本设置开机自启,放到rc.local文件中,且放在后台运行

相关文章推荐
- mongodb笔记 getting started
- 16. Spring Boot使用Druid(编程注入)【从零开始学Spring Boot】
- java内存模型笔记深入
- UVa 10003
- ListView条目焦点获取不到问题解决
- iOS-环信SDK讲解
- Hibernate学习笔记----双向多对多关联
- 汉诺塔
- 15、Spring Boot使用Druid和监控配置【从零开始学Spring Boot】
- python核心编程学习笔记-2016-07-23-01-习题5-6
- 【排序】【Java】Java实现几种常见排序方法
- Hadoop+Spark集群搭建
- 多种方法实现费波纳契数列
- js基础学习之--DOM总结
- PAT甲级.1009. Product of Polynomials (25)
- activityMQ
- (3)HTML的全局属性
- 路由表建立策略(算法)
- java继承机制
- H5学习之1 audio标签的使用