使用Visual Studio Code开发Asp.Net Core WebApi学习笔记(六)-- 依赖注入
2016-07-22 23:52
1876 查看
本篇将介绍Asp.Net Core中一个非常重要的特性:依赖注入,并展示其简单用法。
第一部分、概念介绍
Dependency Injection:又称依赖注入,简称DI。在以前的开发方式中,层与层之间、类与类之间都是通过new一个对方的实例进行相互调用,这样在开发过程中有一个好处,可以清晰的知道在使用哪个具体的实现。随着软件体积越来越庞大,逻辑越来越复杂,当需要更换实现方式,或者依赖第三方系统的某些接口时,这种相互之间持有具体实现的方式不再合适。为了应对这种情况,就要采用契约式编程:相互之间依赖于规定好的契约(接口),不依赖于具体的实现。这样带来的好处是相互之间的依赖变得非常简单,又称松耦合。至于契约和具体实现的映射关系,则会通过配置的方式在程序启动时由运行时确定下来。这就会用到DI。第二部分、DI的注册与注入
借用这个系列之前的框架结构,添加如下接口和实现类namespace WebApiFrame
{
public class TestService
{
public ITestTransient TestTransient { get; }
public ITestScoped TestScoped { get; }
public ITestSingleton TestSingleton { get; }
public TestService(ITestTransient testTransient, ITestScoped testScoped, ITestSingleton testSingleton)
{
TestTransient = testTransient;
TestScoped = testScoped;
TestSingleton = testSingleton;
}
}
}TestService.cs
修改 Startup.cs 的ConfigureServices方法里添加注册内容
public void ConfigureServices(IServiceCollection services)
{
// 注入MVC框架
services.AddMvc();

// 注册接口和实现类的映射关系
services.AddTransient<ITestTransient, TestInstance>();
services.AddScoped<ITestScoped, TestInstance>();
services.AddSingleton<ITestSingleton, TestInstance>();
services.AddTransient<TestService, TestService>();
}
修改 DemoController.cs 内容
using System.Threading.Tasks;
using Microsoft.AspNetCore.Http;
using Microsoft.AspNetCore.Mvc;

namespace WebApiFrame
{
[Route("[controller]")]
public class DemoController : Controller
{
public ITestTransient _testTransient { get; }
public ITestScoped _testScoped { get; }
public ITestSingleton _testSingleton { get; }
public TestService _testService { get; }

public DemoController(ITestTransient testTransient, ITestScoped testScoped, ITestSingleton testSingleton, TestService testService)
{
_testTransient = testTransient;
_testScoped = testScoped;
_testSingleton = testSingleton;
_testService = testService;
}

[HttpGet("index")]
public async Task Index()
{
HttpContext.Response.ContentType = "text/html";
await HttpContext.Response.WriteAsync($"<h1>Controller Log</h1>");
await HttpContext.Response.WriteAsync($"<h6>Transient => {_testTransient.TargetId.ToString()}</h6>");
await HttpContext.Response.WriteAsync($"<h6>Scoped => {_testScoped.TargetId.ToString()}</h6>");
await HttpContext.Response.WriteAsync($"<h6>Singleton => {_testSingleton.TargetId.ToString()}</h6>");

await HttpContext.Response.WriteAsync($"<h1>Service Log</h1>");
await HttpContext.Response.WriteAsync($"<h6>Transient => {_testService.TestTransient.TargetId.ToString()}</h6>");
await HttpContext.Response.WriteAsync($"<h6>Scoped => {_testService.TestScoped.TargetId.ToString()}</h6>");
await HttpContext.Response.WriteAsync($"<h6>Singleton => {_testService.TestSingleton.TargetId.ToString()}</h6>");
}
}
}
启动调试,连续两次访问地址 http://localhost:5000/demo/index ,查看页面内容
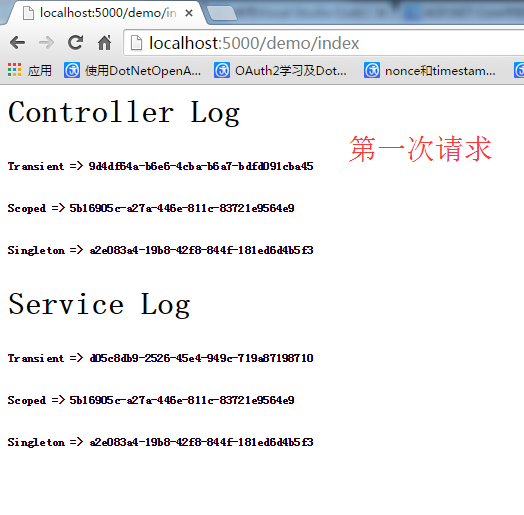
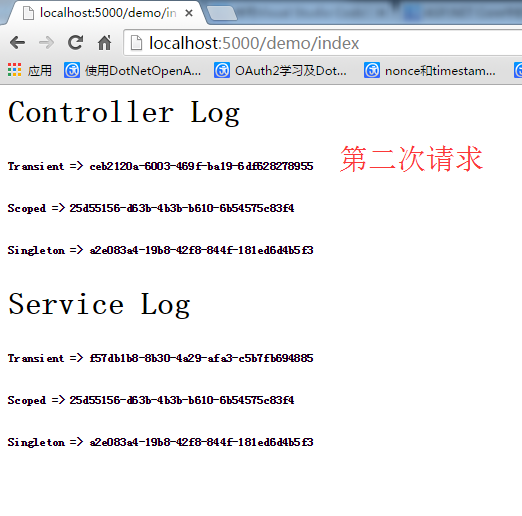
对比内容可以发现,在同一个请求里,Transient对应的GUID都是不一致的,Scoped对应的GUID是一致的。而在不同的请求里,Scoped对应的GUID是不一致的。在两个请求里,Singleton对应的GUID都是一致的。
第三部分、第三方DI容器
除了使用框架默认的DI容器外,还可以引入其他第三方的DI容器。下面以Autofac为例,进行简单的演示。引入Autofac的nuget包
"Autofac.Extensions.DependencyInjection": "4.0.0-rc3-309"
在上面的例子的基础上修改 Startup.cs 的ConfigureServices方法,引入autofac的DI容器,修改方法返回值
public IServiceProvider ConfigureServices(IServiceCollection services)
{
// 注入MVC框架
services.AddMvc();

// autofac容器
var containerBuilder = new ContainerBuilder();
containerBuilder.RegisterType<TestInstance>().As<ITestTransient>().InstancePerDependency();
containerBuilder.RegisterType<TestInstance>().As<ITestScoped>().InstancePerLifetimeScope();
containerBuilder.RegisterType<TestInstance>().As<ITestSingleton>().SingleInstance();
containerBuilder.RegisterType<TestService>().AsSelf().InstancePerDependency();
containerBuilder.Populate(services);

var container = containerBuilder.Build();
return container.Resolve<IServiceProvider>();
}
启动调试,再次访问地址 http://localhost:5000/demo/index ,会得到上个例子同样的效果。

相关文章推荐
- ASP.NET/MVC 配置log4net启用写错误日志功能
- [Asp.Net]登录协同工作平台安全解决方案(优化版)
- asp.net总结
- ASP.NET的三种开发模式
- sqlserver+asp.net+devextreme从零开始(1)
- Exception Handling in ASP.NET Web API webapi异常处理
- Asp.Net MVC2.0 Url 路由入门---实例篇
- Raspberry Pi 3安装配置Raspbian过程(2)
- 为iis设置用户
- vs 序列号密钥
- ASP.NET CORE 1.0 MVC API 文档用 SWASHBUCKLE SWAGGER实现
- ASP.NET服务器端控件RadioButtonList,DropDownList,CheckBoxList的取值、赋值用法
- FastReport.Net 在asp.net MVC中的运用
- org.aspectj.lang.JoinPoint-中文简要API
- ASP.NET MVC中前台页面提交数据到后台控制器
- AspectJ的切入点表达式---execution表达式详解
- asp.net解决高并发的方案.[转]
- Raspbian常见指令笔记
- ASP.NET Core 中文文档 第三章 原理(3)静态文件处理
- asp.net mvc 提交model 接收不了