SpringMVC学习(一)
2016-07-22 11:25
489 查看
SpringMVC学习(一)
标签: springmvc
之前只是用了servlet+jsp+jdbc来写了一个登录注册程序,现在引入springmvc框架,并详细解释一个简单的springmvc需要哪些东西:
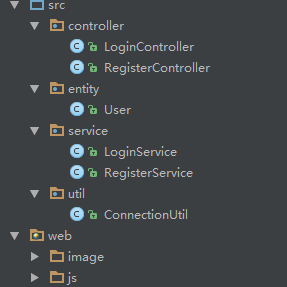
目录结构
首先是web.xml配置文件:
将请求交给spring的DispatcherServlet处理<?xml version="1.0" encoding="UTF-8"?> <web-app xmlns="http://xmlns.jcp.org/xml/ns/javaee" xmlns:xsi="http://www.w3.org/2001/XMLSchema-instance" xsi:schemaLocation="http://xmlns.jcp.org/xml/ns/javaee http://xmlns.jcp.org/xml/ns/javaee/web-app_3_1.xsd" version="3.1"> <servlet> <servlet-name>springmvc</servlet-name> <servlet-class>org.springframework.web.servlet.DispatcherServlet</servlet-class> <!--配置spring文件位置--> <init-param> <param-name>contextConfigLocation</param-name> <param-value>/spring/spring-mvc.xml</param-value> </init-param> <!--是否在启动的时候加载servlet--> <load-on-startup>0</load-on-startup> </servlet> <servlet-mapping> <servlet-name>springmvc</servlet-name> <url-pattern>/</url-pattern> </servlet-mapping> <welcome-file-list> <welcome-file>login.jsp</welcome-file> </welcome-file-list> </web-app>
然后是spring-mvc.xml配置文件
<?xml version="1.0" encoding="UTF-8"?>
<beans xmlns:xsi="http://www.w3.org/2001/XMLSchema-instance"
xmlns:context="http://www.springframework.org/schema/context"
xmlns:mvc="http://www.springframework.org/schema/mvc"
xmlns:p="http://www.springframework.org/schema/p"
xmlns="http://www.springframework.org/schema/beans"
xsi:schemaLocation="http://www.springframework.org/schema/mvc http://www.springframework.org/schema/mvc/spring-mvc-3.2.xsd http://www.springframework.org/schema/beans http://www.springframework.org/schema/beans/spring-beans-3.2.xsd http://www.springframework.org/schema/context http://www.springframework.org/schema/context/spring-context-3.2.xsd">
<!--自动扫描且只扫描controller包下的@Controller-->
<context:component-scan base-package="controller">
<context:include-filter type="annotation" expression="org.springframework.stereotype.Controller"/>
</context:component-scan>

<!--对service进行注入,自动注册bean, 并保证@Required、@Autowired的属性被注入-->
<context:component-scan base-package="service"/>

<!-- 激活基于注解的配置 @RequestMapping, @ExceptionHandler,数据绑定 ,@NumberFormat ,
@DateTimeFormat ,@Controller ,@Valid ,@RequestBody ,@ResponseBody等  -->
<mvc:annotation-driven/>

<!-- 视图解析器配置,使用内部资源视图解析器,使用位于/WEB-INF/目录下的后缀为jsp的文件作为视图 -->
<bean id="viewResolver"
class="org.springframework.web.servlet.view.InternalResourceViewResolver" p:prefix="/"
p:suffix=".jsp"/>

<!-- 静态资源配置 -->
<mvc:resources mapping="js/**"   location="/js/"/>
<mvc:resources mapping="image/**"   location="/image/"/>
</beans>
逐条解释
如果不加入<context:component-scan base-package="controller">
则找不到@controller注释的接口,则会报404错;
如果不加入
<context:component-scan base-package="service"/>
则报错@autowired至少需要一个存在bean,你可以手动加上
<bean id="xxx" class="xxx(你的实现类所在的位置,如这里的service.LoginService)"/>即可,但是如果bean多了的话这样过于麻烦,所以可以配置这句话让spring直接帮你扫描、注入;
<mvc:annotation-driven/>是告知Spring,我们启用注解驱动。然后Spring会自动为我们注册上面说到的几个Bean到工厂中,来处理我们的请求。不加会404
视图解析器就是给你找页面文件的,自行加入前缀和后缀
最后静态资源配置是让spring去给定的地方找静态资源,不加会找不到如js等资源。
ps
可以通过修改web.xml的servlet-mapping为其他的来避免这个问题,比如修改为:<servlet-mapping> <servlet-name>springmvc</servlet-name> <url-pattern>*.do</url-pattern> </servlet-mapping>
jsp页面同样发送.do请求:
<form action="login.do" method="get" class="my_form" onsubmit="return validate()">
...
</form>
LoginController
package controller;

import org.springframework.beans.factory.annotation.Autowired;
import org.springframework.http.MediaType;
import org.springframework.stereotype.Controller;
import org.springframework.web.bind.annotation.RequestBody;
import org.springframework.web.bind.annotation.RequestMapping;
import org.springframework.web.bind.annotation.RequestMethod;
import org.springframework.web.bind.annotation.RequestParam;
import org.springframework.web.servlet.ModelAndView;
import service.LoginService;

/**
* Created by Fate on 2016/7/21.
*/
@Controller
public class LoginController {
@Autowired
LoginService loginService;

@RequestMapping(value = "login", method = RequestMethod.GET)
public ModelAndView login(String username,String password) {
ModelAndView mv=new ModelAndView("login");
boolean result = loginService.login(username, password);
if (result) {
mv.setViewName("wel");
return mv;
}
String msg = "用户名或密码不正确";
mv.addObject("msg", msg);
return mv;
}
}
RegisterController
package controller;

import org.springframework.beans.factory.annotation.Autowired;
import org.springframework.cache.annotation.Cacheable;
import org.springframework.stereotype.Controller;
import org.springframework.web.bind.annotation.RequestMapping;
import org.springframework.web.bind.annotation.RequestParam;
import org.springframework.web.servlet.ModelAndView;
import service.RegisterService;

@Controller
public class RegisterController {
@Autowired
RegisterService registerService;

@RequestMapping("register")
public ModelAndView register(@RequestParam(value = "username", required = false) String user, String password, String age) {
ModelAndView mv = new ModelAndView("register");
int ages = 0;
if (!"".equals(age) && age != null) {
ages = Integer.parseInt(age);
}
if (user == null || password == null) {
return mv;
}
boolean result = registerService.register(user, password, ages);
if (result) {
mv.setViewName("wel");
return mv;
}
String msg = "用户已存在";
mv.addObject("msg", msg);
return mv;
}
}
加入@RequestParam可以进行参数重命名等操作绑定(将username改为user),required=false代表参数可以不存在(不加会绑定参数失败:Required String parameter ‘username’ is not present)。
不加这个注解的话spring会默认绑定名字一样的参数
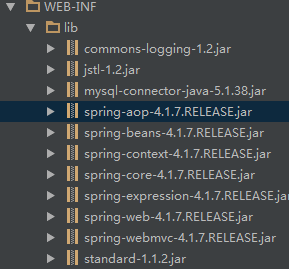
需要的jar包:

相关文章推荐
- 分享微信开发Html5轻游戏中的几个坑
- 一个jar包里的网站
- 一个jar包里的网站之文件上传
- 一个jar包里的网站之返回对媒体类型
- Spring和ThreadLocal
- Spring Boot 开发微服务
- Spring AOP动态代理-切面
- Spring整合Quartz(JobDetailBean方式)
- Spring整合Quartz(JobDetailBean方式)
- C# MVC模式下商品抽奖功能实现
- Zend的MVC机制使用分析(二)
- ASP.NET MVC 4 捆绑和缩小实例介绍
- ASP.NET Mvc开发之查询数据
- ASP.NET MVC中将控制器分离到类库的实现
- asp.net实现在非MVC中使用Razor模板引擎的方法
- ASP.NET MVC中的AJAX应用
- 为ASP.NET MVC及WebApi添加路由优先级
- ASP.NET MVC中图表控件的使用方法
- Asp.net mvc实时生成缩率图到硬盘