Introduction to Android Espresso
2016-07-20 11:22
585 查看
Introduction to Android Espresso
Espresso is a testing framework that exposes a simple API to perform UI testing of android apps. With the latest 2.0 release, Espresso is now part of the Android Support Repository which makes it more easier to add automated testing support for your project.But before jumping into Espresso API, lets consider what puts it apart from the other testing frameworks.
One of the first things you’ll notice about Espresso, is that its code looks a lot like English, which makes it predictable and easy to learn.
The API is relatively small, and yet open for customization.
Espresso tests run optimally fast (no waits, sleeps)
Gradle + Android Studio support
Adding Espresso to your project
1. First of all make sure you have Android Support Repository installed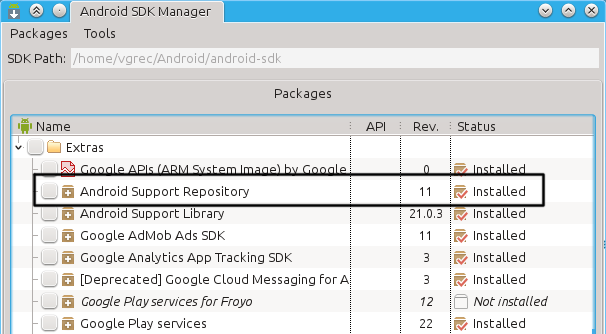
2. Add the following dependencies to your application build.gradle file
The main components of Espresso
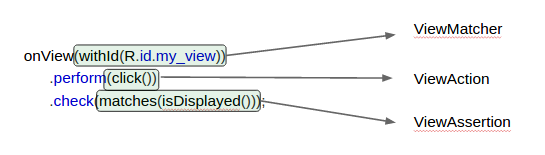
Espresso is built up from 3 major components.These components are:
ViewMatchers – allows you to locate a view in the current view hierarchy
ViewActions – allows you to interact with views
ViewAssertions – allows you to assert the state of a view.
For simplicity, you may use these shortcuts to refer to them:
ViewMatchers – “find something“
ViewActions – “do something“
ViewAssertions – “check something“
And, for example when you will need to check something (like, is some text displayed on the screen?), you’ll know you’ll need a ViewAssertion for that.
Below is an example of a test in Espresso, and where the main components find their place.
A simple test using onView()
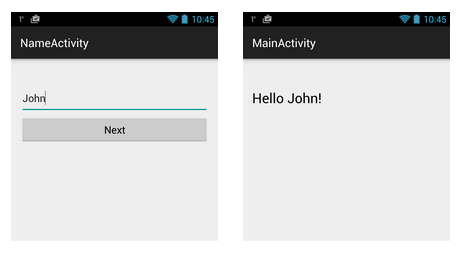
Suppose we have an app where the user is asked to enter his name.After he enters the name, he taps on the “Next” button and is redirected to another activity where a greeting message is displayed.
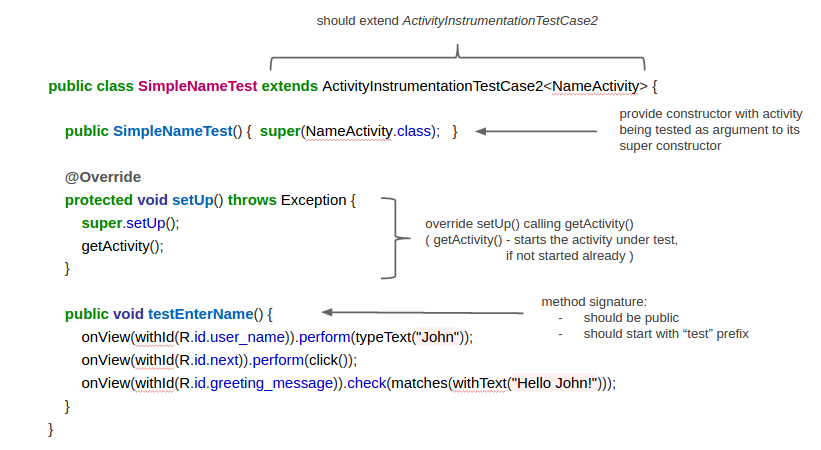
If we would write a test for this scenario, then it might look something like this:
Also, when clicking on the “Next” button and later checking the text, we don’t have to write some special code to tell Espresso that we have navigated to another activity.
Now, if we want to actually run this test, then it should be put in a class. In Gradle, the location where tests are stored is: yourApp/src/androidTest/java.
This is an example of a test class, and its main characteristics:
A simple test using onData()
Whenever you have a ListView, GridView, Spinner, and other Adapter based views, you’ll have to useonData()in order to interact with an item from that list.
onData()is targeting directly the data provided by your adapter. What does this mean, we will see in a moment.
In a hypothetical application we are asked to select a country from a
Spinner, once selected, the country is displayed next to the
Spinner.

A test to check that the displayed country is equal with what was selected, might look like this:
Spinneryou saw in the example above is backed by a simple array of strings, and because of this, we specify that we are looking for an item of type
String. If, instead of a
String, it were some custom object, then we would specify that instead.
To illustrate, consider the following example where a list of books is displayed:

Since the items in the adapter are of type
Book, so will look the query:
DataInteractions
Espresso has a few useful methods that can be used to interact with data.atPosition()– Might be useful when the element to interact with is not relevant, or when the items always appear in a specific order, so you know every item on what position sits.
inRoot()– Use
inRoot()to target non-default windows. One scenario where this can be used is when testing autocomplete. The list that appears in the autocomplete view belongs to a window that is drawn on top of
application window.
In this case you have to specify that the data you are looking for, is not in the main window.
onChildView()– This
DataInteractionallows to further refine the query by letting you interact with a specific view from a list row.
Let say that you have a list of items and every item has a delete button. You want to click on Delete button of a specific item:
inAdapterView()– This allows to select a particular adapter view to operate on, by default Espresso operates on any adapter view.
You may find this useful when dealing with
ViewPagersand
Fragments, and you want to interact with the
AdapterViewthat is currently displayed, or when you have more than one adapter view in your activity.
Espresso and RecyclerView
RecyclerViewis an UI component designed to render a collection of data just like
ListViewand
GridView, actually, it is intended to be a replacement of these two. What interests us from a testing point of view, is that a
RecyclerViewis no longer an
AdapterView. This means that you can not use
onData()to interact with list items.
Fortunately, there is a class called
RecyclerViewActions that exposes a small API to operate on a
RecyclerView. RecyclerViewActions is part of a separate lib called
espresso-contrib, that also should be added to build.gradle:
them from espresso-contrib like this:
https://github.com/vgrec/EspressoExamples
原文地址:https://androidresearch.wordpress.com/2015/04/04/an-introduction-to-espresso/

相关文章推荐
- 使用C++实现JNI接口需要注意的事项
- Android IPC进程间通讯机制
- Android Manifest 用法
- [转载]Activity中ConfigChanges属性的用法
- Android之获取手机上的图片和视频缩略图thumbnails
- Android之使用Http协议实现文件上传功能
- Android学习笔记(二九):嵌入浏览器
- android string.xml文件中的整型和string型代替
- i-jetty环境搭配与编译
- android之定时器AlarmManager
- android wifi 无线调试
- Android Native 绘图方法
- Android java 与 javascript互访(相互调用)的方法例子
- android 代码实现控件之间的间距
- android FragmentPagerAdapter的“标准”配置
- Android"解决"onTouch和onClick的冲突问题
- android:installLocation简析
- android searchView的关闭事件
- SourceProvider.getJniDirectories