android跨进程通信(IPC):使用AIDL
2016-07-18 11:14
525 查看
AIDL的作用
AIDL (Android Interface Definition Language) 是一种IDL 语言,用于生成可以在Android设备上两个进程之间进行进程间通信(interprocess communication, IPC)的代码。如果在一个进程中(例如Activity)要调用另一个进程中(例如Service)对象的操作,就可以使用AIDL生成可序列化的参数。AIDL IPC机制是面向接口的,像COM或Corba一样,但是更加轻量级。它是使用代理类在客户端和实现端传递数据。
选择AIDL的使用场合
官方文档特别提醒我们何时使用AIDL是必要的:只有你允许客户端从不同的应用程序为了进程间的通信而去访问你的service,以及想在你的service处理多线程。如果不需要进行不同应用程序间的并发通信(IPC),you should create your interface by implementing a Binder;或者你想进行IPC,但不需要处理多线程的,则implement your interface using a Messenger。无论如何,在使用AIDL前,必须要理解如何绑定service——bindService。如何绑定服务,请参考我的另一篇文章:http://blog.csdn.net/singwhatiwanna/article/details/9058143。这里先假设你已经了解如何使用bindService。
如何使用AIDL
1.先建立一个android工程,用作服务端
创建一个android工程,用来充当跨进程通信的服务端。
2.创建一个包名用来存放aidl文件
创建一个包名用来存放aidl文件,比如com.ryg.sayhi.aidl,在里面新建IMyService.aidl文件,如果需要访问自定义对象,还需要建立对象的aidl文件,这里我们由于使用了自定义对象Student,所以,还需要创建Student.aidl和Student.java。注意,这三个文件,需要都放在com.ryg.sayhi.aidl包里。下面描述如何写这三个文件。IMyService.aidl代码如下:
[java] view
plaincopy


package com.ryg.sayhi.aidl;
import com.ryg.sayhi.aidl.Student;
interface IMyService {
List<Student> getStudent();
void addStudent(in Student student);
}
说明:
aidl中支持的参数类型为:基本类型(int,long,char,boolean等),String,CharSequence,List,Map,其他类型必须使用import导入,即使它们可能在同一个包里,比如上面的Student,尽管它和IMyService在同一个包中,但是还是需要显示的import进来。
另外,接口中的参数除了aidl支持的类型,其他类型必须标识其方向:到底是输入还是输出抑或两者兼之,用in,out或者inout来表示,上面的代码我们用in标记,因为它是输入型参数。
在gen下面可以看到,eclipse为我们自动生成了一个代理类
public static abstract class Stub extends android.os.Binder implements com.ryg.sayhi.aidl.IMyService
可见这个Stub类就是一个普通的Binder,只不过它实现了我们定义的aidl接口。它还有一个静态方法
public static com.ryg.sayhi.aidl.IMyService asInterface(android.os.IBinder obj)
这个方法很有用,通过它,我们就可以在客户端中得到IMyService的实例,进而通过实例来调用其方法。
Student.aidl代码如下:
[java] view
plaincopy
package com.ryg.sayhi.aidl;
parcelable Student;
说明:这里parcelable是个类型,首字母是小写的,和Parcelable接口不是一个东西,要注意。
Student.java代码如下:
[java] view
plaincopy
package com.ryg.sayhi.aidl;
import java.util.Locale;
import android.os.Parcel;
import android.os.Parcelable;
public final class Student implements Parcelable {
public static final int SEX_MALE = 1;
public static final int SEX_FEMALE = 2;
public int sno;
public String name;
public int sex;
public int age;
public Student() {
}
public static final Parcelable.Creator<Student> CREATOR = new
Parcelable.Creator<Student>() {
public Student createFromParcel(Parcel in) {
return new Student(in);
}
public Student[] newArray(int size) {
return new Student[size];
}
};
private Student(Parcel in) {
readFromParcel(in);
}
@Override
public int describeContents() {
return 0;
}
@Override
public void writeToParcel(Parcel dest, int flags) {
dest.writeInt(sno);
dest.writeString(name);
dest.writeInt(sex);
dest.writeInt(age);
}
public void readFromParcel(Parcel in) {
sno = in.readInt();
name = in.readString();
sex = in.readInt();
age = in.readInt();
}
@Override
public String toString() {
return String.format(Locale.ENGLISH, "Student[ %d, %s, %d, %d ]", sno, name, sex, age);
}
}
说明:通过AIDL传输非基本类型的对象,被传输的对象需要序列化,序列化功能java有提供,但是android sdk提供了更轻量级更方便的方法,即实现Parcelable接口,关于android的序列化,我会在以后写文章介绍。这里只要简单理解一下就行,大意是要实现如下函数
readFromParcel : 从parcel中读取对象
writeToParcel :将对象写入parcel
describeContents:返回0即可
Parcelable.Creator<Student> CREATOR:这个照着上面的代码抄就可以
需要注意的是,readFromParcel和writeToParcel操作数据成员的顺序要一致
3.创建服务端service
创建一个service,比如名为MyService.java,代码如下:[java] view
plaincopy
/**
* @author scott
*/
public class MyService extends Service
{
private final static String TAG = "MyService";
private static final String PACKAGE_SAYHI = "com.example.test";
private NotificationManager mNotificationManager;
private boolean mCanRun = true;
private List<Student> mStudents = new ArrayList<Student>();
//这里实现了aidl中的抽象函数
private final IMyService.Stub mBinder = new IMyService.Stub() {
@Override
public List<Student> getStudent() throws RemoteException {
synchronized (mStudents) {
return mStudents;
}
}
@Override
public void addStudent(Student student) throws RemoteException {
synchronized (mStudents) {
if (!mStudents.contains(student)) {
mStudents.add(student);
}
}
}
//在这里可以做权限认证,return false意味着客户端的调用就会失败,比如下面,只允许包名为com.example.test的客户端通过,
//其他apk将无法完成调用过程
public boolean onTransact(int code, Parcel data, Parcel reply, int flags)
throws RemoteException {
String packageName = null;
String[] packages = MyService.this.getPackageManager().
getPackagesForUid(getCallingUid());
if (packages != null && packages.length > 0) {
packageName = packages[0];
}
Log.d(TAG, "onTransact: " + packageName);
if (!PACKAGE_SAYHI.equals(packageName)) {
return false;
}
return super.onTransact(code, data, reply, flags);
}
};
@Override
public void onCreate()
{
Thread thr = new Thread(null, new ServiceWorker(), "BackgroundService");
thr.start();
synchronized (mStudents) {
for (int i = 1; i < 6; i++) {
Student student = new Student();
student.name = "student#" + i;
student.age = i * 5;
mStudents.add(student);
}
}
mNotificationManager = (NotificationManager) getSystemService(NOTIFICATION_SERVICE);
super.onCreate();
}
@Override
public IBinder onBind(Intent intent)
{
Log.d(TAG, String.format("on bind,intent = %s", intent.toString()));
displayNotificationMessage("服务已启动");
return mBinder;
}
@Override
public int onStartCommand(Intent intent, int flags, int startId)
{
return super.onStartCommand(intent, flags, startId);
}
@Override
public void onDestroy()
{
mCanRun = false;
super.onDestroy();
}
private void displayNotificationMessage(String message)
{
Notification notification = new Notification(R.drawable.icon, message,
System.currentTimeMillis());
notification.flags = Notification.FLAG_AUTO_CANCEL;
notification.defaults |= Notification.DEFAULT_ALL;
PendingIntent contentIntent = PendingIntent.getActivity(this, 0,
new Intent(this, MyActivity.class), 0);
notification.setLatestEventInfo(this, "我的通知", message,
contentIntent);
mNotificationManager.notify(R.id.app_notification_id + 1, notification);
}
class ServiceWorker implements Runnable
{
long counter = 0;
@Override
public void run()
{
// do background processing here.....
while (mCanRun)
{
Log.d("scott", "" + counter);
counter++;
try
{
Thread.sleep(2000);
} catch (InterruptedException e)
{
e.printStackTrace();
}
}
}
}
}
说明:为了表示service的确在活着,我通过打log的方式,每2s打印一次计数。上述代码的关键在于onBind函数,当客户端bind上来的时候,将IMyService.Stub mBinder返回给客户端,这个mBinder是aidl的存根,其实现了之前定义的aidl接口中的抽象函数。
问题:问题来了,有可能你的service只想让某个特定的apk使用,而不是所有apk都能使用,这个时候,你需要重写Stub中的onTransact方法,根据调用者的uid来获得其信息,然后做权限认证,如果返回true,则调用成功,否则调用会失败。对于其他apk,你只要在onTransact中返回false就可以让其无法调用IMyService中的方法,这样就可以解决这个问题了。
4.
在AndroidMenifest中声明service
[html] viewplaincopy
<service
android:name="com.ryg.sayhi.MyService"
android:process=":remote"
android:exported="true" >
<intent-filter>
<category android:name="android.intent.category.DEFAULT" />
<action android:name="com.ryg.sayhi.MyService" />
</intent-filter>
</service>
说明:上述的 <action Android:name="com.ryg.sayhi.MyService"
/>是为了能让其他apk隐式bindService,通过隐式调用的方式来起activity或者service,需要把category设为default,这是因为,隐式调用的时候,intent中的category默认会被设置为default。
5.
新建一个工程,充当客户端
新建一个客户端工程,将服务端工程中的com.ryg.sayhi.aidl包整个拷贝到客户端工程的src下,这个时候,客户端com.ryg.sayhi.aidl包是和服务端工程完全一样的。如果客户端工程中不采用服务端的包名,客户端将无法正常工作,比如你把客户端中com.ryg.sayhi.aidl改一下名字,你运行程序的时候将会crash,也就是说,客户端存放aidl文件的包必须和服务端一样。客户端bindService的代码就比较简单了,如下:[java] view
plaincopy
import com.ryg.sayhi.aidl.IMyService;
import com.ryg.sayhi.aidl.Student;
public class MainActivity extends Activity implements OnClickListener {
private static final String ACTION_BIND_SERVICE = "com.ryg.sayhi.MyService";
private IMyService mIMyService;
private ServiceConnection mServiceConnection = new ServiceConnection()
{
@Override
public void onServiceDisconnected(ComponentName name)
{
mIMyService = null;
}
@Override
public void onServiceConnected(ComponentName name, IBinder service)
{
//通过服务端onBind方法返回的binder对象得到IMyService的实例,得到实例就可以调用它的方法了
mIMyService = IMyService.Stub.asInterface(service);
try {
Student student = mIMyService.getStudent().get(0);
showDialog(student.toString());
} catch (RemoteException e) {
e.printStackTrace();
}
}
};
@Override
protected void onCreate(Bundle savedInstanceState) {
super.onCreate(savedInstanceState);
setContentView(R.layout.activity_main);
Button button1 = (Button) findViewById(R.id.button1);
button1.setOnClickListener(new OnClickListener() {
@Override
public void onClick(View view) {
if (view.getId() == R.id.button1) {
Intent intentService = new Intent(ACTION_BIND_SERVICE);
intentService.setFlags(Intent.FLAG_ACTIVITY_NEW_TASK);
MainActivity.this.bindService(intentService, mServiceConnection, BIND_AUTO_CREATE);
}
}
public void showDialog(String message)
{
new AlertDialog.Builder(MainActivity.this)
.setTitle("scott")
.setMessage(message)
.setPositiveButton("确定", null)
.show();
}
@Override
protected void onDestroy() {
if (mIMyService != null) {
unbindService(mServiceConnection);
}
super.onDestroy();
}
}
运行效果
可以看到,当点击按钮1的时候,客户端bindService到服务端apk,并且调用服务端的接口mIMyService.getStudent()来获取学生列表,并且把返回列表中第一个学生的信息显示出来,这就是整个ipc过程,需要注意的是:学生列表是另一个apk中的数据,通过aidl,我们才得到的。另外,如果你在onTransact中返回false,将会发现,获取的学生列表是空的,这意味着方法调用失败了,也就是实现了权限认证。
第二个栗子
为使应用程序之间能够彼此通信,Android提供了IPC (Inter Process Communication,进程间通信)的一种独特实现: AIDL (Android Interface Definition Language, Android接口定义语言)。
网上看了几篇关于AIDL的文章,写得都很不错,不过例子构造大多略微复杂: 建立两个Android项目,一个是client,一个是server(提供service)。
这篇文章将通过一个项目来介绍AIDL用法,包含了service和client。可能简单了些,不过轻省许多。
这篇博文包含以下两个部分:
1、AIDL介绍
2、定义
3、用例: HelloSumAIDL
3.1、创建工程
3.2、定义AIDL文件
3.3、实现远程服务(Service)
3.4、“暴露”服务
3.5、相关代码
一、 AIDL介绍
在Android中,每个应用(Application)执行在它自己的进程中,无法直接调用到其他应用的资源,这也符合“沙箱”的理念。所谓沙箱原理,一般来说用在移动电话业务中,简单地说旨在部分地或全部地隔离应用程序。关于沙箱技术我们这里就不多做介绍了,可以参看51CTO的这篇文章。
因此,在Android中,当一个应用被执行时,一些操作是被限制的,比如访问内存,访问传感器,等等。这样做可以最大化地保护系统,免得应用程序“为所欲为”。
那我们有时需要在应用间交互,怎么办呢?于是,Android需要实现IPC协议。然而,这个协议还是有点复杂,主要因为需要实现数据管理系统(在进程或线程间传递数据)。为了暂时减缓这个“会呼吸的痛”,Android为我们实现了自己的IPC,也就是梁静茹,oh,sorry,是AIDL :]
二、 定义
AIDL是IPC的一个轻量级实现,用了对于Java开发者来说很熟悉的语法。Android也提供了一个工具,可以自动创建Stub(类构架,类骨架)。当我们需要在应用间通信时,我们需要按以下几步走:
1. 定义一个AIDL接口
2. 为远程服务(Service)实现对应Stub
3. 将服务“暴露”给客户程序使用
三、 用例: HelloSumAIDL
AIDL的语法很类似Java的接口(Interface),只需要定义方法的签名。
AIDL支持的数据类型与Java接口支持的数据类型有些不同
1. 所有基础类型(int, char, 等)
2. String,List,Map,CharSequence等类
3. 其他AIDL接口类型
4. 所有Parcelable的类
为了更好地展示AIDL的用法,我们来看一个很简单的例子: 两数相加。
3.1
创建工程
事不宜迟,我们就创建一个Android项目。以下是项目的基本信息(不一定要一样):
-
项目名称: HelloSumAIDL
-
目标平台: 4.3
-
包名: com.android.hellosumaidl
-
Activity名称: HelloSumAidlActivity
3.2 创建工程
在com.android.hellosumaidl
这个包中,新建一个普通文件(New->File),取名为 IAdditionService.aidl。在这个文件中输入以下代码:
| 1 2 3 4 5 6 7 | package com.android.hellosumaidl; // Interface declaration interface IAdditionService { // You can pass the value of in, out or inout // The primitive types (int, boolean, etc) are only passed by in int add(in int value1, in int value2); } |
IAdditionService.java这个文件。因为是自动生成的,所以无需改动。这个文件里就包含了Stub,我们接下来要为我们的远程服务实现这个Stub。
3.3 实现远程服务
首先我们在
com.android.hellosumaidl
这个包中新建一个类,取名叫AdditionService.java。为了实现我们的服务,我们需要让这个类中的onBind方法返回一个IBinder类的对象。这个IBinder类的对象就代表了远程服务的实现。为了实现这个服务,我们要用到自动生成的子类IAdditionService.Stub。在其中,我们也必须实现我们之前在AIDL文件中定义的add()函数。下面是我们远程服务的代码:
| 1 2 3 4 5 6 7 8 9 10 11 12 13 14 15 16 17 18 19 20 21 22 23 24 25 26 27 28 29 30 31 32 | package com.android.hellosumaidl; import android.app.Service; import android.content.Intent; import android.os.IBinder; import android.os.RemoteException; /* * This class exposes the service to client */ public class AdditionService extends Service { @override public void onCreate() { super.onCreate(); } @override public IBinder onBind(Intent intent) { return new IAdditionService.Stub() { /* * Implement com.android.hellosumaidl.IAdditionService.add(int, int) */ @override public int add(int value1, int value2) throws RemoteException { return value1 + value2; } }; } @override public void onDestroy() { super.onDestroy(); } } |
一旦实现了服务中的onBind方法,我们就可以把客户程序(在这里是HelloSumAidlActivity.java)与服务连接起来了。为了建立这样的一个链接,我们需要实现ServiceConnection类。我们在HelloSumAidlActivity.java创建一个内部类AdditionServiceConnection,这个类继承ServiceConnection类,并且重写了它的两个方法:onServiceConnected和onServiceDisconnected。下面给出内部类的代码:
| 1 2 3 4 5 6 7 8 9 10 11 12 13 14 | /* * This inner class is used to connect to the service */ class AdditionServiceConnection implements ServiceConnection { public void onServiceConnected(ComponentName name, IBinder boundService) { service = IAdditionService.Stub.asInterface((IBinder)boundService); Toast.makeText(HelloSumAidlActivity.this, "Service connected", Toast.LENGTH_LONG).show(); } public void onServiceDisconnected(ComponentName name) { service = null; Toast.makeText(HelloSumAidlActivity.this, "Service disconnected", Toast.LENGTH_LONG).show(); } } |
为我们自己的AIDL的实现。我们使用 IAdditionService.Stub.asInterface((IBinder)boundService)
。
3.5 相关代码
为了完成我们的测试项目,我们需要首先改写
main.xml
(主界面的格局文件)和string.xml (字符串定义文件):
main.xml
| 1 2 3 4 5 6 7 8 9 10 11 12 13 14 15 16 17 18 19 20 21 22 23 24 25 26 27 28 29 30 31 32 33 34 35 36 37 38 39 40 41 42 43 44 45 46 47 | <?xml version="1.0" encoding="utf-8"?> <LinearLayout xmlns:android="http://schemas.android.com/apk/res/android" android:layout_width="match_parent" android:layout_height="match_parent" android:orientation="vertical" > <TextView android:layout_width="fill_parent" android:layout_height="wrap_content" android:text="@string/hello" android:textSize="22sp" /> <EditText android:id="@+id/value1" android:layout_width="wrap_content" android:layout_height="wrap_content" android:hint="@string/hint1" > </EditText> <TextView android:id="@+id/TextView01" android:layout_width="wrap_content" android:layout_height="wrap_content" android:text="@string/plus" android:textSize="36sp" /> <EditText android:id="@+id/value2" android:layout_width="wrap_content" android:layout_height="wrap_content" android:hint="@string/hint2" > </EditText> <Button android:id="@+id/buttonCalc" android:layout_width="wrap_content" android:layout_height="wrap_content" android:hint="@string/equal" > </Button> <TextView android:id="@+id/result" android:layout_width="wrap_content" android:layout_height="wrap_content" android:text="@string/result" android:textSize="36sp" /> </LinearLayout> |
| 1 2 3 4 5 6 7 8 9 10 11 12 13 | <?xml version="1.0" encoding="utf-8"?> <resources> <string name="app_name">HelloSumAIDL</string> <string name="hello">Hello Sum AIDL</string> <string name="result">Result</string> <string name="plus">+</string> <string name="equal">=</string> <string name="hint1">Value 1</string> <string name="hint2">Value 2</string> </resources> |
| 1 2 3 4 5 6 7 8 9 10 11 12 13 14 15 16 17 18 19 20 21 22 23 24 25 26 27 28 29 30 31 32 33 34 35 36 37 38 39 40 41 42 43 44 45 46 47 48 49 50 51 52 53 54 55 56 57 58 59 60 61 62 63 64 65 66 67 68 69 70 71 72 73 74 75 76 77 78 79 80 81 82 83 84 85 86 87 88 89 | package com.android.hellosumaidl; import android.os.Bundle; import android.os.IBinder; import android.os.RemoteException; import android.view.View; import android.view.View.OnClickListener; import android.widget.Button; import android.widget.EditText; import android.widget.TextView; import android.widget.Toast; import android.app.Activity; import android.content.ComponentName; import android.content.Context; import android.content.Intent; import android.content.ServiceConnection; public class HelloSumAidlActivity extends Activity { IAdditionService service; AdditionServiceConnection connection; @override public void onCreate(Bundle savedInstanceState) { super.onCreate(savedInstanceState); setContentView(R.layout.main); initService(); Button buttonCalc = (Button)findViewById(R.id.buttonCalc); buttonCalc.setOnClickListener(new OnClickListener() { TextView result = (TextView)findViewById(R.id.result); EditText value1 = (EditText)findViewById(R.id.value1); EditText value2 = (EditText)findViewById(R.id.value2); @override public void onClick(View v) { int v1, v2, res = -1; v1 = Integer.parseInt(value1.getText().toString()); v2 = Integer.parseInt(value2.getText().toString()); try { res = service.add(v1, v2); } catch (RemoteException e) { e.printStackTrace(); } result.setText(Integer.valueOf(res).toString()); } }); } @override protected void onDestroy() { super.onDestroy(); releaseService(); } /* * This inner class is used to connect to the service */ class AdditionServiceConnection implements ServiceConnection { public void onServiceConnected(ComponentName name, IBinder boundService) { service = IAdditionService.Stub.asInterface((IBinder)boundService); Toast.makeText(HelloSumAidlActivity.this, "Service connected", Toast.LENGTH_LONG).show(); } public void onServiceDisconnected(ComponentName name) { service = null; Toast.makeText(HelloSumAidlActivity.this, "Service disconnected", Toast.LENGTH_LONG).show(); } } /* * This function connects the Activity to the service */ private void initService() { connection = new AdditionServiceConnection(); Intent i = new Intent(); i.setClassName("com.android.hellosumaidl", com.android.hellosumaidl.AdditionService.class.getName()); boolean ret = bindService(i, connection, Context.BIND_AUTO_CREATE); } /* * This function disconnects the Activity from the service */ private void releaseService() { unbindService(connection); connection = null; } } |
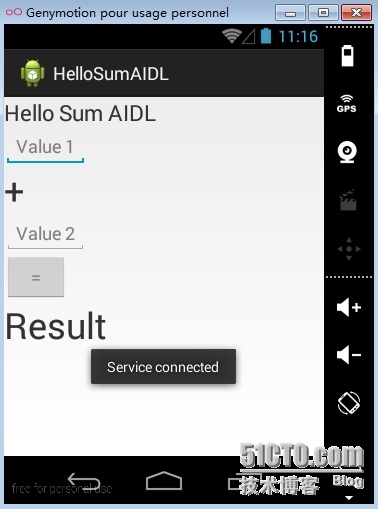
Fig 1 : 填写数字前
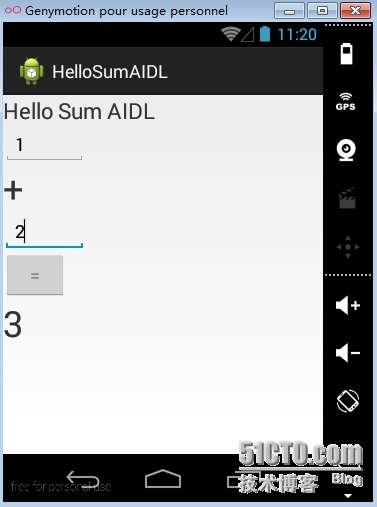
Fig 2 : 按下计算按钮后
后记
附上测试项目的Android代码包

HelloSumAidl.zip (1.41
MB)
2013-12-4 17:25, 下载次数: 5608

相关文章推荐
- Android 修改厂商信息
- Android随VierPager滑动的导航栏
- Android解析Json数据之FastJson解析
- Error:(1, 0) Plugin is too old, please update to a more recent version, or set ANDROID_DAILY_OVERRID
- 最新基于高德地图的android进阶开发(2)小试牛刀
- Android中ProgressBar自定义进度条的高度、颜色、圆角
- 【腾讯Bugly干货分享】浅谈Android自定义锁屏页的发车姿势
- Android 防止popup window遮挡软键盘
- Android开发中发送Get请求的实例
- Android Studio 的常用快捷键
- android:configChanges="orientation|keyboardHidden"的使用
- Android绘图——圆圈+水波
- 【腾讯Bugly干货分享】浅谈Android自定义锁屏页的发车姿势
- Android开发之RecyclerView的使用全解
- Android Intent
- Android TV开发经验总结---初识TV开发
- Android应用开发的插件化 模块化
- Android中使用DownloadManager类来管理数据下载
- Android之图片选择与裁剪
- Android——实现无障碍