基于 CoreText 实现的高性能 UITableView
2016-07-14 08:28
435 查看
引起UITableView卡顿比较常见的原因有cell的层级过多、cell中有触发离屏渲染的代码(譬如:cornerRadius、maskToBounds 同时使用)、像素是否对齐、是否使用UITableView自动计算cell高度的方法等。本文将从cell层级出发,以一个仿朋友圈的demo来讲述如何让列表保持顺滑,项目的源码可在文末获得。不可否认的是,过早的优化是魔鬼,请在项目出现性能瓶颈再考虑优化。
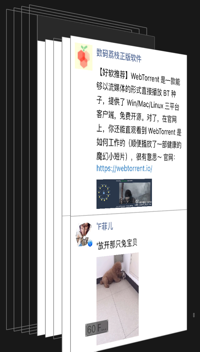
首先看看reveal上页面层级的效果图
1、绘制文本
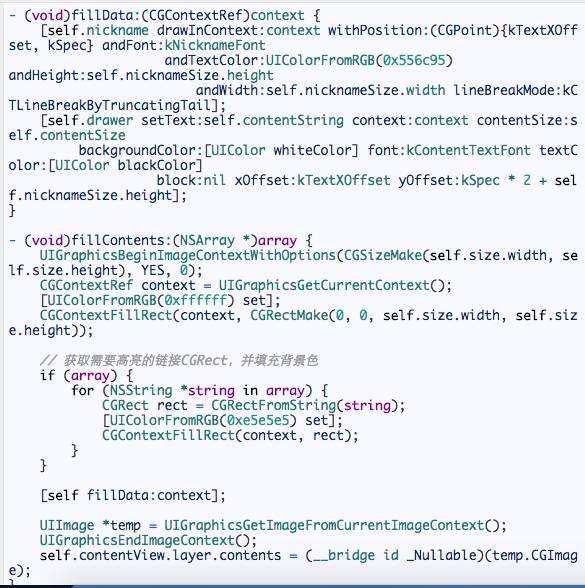
使用core text可以将文本绘制在一个CGContextRef上,最后再通过UIGraphicsGetImageFromCurrentImageContext()生成图片,再将图片赋值给cell.contentView.layer,从而达到减少cell层级的目的。
绘制普通文本(譬如用户昵称)在context上,相关注释在代码里:
- (void)drawInContext:(CGContextRef)context withPosition:(CGPoint)p andFont:(UIFont *)font andTextColor:(UIColor *)color andHeight:(float)height andWidth:(float)width lineBreakMode:(CTLineBreakMode)lineBreakMode {
CGSize size = CGSizeMake(width, height);
// 翻转坐标系
CGContextSetTextMatrix(context,CGAffineTransformIdentity);
CGContextTranslateCTM(context,0,height);
CGContextScaleCTM(context,1.0,-1.0);
NSMutableDictionary * attributes = [StringAttributes attributeFont:font andTextColor:color lineBreakMode:lineBreakMode];
// 创建绘制区域(路径)
CGMutablePathRef path = CGPathCreateMutable();
CGPathAddRect(path,NULL,CGRectMake(p.x, height-p.y-size.height,(size.width),(size.height)));
// 创建AttributedString
NSMutableAttributedString *attributedStr = [[NSMutableAttributedString alloc] initWithString:self attributes:attributes];
CFAttributedStringRef attributedString = (__bridge CFAttributedStringRef)attributedStr;
// 绘制frame
CTFramesetterRef framesetter = CTFramesetterCreateWithAttributedString((CFAttributedStringRef)attributedString);
CTFrameRef ctframe = CTFramesetterCreateFrame(framesetter, CFRangeMake(0,0),path,NULL);
CTFrameDraw(ctframe,context);
CGPathRelease(path);
CFRelease(framesetter);
CFRelease(ctframe);
[[attributedStr mutableString] setString:@""];
CGContextSetTextMatrix(context,CGAffineTransformIdentity);
CGContextTranslateCTM(context,0, height);
CGContextScaleCTM(context,1.0,-1.0);
}
绘制朋友圈内容文本(带链接)在context上,这里我还没有去实现文本多了会折叠的效果,与上面普通文本不同的是这里需要创建带链接的AttributeString和CTLineRef的逐行绘制:
- (NSMutableAttributedString *)highlightText:(NSMutableAttributedString *)coloredString{
// 创建带高亮的AttributedString
NSString* string = coloredString.string;
NSRange range = NSMakeRange(0,[string length]);
NSDataDetector *linkDetector = [NSDataDetector dataDetectorWithTypes:NSTextCheckingTypeLink error:nil];
NSArray *matches = [linkDetector matchesInString:string options:0 range:range];
for(NSTextCheckingResult* match in matches) {
[self.ranges addObject:NSStringFromRange(match.range)];
UIColor *highlightColor = UIColorFromRGB(0x297bc1);
[coloredString addAttribute:(NSString*)kCTForegroundColorAttributeName
value:(id)highlightColor.CGColor range:match.range];
}
return coloredString;
}
- (void)drawFramesetter:(CTFramesetterRef)framesetter
attributedString:(NSAttributedString *)attributedString
textRange:(CFRange)textRange
inRect:(CGRect)rect
context:(CGContextRef)c {
CGMutablePathRef path = CGPathCreateMutable();
CGPathAddRect(path, NULL, rect);
CTFrameRef frame = CTFramesetterCreateFrame(framesetter, textRange, path, NULL);
CGFloat ContentHeight = CGRectGetHeight(rect);
CFArrayRef lines = CTFrameGetLines(frame);
NSInteger numberOfLines = CFArrayGetCount(lines);
CGPoint lineOrigins[numberOfLines];
CTFrameGetLineOrigins(frame, CFRangeMake(0, numberOfLines), lineOrigins);
// 遍历每一行
for (CFIndex lineIndex = 0; lineIndex < numberOfLines; lineIndex++) {
CGPoint lineOrigin = lineOrigins[lineIndex];
CTLineRef line = CFArrayGetValueAtIndex(lines, lineIndex);
CGFloat descent = 0.0f, ascent = 0.0f, lineLeading = 0.0f;
CTLineGetTypographicBounds((CTLineRef)line, &ascent, &descent, &lineLeading);
CGFloat penOffset = (CGFloat)CTLineGetPenOffsetForFlush(line, NSTextAlignmentLeft, rect.size.width);
CGFloat y = lineOrigin.y - descent - self.font.descender;
// 设置每一行位置
CGContextSetTextPosition(c, penOffset + self.xOffset, y - self.yOffset);
CTLineDraw(line, c);
// CTRunRef同一行中文本的不同样式,包括颜色、字体等,此处用途为处理链接高亮
CFArrayRef runs = CTLineGetGlyphRuns(line);
for (int j = 0; j < CFArrayGetCount(runs); j++) {
CGFloat runAscent, runDescent, lineLeading1;
CTRunRef run = CFArrayGetValueAtIndex(runs, j);
NSDictionary *attributes = (__bridge NSDictionary*)CTRunGetAttributes(run);
// 判断是不是链接
if (!CGColorEqualToColor((__bridge CGColorRef)([attributes valueForKey:@"CTForegroundColor"]), self.textColor.CGColor)) {
CFRange range = CTRunGetStringRange(run);
float offset = CTLineGetOffsetForStringIndex(line, range.location, NULL);
// 得到链接的CGRect
CGRect runRect;
runRect.size.width = CTRunGetTypographicBounds(run, CFRangeMake(0,0), &runAscent, &runDescent, &lineLeading1);
runRect.size.height = self.font.lineHeight;
runRect.origin.x = lineOrigin.x + offset+ self.xOffset;
runRect.origin.y = lineOrigin.y;
runRect.origin.y -= descent + self.yOffset;
// 因为坐标系被翻转,链接正常的坐标需要通过CGAffineTransform计算得到
CGAffineTransform transform = CGAffineTransformMakeTranslation(0, ContentHeight);
transform = CGAffineTransformScale(transform, 1.f, -1.f);
CGRect flipRect = CGRectApplyAffineTransform(runRect, transform);
// 保存是链接的CGRect
NSRange nRange = NSMakeRange(range.location, range.length);
self.framesDict[NSStringFromRange(nRange)] = [NSValue valueWithCGRect:flipRect];
// 保存同一条链接的不同CGRect,用于点击时背景色处理
for (NSString *rangeString in self.ranges) {
NSRange range = NSRangeFromString(rangeString);
if (NSLocationInRange(nRange.location, range)) {
NSMutableArray *array = self.relationDict[rangeString];
if (array) {
[array addObject:NSStringFromCGRect(flipRect)];
self.relationDict[rangeString] = array;
} else {
self.relationDict[rangeString] = [NSMutableArray arrayWithObject:NSStringFromCGRect(flipRect)];
}
}
}
}
}
}
CFRelease(frame);
CFRelease(path);
}
上述方法运用起来就是:
这样就完成了文本的显示。
2、显示图片
图片包括用户头像和朋友圈的内容,这里只是将CALayer添加到contentView.layer上,具体做法是继承了CALayer,实现部分功能。
通过链接显示图片:
- (void)setContentsWithURLString:(NSString *)urlString {
self.contents = (__bridge id _Nullable)([UIImage imageNamed:@"placeholder"].CGImage);
@weakify(self)
SDWebImageManager *manager = [SDWebImageManager sharedManager];
[manager downloadImageWithURL:[NSURL URLWithString:urlString]
options:SDWebImageCacheMemoryOnly
progress:nil
completed:^(UIImage *image, NSError *error, SDImageCacheType cacheType, BOOL finished, NSURL *imageURL) {
if (image) {
@strongify(self)
dispatch_async(dispatch_get_global_queue(DISPATCH_QUEUE_PRIORITY_DEFAULT, 0), ^{
if (!_observer) {
_observer = CFRunLoopObserverCreateWithHandler(kCFAllocatorDefault, kCFRunLoopBeforeWaiting | kCFRunLoopExit, false, POPAnimationApplyRunLoopOrder, ^(CFRunLoopObserverRef observer, CFRunLoopActivity activity) {
self.contents = (__bridge id _Nullable)(image.CGImage);
});
if (_observer) {
CFRunLoopAddObserver(CFRunLoopGetMain(), _observer, kCFRunLoopCommonModes);
}
}
});
self.originImage = image;
}
}];
}
其他比较简单就不展开。
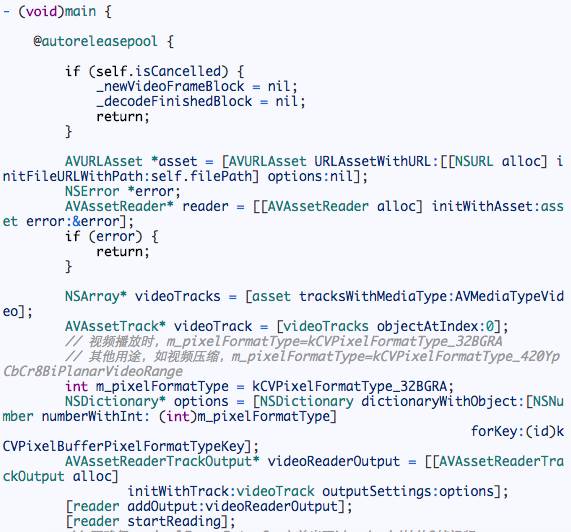
3、显示小视频
之前的一篇文章简单讲了怎么自己做一个播放器,这里就派上用场了。而显示小视频封面图片的CALayer同样在显示小视频的时候可以复用。
这里使用了NSOperationQueue来保障播放视频的流畅性,具体继承NSOperation的VideoDecodeOperation相关代码如下:
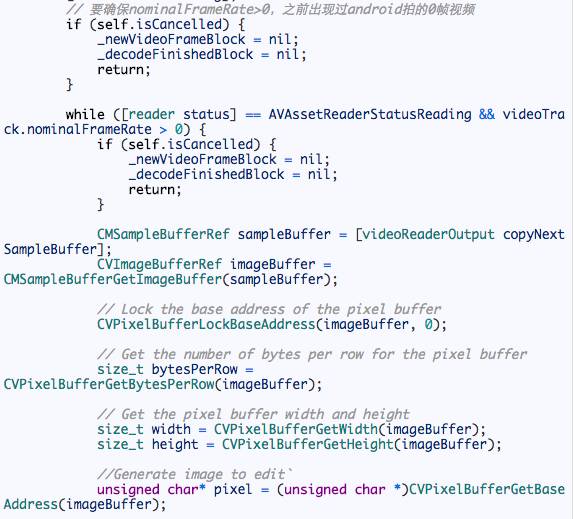
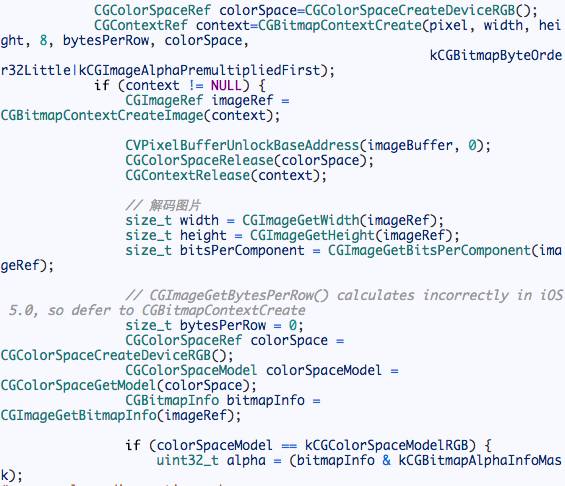
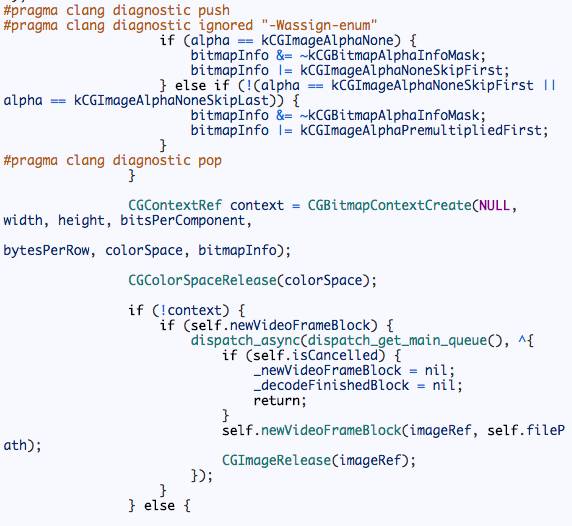
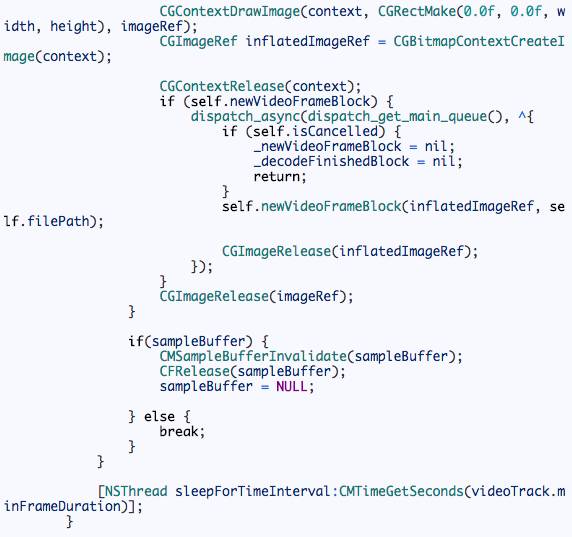
解码图片是因为UIImage在界面需要显示的时候才开始解码,这样可能会造成主线程的卡顿,所以在子线程对其进行解压缩处理。
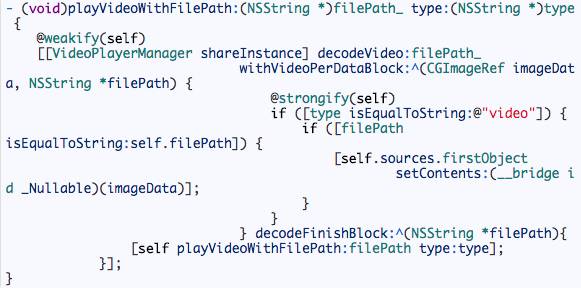
具体的使用:
4、其他
1、触摸交互是覆盖了以下方法实现:
- (void)touchesCancelled:(NSSet<UITouch *> *)touches withEvent:(UIEvent *)event
- (void)touchesCancelled:(NSSet<UITouch *> *)touches withEvent:(UIEvent *)event
- (void)touchesEnded:(NSSet<UITouch *> *)touches withEvent:(UIEvent *)event
2、页面上FPS的测量是使用了YYKit项目中的YYFPSLabel。
3、测试数据是微博找的,其中小视频是Gif快手。
本文的代码在https://github.com/hawk0620/PYQFeedDemo
首先看看reveal上页面层级的效果图
1、绘制文本
使用core text可以将文本绘制在一个CGContextRef上,最后再通过UIGraphicsGetImageFromCurrentImageContext()生成图片,再将图片赋值给cell.contentView.layer,从而达到减少cell层级的目的。
绘制普通文本(譬如用户昵称)在context上,相关注释在代码里:
- (void)drawInContext:(CGContextRef)context withPosition:(CGPoint)p andFont:(UIFont *)font andTextColor:(UIColor *)color andHeight:(float)height andWidth:(float)width lineBreakMode:(CTLineBreakMode)lineBreakMode {
CGSize size = CGSizeMake(width, height);
// 翻转坐标系
CGContextSetTextMatrix(context,CGAffineTransformIdentity);
CGContextTranslateCTM(context,0,height);
CGContextScaleCTM(context,1.0,-1.0);
NSMutableDictionary * attributes = [StringAttributes attributeFont:font andTextColor:color lineBreakMode:lineBreakMode];
// 创建绘制区域(路径)
CGMutablePathRef path = CGPathCreateMutable();
CGPathAddRect(path,NULL,CGRectMake(p.x, height-p.y-size.height,(size.width),(size.height)));
// 创建AttributedString
NSMutableAttributedString *attributedStr = [[NSMutableAttributedString alloc] initWithString:self attributes:attributes];
CFAttributedStringRef attributedString = (__bridge CFAttributedStringRef)attributedStr;
// 绘制frame
CTFramesetterRef framesetter = CTFramesetterCreateWithAttributedString((CFAttributedStringRef)attributedString);
CTFrameRef ctframe = CTFramesetterCreateFrame(framesetter, CFRangeMake(0,0),path,NULL);
CTFrameDraw(ctframe,context);
CGPathRelease(path);
CFRelease(framesetter);
CFRelease(ctframe);
[[attributedStr mutableString] setString:@""];
CGContextSetTextMatrix(context,CGAffineTransformIdentity);
CGContextTranslateCTM(context,0, height);
CGContextScaleCTM(context,1.0,-1.0);
}
绘制朋友圈内容文本(带链接)在context上,这里我还没有去实现文本多了会折叠的效果,与上面普通文本不同的是这里需要创建带链接的AttributeString和CTLineRef的逐行绘制:
- (NSMutableAttributedString *)highlightText:(NSMutableAttributedString *)coloredString{
// 创建带高亮的AttributedString
NSString* string = coloredString.string;
NSRange range = NSMakeRange(0,[string length]);
NSDataDetector *linkDetector = [NSDataDetector dataDetectorWithTypes:NSTextCheckingTypeLink error:nil];
NSArray *matches = [linkDetector matchesInString:string options:0 range:range];
for(NSTextCheckingResult* match in matches) {
[self.ranges addObject:NSStringFromRange(match.range)];
UIColor *highlightColor = UIColorFromRGB(0x297bc1);
[coloredString addAttribute:(NSString*)kCTForegroundColorAttributeName
value:(id)highlightColor.CGColor range:match.range];
}
return coloredString;
}
- (void)drawFramesetter:(CTFramesetterRef)framesetter
attributedString:(NSAttributedString *)attributedString
textRange:(CFRange)textRange
inRect:(CGRect)rect
context:(CGContextRef)c {
CGMutablePathRef path = CGPathCreateMutable();
CGPathAddRect(path, NULL, rect);
CTFrameRef frame = CTFramesetterCreateFrame(framesetter, textRange, path, NULL);
CGFloat ContentHeight = CGRectGetHeight(rect);
CFArrayRef lines = CTFrameGetLines(frame);
NSInteger numberOfLines = CFArrayGetCount(lines);
CGPoint lineOrigins[numberOfLines];
CTFrameGetLineOrigins(frame, CFRangeMake(0, numberOfLines), lineOrigins);
// 遍历每一行
for (CFIndex lineIndex = 0; lineIndex < numberOfLines; lineIndex++) {
CGPoint lineOrigin = lineOrigins[lineIndex];
CTLineRef line = CFArrayGetValueAtIndex(lines, lineIndex);
CGFloat descent = 0.0f, ascent = 0.0f, lineLeading = 0.0f;
CTLineGetTypographicBounds((CTLineRef)line, &ascent, &descent, &lineLeading);
CGFloat penOffset = (CGFloat)CTLineGetPenOffsetForFlush(line, NSTextAlignmentLeft, rect.size.width);
CGFloat y = lineOrigin.y - descent - self.font.descender;
// 设置每一行位置
CGContextSetTextPosition(c, penOffset + self.xOffset, y - self.yOffset);
CTLineDraw(line, c);
// CTRunRef同一行中文本的不同样式,包括颜色、字体等,此处用途为处理链接高亮
CFArrayRef runs = CTLineGetGlyphRuns(line);
for (int j = 0; j < CFArrayGetCount(runs); j++) {
CGFloat runAscent, runDescent, lineLeading1;
CTRunRef run = CFArrayGetValueAtIndex(runs, j);
NSDictionary *attributes = (__bridge NSDictionary*)CTRunGetAttributes(run);
// 判断是不是链接
if (!CGColorEqualToColor((__bridge CGColorRef)([attributes valueForKey:@"CTForegroundColor"]), self.textColor.CGColor)) {
CFRange range = CTRunGetStringRange(run);
float offset = CTLineGetOffsetForStringIndex(line, range.location, NULL);
// 得到链接的CGRect
CGRect runRect;
runRect.size.width = CTRunGetTypographicBounds(run, CFRangeMake(0,0), &runAscent, &runDescent, &lineLeading1);
runRect.size.height = self.font.lineHeight;
runRect.origin.x = lineOrigin.x + offset+ self.xOffset;
runRect.origin.y = lineOrigin.y;
runRect.origin.y -= descent + self.yOffset;
// 因为坐标系被翻转,链接正常的坐标需要通过CGAffineTransform计算得到
CGAffineTransform transform = CGAffineTransformMakeTranslation(0, ContentHeight);
transform = CGAffineTransformScale(transform, 1.f, -1.f);
CGRect flipRect = CGRectApplyAffineTransform(runRect, transform);
// 保存是链接的CGRect
NSRange nRange = NSMakeRange(range.location, range.length);
self.framesDict[NSStringFromRange(nRange)] = [NSValue valueWithCGRect:flipRect];
// 保存同一条链接的不同CGRect,用于点击时背景色处理
for (NSString *rangeString in self.ranges) {
NSRange range = NSRangeFromString(rangeString);
if (NSLocationInRange(nRange.location, range)) {
NSMutableArray *array = self.relationDict[rangeString];
if (array) {
[array addObject:NSStringFromCGRect(flipRect)];
self.relationDict[rangeString] = array;
} else {
self.relationDict[rangeString] = [NSMutableArray arrayWithObject:NSStringFromCGRect(flipRect)];
}
}
}
}
}
}
CFRelease(frame);
CFRelease(path);
}
上述方法运用起来就是:
这样就完成了文本的显示。
2、显示图片
图片包括用户头像和朋友圈的内容,这里只是将CALayer添加到contentView.layer上,具体做法是继承了CALayer,实现部分功能。
通过链接显示图片:
- (void)setContentsWithURLString:(NSString *)urlString {
self.contents = (__bridge id _Nullable)([UIImage imageNamed:@"placeholder"].CGImage);
@weakify(self)
SDWebImageManager *manager = [SDWebImageManager sharedManager];
[manager downloadImageWithURL:[NSURL URLWithString:urlString]
options:SDWebImageCacheMemoryOnly
progress:nil
completed:^(UIImage *image, NSError *error, SDImageCacheType cacheType, BOOL finished, NSURL *imageURL) {
if (image) {
@strongify(self)
dispatch_async(dispatch_get_global_queue(DISPATCH_QUEUE_PRIORITY_DEFAULT, 0), ^{
if (!_observer) {
_observer = CFRunLoopObserverCreateWithHandler(kCFAllocatorDefault, kCFRunLoopBeforeWaiting | kCFRunLoopExit, false, POPAnimationApplyRunLoopOrder, ^(CFRunLoopObserverRef observer, CFRunLoopActivity activity) {
self.contents = (__bridge id _Nullable)(image.CGImage);
});
if (_observer) {
CFRunLoopAddObserver(CFRunLoopGetMain(), _observer, kCFRunLoopCommonModes);
}
}
});
self.originImage = image;
}
}];
}
其他比较简单就不展开。
3、显示小视频
之前的一篇文章简单讲了怎么自己做一个播放器,这里就派上用场了。而显示小视频封面图片的CALayer同样在显示小视频的时候可以复用。
这里使用了NSOperationQueue来保障播放视频的流畅性,具体继承NSOperation的VideoDecodeOperation相关代码如下:
解码图片是因为UIImage在界面需要显示的时候才开始解码,这样可能会造成主线程的卡顿,所以在子线程对其进行解压缩处理。
具体的使用:
4、其他
1、触摸交互是覆盖了以下方法实现:
- (void)touchesCancelled:(NSSet<UITouch *> *)touches withEvent:(UIEvent *)event
- (void)touchesCancelled:(NSSet<UITouch *> *)touches withEvent:(UIEvent *)event
- (void)touchesEnded:(NSSet<UITouch *> *)touches withEvent:(UIEvent *)event
2、页面上FPS的测量是使用了YYKit项目中的YYFPSLabel。
3、测试数据是微博找的,其中小视频是Gif快手。
本文的代码在https://github.com/hawk0620/PYQFeedDemo

相关文章推荐
- Django list转Queryset
- hdu_2604Queuing(快速幂矩阵)
- Implement Stack using Queues
- 陶哲轩实分析-第18章 Lebesgue积分
- UICollectionView的使用
- HDU 4339 Query(线段树)
- vue firebase check ..
- 常用STL类的使用
- java实现BlockingQueue接口的队列解析
- Error:No suitable device found: no device found for connection "System eth0"
- UITableView+UITableViewStyleGrouped 处理section之间间隙
- 克隆虚拟机重启服务时 Error:No suitable device found: no device found for connection "System eth0"
- Qt Quick Controls 和 Qt Quick的区别
- UITableView 重用池原理
- Could Not Get the Value for Parameter compilerId for Plugin Execution
- UITableView设置表头后向上拉,表头的解决办法
- 一次$_REQUEST的count参数异常BUG排查
- 在win7上安装ubuntu12.04双系统(uefi主板)
- F - Longest Ordered Subsequence
- UGUI之修改Text字间距