【POI xlsx】使用POI对xlsx的单元格样式进行设置 / 使用POI对xlsx的字体进行设置
2016-07-12 16:40
603 查看
涉及到的样式都在代码中有说明:
View Code
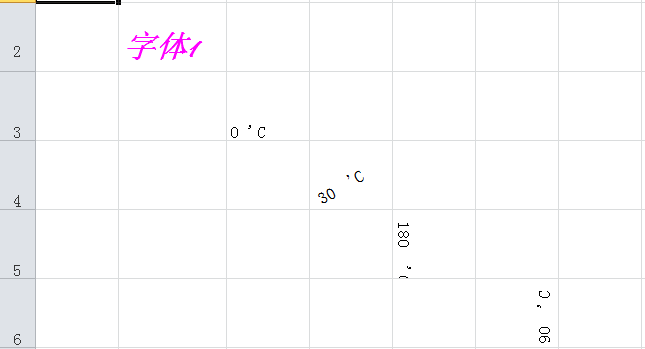
样式显示如下:
package com.it.poiTest;

import java.io.FileInputStream;
import java.io.FileNotFoundException;
import java.io.FileOutputStream;
import java.io.IOException;

import org.apache.poi.hssf.util.HSSFColor;
import org.apache.poi.ss.usermodel.Cell;
import org.apache.poi.ss.usermodel.IndexedColors;
import org.apache.poi.ss.usermodel.Row;
import org.apache.poi.xssf.usermodel.XSSFCellStyle;
import org.apache.poi.xssf.usermodel.XSSFFont;
import org.apache.poi.xssf.usermodel.XSSFSheet;
import org.apache.poi.xssf.usermodel.XSSFWorkbook;

public class FontTest {

public static void main(String[] args) {
try {
XSSFWorkbook workbook = new XSSFWorkbook();
FileOutputStream out = new FileOutputStream("FontSet.xlsx");
XSSFSheet sheet = workbook.createSheet("font  set");
sheet.setColumnWidth(1, 3000);
Row row = sheet.createRow(1);
row.setHeight((short) 900);
Cell cell = row.createCell(1);
cell.setCellValue("字体1");

/**
* font设置---设置字体样式
*/
XSSFFont font1 = workbook.createFont();
//设置行高使用HSSFRow对象的setHeight和setHeightInPoints方法,这两个方法的区别在于setHeightInPoints的单位是点,而setHeight的单位是1/20个点,所以setHeight的值永远是setHeightInPoints的20倍。
//设置字号大小
//font1.setFontHeight(20);
//设置字号大小
font1.setFontHeightInPoints((short) 20);
//设置字体
font1.setFontName("Pristina");
//设置加粗
font1.setBold(true);
//设置斜体
font1.setItalic(true);
//设置字体颜色
font1.setColor(IndexedColors.PINK.getIndex());
//或者
//font1.setColor(HSSFColor.YELLOW.index);
XSSFCellStyle style = workbook.createCellStyle();
style.setFont(font1);
cell.setCellStyle(style);

/**
* 设置字体角度  顺时针旋转
*/
row = sheet.createRow(2);
row.setHeight((short) 900);
cell = row.createCell(2);
XSSFCellStyle style1 = workbook.createCellStyle();
style1.setRotation((short) 0);
cell.setCellValue("0 'C");
cell.setCellStyle(style1);

row = sheet.createRow(3);
row.setHeight((short) 900);
cell = row.createCell(3);
XSSFCellStyle style2 = workbook.createCellStyle();
style2.setRotation((short) 30);
cell.setCellValue("30  'C");
cell.setCellStyle(style2);

row = sheet.createRow(4);
row.setHeight((short) 900);
cell = row.createCell(4);
XSSFCellStyle style3 = workbook.createCellStyle();
style3.setRotation((short) 180);
cell.setCellValue("180  'C");
cell.setCellStyle(style3);

row = sheet.createRow(5);
row.setHeight((short) 900);
cell = row.createCell(5);
XSSFCellStyle style4 = workbook.createCellStyle();
style4.setRotation((short) 90);
cell.setCellValue("90  'C");
cell.setCellStyle(style4);

workbook.write(out);
out.close();
} catch (FileNotFoundException e) {
e.printStackTrace();
} catch (IOException e) {
e.printStackTrace();
}
}

}
View Code
样式显示如下:

相关文章推荐
- css实现鼠标移动图片上放大效果
- 在网上看到用CSS制作动态小黄人,我自己实践了下
- WPF窗体样式继承
- Atom Editor 插件 atom-less 的使用方法
- 如何让div自动适应内容宽度,并且居中
- CSS整体界面设计
- CSS tab选项卡(标签页)切换
- CSS list-style属性控制ul标签样式
- 使用CSS3 backface-visibility:hidden;属性制作翻转动画效果
- css-表格的美化总结
- [原创]CSS3打造动态3D气球
- CSS实现会发光的输入框input
- css的transition 属性
- 淘宝顶端的通知样式 .
- css--伪类:first-child
- CSS中!important的使用
- 关于css 的 !important
- nav布局 在线演示 DIVCSS5
- Animate.css 教程
- 边框动画 Creating a Border Animation Effect with SVG and CSS 动画边框,很不错!