自己动手编译最新Android源码及SDK
2016-07-09 22:55
531 查看
在Android Studio代码调试一文中,简单的介绍了代码调试的一些技巧.现在我们来谈谈android源码编译的一些事.(俺认为,作为android developer人人都应该有一份自己Android源码,这样我们就可以随时对自己有疑惑的地方通过亲手调试来加强理解).
本文适用于Ubuntu 16.04上编译Android 6.0.*,其他情况请酌情处理,自行参考官网吧.
请首先确保自己已经安装了Git.没安装的同学可以通过以下命令进行安装:
其中test@test.com为你自己的邮箱.
android源码编译的四个流程:1.源码下载;2.构建编译环境;3.编译源码;4运行.下文也将按照该流程讲述.
由于某墙的原因,这里我们采用国内的镜像源进行下载.
目前,可用的镜像源一般是科大和清华的,具体使用差不多,这里我选择清华大学镜像进行说明.(参考:科大源,清华源)
通过执行以下命令实现repo工具的下载和安装
补充说明
这里,我来简单的介绍下repo工具,我们知道AOSP项目由不同的子项目组成,为了方便进行管理,Google采用Git对AOSP项目进行多仓库管理.在聊repo工具之前,我先带你来聊聊多仓库项目:
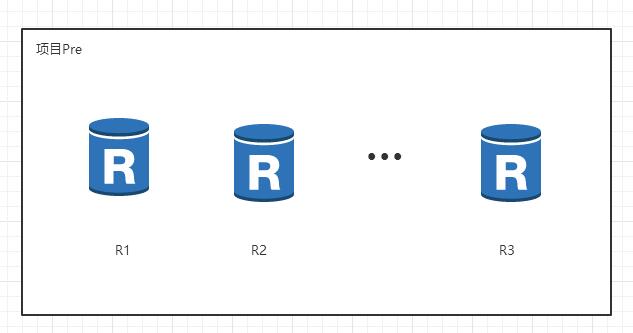
我们有个非常庞大的项目Pre,该项目由很多个子项目R1,R2,…Rn等组成,为了方便管理和协同开发,我们为每个子项目创立自己的仓库,整个项目的结构如下:
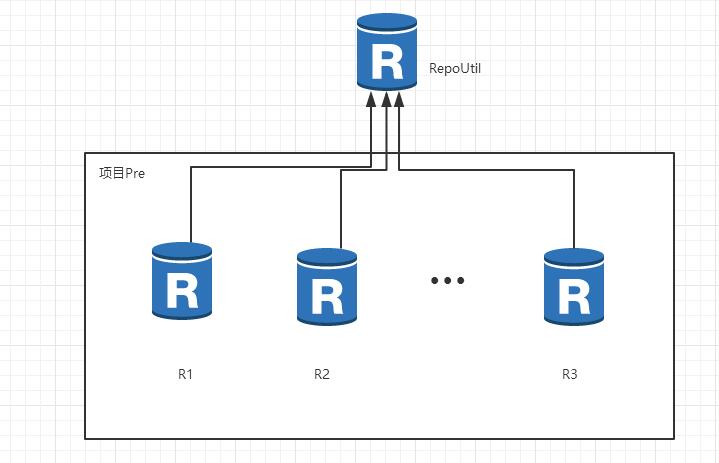
将一个项目Pre进行分库后会遇到这么一个问题:如果我们想要创建Pre分支来做feature开发,这就意味着,我们需要到每个子项目中分别创建对应的分支,这个过程如果纯粹靠手工做,那简直是个灾难,利索当然我们会想写个自动化处理程序(我们假设这个工具叫做RepoUtil)来帮助我们解决这个问题.这个RepoUtil也会有版本管理之类的需求,因此我们也用Git对其管理,并为其创建对应的仓库.此时整个项目的结构如下:
这里RepoUtil知道整个项目Pre下的每个子项目(即维护子项目的列表),同时需要提供对这些子项目的管理功能,比如统一创建分支等.但是从”单一职责”角度来看,RepoUitl这个工具的功能过于复杂,我们完全可以将维护子项目列表这个功能抽取出来作为一个新项目sub_projects,因为子项目也会变化,因此,为其创建对应的仓库,并用Git管理,这样的化,RepoUtil只需要通过简单的对ub_projects进行依赖即可,此时整个项目的结构如下:
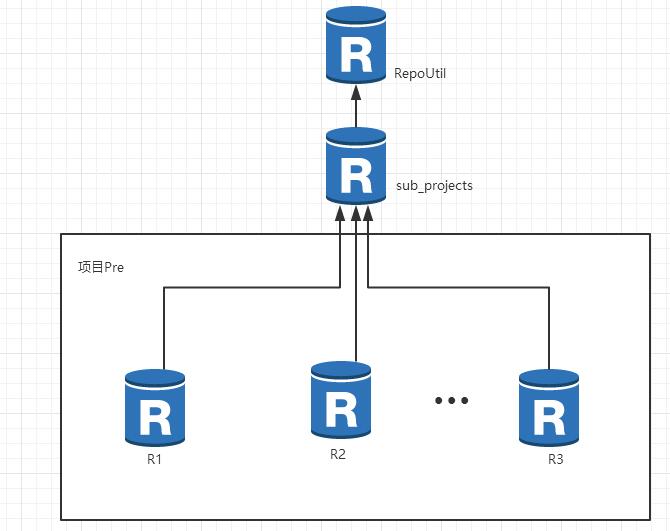
AOSP项目结构和我上文的描述非常类似.repo工具对应RepoUtil,mainfest对应sub_projects.
总结一下:repo就是这么一种工具,由一系列python脚本组成,通过调用Git命令实现对AOSP项目的管理.
熟悉Git的同学都应该知道,我们需要为项目在本地创建对应的仓库.同样,这里为了方便对代码进行管理,我们为其创建一个文件夹.这里我在当前用户目录下创建了source文件夹,后面所有的下载的源码和编译出的产物也都放在这里,命令如下:
我们将上面的source文件夹作为仓库,现在需要来初始化这个仓库了.通过执行初始化仓库命令可以获取AOSP项目master上最新的代码并初始化该仓库,命令如下:
或者使用:
两者实现的效果一致,仅仅只是协议不同.
如果执行该命令的过程中,如果提示无法连接到 gerrit.googlesource.com,那么我们只需要编辑 ~/bin/repo文件,找到REPO_URL这一行,然后将其内容修改为:
然后重新执行上述命令即可.
补充说明
不带参数的manifest命令用于获取master上最新的代码,但是可以通过-b参数指定获取某个特定的android版本,比如我们想要获取android-4.0.1_r1分支,那么命令如下:
(AOSP项目当前所有的分支列表参看:分支列表)
注意:这里只是说明如何获取指定版本的内容,后面的操作还是演示仍然基于编译android 6.0.*,编译其他版本可能略有不同.
初始化仓库之后,就可以开始正式同步代码到本地了,命令如下:
以后如果需要同步最新的远程代码到本地,也只需要执行该命令即可.在同步过程中,如果因为网络原因中断,使用该命令继续同步即可.不出意外,5个小时便可以将全部源码同步到本地.所以呢,这个过程可以放在晚上睡觉期间完成.
(提示:一定要确定代码完全同步了,不然在下面编译过程出现的错误会让你痛不欲生,不确定的童鞋可以多用repo sync同步几次)
源码下载完成后,就可以构建编译环境了.在开始之前,我们先来看看一些编译要求:
1. 硬件要求:
64位的操作系统只能编译2.3.x以上的版本,如果你想要编译2.3.x以下的,那么需要32位的操作系统.
磁盘空间越多越好,至少在100GB以上.意思就是,你可以去买个大点的硬盘了啊
如果你想要在是在虚拟机运行linux,那么至少需要16GB的RAM/swap.
(实际上,我非常不推荐在虚拟机中编译2.3.x以上的代码.)
2. 软件要求:
1. 操作系统要求
在AOSP开源中,主分支使用Ubuntu长期版本开发和测试的,因此也建议你使用Ubuntu进行编译,下面我们列出不同版本的的Ubuntu能够编译那些android版本:
2. JDK版本要求
除了操作系统版本这个问题外,我们还需要关注JDK版本问题,为了方便,同样我们也列出的不同Android版本的源码需要用到的JDK版本:
更具体的可以参看:Google源码编译要求
我现在在Ubuntu 16.04下编译AOSP主线代码,因此需要安装OpenJDK 8,执行命令如下:
如果你需要在Ubuntu 14.04下编译AOSP主线代码,同样需要安装OpenJDK 8,此时需要执行如下命令:
如果你要编译的是Android 5.x到android 6.0之间的系统版本,需要采用openjdk7.但是在Ubuntu 15.04及之后的版本的在线安装库中只支持openjdk8和openjdk9的安装.因此,如果你想要安装openjdk 7需要首先设置ppa:
然后再执行安装命令:
有时候,我们需要编译不同版本的android系统,就可能使用不同的jdk版本.关于jdk版本切换,可以使用如下命令:
3. 其他要求
Google官方构建编译环境指南中已经说明了Ubuntu14.04,Ubuntu 12.04,Ubuntu 10.04需要添加的依赖,这里我们就不做介绍了.我原先以为,Ubuntu16.04的设置和Ubuntu14.04的依赖设置应该差不多,但是只能说too
young too simple.
下面是Ubuntu16.04中的依赖设置:
(其中几个命令中参数是重复的,但不妨碍我们)
确保上述过程完成后,接下来我们需要初始化编译环境,命令如下:
执行该命令结果如下:
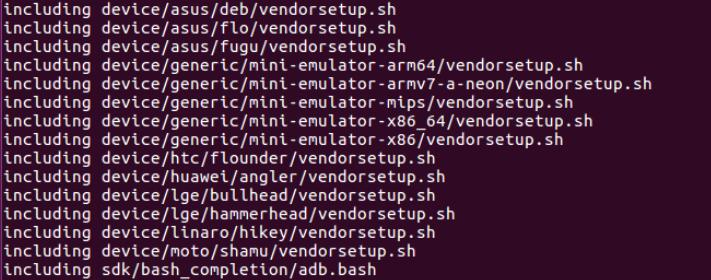
不难发现该命令只是引入了其他执行脚本,至于这些脚本做什么,目前不在本文中细说.
该命令执行成功后,我们会得到了一些有用的命令,比如最下面要用到的lunch命令.
初始化编译环境之后,就进入源码编译阶段.这个阶段又包括两个阶段:选择编译目标和执行编译.
通过lunch指令设置编译目标,所谓的编译目标就是生成的镜像要运行在什么样的设备上.这里我们设置的编译目标是aosp_arm64-eng,因此执行指令:
编译目标格式说明
编译目标的格式:BUILD-BUILDTYPE,比如上面的aosp_arm-eng的BUILD是aosp_arm,BUILDTYPE是eng.
什么是BUILD
BUILD指的是特定功能的组合的特定名称,即表示编译出的镜像可以运行在什么环境.其中,aosp(Android Open Source Project)代表Android开源项目;arm表示系统是运行在arm架构的处理器上,arm64则是指64位arm架构;处理器,x86则表示x86架构的处理器;此外,还有一些单词代表了特定的Nexus设备,下面是常用的设备代码和编译目标,更多参考官方文档
提示:如果你没有Nexus设备,那么通常选择arm或者x86即可
什么是BUILDTYPE
BUILD TYPE则指的是编译类型,通常有三种:
-user:代表这是编译出的系统镜像是可以用来正式发布到市场的版本,其权限是被限制的(如,没有root权限,不鞥年dedug等)
-userdebug:在user版本的基础上开放了root权限和debug权限.
-eng:代表engineer,也就是所谓的开发工程师的版本,拥有最大的权限(root等),此外还附带了许多debug工具
了解编译目标的组成之后,我们就可以根据自己目前的情况选择了.那不知道编译目标怎么办?
我们只需要执行不带参数的lunch指令,稍后,控制台会列出所有的编译目标,如下:
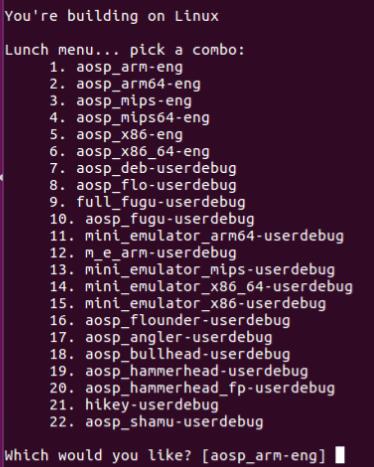
接着我们只需要输入相应的数字即可.
来举个例子:你没有Nexus设备,只想编译完后运行看看,那么就可以选择aosp_arm-eng.
(我在ubuntu 16.04(64位)中编译完成后启动虚拟机时,卡在黑屏,尝试编译aosp_arm64-eng解决.因此,这里我使用了aosp_arm64-eng)
通过make指令进行代码编译,该指令通过
需要注意的是,参与编译的线程并不是越多越好,通常是根据你机器cup的核心来确定:core*2,即当前cpu的核心的2倍.比如,我现在的笔记本是双核四线程的,因此根据公式,最快速的编译可以make -j8.
(通过
如果一切顺利的化,在几个小时之后,便可以编译完成.看到
在编译完成之后,就可以通过以下命令运行Android虚拟机了,命令如下:
如果你是在编译完后立刻运行虚拟机,由于我们之前已经执行过source及lunch命令了,因此现在你只需要执行命令就可以运行虚拟机:
不出意外,在等待一会之后,你会看到运行界面:

补充
既然谈到了模拟器运行,这里我们顺便介绍模拟器运行所需要四个文件:
Linux Kernel
system.img
userdate.img
ramdisk.img
如果你在使用lunch命令时选择的是aosp_arm-eng,那么在执行不带参数的emualtor命令时,Linux Kernel默认使用的是
上面我在使用lunch命令时选择的是aosp_arm64-eng,因此linux默认使用的
当然,emulator指令允许你通过参数制定使用不同的文件,具体用法可以通过
除了通过make命令编译可以整个android源码外,Google也为我们提供了相应的命令来支持单独模块的编译.
编译环境初始化(即执行
其中mmm指令就是用来编译指定目录.通常来说,每个目录只包含一个模块.比如这里我们要编译Launcher2模块,执行指令:
稍等一会之后,如果提示:
即表示编译完成,此时在
重新打包系统镜像
编译好指定模块后,如果我们想要将该模块对应的apk集成到系统镜像中,需要借助
单独安装模块
我们在不断的修改某些模块,总不能每次编译完成后都要重新打包system.img,然后重启手机吧?有没有什么简单的方法呢?
在编译完后,借助adb install命令直接将生成的apk文件安装到设备上即可,相比使用make snod,会节省很多事件.
补充
我们简单的来介绍
Android系统自带的apk文件都在
一些可执行文件(比如C编译的执行),放在
动态链接库放在
硬件抽象层文件都放在
SDK的编译和模块编译非常相似,其命令如下:
首先是初始化编译环境:
接下来是设定编译目标
最后通过以下命令编译SDK
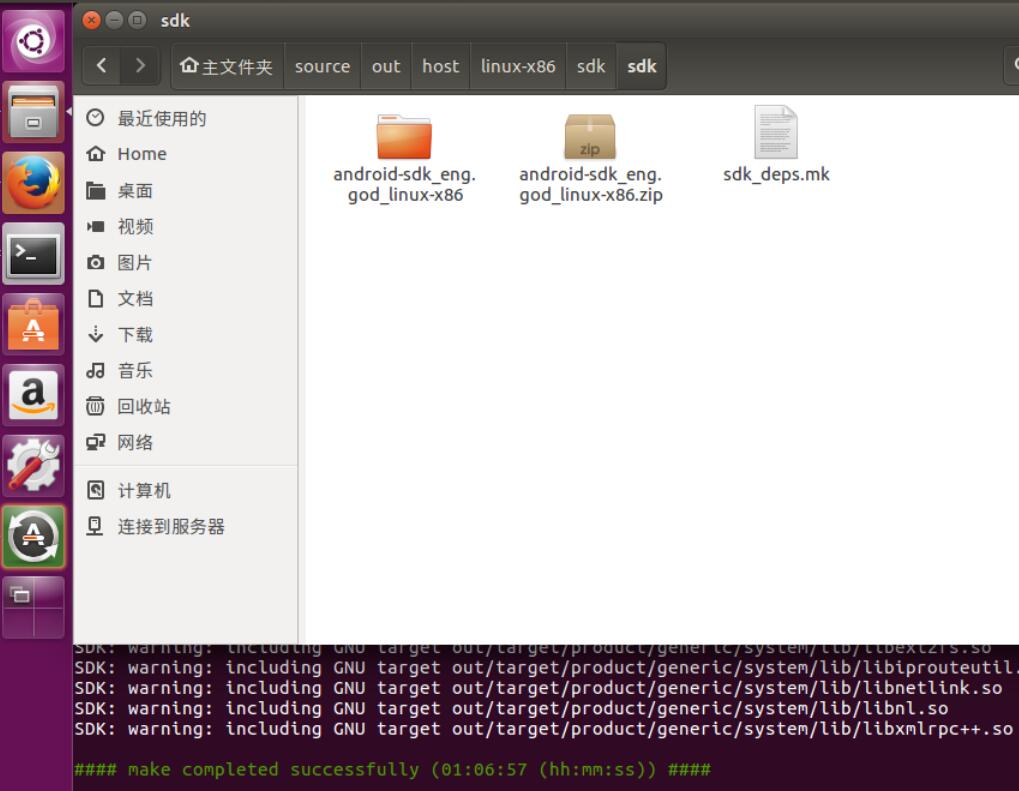
出现以下提示表示编译完成,不出意外,在out/host/linux-x86/sdk就可以看到了:
注:SDK编译完后,之前编译的system.img等文件会被删除,所以,在编译SDK之前,建议自行备份一下.当然,如果被移除了也没关系,可以通过make命令再编译.
另外,某些命令也会删除sdk,因此在编译SDK后,我们将其备份到另外一个目录,以备不时之需.
在编译过程中,遇到的大部分错误都可以在google搜到解决方案.这里只列举几个常见的错误:
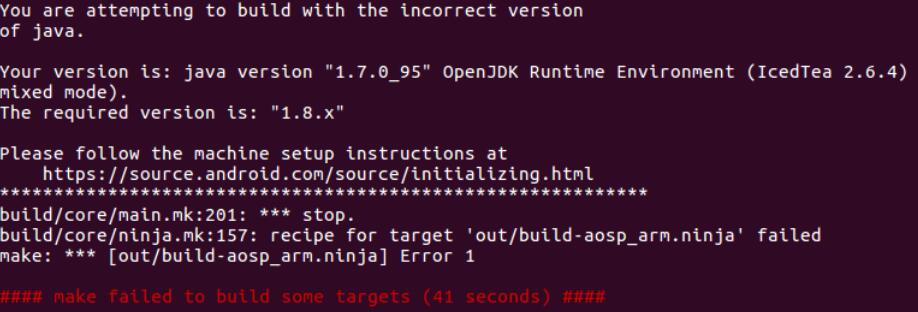
错误一: You are attemping to build with the incorrect version.具体错误如下:
如果你认真看了构建环境的的要求,那么这个错误是可以避免的.当然,这个问题也很容易解决:安装openjdk 8,别忘了使用sudo update-alternative命令切换jdk版本.
错误二: Out of memory error.具体错误如下:

这个错误比较常见,尤其是在编译AOSP主线代码时,常常会因为JVM heap size太小而导致该错误.
此时有两种解决方法:
方法一:
在编译命令之前,修改prebuilts/sdk/tools/jack-admin文件,找到文件中的这一行:
然后在该行添加-Xmx4096m,如:
然后再执行time make -8j
方法二:
在控制台执行以下命令:
如图:

执行完该命令后,再使用make命令继续编译.某些情况下,当你执行jack-admin kill-server时可能提示你命令不存在,此时去你去out/host/linux-x86/bin/目录下会发现不存在jack-admin文件.如果我是你,我就会重新repo sync下,然后从头来过.
注意:在编译SDK的时候同样可能出现因jvm heap size太小而导致编译错误,一旦出现用以上任何一种方案都可以解决.
错误三:使用emulator时,虚拟机停在黑屏界面,点击无任何响应.此时,可能是kerner内核问题,解决方法如下:
执行如下命令:
通过使用kernel-qemu-armv7内核 解决模拟器等待黑屏问题.而-partition-size 1024 则是解决警告: system partion siez adjusted to match image file (163 MB >66 MB)
如果你一开始编译的版本是aosp_arm-eng,使用上述命令仍然不能解决等待黑屏问题时,不妨编译aosp_arm64-eng试试.
到现在为止,你已经了解了整个android编译的流程.除此之外,我也简单的说明android源码的多仓库管理机制.下面,不妨自己动手尝试一下.
本文适用于Ubuntu 16.04上编译Android 6.0.*,其他情况请酌情处理,自行参考官网吧.
请首先确保自己已经安装了Git.没安装的同学可以通过以下命令进行安装:
<code class="hljs applescript has-numbering" style="display: block; padding: 0px; color: inherit; box-sizing: border-box; font-family: 'Source Code Pro', monospace;font-size:undefined; white-space: pre; border-radius: 0px; word-wrap: normal; background: transparent;">sudo apt-<span class="hljs-keyword" style="color: rgb(0, 0, 136); box-sizing: border-box;">get</span> install git
git config –<span class="hljs-keyword" style="color: rgb(0, 0, 136); box-sizing: border-box;">global</span> user.email “test@test.com”
git config –<span class="hljs-keyword" style="color: rgb(0, 0, 136); box-sizing: border-box;">global</span> user.<span class="hljs-property" style="box-sizing: border-box;">name</span> “test”</code><ul class="pre-numbering" style="box-sizing: border-box; position: absolute; width: 50px; top: 0px; left: 0px; margin: 0px; padding: 6px 0px 40px; border-right-width: 1px; border-right-style: solid; border-right-color: rgb(221, 221, 221); list-style: none; text-align: right; background-color: rgb(238, 238, 238);"><li style="box-sizing: border-box; padding: 0px 5px;">1</li><li style="box-sizing: border-box; padding: 0px 5px;">2</li><li style="box-sizing: border-box; padding: 0px 5px;">3</li></ul>
其中test@test.com为你自己的邮箱.
简要说明
android源码编译的四个流程:1.源码下载;2.构建编译环境;3.编译源码;4运行.下文也将按照该流程讲述.
源码下载
由于某墙的原因,这里我们采用国内的镜像源进行下载. 目前,可用的镜像源一般是科大和清华的,具体使用差不多,这里我选择清华大学镜像进行说明.(参考:科大源,清华源)
repo工具下载及安装
通过执行以下命令实现repo工具的下载和安装<code class="hljs perl has-numbering" style="display: block; padding: 0px; color: inherit; box-sizing: border-box; font-family: 'Source Code Pro', monospace;font-size:undefined; white-space: pre; border-radius: 0px; word-wrap: normal; background: transparent;"><span class="hljs-keyword" style="color: rgb(0, 0, 136); box-sizing: border-box;">mkdir</span> ~<span class="hljs-regexp" style="color: rgb(0, 136, 0); box-sizing: border-box;">/bin PATH=~/bin</span>:<span class="hljs-variable" style="color: rgb(102, 0, 102); box-sizing: border-box;">$PATH</span> curl https:<span class="hljs-regexp" style="color: rgb(0, 136, 0); box-sizing: border-box;">//storage</span>.googleapis.com/git-repo-downloads/repo > ~<span class="hljs-regexp" style="color: rgb(0, 136, 0); box-sizing: border-box;">/bin/repo</span> <span class="hljs-keyword" style="color: rgb(0, 0, 136); box-sizing: border-box;">chmod</span> a+<span class="hljs-keyword" style="color: rgb(0, 0, 136); box-sizing: border-box;">x</span> ~<span class="hljs-regexp" style="color: rgb(0, 136, 0); box-sizing: border-box;">/bin/repo</span></code><ul class="pre-numbering" style="box-sizing: border-box; position: absolute; width: 50px; top: 0px; left: 0px; margin: 0px; padding: 6px 0px 40px; border-right-width: 1px; border-right-style: solid; border-right-color: rgb(221, 221, 221); list-style: none; text-align: right; background-color: rgb(238, 238, 238);"><li style="box-sizing: border-box; padding: 0px 5px;">1</li><li style="box-sizing: border-box; padding: 0px 5px;">2</li><li style="box-sizing: border-box; padding: 0px 5px;">3</li><li style="box-sizing: border-box; padding: 0px 5px;">4</li></ul>
补充说明
这里,我来简单的介绍下repo工具,我们知道AOSP项目由不同的子项目组成,为了方便进行管理,Google采用Git对AOSP项目进行多仓库管理.在聊repo工具之前,我先带你来聊聊多仓库项目:
我们有个非常庞大的项目Pre,该项目由很多个子项目R1,R2,…Rn等组成,为了方便管理和协同开发,我们为每个子项目创立自己的仓库,整个项目的结构如下:
将一个项目Pre进行分库后会遇到这么一个问题:如果我们想要创建Pre分支来做feature开发,这就意味着,我们需要到每个子项目中分别创建对应的分支,这个过程如果纯粹靠手工做,那简直是个灾难,利索当然我们会想写个自动化处理程序(我们假设这个工具叫做RepoUtil)来帮助我们解决这个问题.这个RepoUtil也会有版本管理之类的需求,因此我们也用Git对其管理,并为其创建对应的仓库.此时整个项目的结构如下:
这里RepoUtil知道整个项目Pre下的每个子项目(即维护子项目的列表),同时需要提供对这些子项目的管理功能,比如统一创建分支等.但是从”单一职责”角度来看,RepoUitl这个工具的功能过于复杂,我们完全可以将维护子项目列表这个功能抽取出来作为一个新项目sub_projects,因为子项目也会变化,因此,为其创建对应的仓库,并用Git管理,这样的化,RepoUtil只需要通过简单的对ub_projects进行依赖即可,此时整个项目的结构如下:
AOSP项目结构和我上文的描述非常类似.repo工具对应RepoUtil,mainfest对应sub_projects.
总结一下:repo就是这么一种工具,由一系列python脚本组成,通过调用Git命令实现对AOSP项目的管理.
建立源码文件夹
熟悉Git的同学都应该知道,我们需要为项目在本地创建对应的仓库.同样,这里为了方便对代码进行管理,我们为其创建一个文件夹.这里我在当前用户目录下创建了source文件夹,后面所有的下载的源码和编译出的产物也都放在这里,命令如下:<code class="hljs bash has-numbering" style="display: block; padding: 0px; color: inherit; box-sizing: border-box; font-family: 'Source Code Pro', monospace;font-size:undefined; white-space: pre; border-radius: 0px; word-wrap: normal; background: transparent;">mkdir <span class="hljs-built_in" style="color: rgb(102, 0, 102); box-sizing: border-box;">source</span> <span class="hljs-built_in" style="color: rgb(102, 0, 102); box-sizing: border-box;">cd</span> <span class="hljs-built_in" style="color: rgb(102, 0, 102); box-sizing: border-box;">source</span></code><ul class="pre-numbering" style="box-sizing: border-box; position: absolute; width: 50px; top: 0px; left: 0px; margin: 0px; padding: 6px 0px 40px; border-right-width: 1px; border-right-style: solid; border-right-color: rgb(221, 221, 221); list-style: none; text-align: right; background-color: rgb(238, 238, 238);"><li style="box-sizing: border-box; padding: 0px 5px;">1</li><li style="box-sizing: border-box; padding: 0px 5px;">2</li></ul>
初始化仓库
我们将上面的source文件夹作为仓库,现在需要来初始化这个仓库了.通过执行初始化仓库命令可以获取AOSP项目master上最新的代码并初始化该仓库,命令如下:<code class="hljs avrasm has-numbering" style="display: block; padding: 0px; color: inherit; box-sizing: border-box; font-family: 'Source Code Pro', monospace;font-size:undefined; white-space: pre; border-radius: 0px; word-wrap: normal; background: transparent;">repo init -u https://aosp<span class="hljs-preprocessor" style="color: rgb(68, 68, 68); box-sizing: border-box;">.tuna</span><span class="hljs-preprocessor" style="color: rgb(68, 68, 68); box-sizing: border-box;">.tsinghua</span><span class="hljs-preprocessor" style="color: rgb(68, 68, 68); box-sizing: border-box;">.edu</span><span class="hljs-preprocessor" style="color: rgb(68, 68, 68); box-sizing: border-box;">.cn</span>/platform/manifest </code><ul class="pre-numbering" style="box-sizing: border-box; position: absolute; width: 50px; top: 0px; left: 0px; margin: 0px; padding: 6px 0px 40px; border-right-width: 1px; border-right-style: solid; border-right-color: rgb(221, 221, 221); list-style: none; text-align: right; background-color: rgb(238, 238, 238);"><li style="box-sizing: border-box; padding: 0px 5px;">1</li><li style="box-sizing: border-box; padding: 0px 5px;">2</li></ul>
或者使用:
<code class="hljs avrasm has-numbering" style="display: block; padding: 0px; color: inherit; box-sizing: border-box; font-family: 'Source Code Pro', monospace;font-size:undefined; white-space: pre; border-radius: 0px; word-wrap: normal; background: transparent;">repo init -u git://aosp<span class="hljs-preprocessor" style="color: rgb(68, 68, 68); box-sizing: border-box;">.tuna</span><span class="hljs-preprocessor" style="color: rgb(68, 68, 68); box-sizing: border-box;">.tsinghua</span><span class="hljs-preprocessor" style="color: rgb(68, 68, 68); box-sizing: border-box;">.edu</span><span class="hljs-preprocessor" style="color: rgb(68, 68, 68); box-sizing: border-box;">.cn</span>/aosp/platform/manifest</code><ul class="pre-numbering" style="box-sizing: border-box; position: absolute; width: 50px; top: 0px; left: 0px; margin: 0px; padding: 6px 0px 40px; border-right-width: 1px; border-right-style: solid; border-right-color: rgb(221, 221, 221); list-style: none; text-align: right; background-color: rgb(238, 238, 238);"><li style="box-sizing: border-box; padding: 0px 5px;">1</li></ul>
两者实现的效果一致,仅仅只是协议不同.
如果执行该命令的过程中,如果提示无法连接到 gerrit.googlesource.com,那么我们只需要编辑 ~/bin/repo文件,找到REPO_URL这一行,然后将其内容修改为:
<code class="hljs bash has-numbering" style="display: block; padding: 0px; color: inherit; box-sizing: border-box; font-family: 'Source Code Pro', monospace;font-size:undefined; white-space: pre; border-radius: 0px; word-wrap: normal; background: transparent;">REPO_URL = <span class="hljs-string" style="color: rgb(0, 136, 0); box-sizing: border-box;">'https://gerrit-google.tuna.tsinghua.edu.cn/git-repo'</span></code><ul class="pre-numbering" style="box-sizing: border-box; position: absolute; width: 50px; top: 0px; left: 0px; margin: 0px; padding: 6px 0px 40px; border-right-width: 1px; border-right-style: solid; border-right-color: rgb(221, 221, 221); list-style: none; text-align: right; background-color: rgb(238, 238, 238);"><li style="box-sizing: border-box; padding: 0px 5px;">1</li></ul>
然后重新执行上述命令即可.
补充说明
不带参数的manifest命令用于获取master上最新的代码,但是可以通过-b参数指定获取某个特定的android版本,比如我们想要获取android-4.0.1_r1分支,那么命令如下:
<code class="hljs avrasm has-numbering" style="display: block; padding: 0px; color: inherit; box-sizing: border-box; font-family: 'Source Code Pro', monospace;font-size:undefined; white-space: pre; border-radius: 0px; word-wrap: normal; background: transparent;">repo init -u https://aosp<span class="hljs-preprocessor" style="color: rgb(68, 68, 68); box-sizing: border-box;">.tuna</span><span class="hljs-preprocessor" style="color: rgb(68, 68, 68); box-sizing: border-box;">.tsinghua</span><span class="hljs-preprocessor" style="color: rgb(68, 68, 68); box-sizing: border-box;">.edu</span><span class="hljs-preprocessor" style="color: rgb(68, 68, 68); box-sizing: border-box;">.cn</span>/platform/manifest -b android-<span class="hljs-number" style="color: rgb(0, 102, 102); box-sizing: border-box;">4.0</span><span class="hljs-number" style="color: rgb(0, 102, 102); box-sizing: border-box;">.1</span>_r1</code><ul class="pre-numbering" style="box-sizing: border-box; position: absolute; width: 50px; top: 0px; left: 0px; margin: 0px; padding: 6px 0px 40px; border-right-width: 1px; border-right-style: solid; border-right-color: rgb(221, 221, 221); list-style: none; text-align: right; background-color: rgb(238, 238, 238);"><li style="box-sizing: border-box; padding: 0px 5px;">1</li></ul>
(AOSP项目当前所有的分支列表参看:分支列表)
注意:这里只是说明如何获取指定版本的内容,后面的操作还是演示仍然基于编译android 6.0.*,编译其他版本可能略有不同.
同步源码到本地
初始化仓库之后,就可以开始正式同步代码到本地了,命令如下:<code class="hljs has-numbering" style="display: block; padding: 0px; color: inherit; box-sizing: border-box; font-family: 'Source Code Pro', monospace;font-size:undefined; white-space: pre; border-radius: 0px; word-wrap: normal; background: transparent;">repo sync</code><ul class="pre-numbering" style="box-sizing: border-box; position: absolute; width: 50px; top: 0px; left: 0px; margin: 0px; padding: 6px 0px 40px; border-right-width: 1px; border-right-style: solid; border-right-color: rgb(221, 221, 221); list-style: none; text-align: right; background-color: rgb(238, 238, 238);"><li style="box-sizing: border-box; padding: 0px 5px;">1</li></ul>
以后如果需要同步最新的远程代码到本地,也只需要执行该命令即可.在同步过程中,如果因为网络原因中断,使用该命令继续同步即可.不出意外,5个小时便可以将全部源码同步到本地.所以呢,这个过程可以放在晚上睡觉期间完成.
(提示:一定要确定代码完全同步了,不然在下面编译过程出现的错误会让你痛不欲生,不确定的童鞋可以多用repo sync同步几次)
构建编译环境
源码下载完成后,就可以构建编译环境了.在开始之前,我们先来看看一些编译要求:1. 硬件要求:
64位的操作系统只能编译2.3.x以上的版本,如果你想要编译2.3.x以下的,那么需要32位的操作系统.
磁盘空间越多越好,至少在100GB以上.意思就是,你可以去买个大点的硬盘了啊
如果你想要在是在虚拟机运行linux,那么至少需要16GB的RAM/swap.
(实际上,我非常不推荐在虚拟机中编译2.3.x以上的代码.)
2. 软件要求:
1. 操作系统要求
在AOSP开源中,主分支使用Ubuntu长期版本开发和测试的,因此也建议你使用Ubuntu进行编译,下面我们列出不同版本的的Ubuntu能够编译那些android版本:
| Android版本 | 编译要求的Ubuntu最低版本 |
|---|---|
| Android 6.0至AOSP master | Ubuntu 14.04 |
| Android 2.3.x至Android 5.x | Ubuntu 12.04 |
| Android 1.5至Android 2.2.x | Ubuntu 10.04 |
除了操作系统版本这个问题外,我们还需要关注JDK版本问题,为了方便,同样我们也列出的不同Android版本的源码需要用到的JDK版本:
| Android版本 | 编译要求的JDK版本 |
|---|---|
| AOSP的Android主线 | OpenJDK 8 |
| Android 5.x至android 6.0 | OpenJDK 7 |
| Android 2.3.x至Android 4.4.x | Oracle JDK 6 |
| Android 1.5至Android 2.2.x | Oracle JDK 5 |
我现在在Ubuntu 16.04下编译AOSP主线代码,因此需要安装OpenJDK 8,执行命令如下:
sudo apt-get install openjdk-8-jdk
如果你需要在Ubuntu 14.04下编译AOSP主线代码,同样需要安装OpenJDK 8,此时需要执行如下命令:
<code class="hljs lasso has-numbering" style="display: block; padding: 0px; color: inherit; box-sizing: border-box; font-family: 'Source Code Pro', monospace;font-size:undefined; white-space: pre; border-radius: 0px; word-wrap: normal; background: transparent;">sudo apt<span class="hljs-attribute" style="box-sizing: border-box;">-get</span> update
sudo apt<span class="hljs-attribute" style="box-sizing: border-box;">-get</span> install openjdk<span class="hljs-subst" style="color: rgb(0, 0, 0); box-sizing: border-box;">-</span><span class="hljs-number" style="color: rgb(0, 102, 102); box-sizing: border-box;">8</span><span class="hljs-attribute" style="box-sizing: border-box;">-jdk</span></code><ul class="pre-numbering" style="box-sizing: border-box; position: absolute; width: 50px; top: 0px; left: 0px; margin: 0px; padding: 6px 0px 40px; border-right-width: 1px; border-right-style: solid; border-right-color: rgb(221, 221, 221); list-style: none; text-align: right; background-color: rgb(238, 238, 238);"><li style="box-sizing: border-box; padding: 0px 5px;">1</li><li style="box-sizing: border-box; padding: 0px 5px;">2</li></ul>
如果你要编译的是Android 5.x到android 6.0之间的系统版本,需要采用openjdk7.但是在Ubuntu 15.04及之后的版本的在线安装库中只支持openjdk8和openjdk9的安装.因此,如果你想要安装openjdk 7需要首先设置ppa:
<code class="hljs lasso has-numbering" style="display: block; padding: 0px; color: inherit; box-sizing: border-box; font-family: 'Source Code Pro', monospace;font-size:undefined; white-space: pre; border-radius: 0px; word-wrap: normal; background: transparent;">sudo add<span class="hljs-attribute" style="box-sizing: border-box;">-apt</span><span class="hljs-attribute" style="box-sizing: border-box;">-repository</span> ppa:openjdk<span class="hljs-attribute" style="box-sizing: border-box;">-r</span>/ppa
sudo apt<span class="hljs-attribute" style="box-sizing: border-box;">-get</span> update</code><ul class="pre-numbering" style="box-sizing: border-box; position: absolute; width: 50px; top: 0px; left: 0px; margin: 0px; padding: 6px 0px 40px; border-right-width: 1px; border-right-style: solid; border-right-color: rgb(221, 221, 221); list-style: none; text-align: right; background-color: rgb(238, 238, 238);"><li style="box-sizing: border-box; padding: 0px 5px;">1</li><li style="box-sizing: border-box; padding: 0px 5px;">2</li></ul>
然后再执行安装命令:
<code class="hljs lasso has-numbering" style="display: block; padding: 0px; color: inherit; box-sizing: border-box; font-family: 'Source Code Pro', monospace;font-size:undefined; white-space: pre; border-radius: 0px; word-wrap: normal; background: transparent;">sudo apt<span class="hljs-attribute" style="box-sizing: border-box;">-get</span> install openjdk<span class="hljs-subst" style="color: rgb(0, 0, 0); box-sizing: border-box;">-</span><span class="hljs-number" style="color: rgb(0, 102, 102); box-sizing: border-box;">7</span><span class="hljs-attribute" style="box-sizing: border-box;">-jdk</span> </code><ul class="pre-numbering" style="box-sizing: border-box; position: absolute; width: 50px; top: 0px; left: 0px; margin: 0px; padding: 6px 0px 40px; border-right-width: 1px; border-right-style: solid; border-right-color: rgb(221, 221, 221); list-style: none; text-align: right; background-color: rgb(238, 238, 238);"><li style="box-sizing: border-box; padding: 0px 5px;">1</li></ul>
有时候,我们需要编译不同版本的android系统,就可能使用不同的jdk版本.关于jdk版本切换,可以使用如下命令:
<code class="hljs bash has-numbering" style="display: block; padding: 0px; color: inherit; box-sizing: border-box; font-family: 'Source Code Pro', monospace;font-size:undefined; white-space: pre; border-radius: 0px; word-wrap: normal; background: transparent;"><span class="hljs-built_in" style="color: rgb(102, 0, 102); box-sizing: border-box;">sudo</span> update-alternative --config java
<span class="hljs-built_in" style="color: rgb(102, 0, 102); box-sizing: border-box;">sudo</span> update-alternative --config javac</code><ul class="pre-numbering" style="box-sizing: border-box; position: absolute; width: 50px; top: 0px; left: 0px; margin: 0px; padding: 6px 0px 40px; border-right-width: 1px; border-right-style: solid; border-right-color: rgb(221, 221, 221); list-style: none; text-align: right; background-color: rgb(238, 238, 238);"><li style="box-sizing: border-box; padding: 0px 5px;">1</li><li style="box-sizing: border-box; padding: 0px 5px;">2</li></ul>
3. 其他要求
Google官方构建编译环境指南中已经说明了Ubuntu14.04,Ubuntu 12.04,Ubuntu 10.04需要添加的依赖,这里我们就不做介绍了.我原先以为,Ubuntu16.04的设置和Ubuntu14.04的依赖设置应该差不多,但是只能说too
young too simple.
下面是Ubuntu16.04中的依赖设置:
<code class="hljs lasso has-numbering" style="display: block; padding: 0px; color: inherit; box-sizing: border-box; font-family: 'Source Code Pro', monospace;font-size:undefined; white-space: pre; border-radius: 0px; word-wrap: normal; background: transparent;">sudo apt<span class="hljs-attribute" style="box-sizing: border-box;">-get</span> install libx11<span class="hljs-attribute" style="box-sizing: border-box;">-dev</span>:i386 libreadline6<span class="hljs-attribute" style="box-sizing: border-box;">-dev</span>:i386 libgl1<span class="hljs-attribute" style="box-sizing: border-box;">-mesa</span><span class="hljs-attribute" style="box-sizing: border-box;">-dev</span> g<span class="hljs-subst" style="color: rgb(0, 0, 0); box-sizing: border-box;">++-</span>multilib
sudo apt<span class="hljs-attribute" style="box-sizing: border-box;">-get</span> install <span class="hljs-attribute" style="box-sizing: border-box;">-y</span> git flex bison gperf build<span class="hljs-attribute" style="box-sizing: border-box;">-essential</span> libncurses5<span class="hljs-attribute" style="box-sizing: border-box;">-dev</span>:i386
sudo apt<span class="hljs-attribute" style="box-sizing: border-box;">-get</span> install tofrodos python<span class="hljs-attribute" style="box-sizing: border-box;">-markdown</span> libxml2<span class="hljs-attribute" style="box-sizing: border-box;">-utils</span> xsltproc zlib1g<span class="hljs-attribute" style="box-sizing: border-box;">-dev</span>:i386
sudo apt<span class="hljs-attribute" style="box-sizing: border-box;">-get</span> install dpkg<span class="hljs-attribute" style="box-sizing: border-box;">-dev</span> libsdl1<span class="hljs-number" style="color: rgb(0, 102, 102); box-sizing: border-box;">.2</span><span class="hljs-attribute" style="box-sizing: border-box;">-dev</span> libesd0<span class="hljs-attribute" style="box-sizing: border-box;">-dev</span>
sudo apt<span class="hljs-attribute" style="box-sizing: border-box;">-get</span> install git<span class="hljs-attribute" style="box-sizing: border-box;">-core</span> gnupg flex bison gperf build<span class="hljs-attribute" style="box-sizing: border-box;">-essential</span>
sudo apt<span class="hljs-attribute" style="box-sizing: border-box;">-get</span> install zip curl zlib1g<span class="hljs-attribute" style="box-sizing: border-box;">-dev</span> gcc<span class="hljs-attribute" style="box-sizing: border-box;">-multilib</span> g<span class="hljs-subst" style="color: rgb(0, 0, 0); box-sizing: border-box;">++-</span>multilib
sudo apt<span class="hljs-attribute" style="box-sizing: border-box;">-get</span> install libc6<span class="hljs-attribute" style="box-sizing: border-box;">-dev</span><span class="hljs-attribute" style="box-sizing: border-box;">-i386</span>
sudo apt<span class="hljs-attribute" style="box-sizing: border-box;">-get</span> install lib32ncurses5<span class="hljs-attribute" style="box-sizing: border-box;">-dev</span> x11proto<span class="hljs-attribute" style="box-sizing: border-box;">-core</span><span class="hljs-attribute" style="box-sizing: border-box;">-dev</span> libx11<span class="hljs-attribute" style="box-sizing: border-box;">-dev</span>
sudo apt<span class="hljs-attribute" style="box-sizing: border-box;">-get</span> install libgl1<span class="hljs-attribute" style="box-sizing: border-box;">-mesa</span><span class="hljs-attribute" style="box-sizing: border-box;">-dev</span> libxml2<span class="hljs-attribute" style="box-sizing: border-box;">-utils</span> xsltproc unzip m4
sudo apt<span class="hljs-attribute" style="box-sizing: border-box;">-get</span> install lib32z<span class="hljs-attribute" style="box-sizing: border-box;">-dev</span> ccache</code><ul class="pre-numbering" style="box-sizing: border-box; position: absolute; width: 50px; top: 0px; left: 0px; margin: 0px; padding: 6px 0px 40px; border-right-width: 1px; border-right-style: solid; border-right-color: rgb(221, 221, 221); list-style: none; text-align: right; background-color: rgb(238, 238, 238);"><li style="box-sizing: border-box; padding: 0px 5px;">1</li><li style="box-sizing: border-box; padding: 0px 5px;">2</li><li style="box-sizing: border-box; padding: 0px 5px;">3</li><li style="box-sizing: border-box; padding: 0px 5px;">4</li><li style="box-sizing: border-box; padding: 0px 5px;">5</li><li style="box-sizing: border-box; padding: 0px 5px;">6</li><li style="box-sizing: border-box; padding: 0px 5px;">7</li><li style="box-sizing: border-box; padding: 0px 5px;">8</li><li style="box-sizing: border-box; padding: 0px 5px;">9</li><li style="box-sizing: border-box; padding: 0px 5px;">10</li></ul>
(其中几个命令中参数是重复的,但不妨碍我们)
初始化编译环境
确保上述过程完成后,接下来我们需要初始化编译环境,命令如下:<code class="hljs bash has-numbering" style="display: block; padding: 0px; color: inherit; box-sizing: border-box; font-family: 'Source Code Pro', monospace;font-size:undefined; white-space: pre; border-radius: 0px; word-wrap: normal; background: transparent;"><span class="hljs-built_in" style="color: rgb(102, 0, 102); box-sizing: border-box;">source</span> build/envsetup.sh</code><ul class="pre-numbering" style="box-sizing: border-box; position: absolute; width: 50px; top: 0px; left: 0px; margin: 0px; padding: 6px 0px 40px; border-right-width: 1px; border-right-style: solid; border-right-color: rgb(221, 221, 221); list-style: none; text-align: right; background-color: rgb(238, 238, 238);"><li style="box-sizing: border-box; padding: 0px 5px;">1</li></ul>
执行该命令结果如下:
不难发现该命令只是引入了其他执行脚本,至于这些脚本做什么,目前不在本文中细说.
该命令执行成功后,我们会得到了一些有用的命令,比如最下面要用到的lunch命令.
编译源码
初始化编译环境之后,就进入源码编译阶段.这个阶段又包括两个阶段:选择编译目标和执行编译.
选择编译目标
通过lunch指令设置编译目标,所谓的编译目标就是生成的镜像要运行在什么样的设备上.这里我们设置的编译目标是aosp_arm64-eng,因此执行指令:<code class="hljs lasso has-numbering" style="display: block; padding: 0px; color: inherit; box-sizing: border-box; font-family: 'Source Code Pro', monospace;font-size:undefined; white-space: pre; border-radius: 0px; word-wrap: normal; background: transparent;">lunch aosp_arm64<span class="hljs-attribute" style="box-sizing: border-box;">-eng</span></code><ul class="pre-numbering" style="box-sizing: border-box; position: absolute; width: 50px; top: 0px; left: 0px; margin: 0px; padding: 6px 0px 40px; border-right-width: 1px; border-right-style: solid; border-right-color: rgb(221, 221, 221); list-style: none; text-align: right; background-color: rgb(238, 238, 238);"><li style="box-sizing: border-box; padding: 0px 5px;">1</li></ul>
编译目标格式说明
编译目标的格式:BUILD-BUILDTYPE,比如上面的aosp_arm-eng的BUILD是aosp_arm,BUILDTYPE是eng.
什么是BUILD
BUILD指的是特定功能的组合的特定名称,即表示编译出的镜像可以运行在什么环境.其中,aosp(Android Open Source Project)代表Android开源项目;arm表示系统是运行在arm架构的处理器上,arm64则是指64位arm架构;处理器,x86则表示x86架构的处理器;此外,还有一些单词代表了特定的Nexus设备,下面是常用的设备代码和编译目标,更多参考官方文档
| 受型号 | 设备代码 | 编译目标 |
|---|---|---|
| Nexus 6P | angler | aosp_angler-userdebug |
| Nexus 5X | bullhead | aosp_bullhead-userdebug |
| Nexus 6 | shamu | aosp_shamu-userdebug |
| Nexus 5 | hammerhead | aosp_hammerhead-userdebug |
什么是BUILDTYPE
BUILD TYPE则指的是编译类型,通常有三种:
-user:代表这是编译出的系统镜像是可以用来正式发布到市场的版本,其权限是被限制的(如,没有root权限,不鞥年dedug等)
-userdebug:在user版本的基础上开放了root权限和debug权限.
-eng:代表engineer,也就是所谓的开发工程师的版本,拥有最大的权限(root等),此外还附带了许多debug工具
了解编译目标的组成之后,我们就可以根据自己目前的情况选择了.那不知道编译目标怎么办?
我们只需要执行不带参数的lunch指令,稍后,控制台会列出所有的编译目标,如下:
接着我们只需要输入相应的数字即可.
来举个例子:你没有Nexus设备,只想编译完后运行看看,那么就可以选择aosp_arm-eng.
(我在ubuntu 16.04(64位)中编译完成后启动虚拟机时,卡在黑屏,尝试编译aosp_arm64-eng解决.因此,这里我使用了aosp_arm64-eng)
开始编译
通过make指令进行代码编译,该指令通过-j参数来设置参与编译的线程数量,以提高编译速度.比如这里我们设置8个线程同时编译:
<code class="hljs lasso has-numbering" style="display: block; padding: 0px; color: inherit; box-sizing: border-box; font-family: 'Source Code Pro', monospace;font-size:undefined; white-space: pre; border-radius: 0px; word-wrap: normal; background: transparent;">make <span class="hljs-attribute" style="box-sizing: border-box;">-j8</span></code><ul class="pre-numbering" style="box-sizing: border-box; position: absolute; width: 50px; top: 0px; left: 0px; margin: 0px; padding: 6px 0px 40px; border-right-width: 1px; border-right-style: solid; border-right-color: rgb(221, 221, 221); list-style: none; text-align: right; background-color: rgb(238, 238, 238);"><li style="box-sizing: border-box; padding: 0px 5px;">1</li></ul>
需要注意的是,参与编译的线程并不是越多越好,通常是根据你机器cup的核心来确定:core*2,即当前cpu的核心的2倍.比如,我现在的笔记本是双核四线程的,因此根据公式,最快速的编译可以make -j8.
(通过
cat /proc/cpuinfo查看相关cpu信息)
如果一切顺利的化,在几个小时之后,便可以编译完成.看到
### make completed successfully (01:18:45(hh:mm:ss)) ###表示你编译成功了.
运行模拟器
在编译完成之后,就可以通过以下命令运行Android虚拟机了,命令如下:<code class="hljs bash has-numbering" style="display: block; padding: 0px; color: inherit; box-sizing: border-box; font-family: 'Source Code Pro', monospace;font-size:undefined; white-space: pre; border-radius: 0px; word-wrap: normal; background: transparent;"><span class="hljs-built_in" style="color: rgb(102, 0, 102); box-sizing: border-box;">source</span> build/envsetup.sh lunch(选择刚才你设置的目标版本,比如这里了我选择的是<span class="hljs-number" style="color: rgb(0, 102, 102); box-sizing: border-box;">2</span>) emulator</code><ul class="pre-numbering" style="box-sizing: border-box; position: absolute; width: 50px; top: 0px; left: 0px; margin: 0px; padding: 6px 0px 40px; border-right-width: 1px; border-right-style: solid; border-right-color: rgb(221, 221, 221); list-style: none; text-align: right; background-color: rgb(238, 238, 238);"><li style="box-sizing: border-box; padding: 0px 5px;">1</li><li style="box-sizing: border-box; padding: 0px 5px;">2</li><li style="box-sizing: border-box; padding: 0px 5px;">3</li></ul>
如果你是在编译完后立刻运行虚拟机,由于我们之前已经执行过source及lunch命令了,因此现在你只需要执行命令就可以运行虚拟机:
<code class="hljs has-numbering" style="display: block; padding: 0px; color: inherit; box-sizing: border-box; font-family: 'Source Code Pro', monospace;font-size:undefined; white-space: pre; border-radius: 0px; word-wrap: normal; background: transparent;">emulator</code><ul class="pre-numbering" style="box-sizing: border-box; position: absolute; width: 50px; top: 0px; left: 0px; margin: 0px; padding: 6px 0px 40px; border-right-width: 1px; border-right-style: solid; border-right-color: rgb(221, 221, 221); list-style: none; text-align: right; background-color: rgb(238, 238, 238);"><li style="box-sizing: border-box; padding: 0px 5px;">1</li></ul>
不出意外,在等待一会之后,你会看到运行界面:
补充
既然谈到了模拟器运行,这里我们顺便介绍模拟器运行所需要四个文件:
Linux Kernel
system.img
userdate.img
ramdisk.img
如果你在使用lunch命令时选择的是aosp_arm-eng,那么在执行不带参数的emualtor命令时,Linux Kernel默认使用的是
/source/prebuilds/qemu-kernel/arm/kernel-qemu目录下的kernel-qemu文件;而android镜像文件则是默认使用
source/out/target/product/generic目录下的system.img,userdata.img和ramdisk.img,也就是我们刚刚编译出来的镜像文件.
上面我在使用lunch命令时选择的是aosp_arm64-eng,因此linux默认使用的
/source/prebuilds/qemu-kernel/arm64/kernel-qemu下的kernel-qemu,而其他文件则是使用的
source/out/target/product/generic64目录下的system.img,userdata.img和ramdisk.img.
当然,emulator指令允许你通过参数制定使用不同的文件,具体用法可以通过
emulator --help查看
模块编译
除了通过make命令编译可以整个android源码外,Google也为我们提供了相应的命令来支持单独模块的编译.编译环境初始化(即执行
source build/envsetup.sh)之后,我们可以得到一些有用的指令,除了上边用到的lunch,还有以下:
- croot: Changes directory to the top of the tree.
- m: Makes from the top of the tree.
- mm: Builds all of the modules in the current directory.
- mmm: Builds all of the modules in the supplied directories.
- cgrep: Greps on all local C/C++ files.
- jgrep: Greps on all local Java files.
- resgrep: Greps on all local res/*.xml files.
- godir: Go to the directory containing a file.
其中mmm指令就是用来编译指定目录.通常来说,每个目录只包含一个模块.比如这里我们要编译Launcher2模块,执行指令:
<code class="hljs coffeescript has-numbering" style="display: block; padding: 0px; color: inherit; box-sizing: border-box; font-family: 'Source Code Pro', monospace;font-size:undefined; white-space: pre; border-radius: 0px; word-wrap: normal; background: transparent;">mmm packages<span class="hljs-regexp" style="color: rgb(0, 136, 0); box-sizing: border-box;">/apps/Launcher2/</span></code><ul class="pre-numbering" style="box-sizing: border-box; position: absolute; width: 50px; top: 0px; left: 0px; margin: 0px; padding: 6px 0px 40px; border-right-width: 1px; border-right-style: solid; border-right-color: rgb(221, 221, 221); list-style: none; text-align: right; background-color: rgb(238, 238, 238);"><li style="box-sizing: border-box; padding: 0px 5px;">1</li></ul>
稍等一会之后,如果提示:
### make completed success fully ###
即表示编译完成,此时在
out/target/product/gereric/system/app就可以看到编译的Launcher2.apk文件了.
重新打包系统镜像
编译好指定模块后,如果我们想要将该模块对应的apk集成到系统镜像中,需要借助
make snod指令重新打包系统镜像,这样我们新生成的system.img中就包含了刚才编译的Launcher2模块了.重启模拟器之后生效.
单独安装模块
我们在不断的修改某些模块,总不能每次编译完成后都要重新打包system.img,然后重启手机吧?有没有什么简单的方法呢?
在编译完后,借助adb install命令直接将生成的apk文件安装到设备上即可,相比使用make snod,会节省很多事件.
补充
我们简单的来介绍
out/target/product/generic/system目录下的常用目录:
Android系统自带的apk文件都在
out/target/product/generic/system/apk目录下;
一些可执行文件(比如C编译的执行),放在
out/target/product/generic/system/bin目录下;
动态链接库放在
out/target/product/generic/system/lib目录下;
硬件抽象层文件都放在
out/targer/product/generic/system/lib/hw目录下.
SDK编译
SDK的编译和模块编译非常相似,其命令如下: 首先是初始化编译环境:
<code class="language-java hljs has-numbering" style="display: block; padding: 0px; color: inherit; box-sizing: border-box; font-family: 'Source Code Pro', monospace;font-size:undefined; white-space: pre; border-radius: 0px; word-wrap: normal; background: transparent;">source build/envsetup.sh</code><ul class="pre-numbering" style="box-sizing: border-box; position: absolute; width: 50px; top: 0px; left: 0px; margin: 0px; padding: 6px 0px 40px; border-right-width: 1px; border-right-style: solid; border-right-color: rgb(221, 221, 221); list-style: none; text-align: right; background-color: rgb(238, 238, 238);"><li style="box-sizing: border-box; padding: 0px 5px;">1</li></ul>
接下来是设定编译目标
<code class="language-java hljs has-numbering" style="display: block; padding: 0px; color: inherit; box-sizing: border-box; font-family: 'Source Code Pro', monospace;font-size:undefined; white-space: pre; border-radius: 0px; word-wrap: normal; background: transparent;">lunch sdk-eng</code><ul class="pre-numbering" style="box-sizing: border-box; position: absolute; width: 50px; top: 0px; left: 0px; margin: 0px; padding: 6px 0px 40px; border-right-width: 1px; border-right-style: solid; border-right-color: rgb(221, 221, 221); list-style: none; text-align: right; background-color: rgb(238, 238, 238);"><li style="box-sizing: border-box; padding: 0px 5px;">1</li></ul>
最后通过以下命令编译SDK
<code class="hljs go has-numbering" style="display: block; padding: 0px; color: inherit; box-sizing: border-box; font-family: 'Source Code Pro', monospace;font-size:undefined; white-space: pre; border-radius: 0px; word-wrap: normal; background: transparent;"><span class="hljs-built_in" style="color: rgb(102, 0, 102); box-sizing: border-box;">make</span> sdk</code><ul class="pre-numbering" style="box-sizing: border-box; position: absolute; width: 50px; top: 0px; left: 0px; margin: 0px; padding: 6px 0px 40px; border-right-width: 1px; border-right-style: solid; border-right-color: rgb(221, 221, 221); list-style: none; text-align: right; background-color: rgb(238, 238, 238);"><li style="box-sizing: border-box; padding: 0px 5px;">1</li></ul>
出现以下提示表示编译完成,不出意外,在out/host/linux-x86/sdk就可以看到了:
注:SDK编译完后,之前编译的system.img等文件会被删除,所以,在编译SDK之前,建议自行备份一下.当然,如果被移除了也没关系,可以通过make命令再编译.
另外,某些命令也会删除sdk,因此在编译SDK后,我们将其备份到另外一个目录,以备不时之需.
错误集合
在编译过程中,遇到的大部分错误都可以在google搜到解决方案.这里只列举几个常见的错误: 错误一: You are attemping to build with the incorrect version.具体错误如下:
如果你认真看了构建环境的的要求,那么这个错误是可以避免的.当然,这个问题也很容易解决:安装openjdk 8,别忘了使用sudo update-alternative命令切换jdk版本.
错误二: Out of memory error.具体错误如下:
这个错误比较常见,尤其是在编译AOSP主线代码时,常常会因为JVM heap size太小而导致该错误.
此时有两种解决方法:
方法一:
在编译命令之前,修改prebuilts/sdk/tools/jack-admin文件,找到文件中的这一行:
JACK_SERVER_COMMAND="java -Djava.io.tmpdir=$TMPDIR $JACK_SERVER_VM_ARGUMENTS -cp $LAUNCHER_JAR $LAUNCHER_NAME"
然后在该行添加-Xmx4096m,如:
JACK_SERVER_COMMAND="java -Djava.io.tmpdir=$TMPDIR $JACK_SERVER_VM_ARGUMENTS -Xmx4096m -cp $LAUNCHER_JAR $LAUNCHER_NAME"
然后再执行time make -8j
方法二:
在控制台执行以下命令:
<code class="hljs lasso has-numbering" style="display: block; padding: 0px; color: inherit; box-sizing: border-box; font-family: 'Source Code Pro', monospace;font-size:undefined; white-space: pre; border-radius: 0px; word-wrap: normal; background: transparent;">export JACK_SERVER_VM_ARGUMENTS<span class="hljs-subst" style="color: rgb(0, 0, 0); box-sizing: border-box;">=</span><span class="hljs-string" style="color: rgb(0, 136, 0); box-sizing: border-box;">"-Dfile.encoding=UTF-8 -XX:+TieredCompilation -Xmx4096m"</span>
out/host/linux<span class="hljs-attribute" style="box-sizing: border-box;">-x86</span>/bin/jack<span class="hljs-attribute" style="box-sizing: border-box;">-admin</span> kill<span class="hljs-attribute" style="box-sizing: border-box;">-server</span>
out/host/linux<span class="hljs-attribute" style="box-sizing: border-box;">-x86</span>/bin/jack<span class="hljs-attribute" style="box-sizing: border-box;">-admin</span> start<span class="hljs-attribute" style="box-sizing: border-box;">-server</span></code><ul class="pre-numbering" style="box-sizing: border-box; position: absolute; width: 50px; top: 0px; left: 0px; margin: 0px; padding: 6px 0px 40px; border-right-width: 1px; border-right-style: solid; border-right-color: rgb(221, 221, 221); list-style: none; text-align: right; background-color: rgb(238, 238, 238);"><li style="box-sizing: border-box; padding: 0px 5px;">1</li><li style="box-sizing: border-box; padding: 0px 5px;">2</li><li style="box-sizing: border-box; padding: 0px 5px;">3</li></ul>
如图:
执行完该命令后,再使用make命令继续编译.某些情况下,当你执行jack-admin kill-server时可能提示你命令不存在,此时去你去out/host/linux-x86/bin/目录下会发现不存在jack-admin文件.如果我是你,我就会重新repo sync下,然后从头来过.
注意:在编译SDK的时候同样可能出现因jvm heap size太小而导致编译错误,一旦出现用以上任何一种方案都可以解决.
错误三:使用emulator时,虚拟机停在黑屏界面,点击无任何响应.此时,可能是kerner内核问题,解决方法如下:
执行如下命令:
<code class="hljs lasso has-numbering" style="display: block; padding: 0px; color: inherit; box-sizing: border-box; font-family: 'Source Code Pro', monospace;font-size:undefined; white-space: pre; border-radius: 0px; word-wrap: normal; background: transparent;"><span class="hljs-built_in" style="color: rgb(102, 0, 102); box-sizing: border-box;">.</span>/out/host/linux<span class="hljs-attribute" style="box-sizing: border-box;">-x86</span>/bin/emulator <span class="hljs-attribute" style="box-sizing: border-box;">-partition</span><span class="hljs-attribute" style="box-sizing: border-box;">-size</span> <span class="hljs-number" style="color: rgb(0, 102, 102); box-sizing: border-box;">1024</span> <span class="hljs-attribute" style="box-sizing: border-box;">-kernel</span> <span class="hljs-built_in" style="color: rgb(102, 0, 102); box-sizing: border-box;">.</span>/prebuilts/qemu<span class="hljs-attribute" style="box-sizing: border-box;">-kernel</span>/arm/kernel<span class="hljs-attribute" style="box-sizing: border-box;">-qemu</span><span class="hljs-attribute" style="box-sizing: border-box;">-armv7</span>
</code><ul class="pre-numbering" style="box-sizing: border-box; position: absolute; width: 50px; top: 0px; left: 0px; margin: 0px; padding: 6px 0px 40px; border-right-width: 1px; border-right-style: solid; border-right-color: rgb(221, 221, 221); list-style: none; text-align: right; background-color: rgb(238, 238, 238);"><li style="box-sizing: border-box; padding: 0px 5px;">1</li><li style="box-sizing: border-box; padding: 0px 5px;">2</li></ul>
通过使用kernel-qemu-armv7内核 解决模拟器等待黑屏问题.而-partition-size 1024 则是解决警告: system partion siez adjusted to match image file (163 MB >66 MB)
如果你一开始编译的版本是aosp_arm-eng,使用上述命令仍然不能解决等待黑屏问题时,不妨编译aosp_arm64-eng试试.
结束吧
到现在为止,你已经了解了整个android编译的流程.除此之外,我也简单的说明android源码的多仓库管理机制.下面,不妨自己动手尝试一下.

相关文章推荐
- Android:一步一步实现音乐播放器
- Android源码学习之观察者模式应用及优点介绍
- Windows下获取Android 源码方法的详解
- Android源码学习之单例模式应用及优点介绍
- Android源码学习之组合模式定义及应用
- android源码编译
- 在 ubuntu10.04下 载 android源码 步骤
- android源码
- Android源码下 进行cts测试 和 cts的注意事项。
- Ubuntu下,管理Android源码,显示所有git的分支名
- Android应用AsyncTask处理机制详解及源码分析
- 版本控制-搭建git服务器
- 假如你喜欢一个程序员小伙
- 我是如何自学Android,资料分享(2015 版)
- 我是如何自学Android,资料分享(2015 版)
- android code bbs for developer
- 高仿精仿愤怒的小鸟android版游戏源码
- 关于Android 获得图片的总结
- 不错的金庸人物考考你android游戏源码
- android源码-安卓游戏源码-安卓源码