基于thinkcmf制作长江文明馆框架总结
2016-07-09 17:14
288 查看
这里简单分享一下我做“长江文明管”网站的基本过程和一些心得体会,基于已将开发好的前端页面和thinkCMF框架,下面我将详细记录制作网页模板的经过。

代码:
<form class="js-ajax-form" action="{:U('user/login/dologin')}" method="post">
<ul class="list_content">
<li><label for="input_username">账号</label><input type="text" id="input_username" name="username" placeholder="请输入用户名或者邮箱" class="span3"></li>
<li><label for="input_password">密码</label><input type="password" id="input_password" name="password" placeholder="请输入密码" class="span3"></li>
e9a2
<li> <label for="input_verify">验证码</label><input type="text" id="input_verify" name="verify" placeholder="请输入验证码" class="span3"> {:sp_verifycode_img('length=4&font_size=15&width=100&height=35&charset=1234567890')}</li>
<li><button class="btn
btn-primary js-ajax-submit" type="submit">确定</button>/li>
</ul>
</form>
效果(http://115.29.148.97/User/login/Index/index):

3.1.2注册页面:
代码:
<form class="form-horizontal js-ajax-form" action="{:U('user/register/doregister')}" method="post">
<ul class="list_content">
<li><label class="pl_title" for="input_username">账号</label><input type="text" id="input_username" name="username" placeholder="请输入账号" class="span3"></li>
<li><label class="pl_title" for="input_email">邮箱</label><input type="text" id="input_email" name="email" placeholder="请输入邮箱" class="span3"></li>
<li><label class="pl_title" for="input_password">密码</label><input type="password" id="input_password" name="password" placeholder="请输入密码" class="span3"></li>
<li><label class="pl_title" for="input_repassword">重复密码</label>
<input type="password" id="input_repassword" name="repassword" placeholder="请输入重复密码" class="span3"></li>
<li><label class="pl_title" for="input_verify">验证码</label><input type="text" id="input_verify" name="verify" placeholder="请输入验证码" class="span3"> {:sp_verifycode_img('length=4&font_size=15&width=100&height=35&charset=1234567890')}
</li>
<li><button class="btn
btn-primary js-ajax-form" type="submit" data-wait="1500">确定注册</button></li>
</ul>
</form>
注册页面(http://115.29.148.97/User/register/Index/index):

<div>
<span class="pl_title">用户评论</span>
</div>
<div>
<form class="form-horizontal comment-form" action="{:U('comment/comment/post')}" method="post">
<div class="control-group">
<textarea class="textarea_input" placeholder="Write
your comment here" name="content"></textarea>
</div>
<div class="control-group">
<button type="submit" class="pl_btn"></button>
</div>
<input type="hidden" name="post_table" value="{:sp_authencode('posts')}"/>
<input type="hidden" name="post_id" value="{$post_id}"/>
<input type="hidden" name="to_uid" value="0"/>
<input type="hidden" name="parentid" value="0"/>
</form>
</div>
用户评论页面(http://115.29.148.97/index.php?m=page&a=index&id=4)

1、全局变量;ThinkCMF封装了前台模板开发时常用的一些变量,这些变量是全局的,你在前台模板任何时候都能直接调用:例如脚步模板的版权信息就调用了:
{$site_copyright} //版权信息
2、模板常量:
__TMPL__:
当前模板根目录,带/;
如:前台
simplebootx 模板根目录是/themes/simplebootx/
后台 simplebootx模板根目录是/admin/themes/simplebootx/
__PUBLIC__:
public目录,不带/;
在制作头部页面时,就用了__TMPL__Public引入css文件以及首页中引用图片,用了这样的相对路径:
引入css文件:<linkrel="stylesheet"type="text/css"href="__TMPL__Public/css/green.css">
引入js文件:<scriptsrc="__TMPL__Public/js/jQuery.min.js"type="text/javascript"></script>
3、tc_include:前台模板包含文件的方法,用于替换原来的include的标签
用法:
<tc_include file="Public:nav"/><!--加载的是当前模板的Public/nav.html-->
<tc_include file="Comment:comment"/><!--加载的是当前模板的User/Profile/comment.html-->
4、forech标签/Volist标签:用法类似,作用差不多都是循环输出数组
<volist name="navs" id="vo">
<php>
$l =explode(',',$vo['label']);
</php>
<td width="200"><a href="{$vo.href}">{$l[0]}</a></td>
</volist>
5、explode(separator,string,limit):根据参数separator分割字符串string到数组,用法如上。
6、leuu(): 一种美化url的方法,规则如下
leuu('地址表达式',['参数'],['伪静态后缀'],['显示域名'])
地址表达式的格式定义如下:
[应用/控制器/操作#锚点@域名]?参数1=值1&参数2=值2...
leuu('portal/list/index',array('id'=>1))
leuu方法要配置后台设置的url规则才能完成url的美化;如果没有相应规则,则和U方法生成的url一样;
7、sp_sql_posts():查询文章列表,不做分页。
sp_sql_posts($tag,$where)
8、Sp_get_term($term_id):返回指定分类
9、sp_sql_posts_paged($tag,$pagesize,$pagetpl):文章分页查询方法
10、sp_sql_page($id):获取指定id页面
下面是部分门户模板页面的效果图:
首页

列表页

文章页

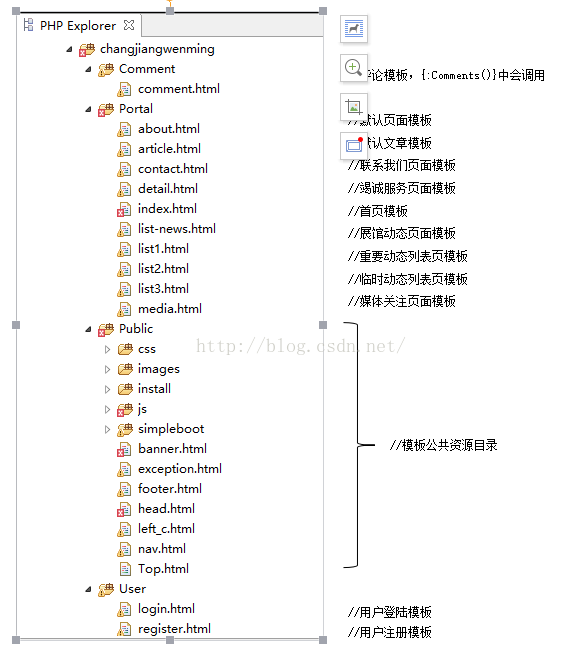
1.模板结构
首先是模板结构,下图是我制作门户应用的时模板的目录结构2.后台管理
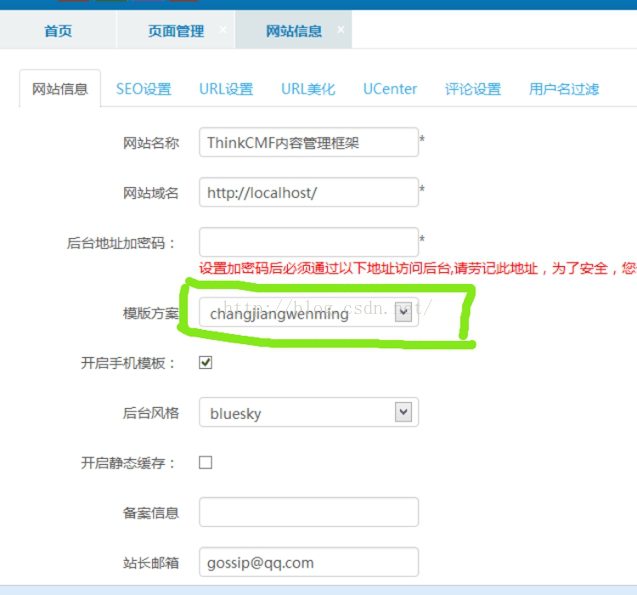
先去后台设置网站信息,使模板方案中选中我们自己制作的模板。2.后台管理
先去后台设置网站信息,使模板方案中选中我们自己制作的模板。2.1页面管理
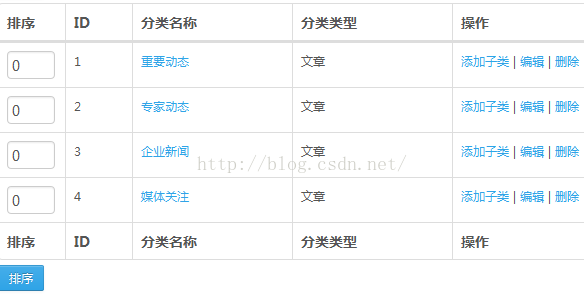
在内容管理的页面管理里,添加所需页面,模板使用目录结构中相应模板如下:2.2 分类管理
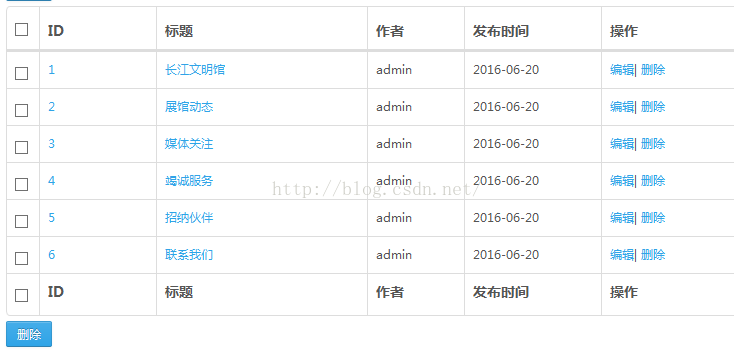
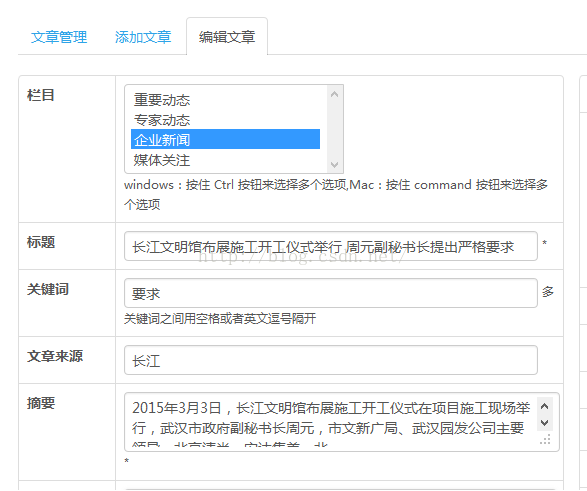
在分类管理中添加分类,模板为列表页模板,显示文章标题列表:2.3文章管理
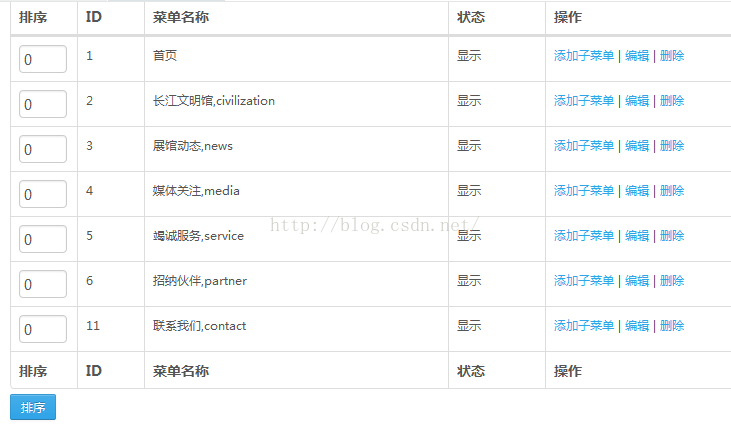
在文章管理添加文章,设置列表模板和文章模板,编辑文章栏中直接编辑要添加的文章2.4 菜单管理
在前台菜单中添加导航所需的菜单,使标签链接到相应的页面,如下图所示:2.页面制作
接下来即使模板页面的制作,下面简单展示一下页面的效果和用到的函数。3.1 User
3.1.1登录页面制作:代码:
<form class="js-ajax-form" action="{:U('user/login/dologin')}" method="post">
<ul class="list_content">
<li><label for="input_username">账号</label><input type="text" id="input_username" name="username" placeholder="请输入用户名或者邮箱" class="span3"></li>
<li><label for="input_password">密码</label><input type="password" id="input_password" name="password" placeholder="请输入密码" class="span3"></li>
e9a2
<li> <label for="input_verify">验证码</label><input type="text" id="input_verify" name="verify" placeholder="请输入验证码" class="span3"> {:sp_verifycode_img('length=4&font_size=15&width=100&height=35&charset=1234567890')}</li>
<li><button class="btn
btn-primary js-ajax-submit" type="submit">确定</button>/li>
</ul>
</form>
效果(http://115.29.148.97/User/login/Index/index):
3.1.2注册页面:
代码:
<form class="form-horizontal js-ajax-form" action="{:U('user/register/doregister')}" method="post">
<ul class="list_content">
<li><label class="pl_title" for="input_username">账号</label><input type="text" id="input_username" name="username" placeholder="请输入账号" class="span3"></li>
<li><label class="pl_title" for="input_email">邮箱</label><input type="text" id="input_email" name="email" placeholder="请输入邮箱" class="span3"></li>
<li><label class="pl_title" for="input_password">密码</label><input type="password" id="input_password" name="password" placeholder="请输入密码" class="span3"></li>
<li><label class="pl_title" for="input_repassword">重复密码</label>
<input type="password" id="input_repassword" name="repassword" placeholder="请输入重复密码" class="span3"></li>
<li><label class="pl_title" for="input_verify">验证码</label><input type="text" id="input_verify" name="verify" placeholder="请输入验证码" class="span3"> {:sp_verifycode_img('length=4&font_size=15&width=100&height=35&charset=1234567890')}
</li>
<li><button class="btn
btn-primary js-ajax-form" type="submit" data-wait="1500">确定注册</button></li>
</ul>
</form>
注册页面(http://115.29.148.97/User/register/Index/index):
3.2 comment(评论模板)
代码:<div>
<span class="pl_title">用户评论</span>
</div>
<div>
<form class="form-horizontal comment-form" action="{:U('comment/comment/post')}" method="post">
<div class="control-group">
<textarea class="textarea_input" placeholder="Write
your comment here" name="content"></textarea>
</div>
<div class="control-group">
<button type="submit" class="pl_btn"></button>
</div>
<input type="hidden" name="post_table" value="{:sp_authencode('posts')}"/>
<input type="hidden" name="post_id" value="{$post_id}"/>
<input type="hidden" name="to_uid" value="0"/>
<input type="hidden" name="parentid" value="0"/>
</form>
</div>
用户评论页面(http://115.29.148.97/index.php?m=page&a=index&id=4)
3.3 portal
这里制作了网站页面框架的主要模板,由于代码太多,我主要介绍制作这些页面用到的部分标签和函数。1、全局变量;ThinkCMF封装了前台模板开发时常用的一些变量,这些变量是全局的,你在前台模板任何时候都能直接调用:例如脚步模板的版权信息就调用了:
{$site_copyright} //版权信息
2、模板常量:
__TMPL__:
当前模板根目录,带/;
如:前台
simplebootx 模板根目录是/themes/simplebootx/
后台 simplebootx模板根目录是/admin/themes/simplebootx/
__PUBLIC__:
public目录,不带/;
在制作头部页面时,就用了__TMPL__Public引入css文件以及首页中引用图片,用了这样的相对路径:
引入css文件:<linkrel="stylesheet"type="text/css"href="__TMPL__Public/css/green.css">
引入js文件:<scriptsrc="__TMPL__Public/js/jQuery.min.js"type="text/javascript"></script>
3、tc_include:前台模板包含文件的方法,用于替换原来的include的标签
用法:
<tc_include file="Public:nav"/><!--加载的是当前模板的Public/nav.html-->
<tc_include file="Comment:comment"/><!--加载的是当前模板的User/Profile/comment.html-->
4、forech标签/Volist标签:用法类似,作用差不多都是循环输出数组
<volist name="navs" id="vo">
<php>
$l =explode(',',$vo['label']);
</php>
<td width="200"><a href="{$vo.href}">{$l[0]}</a></td>
</volist>
5、explode(separator,string,limit):根据参数separator分割字符串string到数组,用法如上。
6、leuu(): 一种美化url的方法,规则如下
leuu('地址表达式',['参数'],['伪静态后缀'],['显示域名'])
地址表达式的格式定义如下:
[应用/控制器/操作#锚点@域名]?参数1=值1&参数2=值2...
leuu('portal/list/index',array('id'=>1))
leuu方法要配置后台设置的url规则才能完成url的美化;如果没有相应规则,则和U方法生成的url一样;
7、sp_sql_posts():查询文章列表,不做分页。
sp_sql_posts($tag,$where)
8、Sp_get_term($term_id):返回指定分类
9、sp_sql_posts_paged($tag,$pagesize,$pagetpl):文章分页查询方法
10、sp_sql_page($id):获取指定id页面
下面是部分门户模板页面的效果图:
首页
列表页
文章页
4.总结心得
将以上制作好的发布到自己买好的服务器上,就可以供其它小伙伴浏览了!!用thinkcmf框架制作能够省去很多代码的编写,可视化界面也简化了操作,尽管中间出了很多问题,如apache连不上,mysql打不开等,每次一出问题,我就习惯性直接百度或者干脆重装系统,但是我发现这样解决问题效率太低,所以其实一遇到问题我们首先需要查看错误日志,然后再根据具体情况解决问题
相关文章推荐
- 最小生成树
- Codevs 3269 混合背包(二进制优化)
- android4.0默认界面旋转180
- mac系统上添加定时任务
- 设计模式--2.工厂方法模式
- 练习二 将字符串反转 练习三 获取关键字出现的次数 练习四 获取2个字符串中最大公共子串
- Linux开发工具(gcc gdb make shell)——GDB中list命令详解
- Spark的事务处理
- doctrine随机取数据
- Linux高速抓包内容分析(1)
- 设计模式——单例模式
- Java开发环境(JDK)的下载、安装、配置
- java语言程序设计基础篇第七章编程练习题
- 记录自己所学的,帮助自己,希望也能帮助他人!!!
- 从实施工程师到研发工程师
- hadoop入门级总结二:Map/Reduce
- hadoop入门级总结二:Map/Reduce
- Android Studio插件整理
- 华为面试题【8】-找零钱
- 华为面试题【8】-找零钱