Android开发实用代码片段(二)
2016-07-08 12:22
281 查看
1.获取控件的宽高
网上的方法呢,有3种,如下:

同时,当我退出的时候,第二种方法还会进行测试2次。
我推荐使用第三种方法
2.按2次返回键退出程序
连续快速按2次返回键退出程序
3.txt文件转String和String写入到txt文件中
(1)txt转String
(2)String写入到txt
4.drawable转Bitmap
5.调用系统拨号
有2种方式
第一种:没有拨号界面,直接拨号
第二种:拨号界面了,号码也输入好了,但是要手动点击拨号
当然,不要忘了要加上权限
6.调用系统短信界面
第一种,设定发送的号码,和内容,界面没有联系人,群组组等按钮
第二种,设定发送短信内容,不设置发送的号码,界面有联系人,群组等按钮
7.调用系统浏览器浏览网页
8.FileUtil工具类
主要包括:在指定的位置创建指定的文件;在指定的位置创建文件夹;删除指定的文件;删除指定的文件夹;复制文件/文件夹;移动指定的文件(夹)到目标文件(夹)。
9.获取sdk版本号
10.存储bitmap到指定路径
11.根据原图绘制圆形头像
12.根据原图片,绘制灰色图片,类似qq人物头像不在线
13.根据图片路径获取其缩略图
14.Notification的创建和使用
15.获取字符串中的数字
16. 将毫秒换算成 x天 x时 x分 x秒 x毫秒
如果对文章内容有疑惑,欢迎指出,共同进步!
网上的方法呢,有3种,如下:
import android.app.Activity;
import android.os.Bundle;
import android.util.DisplayMetrics;
import android.util.Log;
import android.view.View;
import android.view.ViewTreeObserver;
import android.view.ViewTreeObserver.OnGlobalLayoutListener;
import android.widget.Button;

public class MainActivity extends Activity {
Button bt;
@Override
protected void onCreate(Bundle savedInstanceState) {
super.onCreate(savedInstanceState);
setContentView(R.layout.activity_main);
bt = (Button) findViewById(R.id.bt1);
getViewSize(bt);
getViewSize2(bt);
getViewSize3(bt);
DisplayMetrics dmDisplayMetrics=new DisplayMetrics();
getWindowManager().getDefaultDisplay().getMetrics(dmDisplayMetrics);
Log.e("屏幕宽度---->", dmDisplayMetrics.widthPixels+"");

}

public void getViewSize(View v) {
int w = View.MeasureSpec.makeMeasureSpec(0,
View.MeasureSpec.UNSPECIFIED);
int h = View.MeasureSpec.makeMeasureSpec(0,
View.MeasureSpec.UNSPECIFIED);
v.measure(w, h);
int height = v.getMeasuredHeight();
int width = v.getMeasuredWidth();
Log.e("方法一---->", width + "  " + height);
}

public void getViewSize2(final View v) {
ViewTreeObserver vto = v.getViewTreeObserver();
vto.addOnPreDrawListener(new ViewTreeObserver.OnPreDrawListener() {
public boolean onPreDraw() {
int height = v.getMeasuredHeight();
int width = v.getMeasuredWidth();
Log.e("方法二---->", width + "  " + height);
return true;
}
});
}

public void getViewSize3(final View v) {
ViewTreeObserver vto2 = v.getViewTreeObserver();
vto2.addOnGlobalLayoutListener(new OnGlobalLayoutListener() {
@Override
public void onGlobalLayout() {
v.getViewTreeObserver().removeGlobalOnLayoutListener(this);
Log.e("方法三---->", v.getWidth() + "  " + v.getHeight());
}
});
}
}界面就一个宽度为match_parent,高度为50dp的bt.测试结果如下:同时,当我退出的时候,第二种方法还会进行测试2次。
我推荐使用第三种方法
2.按2次返回键退出程序
连续快速按2次返回键退出程序
private long mkeyTime;
public boolean onKeyDown(int keyCode, KeyEvent event) {
// TODO Auto-generated method stub
if (keyCode == KeyEvent.KEYCODE_BACK) {
if ((System.currentTimeMillis() - mkeyTime) > 2000) {
mkeyTime = System.currentTimeMillis();
Toast.makeText(this, "再按一次退出程序",Toast.LENGTH_LONG).show();
} else {
finish();
}
return true;
}
return super.onKeyDown(keyCode, event);
}
3.txt文件转String和String写入到txt文件中
(1)txt转String
public static String txt2String(File file){
String result = "";
try{
BufferedReader br = new BufferedReader(new FileReader(file));//构造一个BufferedReader类来读取文件
String s = null;
while((s = br.readLine())!=null){//使用readLine方法,一次读一行
result = result + "\n" +s;
}
br.close();
}catch(Exception e){
e.printStackTrace();
}
return result;
}
(2)String写入到txt
/**
* String写入文件
* @param fileName
* @param content
* @return
*/
public static boolean writeToTxt(String fileName, String content)
{
try
{
File newFile = new File(fileName);
if (newFile.exists())
{
newFile.delete();
}
int iLen = Util.getLengthString(content);
OutputStreamWriter write = null;
BufferedWriter out = null;
if (!TextUtils.isEmpty(fileName))
{
try
{
// new FileOutputStream(fileName, true) 第二个参数表示追加写入
write = new OutputStreamWriter(new FileOutputStream(
fileName),Charset.forName("gbk"));//一定要使用gbk格式
out = new BufferedWriter(write, iLen);
}
catch (Exception e)
{
}
}
out.write(content);
out.flush();
out.close();
return true;
}
catch (Exception e)
{
return false;
}
}
4.drawable转Bitmap
private Bitmap drawableToBitmap(Drawable drawable) {
int dw = drawable.getIntrinsicWidth();
int dh = drawable.getIntrinsicHeight();
Bitmap.Config config = drawable.getOpacity() != PixelFormat.OPAQUE ? Bitmap.Config.ARGB_8888
: Bitmap.Config.RGB_565;
Bitmap bitmap=Bitmap.createBitmap(dw, dh, config);
Canvas canvas = new Canvas(bitmap);
drawable.setBounds(0, 0, dw, dh);
drawable.draw(canvas);
return bitmap;
}
5.调用系统拨号
有2种方式
第一种:没有拨号界面,直接拨号
Uri uri=Uri.parse("tel:"+"13012345678");
Intent intent=new Intent();
intent.setAction(Intent.ACTION_CALL);//  ACTION_CALL直接拨出
intent.setData(uri);
startActivity(intent);
第二种:拨号界面了,号码也输入好了,但是要手动点击拨号
Uri uri=Uri.parse("tel:"+"13012345678");
Intent intent=new Intent();
intent.setAction(Intent.ACTION_DIAL);
intent.setData(uri);
startActivity(intent);
当然,不要忘了要加上权限
<uses-permission android:name="android.permission.CALL_PHONE" />
6.调用系统短信界面
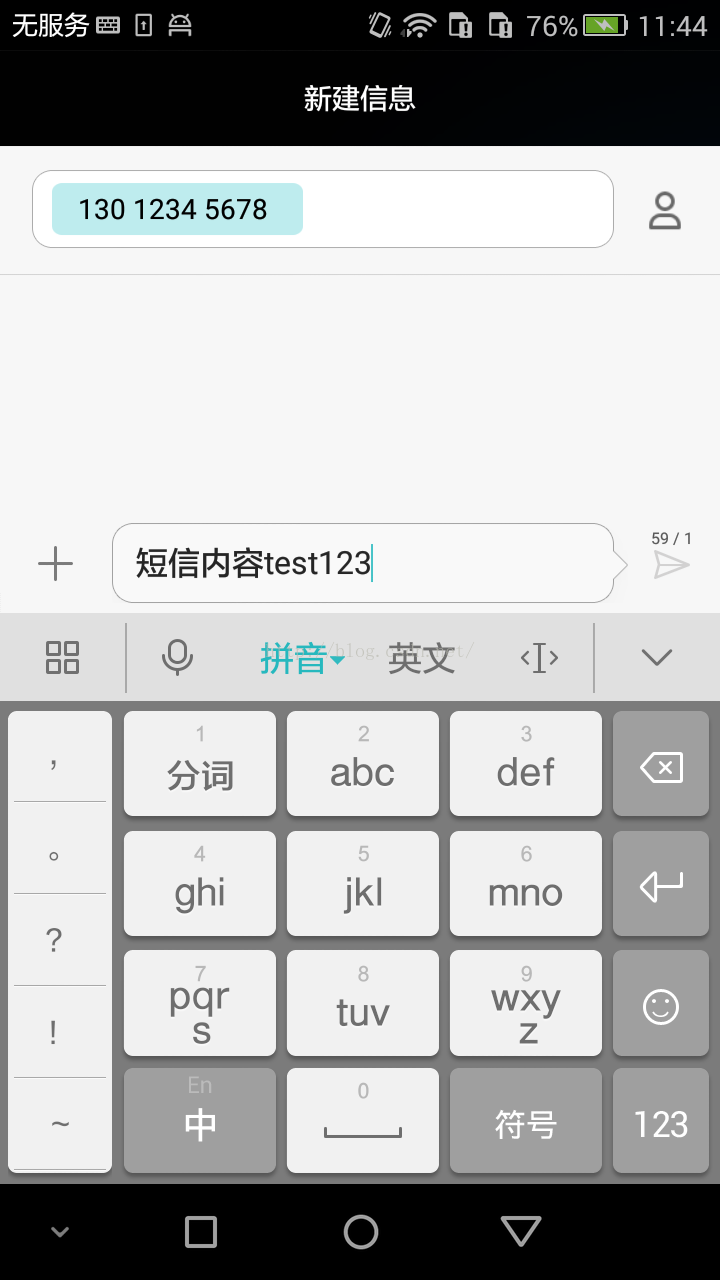
第一种,设定发送的号码,和内容,界面没有联系人,群组组等按钮
Uri smsToUri = Uri.parse("smsto:13012345678");// 联系人地址
Intent mIntent = new Intent(android.content.Intent.ACTION_SENDTO,
smsToUri);
mIntent.putExtra("sms_body", "短信内容test123");// 短信内容
startActivity(mIntent);效果如下:第二种,设定发送短信内容,不设置发送的号码,界面有联系人,群组等按钮
Uri smsUri = Uri.parse("smsto:");
Intent intent = new Intent(Intent.ACTION_VIEW, smsUri);
intent.putExtra("sms_body", "短信内容");
intent.setType("vnd.android-dir/mms-sms");
startActivity(intent);
7.调用系统浏览器浏览网页
Uri uri = Uri.parse("http://www.baidu.com");

Intent it   = new Intent(Intent.ACTION_VIEW,uri);

startActivity(it);
8.FileUtil工具类
主要包括:在指定的位置创建指定的文件;在指定的位置创建文件夹;删除指定的文件;删除指定的文件夹;复制文件/文件夹;移动指定的文件(夹)到目标文件(夹)。
/**
* 文件操作工具类
*/
public class FileUtil {
/**
* 在指定的位置创建指定的文件
*
* @param filePath 完整的文件路径
* @param mkdir 是否创建相关的文件夹
* @throws Exception
*/
public static void mkFile(String filePath, boolean mkdir) throws Exception {
File file = new File(filePath);
file.getParentFile().mkdirs();
file.createNewFile();
file = null;
}

/**
* 在指定的位置创建文件夹
*
* @param dirPath 文件夹路径
* @return 若创建成功,则返回True;反之,则返回False
*/
public static boolean mkDir(String dirPath) {
return new File(dirPath).mkdirs();
}

/**
* 删除指定的文件
*
* @param filePath 文件路径
*
* @return 若删除成功,则返回True;反之,则返回False
*
*/
public static boolean delFile(String filePath) {
return new File(filePath).delete();
}

/**
* 删除指定的文件夹
*
* @param dirPath 文件夹路径
* @param delFile 文件夹中是否包含文件
* @return 若删除成功,则返回True;反之,则返回False
*
*/
public static boolean delDir(String dirPath, boolean delFile) {
if (delFile) {
File file = new File(dirPath);
if (file.isFile()) {
return file.delete();
} else if (file.isDirectory()) {
if (file.listFiles().length == 0) {
return file.delete();
} else {
int zfiles = file.listFiles().length;
File[] delfile = file.listFiles();
for (int i = 0; i < zfiles; i++) {
if (delfile[i].isDirectory()) {
delDir(delfile[i].getAbsolutePath(), true);
}
delfile[i].delete();
}
return file.delete();
}
} else {
return false;
}
} else {
return new File(dirPath).delete();
}
}

/**
* 复制文件/文件夹 若要进行文件夹复制,请勿将目标文件夹置于源文件夹中
* @param source 源文件(夹)
* @param target 目标文件(夹)
* @param isFolder 若进行文件夹复制,则为True;反之为False
* @throws Exception
*/
public static void copy(String source, String target, boolean isFolder)
throws Exception {
if (isFolder) {
(new File(target)).mkdirs();
File a = new File(source);
String[] file = a.list();
File temp = null;
for (int i = 0; i < file.length; i++) {
if (source.endsWith(File.separator)) {
temp = new File(source + file[i]);
} else {
temp = new File(source + File.separator + file[i]);
}
if (temp.isFile()) {
FileInputStream input = new FileInputStream(temp);
FileOutputStream output = new FileOutputStream(target + "/" + (temp.getName()).toString());
byte[] b = new byte[1024];
int len;
while ((len = input.read(b)) != -1) {
output.write(b, 0, len);
}
output.flush();
output.close();
input.close();
}
if (temp.isDirectory()) {
copy(source + "/" + file[i], target + "/" + file[i], true);
}
}
} else {
int byteread = 0;
File oldfile = new File(source);
if (oldfile.exists()) {
InputStream inStream = new FileInputStream(source);
File file = new File(target);
file.getParentFile().mkdirs();
file.createNewFile();
FileOutputStream fs = new FileOutputStream(file);
byte[] buffer = new byte[1024];
while ((byteread = inStream.read(buffer)) != -1) {
fs.write(buffer, 0, byteread);
}
inStream.close();
fs.close();
}
}
}

/**
* 移动指定的文件(夹)到目标文件(夹)
* @param source 源文件(夹)
* @param target 目标文件(夹)
* @param isFolder 若为文件夹,则为True;反之为False
* @return
* @throws Exception
*/
public static boolean move(String source, String target, boolean isFolder)
throws Exception {
copy(source, target, isFolder);
if (isFolder) {
return delDir(source, true);
} else {
return delFile(source);
}
}
}
9.获取sdk版本号
public static int getAndroidSDKVersion(){
int version;
version = Integer.valueOf(android.os.Build.VERSION.SDK);
return version;
}
10.存储bitmap到指定路径
/**
* bitmap存储
* @param mBitmap
* @param strPath
*/
public static void saveMyBitmap(Bitmap mBitmap, String strPath,boolean isRecycle)
{
if(mBitmap!=null&&!mBitmap.isRecycled()&&!TextUtils.isEmpty(strPath))
{
File f = new File( strPath );
if (f.exists())
{
f.delete();
}
FileOutputStream fOut = null;
try {
fOut = new FileOutputStream(f);
} catch (FileNotFoundException e) {
e.printStackTrace();
}
mBitmap.compress(Bitmap.CompressFormat.JPEG, 60, fOut);
try {
fOut.flush();
} catch (IOException e) {
e.printStackTrace();
}catch (NullPointerException e)
{
e.getMessage();
}
try {
fOut.close();
} catch (IOException e) {
e.printStackTrace();
}
if(!mBitmap.isRecycled()&&isRecycle)
{
mBitmap.recycle();
System.gc();
}
}
}
11.根据原图绘制圆形头像
/**
* 根据原图和宽度保存圆形图片
*
* @param strPath
* @return
*/
public static Bitmap SaveCircleImage(String strPath)
{
Bitmap source = null;
try
{
source=Util.getLocalBitmap(strPath,true);

if(source != null)
{
final Paint paint = new Paint();
paint.setAntiAlias(true);
int iWidth = source.getWidth();
int iHeight = source.getHeight();

float fRate = 1.0f;
if (iWidth > 800 || iHeight > 800)
{
int iSetWidth = iWidth;
int iSetHeight = iHeight;
while(iSetWidth > 800 || iSetHeight > 800)
{
fRate = fRate - 0.01f;
iSetWidth = (int)(iWidth * fRate);
iSetHeight = (int)(iHeight * fRate);
}
}
iWidth = (int)(iWidth*fRate);
iHeight = (int)(iHeight*fRate);

Matrix matrix = new Matrix();
matrix.postScale(fRate,fRate); //长和宽缩小的比例
Bitmap resizeBmp = Bitmap.createBitmap(source, 0, 0, source.getWidth(), source.getHeight(), matrix, true);

int min = iWidth;
if (iHeight < iWidth)
{
min = iHeight;
}

Bitmap target = Bitmap.createBitmap(min, min, Bitmap.Config.ARGB_4444);

/**
* 产生一个同样大小的画布
*/
Canvas canvas = new Canvas(target);
/**
* 首先绘制圆形
*/
canvas.drawCircle(min / 2, min / 2, min / 2, paint);
/**
* 使用SRC_IN
*/
paint.setXfermode(new PorterDuffXfermode(PorterDuff.Mode.SRC_IN));
/**
* 绘制图片
*/
Rect srcRc = new Rect(0, 0, iWidth, iHeight);
Rect dstRc = new Rect(0, 0, min, min);
if (iHeight < iWidth)
{
srcRc.left = (iWidth - iHeight)/2;
srcRc.right = srcRc.left + iHeight;
}
else
{
srcRc.top = (iHeight - iWidth)/2;
srcRc.bottom = srcRc.top + iWidth;
}
canvas.drawBitmap(resizeBmp, srcRc, dstRc, paint);

if(!source.isRecycled())
{
source.recycle();
System.gc();
}
if(!resizeBmp.isRecycled())
{
resizeBmp.recycle();
System.gc();
}

Bitmap bmSave = GetWhiteBkPng(target, min);
saveMyBitmap(bmSave, strPath);
return target;
}
}
catch (Exception e)
{
e.printStackTrace();
return null;
}
return null;
}
12.根据原图片,绘制灰色图片,类似qq人物头像不在线
/**
* 将彩色图转换为灰度图
* @param img 位图,img不可以回收
* @return  返回转换好的位图
*/
public static Bitmap convertImgToGrey(Bitmap img)
{
int width = img.getWidth();         //获取位图的宽
int height = img.getHeight();       //获取位图的高

int []pixels = new int[width * height]; //通过位图的大小创建像素点数组

img.getPixels(pixels, 0, width, 0, 0, width, height);
int alpha = 0xFF << 24;
for(int i = 0; i < height; i++)  {
for(int j = 0; j < width; j++) {
int grey = pixels[width * i + j];

int red = ((grey  & 0x00FF0000 ) >> 16);
int green = ((grey & 0x0000FF00) >> 8);
int blue = (grey & 0x000000FF);

grey = (int)((float) red * 0.3 + (float)green * 0.59 + (float)blue * 0.11);
grey = alpha | (grey << 16) | (grey << 8) | grey;
pixels[width * i + j] = grey;
}
}
Bitmap result = Bitmap.createBitmap(width, height, Bitmap.Config.RGB_565);
result.setPixels(pixels, 0, width, 0, 0, width, height);
return result;
}
13.根据图片路径获取其缩略图
/**
* 获取图片缩略图
* @param imagePath
* @return
*/
public static Bitmap getImageThumbnail(String imagePath) {
Bitmap bitmap = null;
BitmapFactory.Options options = new BitmapFactory.Options();
options.inJustDecodeBounds = true;
options.inSampleSize = 4;
bitmap=BitmapFactory.decodeFile(imagePath, options);
options.inJustDecodeBounds = false; // 设为 false
int length= MainActivity.dip2px(MainActivity.mainWnd, 60);
int h = options.outHeight;
int w = options.outWidth;
int be;
if(w<h)
{
be=h/length;
}
else
{
be=w/length;
}
if (be <= 0) {
be = 1;
}
options.inSampleSize = be;
// 重新读入图片,读取缩放后的bitmap,注意这次要把options.inJustDecodeBounds 设为 false
bitmap = BitmapFactory.decodeFile(imagePath, options);
// 利用ThumbnailUtils来创建缩略图,这里要指定要缩放哪个Bitmap对象
bitmap = ThumbnailUtils.extractThumbnail(bitmap, length, length,
ThumbnailUtils.OPTIONS_RECYCLE_INPUT);
return bitmap;
}
14.Notification的创建和使用
NotificationManager manager = (NotificationManager) getSystemService(Context.NOTIFICATION_SERVICE);
PendingIntent pendingIntent = PendingIntent.getActivity(this, 0,
new Intent(this, MainActivity.class), 0);//点击后要跳转的Activity
// 通过Notification.Builder来创建通知,注意API Level
// API11之后才支持
Notification notify = new Notification.Builder(this)
.setSmallIcon(R.drawable.ic_launcher) // 设置状态栏中的小图片,尺寸一般建议在24×24,这个图片同样也是在下拉状态栏中所显示,如果在那里需要更换更大的图片,可以使用setLargeIcon(Bitmap
// icon)
.setTicker("TickerText:" + "您有新短消息,请注意查收!")// 设置在status  bar上显示的提示文字
.setContentTitle("Notification Title")// 设置NotififyMessage的TextView中显示的标题
.setContentText("This is the notification message")// TextView中显示的详细内容
.setContentIntent(pendingIntent) // 关联PendingIntent
.setNumber(1) // 在TextView的右方显示的数字,可放大图片看,在最右侧。这个number同时也起到一个序列号的左右,如果多个触发多个通知(同一ID),可以指定显示哪一个。
.getNotification(); // 需要注意build()是在API level
// 16及之后增加的,在API11中可以使用getNotificatin()来代替
notify.flags |= Notification.FLAG_AUTO_CANCEL; //点击后取消
manager.notify(NOTIFICATION_FLAG, notify);
15.获取字符串中的数字
String str = "37Alibaba23Android37String3423java23End";
Pattern p = Pattern.compile("[0-9\\.]+");
Matcher m = p.matcher(str);
List<Integer> list = new ArrayList<Integer>();
while (m.find()) {
list.add(Integer.valueOf(m.group()));
}
16. 将毫秒换算成 x天 x时 x分 x秒 x毫秒
/*
* 毫秒转化
*/
public static String formatTime(long ms) {

int ss = 1000;
int mi = ss * 60;
int hh = mi * 60;
int dd = hh * 24;

long day = ms / dd;
long hour = (ms - day * dd) / hh;
long minute = (ms - day * dd - hour * hh) / mi;
long second = (ms - day * dd - hour * hh - minute * mi) / ss;
long milliSecond = ms - day * dd - hour * hh - minute * mi - second * ss;

String strDay = day < 10 ? "0" + day : "" + day; //天
String strHour = hour < 10 ? "0" + hour : "" + hour;//小时
String strMinute = minute < 10 ? "0" + minute : "" + minute;//分钟
String strSecond = second < 10 ? "0" + second : "" + second;//秒
String strMilliSecond = milliSecond < 10 ? "0" + milliSecond : "" + milliSecond;//毫秒
strMilliSecond = milliSecond < 100 ? "0" + strMilliSecond : "" + strMilliSecond;

return strMinute + " 分钟 " + strSecond + " 秒";
}
如果对文章内容有疑惑,欢迎指出,共同进步!

相关文章推荐
- Android开发艺术探索读书笔记(第12章 Bitmap的加载和Cache)
- Android:通知栏的使用2
- service不被杀死
- Android实现带有边框的ListView和item的方法
- 得到Android屏幕高度,宽度
- android 解决ViewPager加载大量图片内存溢出问题
- android之fragment的两种使用方式(add和replace方式切换)
- ionic 上弹出菜单 在Android平台没有取消,样式混乱
- Android 开源之StickyHeaderListView 标题渐变、吸附悬停、筛选分类、动态头部
- android 单元测试
- 浅谈3DES加密解密
- Android程序开发之使用PullToRefresh实现下拉刷新和上拉加载
- Android:通知栏的使用
- 查询Android的包名和activity名方法
- android sutdio 运行项目报错java.io.IOException: Failed to read zip file
- Android 屏幕旋转的处理
- Android实现带磁性的悬浮窗体效果
- Android组件(二)-水平ProgressBar
- Android自动测试工具Monkey的实现方法
- android static Handler