Android Studio中ButterKnife插件的安装与使用
2016-07-07 15:22
579 查看
最近用到Android Butterknife Zelezny插件,感觉特别棒!在Android开发过程中,我们会写大量的初始化控件和设置控件点击事件的操作,这样简单而重复的工作让人觉得麻烦而且没意思,可以采用注解的方式去实现,而ButterKnife是注解中相对简单易懂的开源框架。
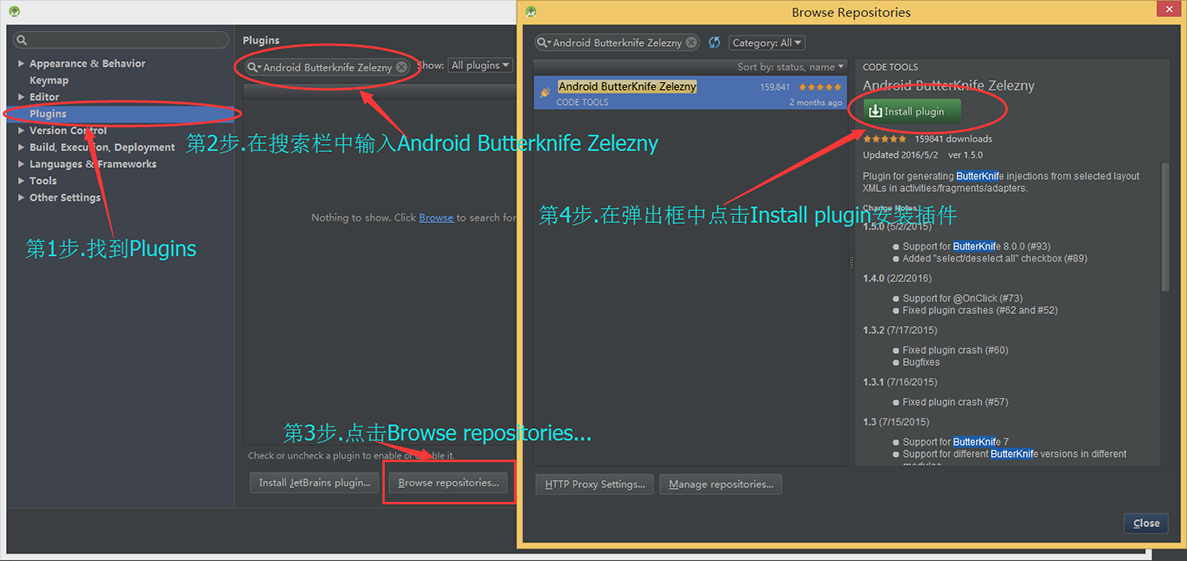
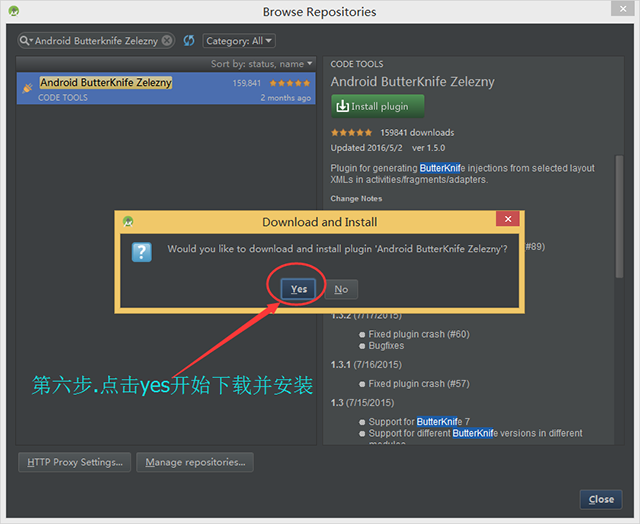
一、Android Studio中安装ButterKnife插件:
(1)和安装其他插件一样,首先,打开:settings->plugins界面


(2)重新启动了Android Studio之后,此时我们已经安装了ButterKnife插件了,接下来在项目的bulid.gradle中添加依赖,如下图所示:

(3)重新编译一下该项目,就可以在代码中使用注解的方式了,在这里我们先写一个简单的布局文件来举例:
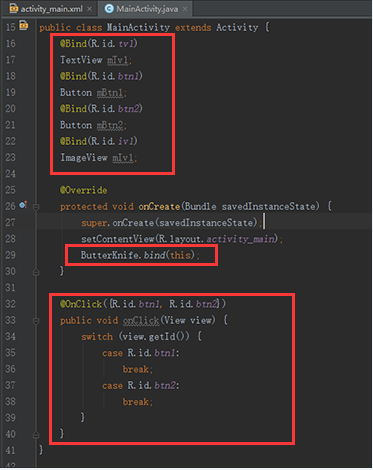
如果不使用ButterKnife插件,我们需要在 重写的onCreate()方法中通过findViewById()对控件进行实例化并对控件添加事件监听,如下如所示:
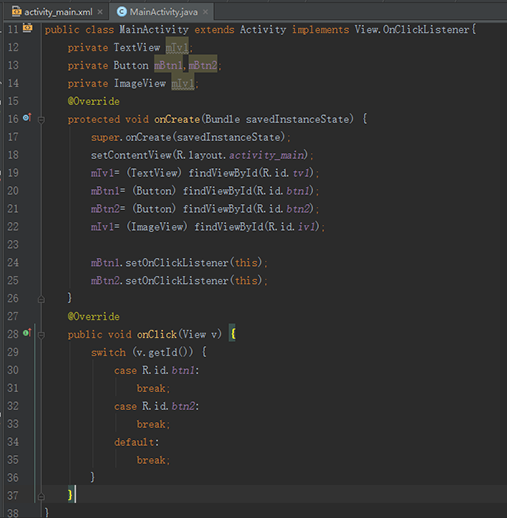
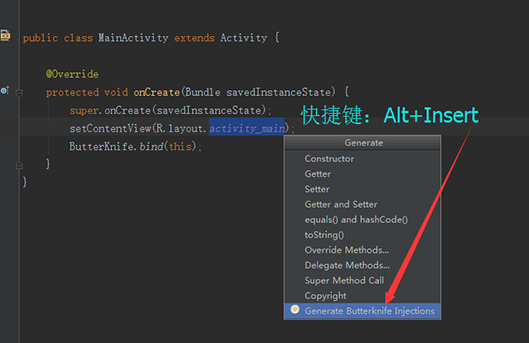
代码还是比较简洁,这也是因为我们的布局相对而言比较简单,可是如果布局比较复杂的话,这样的操作就显得比较繁琐。现在我们只需要简单点击几下鼠标就可以完成这些操作了。
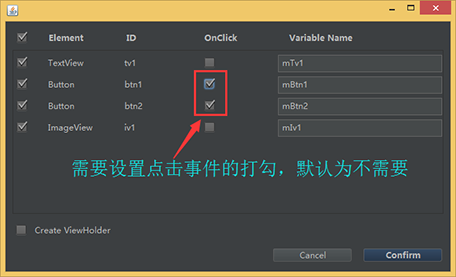
(4)鼠标双击选择布局文件名,右键(或者直接快捷键:Alt+Insert)
一、Android Studio中安装ButterKnife插件:
(1)和安装其他插件一样,首先,打开:settings->plugins界面
(2)重新启动了Android Studio之后,此时我们已经安装了ButterKnife插件了,接下来在项目的bulid.gradle中添加依赖,如下图所示:
compile 'com.jakewharton:butterknife:7.0.0'
(3)重新编译一下该项目,就可以在代码中使用注解的方式了,在这里我们先写一个简单的布局文件来举例:
<LinearLayout xmlns:android="http://schemas.android.com/apk/res/android"
android:layout_width="match_parent"
android:layout_height="match_parent"
android:orientation="vertical">

<TextView
android:id="@+id/tv1"
android:layout_width="match_parent"
android:layout_height="wrap_content"
android:text="TextView1" />

<Button
android:id="@+id/btn1"
android:layout_width="match_parent"
android:layout_height="wrap_content"
android:text="Button1" />

<Button
android:id="@+id/btn2"
android:layout_width="match_parent"
android:layout_height="wrap_content"
android:text="Button2" />

<ImageView
android:id="@+id/iv1"
android:layout_width="match_parent"
android:layout_height="wrap_content"
android:src="@mipmap/ic_launcher" />

</LinearLayout>
如果不使用ButterKnife插件,我们需要在 重写的onCreate()方法中通过findViewById()对控件进行实例化并对控件添加事件监听,如下如所示:
代码还是比较简洁,这也是因为我们的布局相对而言比较简单,可是如果布局比较复杂的话,这样的操作就显得比较繁琐。现在我们只需要简单点击几下鼠标就可以完成这些操作了。
(4)鼠标双击选择布局文件名,右键(或者直接快捷键:Alt+Insert)

相关文章推荐
- 初次使用Android studio 需要的一些配置
- FLAG_ACTIVITY_REORDER_TO_FRONT之ANR问题(Android L)
- J2V8 For Android
- Android 应用(中英文)切换
- 我的Android进阶之旅------>解决Error:Could not find property 'compile' on org.gradle.api.internal.artifacts.
- Android 什么是AIDL?
- 【Android基础知识】Fragment和Activity通信
- Android数据存储SQLite数据库存储
- Android中的dispatchTouchEvent()、onInterceptTouchEvent()和onTouchEvent()
- Android自定义增加系统服务和AIDL
- android自定义开关SwitchView
- Android权限一览
- 开源框架 EventBus 简单使用
- 手把手教你逆向分析 Android 程序
- android developer tiny share-20160707
- android developer tiny share-20160707
- android developer tiny share-20160706
- android developer tiny share-20160706
- android developer tiny share-20160705
- android developer tiny share-20160705