Android之Fragment的使用(二)
2016-07-02 23:56
363 查看
声明: 本人菜鸟一枚, 本博客是本人自学的内容, 适用于初学者, 不喜勿喷, 谢谢大家
处理Fragment事务
与Activity交互
PreferenceFragment
你也可以将每一个事务保存在由Activity管理的后台栈中, 并且允许用户导航回退Fragment变更(类似于Activity的导航回退)
//截取自API文档
Activity能够调用Fragment函数 findFragmentById() 或者findByTag().
Fragment与Activity共享事件
一个好方法是在fragment内容内部定义一个回调接口, 并需要宿主activity实现它. 当activity通过回调接口接收回调时, 可以在必要时与布局文件中的其他fragment共享信息.
下面是关于fragment与Activity和fragment与fragment之间的交互的例子
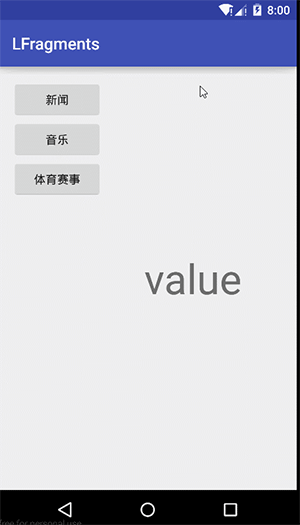
1, 首先两个Fragment, 一个是用来点击的菜单项, 另一个是用来响应相应菜单项的主界面.
//MenuFragment.java
fragment_menu.xml
MainFragment.java
fragment_main.xml
2, 下面是宿主Activity和相应的xml布局文件
Main3Activity.java
activity_main3.xml
3, 效果图:
下面将展示如何去创建和使用PreferenceFragment
1, 在res文件夹下新建一个xml文件夹, 在xml文件夹下面新建一个文件: preference.xml
2, 在包路径下面新建一个类: Fragment继承PreferenceFragment
3, 从xml文件加载选项addPreferenceFromResource(R.xml.preference);
在本类中获取shared_pref文件
String name = getPreferenceManager().getSharePreencesName();
//获取默认的属性配置
SharePreference sp = PreferenceManager.getDefaultSharePreference(this);
boolean checkbox_preference = sp.getBoolean(“checkbox_preference”, false);
1, 在创建xml文件下的文件perference.xml
2, 创建的Fragment
效果图:
座右铭: 少说话, 多做事
处理Fragment事务
与Activity交互
PreferenceFragment
处理Fragment事务
在Activity中使用Fragment的一大特点是具有添加, 删除, 替换和执行其他动作的能力, 以响应用户的互动. 提交给Activity的每一系列变化被称之为事务, 并且可以用FragmentTransaction中APIs处理.你也可以将每一个事务保存在由Activity管理的后台栈中, 并且允许用户导航回退Fragment变更(类似于Activity的导航回退)
//截取自API文档
// Create new fragment and transaction
Fragment newFragment = new ExampleFragment();
FragmentTransaction transaction = getFragmentManager().beginTransaction();
// Replace whatever is in the fragment_container view with this fragment,
// and add the transaction to the back stack
transaction.replace(R.id.fragment_container, newFragment);
transaction.addToBackStack(null);
// Commit the transaction
transaction.commit();
与Activity交互
Fragment可以通过getActivity()函数访问Activity, 并且很容易的执行类似于查找Activity布局中的视图的任务:Activity能够调用Fragment函数 findFragmentById() 或者findByTag().
Fragment与Activity共享事件
一个好方法是在fragment内容内部定义一个回调接口, 并需要宿主activity实现它. 当activity通过回调接口接收回调时, 可以在必要时与布局文件中的其他fragment共享信息.
下面是关于fragment与Activity和fragment与fragment之间的交互的例子
1, 首先两个Fragment, 一个是用来点击的菜单项, 另一个是用来响应相应菜单项的主界面.
//MenuFragment.java
/**
* Created by Lulu on 2016/7/2.
*/
public class MenuFragment extends Fragment implements View.OnClickListener {

public MyMenuListener myMenuListener;

public MenuFragment() {
}

@Nullable
@Override
public View onCreateView(LayoutInflater inflater, ViewGroup container, Bundle savedInstanceState) {
View view = inflater.inflate(R.layout.fragment_menu, container, false);
view.findViewById(R.id.bt_news).setOnClickListener(this);
view.findViewById(R.id.bt_music).setOnClickListener(this);
view.findViewById(R.id.bt_gym).setOnClickListener(this);

return view;
}

//监听器的注册方法
public void setMyMenuListener(MyMenuListener myMenuListener) {
this.myMenuListener = myMenuListener;
}

@Override
public void onClick(View v) {
switch (v.getId()) {
case R.id.bt_news:
myMenuListener.changerValue("新闻页面");
break;
case R.id.bt_music:
myMenuListener.changerValue("音乐页面");
break;
case R.id.bt_gym:
myMenuListener.changerValue("体育页面");
break;

}
}

//定义一个回调接口, 用于改变相应的值, 这里为了做测试, 并无实际意义
public static interface MyMenuListener {
public void changerValue(String vlaue);
}

}
fragment_menu.xml
<?xml version="1.0" encoding="utf-8"?>
<LinearLayout xmlns:android="http://schemas.android.com/apk/res/android"
android:layout_width="match_parent"
android:layout_height="match_parent"
android:orientation="vertical">

<Button
android:id="@+id/bt_news"
android:layout_width="match_parent"
android:layout_height="wrap_content"

android:text="新闻" />

<Button
android:id="@+id/bt_music"
android:layout_width="match_parent"
android:layout_height="wrap_content"
android:onClick="musicClick"
android:text="音乐" />

<Button
android:id="@+id/bt_gym"
android:layout_width="match_parent"
android:layout_height="wrap_content"
android:onClick="gymClick"
android:text="体育赛事" />

</LinearLayout>
MainFragment.java
/**
* Created by Lulu on 2016/7/2.
*/
public class MainFragment extends Fragment {
private TextView textView_value;

public MainFragment() {
}

@Nullable
@Override
public View onCreateView(LayoutInflater inflater, ViewGroup container, Bundle savedInstanceState) {
View view = inflater.inflate(R.layout.fragment_main, container, false);
textView_value = (TextView) view.findViewById(R.id.value);
return view;
}

public void changerValue(String value) {
textView_value.setText(value);
}

}
fragment_main.xml
<?xml version="1.0" encoding="utf-8"?>
<LinearLayout xmlns:android="http://schemas.android.com/apk/res/android"
android:orientation="vertical" android:layout_width="match_parent"
android:layout_height="match_parent">

<TextView
android:gravity="center"
android:text="value"
android:textSize="50dp"
android:id="@+id/value"
android:layout_width="match_parent"
android:layout_height="match_parent"
/>

</LinearLayout>
2, 下面是宿主Activity和相应的xml布局文件
Main3Activity.java
public class Main3Activity extends AppCompatActivity implements MenuFragment.MyMenuListener {
private MenuFragment menuFragment;
private MainFragment mainFragment;

@Override
protected void onCreate(Bundle savedInstanceState) {
super.onCreate(savedInstanceState);
setContentView(R.layout.activity_main3);

menuFragment = (MenuFragment) getFragmentManager().findFragmentById(R.id.menuFragment);
mainFragment = (MainFragment) getFragmentManager().findFragmentById(R.id.mainFragment);

//注册MenuChanger的监听
menuFragment.setMyMenuListener(this);
}

@Override
public void changerValue(String vlaue) {
//参数从MenuFragment穿过来之后, 在调用MainFragment中的方法改变UI
mainFragment.changerValue(vlaue);
}
}
activity_main3.xml
<?xml version="1.0" encoding="utf-8"?>
<LinearLayout xmlns:android="http://schemas.android.com/apk/res/android"
xmlns:tools="http://schemas.android.com/tools"
android:layout_width="match_parent"
android:layout_height="match_parent"
android:orientation="horizontal"
android:paddingBottom="@dimen/activity_vertical_margin"
android:paddingLeft="@dimen/activity_horizontal_margin"
android:paddingRight="@dimen/activity_horizontal_margin"
android:paddingTop="@dimen/activity_vertical_margin"
tools:context="com.lulu.lfragments.Main3Activity">

<fragment
android:id="@+id/menuFragment"
android:name="com.lulu.lfragments.MenuFragment"
android:layout_width="0dp"
android:layout_height="match_parent"
android:layout_weight="1" />

<fragment
android:id="@+id/mainFragment"
android:name="com.lulu.lfragments.MainFragment"
android:layout_width="0dp"
android:layout_height="match_parent"
android:layout_weight="2" />

</LinearLayout>
3, 效果图:
PreferenceFragment
有时候, 我们的程序需要提供一些选项功能, 能让用户去定制化自己的使用风格. 例如, 允许用户是否自动保存登录信息, 允许用户设定某个页面的刷新时间等等. 我们可以使用PreferenceActivity基类去显示给用户一个选项设置的界面. 在Android3.0以上版本, 可以使用PreferenceFragment类去实现这个功能.下面将展示如何去创建和使用PreferenceFragment
1, 在res文件夹下新建一个xml文件夹, 在xml文件夹下面新建一个文件: preference.xml
2, 在包路径下面新建一个类: Fragment继承PreferenceFragment
3, 从xml文件加载选项addPreferenceFromResource(R.xml.preference);
在本类中获取shared_pref文件
String name = getPreferenceManager().getSharePreencesName();
//获取默认的属性配置
SharePreference sp = PreferenceManager.getDefaultSharePreference(this);
boolean checkbox_preference = sp.getBoolean(“checkbox_preference”, false);
1, 在创建xml文件下的文件perference.xml
<?xml version="1.0" encoding="utf-8"?>
<PreferenceScreen xmlns:android="http://schemas.android.com/apk/res/android">

<PreferenceCategory
android:title="声音设置">
<CheckBoxPreference
android:key="checkbox_preference"
android:title="打开声音"
android:summary="设置打开声音后" />
</PreferenceCategory>

<PreferenceCategory
android:title="城市">
<EditTextPreference
android:key="edittext_preference"
android:title="昵称"
android:summary="请输入昵称"
android:dialogTitle="昵称" />
<ListPreference
android:key="list_preference"
android:title="城市名称"
android:summary="请选择一个城市名称"
android:entries="@array/city"
android:entryValues="@array/city"
android:dialogTitle="城市的名称" />
</PreferenceCategory>

</PreferenceScreen>
2, 创建的Fragment
/**
* Created by Lulu on 2016/7/2.
*/
public class PreferenceFragment extends android.preference.PreferenceFragment {
@Override
public void onCreate(Bundle savedInstanceState) {
super.onCreate(savedInstanceState);
addPreferencesFromResource(R.xml.perference);

}
}
效果图:
座右铭: 少说话, 多做事

相关文章推荐
- 使用C++实现JNI接口需要注意的事项
- Android IPC进程间通讯机制
- Android Manifest 用法
- [转载]Activity中ConfigChanges属性的用法
- Android之获取手机上的图片和视频缩略图thumbnails
- Android之使用Http协议实现文件上传功能
- Android学习笔记(二九):嵌入浏览器
- android string.xml文件中的整型和string型代替
- i-jetty环境搭配与编译
- android之定时器AlarmManager
- android wifi 无线调试
- Android Native 绘图方法
- Android java 与 javascript互访(相互调用)的方法例子
- android 代码实现控件之间的间距
- android FragmentPagerAdapter的“标准”配置
- Android"解决"onTouch和onClick的冲突问题
- android:installLocation简析
- android searchView的关闭事件
- SourceProvider.getJniDirectories