iOS学习之TableView和UIScrollView的综合小应用
2016-07-01 09:28
411 查看
【效果预览】
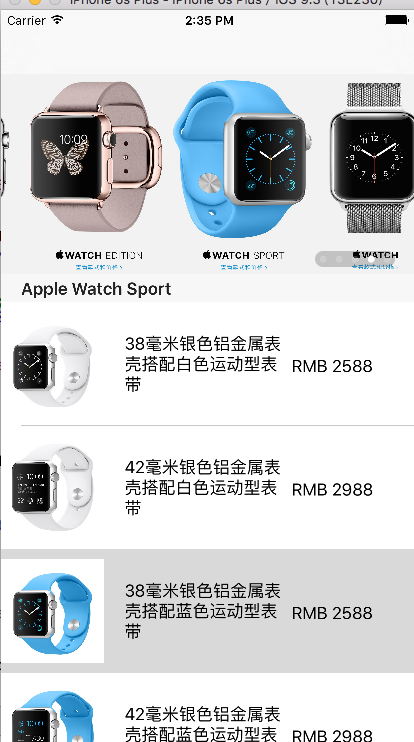
这个小demo是结合了tableview控件和scrollview控件完成的商品展示界面,下面具体讲述下实现的过程和关键技术。
所用到的图片等素材请点击链接下载
布局规划设计
分析效果图,发现页面可以由一个UITableView控件完成,头部为一个UIScrollView的控件实现商品的轮播展示,轮播小点可以由UIPageControl控件实现。
数据模型构造
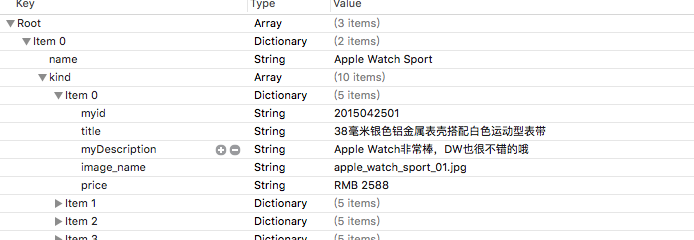
首先分析下素材里面的plist文件,这个文件里面的数据包含了所有条目的图片名称、标题、介绍、价格等内容。简单分析可知,改文档的根节点为array数组,数组里面存放的每个item条目是dictionary类型的数据,而对于item下面又有一个kind的结点,该结点为array类型,该节点下面又有一个dictionary类型的子节点,该子节点才是真正存放手表商品数据的信息节点。根据这个数据结构,我设计了两个类来完成解析,一个是Items类用于描述商品类别信息,一个是Watch类用于描述手表信息。采用NSMutableArray数组分别存储解析出来的每个item结点数据以及每个分类下面的手表数据。具体的代码如下:
3. 自定义UITableViewCell
根据效果图分析便可以知道,每个条目应该包含一个商品图片区域、一个文字介绍和一个价格描述。这个属于自定义设计的范畴,所以考虑自己设计一个类继承于UITableViewCell用来实现每个条目的排版。图片区域采用UIImageView控件,两个文本区域采用UILabel控件完成。代码如下:
UITableView的实现
在ViewController类里面实现UITableView的布局以及实现相应的响应事件。
(1)加入协议
(2)初始化组件
(3)设置分区属性
由于在获取数据时将分类信息都保存在一个类型为NSMutableArray的itemsarray数组里面,所以对应于的分区数量就是这个数组的长度,分区行数类似思想。其中注意的时,对于参数NSIndexPath,其中NSIndexPath.section是指当前的分区,NSIndexPath.row指的是当前所在行。
(4)设置分区每行的内容
在创建每一个cell的时候采用dequeueReusableCellWithIdentifier方法来执行,该方法会根据identifier这个标志去缓冲池里面获取cell,如果不存在cell则创建一个,这个方法可以很大程度上减少系统资源的消耗,提高运行效率。
实现展示界面头部的轮播图
轮播图由UIScrollView和UIPageControl两个控件组合实现。
(1)引入协议
(2)初始化
(3)实现滚动监听
(4)加入定时器,实现自动滚动
这个小demo是结合了tableview控件和scrollview控件完成的商品展示界面,下面具体讲述下实现的过程和关键技术。
所用到的图片等素材请点击链接下载
布局规划设计
分析效果图,发现页面可以由一个UITableView控件完成,头部为一个UIScrollView的控件实现商品的轮播展示,轮播小点可以由UIPageControl控件实现。
数据模型构造
首先分析下素材里面的plist文件,这个文件里面的数据包含了所有条目的图片名称、标题、介绍、价格等内容。简单分析可知,改文档的根节点为array数组,数组里面存放的每个item条目是dictionary类型的数据,而对于item下面又有一个kind的结点,该结点为array类型,该节点下面又有一个dictionary类型的子节点,该子节点才是真正存放手表商品数据的信息节点。根据这个数据结构,我设计了两个类来完成解析,一个是Items类用于描述商品类别信息,一个是Watch类用于描述手表信息。采用NSMutableArray数组分别存储解析出来的每个item结点数据以及每个分类下面的手表数据。具体的代码如下:
//获取plist文件路径
NSString *path = [[NSBundle mainBundle]pathForResource:@"GoodsList" ofType:@"plist"];
NSArray *array = [[NSArray alloc]initWithContentsOfFile:path];
//加载items数组
self.itemsrray = [[NSMutableArray alloc] init];
for (NSDictionary *dict in array) {
Items *item = [[Items alloc]init];

[item setValuesForKeysWithDictionary:dict];
[self.itemsrray addObject:item];
}
//这部分为了简单直接拿出来获取,采用数组遍历更合理
Items *item0 = self.itemsrray[0];
self.watchArray0 = [[NSMutableArray alloc]init];
for (NSDictionary *dict in item0.kind) {
Watch *watch = [[Watch alloc]init];

[watch setValuesForKeysWithDictionary:dict];
[self.watchArray0 addObject:watch];
}
Items *item1 = self.itemsrray[1];
self.watchArray1 = [[NSMutableArray alloc]init];
for (NSDictionary *dict in item1.kind) {
Watch *watch = [[Watch alloc]init];

[watch setValuesForKeysWithDictionary:dict];
[self.watchArray1 addObject:watch];
}
Items *item2 = self.itemsrray[2];
self.watchArray2 = [[NSMutableArray alloc]init];
for (NSDictionary *dict in item2.kind) {
Watch *watch = [[Watch alloc]init];

[watch setValuesForKeysWithDictionary:dict];
[self.watchArray2 addObject:watch];
}

self.watchArray = [[NSMutableArray alloc]init];
[self.watchArray addObject:self.watchArray0];
[self.watchArray addObject:self.watchArray1];
[self.watchArray addObject:self.watchArray2];
3. 自定义UITableViewCell
根据效果图分析便可以知道,每个条目应该包含一个商品图片区域、一个文字介绍和一个价格描述。这个属于自定义设计的范畴,所以考虑自己设计一个类继承于UITableViewCell用来实现每个条目的排版。图片区域采用UIImageView控件,两个文本区域采用UILabel控件完成。代码如下:
-(instancetype)initWithStyle:(UITableViewCellStyle)style reuseIdentifier:(NSString *)reuseIdentifier{
self = [super initWithStyle:style reuseIdentifier:reuseIdentifier];

if(self){
//初始化操作
self.watchImageView = [[UIImageView alloc]initWithFrame:CGRectMake(watchImageViewX, watchImageViewY, watchImageViewW, watchImageViewH)];
[self.contentView addSubview:self.watchImageView];

self.titleLabel = [[UILabel alloc]initWithFrame:CGRectMake(titleLabelX, titleLabelY, titleLabelW, titleLabelH)];
self.titleLabel.numberOfLines = 0;
[self.contentView addSubview:self.titleLabel];

self.priceLabel = [[UILabel alloc]initWithFrame:CGRectMake(priceX, priceY, priceW, priceH)];
[self.contentView addSubview:self.priceLabel];
}

return self;
}
-(void)cellWithWatch:(Watch *)watch{
self.watchImageView.image = [UIImage imageNamed:watch.image_name];
self.titleLabel.text = watch.title;
self.priceLabel.text = watch.price;

}
UITableView的实现
在ViewController类里面实现UITableView的布局以及实现相应的响应事件。
(1)加入协议
<UITableViewDataSource,UITableViewDelegate>
(2)初始化组件
self.tableView = [[UITableView alloc]initWithFrame:[UIScreen mainScreen].bounds style:(UITableViewStylePlain)];
self.tableView.delegate = self;
self.tableView.dataSource =  self;
[self.view addSubview:self.tableView];
(3)设置分区属性
由于在获取数据时将分类信息都保存在一个类型为NSMutableArray的itemsarray数组里面,所以对应于的分区数量就是这个数组的长度,分区行数类似思想。其中注意的时,对于参数NSIndexPath,其中NSIndexPath.section是指当前的分区,NSIndexPath.row指的是当前所在行。
//分区数量
-(NSInteger)numberOfSectionsInTableView:(UITableView *)tableView{
return self.itemsrray.count;
}
//返回每个分区的行数
- (NSInteger)tableView:(UITableView *)tableView numberOfRowsInSection:(NSInteger)section{
Items *item = self.itemsrray[section];
return item.kind.count;
}
-(CGFloat)tableView:(UITableView *)tableView heightForRowAtIndexPath:(NSIndexPath *)indexPath{

return [UIScreen mainScreen].bounds.size.width / 4 + 20;
}
//返回每个分区的标题
- (nullable NSString *)tableView:(UITableView *)tableView titleForHeaderInSection:(NSInteger)section{
Items *item = self.itemsrray[section];
return item.name;
}
(4)设置分区每行的内容
在创建每一个cell的时候采用dequeueReusableCellWithIdentifier方法来执行,该方法会根据identifier这个标志去缓冲池里面获取cell,如果不存在cell则创建一个,这个方法可以很大程度上减少系统资源的消耗,提高运行效率。
//返回每一行内容
- (UITableViewCell *)tableView:(UITableView *)tableView cellForRowAtIndexPath:(NSIndexPath *)indexPath{

WatchViewCell *cell = [tableView dequeueReusableCellWithIdentifier:@"cell"];

if(!cell){
cell = [[WatchViewCell alloc]initWithStyle:(UITableViewCellStyleDefault) reuseIdentifier:@"cell"];
}

Watch *watch = [[Watch alloc]init];
NSMutableArray *array = self.watchArray[indexPath.section];
watch = array[indexPath.row];
[cell cellWithWatch:watch];

return cell;
}
实现展示界面头部的轮播图
轮播图由UIScrollView和UIPageControl两个控件组合实现。
(1)引入协议
<UIScrollViewDelegate,UINavigationControllerDelegate>
(2)初始化
self.scrollView = [[UIScrollView alloc] initWithFrame:CGRectMake(0 , 0, scrollViewW, scrollViewH)];
for (NSInteger i = 0; i < 5; i++) {
UIImageView *imageView = [[UIImageView alloc] initWithFrame:CGRectMake(i * (scrollViewW), 0, scrollViewW, scrollViewH)];

UIImage *image = [UIImage imageNamed:@"header_bg@2x"];

imageView.image = image;
[self.scrollView addSubview:imageView];
}
UIImageView *imageView = [[UIImageView alloc] initWithFrame:CGRectMake(5 * (scrollViewW), 0, scrollViewW, scrollViewH)];
UIImage *image = [UIImage imageNamed:@"header_bg@2x"];

imageView.image = image;
[self.scrollView addSubview:imageView];

//控制其是否可以滑动,如果大于其图片则可以滑动
self.scrollView.contentSize = CGSizeMake(6 * (scrollViewW), scrollViewH);
//是否可以滑动
self.scrollView.scrollEnabled = YES;
//是否整屏翻转
self.scrollView.pagingEnabled = YES;
//关闭边界回弹效果
self.scrollView.bounces = NO;
//隐藏水平滑动条
self.scrollView.showsHorizontalScrollIndicator = NO;
//监听事件
self.scrollView.delegate = self;
(3)实现滚动监听
//滑动停止时调用
- (void)scrollViewDidEndDecelerating:(UIScrollView *)scrollView{
NSLog(@"x = %.2f, y = %.2f",scrollView.contentOffset.x,scrollView.contentOffset.y);

if(scrollView.contentOffset.x > 4 * (scrollViewW)){
//[scrollView setContentOffset:CGPointMake(0, 0)];
[self.scrollView setContentOffset:CGPointMake(0, 0) animated:NO];
}

NSInteger index = self.scrollView.contentOffset.x / self.scrollView.frame.size.width;
if(index > 4)
index = 0;
self.pageControl.currentPage = index;

}
- (void)scrollViewDidEndScrollingAnimation:(UIScrollView *)scrollView{
NSInteger index = self.scrollView.contentOffset.x / self.scrollView.frame.size.width;
if(index > 4){
index = 0;
[self.scrollView setContentOffset:CGPointMake((index) * (scrollViewW), 0) animated:NO];
}

index = self.scrollView.contentOffset.x / self.scrollView.frame.size.width;
if(index > 4)
index = 0;
self.pageControl.currentPage = index;
}
(4)加入定时器,实现自动滚动
//自动滚动效果
[NSTimer scheduledTimerWithTimeInterval:2 target:self selector:@selector(changeToNext:) userInfo:@"1234" repeats:YES];

//自动切换到下一张
-(void)changeToNext : (NSTimer *)timer{
NSInteger index = self.scrollView.contentOffset.x / self.scrollView.frame.size.width;
if(index > 4)
index = 0;
[self.scrollView setContentOffset:CGPointMake((index + 1) * (scrollViewW), 0) animated:YES];

index = self.scrollView.contentOffset.x / self.scrollView.frame.size.width;
if(index > 4)
index = 0;
self.pageControl.currentPage = index;
}

相关文章推荐
- 峰回路转,Firefox 浏览器即将重返 iOS 平台
- 峰回路转,Firefox 浏览器即将重返 iOS 平台
- 不可修补的 iOS 漏洞可能导致 iPhone 4s 到 iPhone X 永久越狱
- iOS 12.4 系统遭黑客破解,漏洞危及数百万用户
- 每日安全资讯:NSO,一家专业入侵 iPhone 的神秘公司
- [转][源代码]Comex公布JailbreakMe 3.0源代码
- 讲解iOS开发中基本的定位功能实现
- iOS中定位当前位置坐标及转换为火星坐标的方法
- js判断客户端是iOS还是Android等移动终端的方法
- iOS应用开发中AFNetworking库的常用HTTP操作方法小结
- iOS应用中UISearchDisplayController搜索效果的用法
- iOS App开发中的UISegmentedControl分段组件用法总结
- IOS开发环境windows化攻略
- iOS应用中UITableView左滑自定义选项及批量删除的实现
- iOS中UIAlertView警告框组件的使用教程
- 浅析iOS应用开发中线程间的通信与线程安全问题
- iOS中的UIKeyboard键盘视图使用方法小结
- 检测iOS设备是否越狱的方法