iOS UIAlertController
2016-07-01 00:00
323 查看
运行环境:
Xcode7.2.1,iOS Simulator9.2
语言:
Objective-C、Swift
关于UIAlertController的使用,主要有三种不同的方式:

下面依次说明一下三种方式的创建和使用。
Swift 版
Swift 版
Swift 版
Xcode7.2.1,iOS Simulator9.2
语言:
Objective-C、Swift
关于UIAlertController的使用,主要有三种不同的方式:
1.简单的UIAlertController形式;
2.带有输入框的UIAlertController;
3.ActionSheet样式的UIAlertController。
下面依次说明一下三种方式的创建和使用。
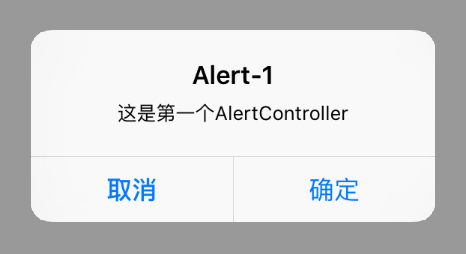
1.简单的UIAlertController形式
Objective-C 版// 创建一个UIAlertController, 命名为alertOne
UIAlertController *alertOne = [UIAlertController alertControllerWithTitle:@"Alert-1" message:@"这是第一个AlertController" preferredStyle:UIAlertControllerStyleAlert];
// 创建一个“取消”按钮
UIAlertAction *cancelAction = [UIAlertAction actionWithTitle:@"取消" style:UIAlertActionStyleCancel handler:nil];
// 创建一个“确定”按钮
UIAlertAction *confirmAction = [UIAlertAction actionWithTitle:@"确定" style:UIAlertActionStyleDefault handler:^(UIAlertAction * _Nonnull action){
// 在此写点击“确定”按钮的触发事件
// ......
}];
// 将两个按钮添加到alertOne
[alertOne addAction:cancelAction];
[alertOne addAction:confirmAction];
// 弹出alertOne
[self presentViewController:alertOne animated:YES completion:nil];Swift 版
// 创建一个UIAlertController,命名为alertOne
let alertOne = UIAlertController.init(title: "Alert-1", message: "这是第一个AlertController", preferredStyle: UIAlertControllerStyle.Alert)
// 创建一个“取消”按钮
let cancelAction = UIAlertAction.init(title: "取消", style: UIAlertActionStyle.Cancel, handler: nil)
// 创建一个“确定”按钮
let confirmAction = UIAlertAction.init(title: "确定", style: UIAlertActionStyle.Default){ (action: UIAlertAction) -> Void in
// 在此写点击“确定”按钮的触发事件
// ......
}
// 将两个按钮添加到alertOne
alertOne.addAction(cancelAction)
alertOne.addAction(confirmAction)

// 弹出alertOne
self.presentViewController(alertOne, animated: true, completion: nil)
2.带有输入框的UIAlertController
Objective-C 版// 创建一个UIAlertController, 命名为alertTwo
UIAlertController *alertTwo = [UIAlertController alertControllerWithTitle:@"Alert-2" message:@"这是第二个AlertController" preferredStyle:UIAlertControllerStyleAlert];
// 给alertTwo添加一个输入框
[alertTwo addTextFieldWithConfigurationHandler:^(UITextField * _Nonnull textfield){
textfield.placeholder = @"第一个输入框";
textfield.clearButtonMode = UITextFieldViewModeWhileEditing;
}];
// 给alertTwo再添加一个输入框
[alertTwo addTextFieldWithConfigurationHandler:^(UITextField * _Nonnull textfield){
textfield.placeholder = @"第二个输入框";
textfield.clearButtonMode = UITextFieldViewModeWhileEditing;
}];
// 创建一个“取消”按钮
UIAlertAction *cancelAction = [UIAlertAction actionWithTitle:@"取消" style:UIAlertActionStyleCancel handler:nil];
// 创建一个“确定”按钮
UIAlertAction *confirmAction = [UIAlertAction actionWithTitle:@"确定" style:UIAlertActionStyleDefault handler:^(UIAlertAction * _Nonnull action){
// 输出文本框中的内容
NSLog([alertTwo.textFields[0] text]);
NSLog([alertTwo.textFields[1] text]);
}];
// 将两个按钮添加到alertTwo上
[alertTwo addAction:cancelAction];
[alertTwo addAction:confirmAction];
// 弹出alertTwo
[self presentViewController:alertTwo animated:YES completion:nil];Swift 版
// 创建一个UIAlertController,命名为alertTwo
let alertTwo = UIAlertController.init(title: "Alert-2", message: "这是第二个AlertController", preferredStyle: UIAlertControllerStyle.Alert)
// 给alertTwo添加第一个输入框
alertTwo.addTextFieldWithConfigurationHandler{ (textfield: UITextField) -> Void in
textfield.placeholder = "第一个输入框"
}
// 给alertTwo添加第二个输入框
alertTwo.addTextFieldWithConfigurationHandler{ (textfield: UITextField) -> Void in
textfield.placeholder = "第二个输入框"
}
// 创建一个“取消”按钮
let cancelAction = UIAlertAction.init(title: "取消", style: UIAlertActionStyle.Cancel, handler: nil)
// 创建一个“确定”按钮
let confirmAction = UIAlertAction.init(title: "确定", style: UIAlertActionStyle.Default){ (action: UIAlertAction) -> Void in
// 在此写点击“确定”按钮的触发事件
// ......
print(alertTwo.textFields![0].text!)
print(alertTwo.textFields![1].text!)
}
// 将两个按钮添加到alertTwo
alertTwo.addAction(cancelAction)
alertTwo.addAction(confirmAction)
// 弹出alertTwo
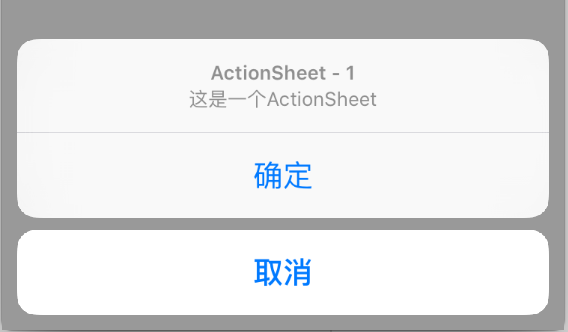
self.presentViewController(alertTwo, animated: true, completion: nil)3.ActionSheet样式的UIAlertController
Objective-C 版// 创建一个UIAlertController, 命名为alertThree, preferredStyle 设置为 UIAlertControllerStyleActionSheet
UIAlertController *alertThree = [UIAlertController alertControllerWithTitle:@"ActionSheet - 1" message:@"这是一个ActionSheet" preferredStyle:UIAlertControllerStyleActionSheet];
// 创建一个“取消”按钮
UIAlertAction *cancelAction = [UIAlertAction actionWithTitle:@"取消" style:UIAlertActionStyleCancel handler:nil];
// 创建一个“确定”按钮
UIAlertAction *confirmAction = [UIAlertAction actionWithTitle:@"确定" style:UIAlertActionStyleDefault handler:^(UIAlertAction * _Nonnull action){
// 在此写点击“确定”按钮的触发事件
// ......
}];
// 将两个按钮添加到alertThree上
[alertThree addAction:cancelAction];
[alertThree addAction:confirmAction];
// 弹出alertThree
[self presentViewController:alertThree animated:YES completion:nil];Swift 版
// 创建一个UIAlertController, 命名为alertThree, preferredStyle 设置为 ActionSheet
let alertThree = UIAlertController.init(title: "ActionSheet - 1", message: "这是一个ActionSheet", preferredStyle: UIAlertControllerStyle.ActionSheet)
// 创建一个“取消”按钮
let cancelAction = UIAlertAction.init(title: "取消", style: UIAlertActionStyle.Cancel, handler: nil)
// 创建一个“确定”按钮
let confirmAction = UIAlertAction.init(title: "确定", style: UIAlertActionStyle.Default){ (action: UIAlertAction) -> Void in
// 在此写点击“确定”按钮的触发事件
// ......
}
// 将两个按钮添加到alertTwo
alertThree.addAction(cancelAction)
alertThree.addAction(confirmAction)

// 弹出alertThree
self.presentViewController(alertThree, animated: true, completion: nil)

相关文章推荐
- java 队列阻塞方法ArrayBlockingQueue学习
- UIView和CALayer
- dequeueReusableCellWithIdentifier 与 dequeueReusableCellWithIdentifier:forIndexPath 区别
- easyui pageSize 默认值修改没反应,没效果
- iOS GPUImage之GPUImageVideoCamera(3)
- Java:String、StringBuffer和StringBuilder的区别
- continue的作用
- hdu 4908 BestCoder Sequence(重构数组)
- EasyUI中combobox实现市县级联操作
- UIView之setNeedsDisplay和setNeedsLayout
- iOS UIButton加在window上点击无效果问题
- stl的heap和priority_queue的使用
- vector list deque
- 如何循环获取html的值,并拼写到json/json,求value所对应key的值
- android bluetooth api
- android Gui系统之SurfaceFlinger(5)---Vsync(2)
- kqueue用法简介
- Codeforces 687C The Values You Can Make(背包)
- iOS GPUImage之GPUImageStillCamera(2)
- ui-router中使用ocLazyLoad和resolve