Android Studio中的单元测试
2016-06-30 11:46
465 查看
在最新版Android Studio(2.1)中,已经可以方便的使用Mockito进行含有android api的单元测试了。因此可以更好的进行敏捷开发与持续集成测试。
其中
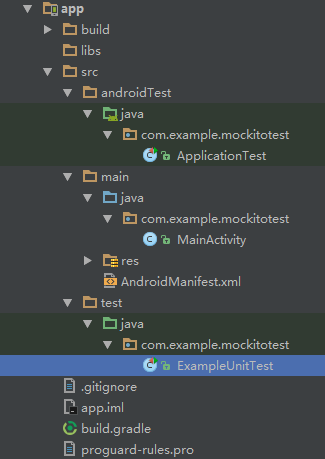
androidTest 目录是Instrumentation Test的工程代码
main 即App工程代码
test 就是单元测试工程代码。
测试了
接下来稍作修改,引用Mockito库;添加含有Android api调用的测试。
为何使用Mockito库呢?这是因为我们的单元测试是直接在PC上运行的,因此并没有真正的Android运行环境,也就没法真正的调用Android各种API,因此我们需要使用一个假的对象(Mock object)来模拟各种API调用并返回预定义好的结果。Mockito就是用来实现Mock功能的测试框架。
在app的build.gradle中添加:
修改ExampleUnitTest:
在样例的注释说明中写道:
To work on unit tests, switch the Test Artifact in the Build Variants view.
但实际在我安装的Android Studio 2.1.2版本中,打开Build Variants面板并没有看到 Test Artifact选项……有可能这个界面与IDE的设置有关。但实际没有关系,有多种方法来运行单元测试:
1.像样例注释说明一样,在Build Variants中设置Test Artifact,并点击运行按钮。
2.直接在单元测试类、或单元测试所在的包、或者是所有测试包的上级java文件夹上点击鼠标右键,选择菜单中的Run项,就会运行单元测试了。
以上两种方法运行过程会在Android Studio的Run面板图形化显示测试结果:

此外还可以通过gradle命令来运行单元测试。使用gradle可以通过Android Studio界面操作,也可以直接通过命令行操作:
1.通过界面:点击Android Studio右上方的Gradle面板,在Gradle projects所列出的所有Task中,双击测试Task,如testDebugUnitTest
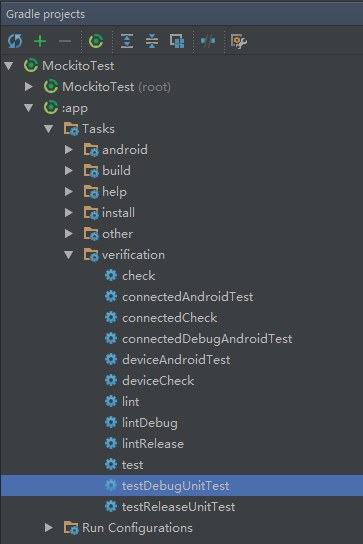
2.命令行进入工程所在文件夹,运行gradle命令:
通过Gradle运行不会在面板中显示图形化的测试进度及结果,会在命令行中输出测试状态:
测试完毕后,除了运行时产生报告,还会自动在工程目录下生成网页形式的Junit测试报告,路径位于:
app/build/reports/tests
创建单元测试
在Android Studio中新建工程,目录结构如下图显示:其中
androidTest 目录是Instrumentation Test的工程代码
main 即App工程代码
test 就是单元测试工程代码。
编写单元测试
直接打开ExampleUnitTest,会看到Android Studio自动生成的样例代码:/**
* To work on unit tests, switch the Test Artifact in the Build Variants view.
*/
public class ExampleUnitTest {
@Test
public void addition_isCorrect() throws Exception {
assertEquals(4, 2 + 2);
}
}测试了
2+2=4的逻辑。
接下来稍作修改,引用Mockito库;添加含有Android api调用的测试。
为何使用Mockito库呢?这是因为我们的单元测试是直接在PC上运行的,因此并没有真正的Android运行环境,也就没法真正的调用Android各种API,因此我们需要使用一个假的对象(Mock object)来模拟各种API调用并返回预定义好的结果。Mockito就是用来实现Mock功能的测试框架。
在app的build.gradle中添加:
dependencies {
compile fileTree(dir: 'libs', include: ['*.jar'])
testCompile 'junit:junit:4.12'
compile 'com.android.support:appcompat-v7:23.4.0'
testCompile "org.mockito:mockito-core:1.10.19"    //添加Mockito库
}
修改ExampleUnitTest:
/**
* To work on unit tests, switch the Test Artifact in the Build Variants view.
*/
public class ExampleUnitTest {
@Test
public void addition_isCorrect() throws Exception {
assertEquals(5, 2 + 2);    //更改一个错误值,查看单元测试失败的结果
}

// 调用WifiManager接口,mock返回Wifi列表数量为9,然后使用断言验证
@Test
public void mytestmethod() {
WifiManager mockWifiManager = mock(WifiManager.class);

List<ScanResult> mockResult = mock(List.class);
when(mockResult.size()).thenReturn(9);
when(mockWifiManager.getScanResults()).thenReturn(mockResult);

System.out.println("mock size: " + mockWifiManager.getScanResults().size());
assertEquals(9, mockWifiManager.getScanResults().size());
}
}
运行单元测试
接下来就可以运行单元测试查看结果了。在样例的注释说明中写道:
To work on unit tests, switch the Test Artifact in the Build Variants view.
但实际在我安装的Android Studio 2.1.2版本中,打开Build Variants面板并没有看到 Test Artifact选项……有可能这个界面与IDE的设置有关。但实际没有关系,有多种方法来运行单元测试:
1.像样例注释说明一样,在Build Variants中设置Test Artifact,并点击运行按钮。
2.直接在单元测试类、或单元测试所在的包、或者是所有测试包的上级java文件夹上点击鼠标右键,选择菜单中的Run项,就会运行单元测试了。
以上两种方法运行过程会在Android Studio的Run面板图形化显示测试结果:
此外还可以通过gradle命令来运行单元测试。使用gradle可以通过Android Studio界面操作,也可以直接通过命令行操作:
1.通过界面:点击Android Studio右上方的Gradle面板,在Gradle projects所列出的所有Task中,双击测试Task,如testDebugUnitTest
2.命令行进入工程所在文件夹,运行gradle命令:
gradle.bat testDebugUnitTest
通过Gradle运行不会在面板中显示图形化的测试进度及结果,会在命令行中输出测试状态:
com.example.mockitotest.ExampleUnitTest > addition_isCorrect FAILED
java.lang.AssertionError at ExampleUnitTest.java:20

2 tests completed, 1 failed

:app:testDebugUnitTest FAILED

FAILURE: Build failed with an exception.

* What went wrong:
Execution failed for task ':app:testDebugUnitTest'.
> There were failing tests. See the report at: file:///D:/work/studio/MockitoTest/app/build/reports/tests/debug/index.html

* Try:
Run with --stacktrace option to get the stack trace. Run with --info or --debug option to get more log output.

BUILD FAILED

Total time: 19.162 secs
测试完毕后,除了运行时产生报告,还会自动在工程目录下生成网页形式的Junit测试报告,路径位于:
app/build/reports/tests

相关文章推荐
- 使用C++实现JNI接口需要注意的事项
- Android IPC进程间通讯机制
- Android Manifest 用法
- [转载]Activity中ConfigChanges属性的用法
- Android之获取手机上的图片和视频缩略图thumbnails
- Android之使用Http协议实现文件上传功能
- Android学习笔记(二九):嵌入浏览器
- android string.xml文件中的整型和string型代替
- i-jetty环境搭配与编译
- android之定时器AlarmManager
- android wifi 无线调试
- Android Native 绘图方法
- Android java 与 javascript互访(相互调用)的方法例子
- android 代码实现控件之间的间距
- android FragmentPagerAdapter的“标准”配置
- Android"解决"onTouch和onClick的冲突问题
- android:installLocation简析
- android searchView的关闭事件
- SourceProvider.getJniDirectories