ScrollView嵌套Listview处理方法
2016-06-26 00:20
260 查看
最近项目中用到了ListView,在一个布局文件中用到了多个组件,发现ScrollView嵌套ListView时,ListView只显示一行item,而且不能拖动。layout_height属性是”match_parent”。然后在百度看了很多文章,原来是listview的高度在加载时无法确定。所以需要在程序中给他指定。先看一下代码最初的写法的显示。
activity_main.xml
listview_item.xml
MainActivity.java
截图:

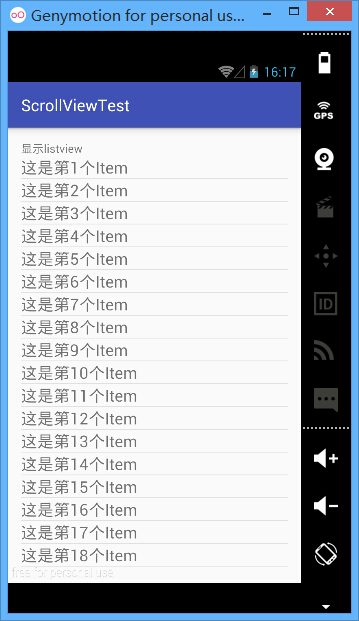
下面进行修改,将所有的Item都显示出来。
再来看看效果
activity_main.xml
<?xml version="1.0" encoding="utf-8"?>
<RelativeLayout xmlns:android="http://schemas.android.com/apk/res/android"
xmlns:tools="http://schemas.android.com/tools"
android:layout_width="match_parent"
android:layout_height="match_parent"
android:paddingBottom="@dimen/activity_vertical_margin"
android:paddingLeft="@dimen/activity_horizontal_margin"
android:paddingRight="@dimen/activity_horizontal_margin"
android:paddingTop="@dimen/activity_vertical_margin"
tools:context="com.fey.scrollviewtest.MainActivity">

<ScrollView
android:id="@+id/test_scrollview"
android:layout_width="match_parent"
android:layout_height="match_parent">

<LinearLayout
android:id="@+id/test_linearlayout"
android:layout_width="match_parent"
android:layout_height="match_parent">

<ListView
android:id="@+id/test_listview"
android:layout_width="match_parent"
android:layout_height="match_parent">

</ListView>
</LinearLayout>
</ScrollView>
</RelativeLayout>
listview_item.xml
<?xml version="1.0" encoding="utf-8"?>
<TextView xmlns:android="http://schemas.android.com/apk/res/android"
android:layout_width="match_parent"
android:layout_height="wrap_content">
</TextView>
MainActivity.java
package com.fey.scrollviewtest;

import android.support.v7.app.AppCompatActivity;
import android.os.Bundle;
import android.widget.ArrayAdapter;
import android.widget.ListView;

public class MainActivity extends AppCompatActivity {
ListView mListview = null;
String[] listviewString={"这是第1个Item","这是第2个Item","这是第3个Item","这是第4个Item","这是第5个Item","这是第6个Item","这是第7个Item","这是第8个Item","这是第9个Item","这是第10个Item","这是第11个Item","这是第12个Item","这是第13个Item","这是第14个Item","这是第15个Item","这是第16个Item"};
@Override
protected void onCreate(Bundle savedInstanceState) {
super.onCreate(savedInstanceState);
setContentView(R.layout.activity_main);
//绑定控件
mListview= (ListView) findViewById(R.id.test_listview);
//生成适配器
ArrayAdapter<String> arrayAdapter = new ArrayAdapter<String>(MainActivity.this, R.layout.listview_item, listviewString);
//绑定适配器
mListview.setAdapter(arrayAdapter);
}
}
截图:
下面进行修改,将所有的Item都显示出来。
public void setListViewHeightBasedOnChildren(ListView listView) {
// 获取ListView对应的Adapter
ListAdapter listAdapter = listView.getAdapter();
if (listAdapter == null) {
return;
}
int totalHeight = 0;
for (int i = 0, len = listAdapter.getCount(); i < len; i++) {
// listAdapter.getCount()返回数据项的数目
View listItem = listAdapter.getView(i, null, listView);
// 计算子项View 的宽高
listItem.measure(0, 0);
// 统计所有子项的总高度
totalHeight += listItem.getMeasuredHeight();
}

ViewGroup.LayoutParams params = listView.getLayoutParams();
params.height = totalHeight + (listView.getDividerHeight() * (listAdapter.getCount() - 1));
// listView.getDividerHeight()获取子项间分隔符占用的高度
// params.height最后得到整个ListView完整显示需要的高度
listView.setLayoutParams(params);
/*listView.setOnTouchListener(new View.OnTouchListener() {
//ScrollView和ListView产生冲突时使用
public boolean onTouch(View v, MotionEvent event) {
if (event.getAction() == MotionEvent.ACTION_MOVE) {
scrollView.requestDisallowInterceptTouchEvent(true);
}
return false;
}
});*/
}
再来看看效果

相关文章推荐
- 完美实现Android ListView中的TextView的跑马灯效果
- android上改变listView的选中颜色
- Delphi7中Listview的常用功能汇总
- Delphi控件ListView的属性及使用方法详解
- Android ListView弹性效果的实现方法
- android中ListView数据刷新时的同步方法
- Android提高之ListView实现自适应表格的方法
- Android中实现水平滑动(横向滑动)ListView示例
- Android ListView分页功能实现方法
- ScrollView滚动条颜色的设置方法
- C#实现ListView选中项向上或向下移动的方法
- C#下listview如何插入图片
- Listview加载的性能优化是如何实现的
- C#实现listview Group收缩扩展的方法
- C# listview添加combobox到单元格的实现代码
- ListView 百分比进度条(delphi版)
- Android listview多视图嵌套多视图
- 刷新Activity中的scrollview示例(局部ui刷新)
- ListView Adapter优化 实例
- Android用ListView显示SDCard文件列表的小例子