关系型数据库之mysql-proxy实现读写分离
2016-06-25 17:22
701 查看
简要:
mysql-proxy作为mysql测试项目,可以实现读写分离架构,具有开发能力的公司通过二次开发的方式去完善bug应用在生产环境中,下面我们通过案例使用mysql-proxy实现读写分离。
准备环境:
1.系统环境:Centos6.5
2.数据库版本:10.0.10-MariaDB-log MariaDB Server
3.Host:
Master主机: master.samlee.com 172.16.100.7
Slave主机: slave.samlee.com 172.16.100.8
Proxy主机:proxy.samlee.com 172.16.100.9
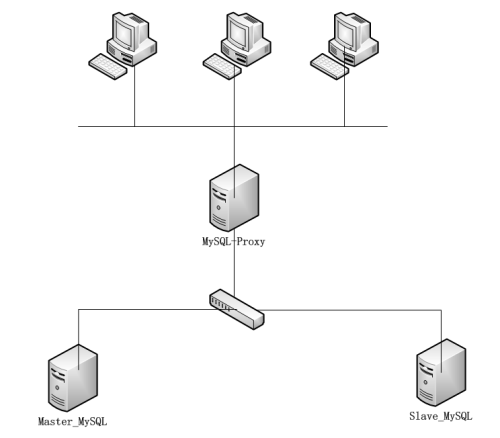
架构图如下:
---------------------------------------------------------------------------------------------------------
配置mysql-proxy服务器:
(1)安装部署mysql-proxy
(4)为服务脚本提供配置文件/etc/sysconfig/mysql-proxy,内容如下所示:
(6)启动mysql-proxy代理服务
以上通过mysql-proxy实现读写分离全部过程。
本文出自 “Opensamlee” 博客,请务必保留此出处http://gzsamlee.blog.51cto.com/9976612/1792866
mysql-proxy作为mysql测试项目,可以实现读写分离架构,具有开发能力的公司通过二次开发的方式去完善bug应用在生产环境中,下面我们通过案例使用mysql-proxy实现读写分离。
准备环境:
1.系统环境:Centos6.5
2.数据库版本:10.0.10-MariaDB-log MariaDB Server
3.Host:
Master主机: master.samlee.com 172.16.100.7
Slave主机: slave.samlee.com 172.16.100.8
Proxy主机:proxy.samlee.com 172.16.100.9
架构图如下:
---------------------------------------------------------------------------------------------------------
配置mysql-proxy服务器:
(1)安装部署mysql-proxy
# wget
# tar xf mysql-proxy-0.8.4-linux-glibc2.3-x86-64bit.tar.gz -C /usr/local/
# cd /usr/local/
# ln -sv mysql-proxy-0.8.4-linux-glibc2.3-x86-64bit mysql-proxy
(2)创建代理用户以及修改程序目录权限
# useradd -s /sbin/nologin -r mysql-proxy
# chown -R mysql-proxy.mysql-proxy /usr/local/mysql-proxy-0.8.4-linux-glibc2.3-x86-64bit/
(3)为mysql-proxy提供SysV服务脚本,内容如下所示:
# vim /etc/rc.d/init.d/mysql-proxy
#!/bin/bash
#
# mysql-proxy This script starts and stops the mysql-proxy daemon
#
# chkconfig: - 78 30
# processname: mysql-proxy
# description: mysql-proxy is a proxy daemon for mysql

# Source function library.
. /etc/rc.d/init.d/functions

prog="/usr/local/mysql-proxy/bin/mysql-proxy"

# Source networking configuration.
if [ -f /etc/sysconfig/network ]; then
. /etc/sysconfig/network
fi

# Check that networking is up.
[ ${NETWORKING} = "no" ] && exit 0

# Set default mysql-proxy configuration.
ADMIN_USER="admin"
ADMIN_PASSWD="admin"
ADMIN_LUA_SCRIPT="/usr/local/mysql-proxy/share/doc/mysql-proxy/admin.lua"
PROXY_OPTIONS="--daemon"
PROXY_PID=/var/run/mysql-proxy.pid
PROXY_USER="mysql-proxy"

# Source mysql-proxy configuration.
if [ -f /etc/sysconfig/mysql-proxy ]; then
. /etc/sysconfig/mysql-proxy
fi

RETVAL=0

start() {
echo -n $"Starting $prog: "
daemon $prog $PROXY_OPTIONS --pid-file=$PROXY_PID --proxy-address="$PROXY_ADDRESS" --user=$PROXY_USER --admin-username="$ADMIN_USER" --admin-lua-script="$ADMIN_LUA_SCRIPT" --admin-password="$ADMIN_PASSWORD"
RETVAL=$?
echo
if [ $RETVAL -eq 0 ]; then
touch /var/lock/subsys/mysql-proxy
fi
}

stop() {
echo -n $"Stopping $prog: "
killproc -p $PROXY_PID -d 3 $prog
RETVAL=$?
echo
if [ $RETVAL -eq 0 ]; then
rm -f /var/lock/subsys/mysql-proxy
rm -f $PROXY_PID
fi
}
# See how we were called.
case "$1" in
start)
start
;;
stop)
stop
;;
restart)
stop
start
;;
condrestart|try-restart)
if status -p $PROXY_PIDFILE $prog >&/dev/null; then
stop
start
fi
;;
status)
status -p $PROXY_PID $prog
;;
*)
echo "Usage: $0 {start|stop|restart|reload|status|condrestart|try-restart}"
RETVAL=1
;;
esac

exit $RETVAL

--授予执行权限,加入服务列表自启动
# chmod +x /etc/rc.d/init.d/mysql-proxy
# chkconfig --add mysql-proxy
(4)为服务脚本提供配置文件/etc/sysconfig/mysql-proxy,内容如下所示:
# vim /etc/sysconfig/mysql-proxy
# Options for mysql-proxy
ADMIN_USER="admin"
ADMIN_PASSWORD="admin"
ADMIN_ADDRESS=""
ADMIN_LUA_SCRIPT="/usr/local/mysql-proxy/share/doc/mysql-proxy/admin.lua"
PROXY_ADDRESS=""
PROXY_USER="mysql-proxy"
PROXY_OPTIONS="--daemon --log-level=info --log-use-syslog --plugins=proxy --plugins=admin --proxy-backend-addresses=172.16.100.7:3306 --proxy-read-only-backend-addresses=172.16.100.8:3306 --proxy-lua-script=/usr/local/mysql-proxy/share/doc/mysql-proxy/rw-splitting.lua"

最后一行运行选项,可以根据需要修改。
--proxy-backend-addresses=
--proxy--read-only-backend-addresses=
可以指定多次,从而指定多台服务器。

其他常用选项如下
mysql-proxy的配置选项大致可分为帮助选项、管理选项、代理选项及应用程序选项几类,下面一起去介绍它们。

--help
--help-admin
--help-proxy
--help-all ―――― 以上四个选项均用于获取帮助信息;

--proxy-address=host:port ―――― 代理服务监听的地址和端口;
--admin-address=host:port ―――― 管理模块监听的地址和端口;
--proxy-backend-addresses=host:port ―――― 后端mysql服务器的地址和端口;
--proxy-read-only-backend-addresses=host:port ―――― 后端只读mysql服务器的地址和端口;
--proxy-lua-script=file_name ―――― 完成mysql代理功能的Lua脚本;
--daemon ―――― 以守护进程模式启动mysql-proxy;
--keepalive ―――― 在mysql-proxy崩溃时尝试重启之;
--log-file=/path/to/log_file_name ―――― 日志文件名称;
--log-level=level ―――― 日志级别;
--log-use-syslog ―――― 基于syslog记录日志;
--plugins=plugin,.. ―――― 在mysql-proxy启动时加载的插件;
--user=user_name ―――― 运行mysql-proxy进程的用户;
--defaults-file=/path/to/conf_file_name ―――― 默认使用的配置文件路径;其配置段使用[mysql-proxy]标识;
--proxy-skip-profiling ―――― 禁用profile;
--pid-file=/path/to/pid_file_name ―――― 进程文件名;
(5)复制如下内容建立admin.lua文件,将其保存至/usr/local/mysql-proxy/share/doc/mysql-proxy/目录中。
# vim /usr/local/mysql-proxy/share/doc/mysql-proxy/admin.lua
--[[ $%BEGINLICENSE%$
Copyright (c) 2007, 2012, Oracle and/or its affiliates. All rights reserved.

This program is free software; you can redistribute it and/or
modify it under the terms of the GNU General Public License as
published by the Free Software Foundation; version 2 of the
License.

This program is distributed in the hope that it will be useful,
but WITHOUT ANY WARRANTY; without even the implied warranty of
MERCHANTABILITY or FITNESS FOR A PARTICULAR PURPOSE. See the
GNU General Public License for more details.

You should have received a copy of the GNU General Public License
along with this program; if not, write to the Free Software
Foundation, Inc., 51 Franklin St, Fifth Floor, Boston, MA
02110-1301  USA

$%ENDLICENSE%$ --]]

function set_error(errmsg)
proxy.response = {
type = proxy.MYSQLD_PACKET_ERR,
errmsg = errmsg or "error"
}
end

function read_query(packet)
if packet:byte() ~= proxy.COM_QUERY then
set_error("[admin] we only handle text-based queries (COM_QUERY)")
return proxy.PROXY_SEND_RESULT
end

local query = packet:sub(2)

local rows = { }
local fields = { }

if query:lower() == "select * from backends" then
fields = {
{ name = "backend_ndx",
type = proxy.MYSQL_TYPE_LONG },

{ name = "address",
type = proxy.MYSQL_TYPE_STRING },
{ name = "state",
type = proxy.MYSQL_TYPE_STRING },
{ name = "type",
type = proxy.MYSQL_TYPE_STRING },
{ name = "uuid",
type = proxy.MYSQL_TYPE_STRING },
{ name = "connected_clients",
type = proxy.MYSQL_TYPE_LONG },
}

for i = 1, #proxy.global.backends do
local states = {
"unknown",
"up",
"down"
}
local types = {
"unknown",
"rw",
"ro"
}
local b = proxy.global.backends[i]

rows[#rows + 1] = {
i,
b.dst.name,          -- configured backend address
states[b.state + 1], -- the C-id is pushed down starting at 0
types[b.type + 1],   -- the C-id is pushed down starting at 0
b.uuid,              -- the MySQL Server's UUID if it is managed
b.connected_clients  -- currently connected clients
}
end
elseif query:lower() == "select * from help" then
fields = {
{ name = "command",
type = proxy.MYSQL_TYPE_STRING },
{ name = "description",
type = proxy.MYSQL_TYPE_STRING },
}
rows[#rows + 1] = { "SELECT * FROM help", "shows this help" }
rows[#rows + 1] = { "SELECT * FROM backends", "lists the backends and their state" }
else
set_error("use 'SELECT * FROM help' to see the supported commands")
return proxy.PROXY_SEND_RESULT
end

proxy.response = {
type = proxy.MYSQLD_PACKET_OK,
resultset = {
fields = fields,
rows = rows
}
}
return proxy.PROXY_SEND_RESULT
end

--授予执行权限
# chown mysql-proxy.mysql-proxy /usr/local/mysql-proxy/share/doc/mysql-proxy/admin.lua
# chmod +x /usr/local/mysql-proxy/share/doc/mysql-proxy/admin.lua
(6)启动mysql-proxy代理服务
# service mysql-proxy start
# ss -tnl
LISTEN      0      128                                           *:4041                                         *:*
LISTEN      0      128                                           *:3306                                         *:*
(7)配置Master与Slave主机为主从复制模式
Master配置:
# mkdir -pv /mydata/binlogs
# chown -R mysql.mysql /mydata/binlogs/
# vim /etc/mysql/my.cnf
server-id       = 1
log-bin=/mydata/binlogs/master-bin

Slave配置:
# mkdir -pv /mydata/relaylogs
# chown -R mysql.mysql /mydata/relaylogs
# vim /etc/mysql/my.cnf
server-id       = 2
relay-log=/mydata/relaylogs/relay-bin
(8)在Master主机上创建拥有权限的用户
MariaDB [(none)]> GRANT REPLICATION SLAVE,REPLICATION CLIENT ON *.* TO 'repluser'@'172.16.%.%' IDENTIFIED BY 'replpass';
MariaDB [(none)]> FLUSH PRIVILEGES;
(9)连接Master服务器
MariaDB [(none)]> CHANGE MASTER TO MASTER_HOST='172.16.100.7',MASTER_USER='repluser',MASTER_PASSWORD='replpass';
MariaDB [(none)]> START SLAVE;
(10)创建远程连接用户
MariaDB [(none)]> GRANT ALL ON *.* TO 'admin'@'172.16.%.%' IDENTIFIED BY 'admin';
MariaDB [(none)]> FLUSH PRIVILEGES;
(11)管理功能测试
--代理服务器上操作
# mysql -uadmin -padmin -h172.16.100.9 --port=4041
mysql> SELECT * FROM backends;
+-------------+-------------------+---------+------+------+-------------------+
| backend_ndx | address           | state   | type | uuid | connected_clients |
+-------------+-------------------+---------+------+------+-------------------+
|           1 | 172.16.100.7:3306 | unknown | rw   | NULL |                 0 |
|           2 | 172.16.100.8:3306 | unknown | ro   | NULL |                 0 |
+-------------+-------------------+---------+------+------+-------------------+
(12)通过代理服务器连接服务器及读写测试
注意:
实验环境中
172.16.100.7 为主服务器
172.16.100.8 为从服务器
172.16.100.9 为代理服务器
--通过代理服务器连接服务器
#  mysql -h172.16.100.9 -uadmin -padmin
mysql> CREATE DATABASE samleedb;

--在主服务器和从服务器上使用下面命令进行监控
--Master进行写入操作的时候状态
# tcpdump -i any -nn -XX -A -p port 3306 and src 172.16.100.9
tcpdump: verbose output suppressed, use -v or -vv for full protocol decode
listening on any, link-type LINUX_SLL (Linux cooked), capture size 65535 bytes
17:05:54.617412 IP 172.16.100.9.40783 > 172.16.100.7.3306: Flags [P.], seq 2523263157:2523263186, ack 2431684210, win 457, options [nop,nop,TS val 12587304 ecr 11832810], length 29
0x0000:  0000 0001 0006 000c 29d4 3452 0000 0800  ........).4R....
0x0010:  4508 0051 6cf2 4000 4006 ad7b ac10 6409  E..Ql.@.@..{..d.
0x0020:  ac10 6407 9f4f 0cea 9665 f0b5 90f0 8e72  ..d..O...e.....r
0x0030:  8018 01c9 88ae 0000 0101 080a 00c0 1128  ...............(
0x0040:  00b4 8dea 1900 0000 0343 5245 4154 4520  .........CREATE.
0x0050:  4441 5441 4241 5345 2073 616d 6c65 6564  DATABASE.samleed
0x0060:  62                                           b

--在代理服务器管理:
mysql> SELECT * FROM backends;
+-------------+-------------------+---------+------+------+-------------------+
| backend_ndx | address           | state   | type | uuid | connected_clients |
+-------------+-------------------+---------+------+------+-------------------+
|           1 | 172.16.100.7:3306 | up      | rw   | NULL |                 0 |
|           2 | 172.16.100.8:3306 | unknown | ro   | NULL |                 0 |
+-------------+-------------------+---------+------+------+-------------------+(13)使用循环脚本验证请求发往的方向向mysql-proxy执行读请求
# for i in {1..10}; do mysql -h172.16.100.9 -uadmin -padmin -e 'select * from hellodb.classes limit 1';done
在主服务器和从服务器上使用下面命令进行监控。
# tcpdump -i any -nn -XX -A -p port 3306 and src 172.16.100.9
可以发现当读请求量增大时,两边主机都可以看见读报文被截获。
向mysql-proxy执行写请求
MariaDB [hellodb]> source /tmp/hellodb.sql
只有在master端可以看到截获报文
通过上面测试后,可以看到两个服务器状态都是up
mysql> SELECT * FROM backends;
+-------------+-------------------+-------+------+------+-------------------+
| backend_ndx | address | state | type | uuid | connected_clients |
+-------------+-------------------+-------+------+------+-------------------+
| 1 | 172.16.100.7:3306 | up | rw | NULL | 0 |
| 2 | 172.16.100.8:3306 | up | ro | NULL | 0 |
+-------------+-------------------+-------+------+------+-------------------+以上通过mysql-proxy实现读写分离全部过程。
本文出自 “Opensamlee” 博客,请务必保留此出处http://gzsamlee.blog.51cto.com/9976612/1792866

相关文章推荐
- MySQL5.6导入‘.frm’、‘.MYD’、‘.MYI’
- MySQL5.6导入.sql
- MySQL入门操作
- link to install mysql on MAC
- MySQL使用中的一些体会
- MySQL Having的使用方法
- mysql 操作
- vc6.0运用mysql数据库中的编码所导致的乱码问题(接收和输出的编码必须要一致)
- MySQL数据库连接池
- MySQL中的isnull、ifnull和nullif函数用法
- 不用pip安装mysql-connector-python:从github上边下载安装
- MySql批处理启动、停止脚本
- 基于mysql的Hive数据仓库的搭建
- MYSQL基础知识
- Windows下Mysql5.7解压版的安装
- mysql学习经验
- mysql基本操作(1)
- mysql5.7.13免安装版超详细安装教程
- MySQL主从配置问题整理
- Mac OS X 下mysql配置备忘