Adapter类型控件之ListView(列表控件)
2016-06-25 14:16
363 查看
(一)概述
Android中的列表控件飞创灵活,可以自定义每一个列表项,实际上每一个列表项就是一个View,在Android定义了3个列表控件:ListView、ExpandableListView和Spinner,其中Spinner就是在Windows中常见的下拉列表框。
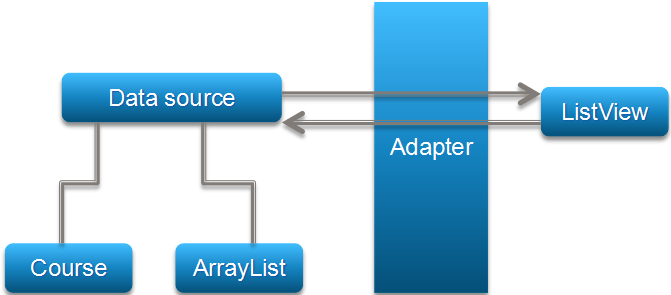
ListView控件用于列表的形式显示数据, ListView控件采用MVC模式将前端显示和后端数据进行分离。也就是说, ListView控件在装载数据时并不是直接使用ListView.add或者类似的方法添加数据,而是需要指定一个Adapter对象。该对象相当于MVC模式中的C(控制器,Controller)。ListView相当于MVC模式中的V(视图,View),用于显示数据。为ListView提供数据的List或数组相当于MVC模式中的M(模型,Model)
在ListView控件中通过Adapter对象获得需要显示的数据,在创建Adapter对象时需要指定要显示的数据(List或数组对象),因此,要显示的数据与ListView之间通过Adapter对象进行连接,同时又互相独立,也就是说,ListView只知道显示的数据来自Adapter,并不知道这些数据来自List还是数组。
对于数据本身来说,只是知道将这些数据添加到Adapter对象中,并不知道这些数据会被用于ListView控件或其他控。
如下图:
不过,在版本中已经被RecyclerView这个新的控件替换掉了,列表作为常用控件之一,还是有必要好好学习的;
(二)自定义BaseAdapter ,然后绑定ListView的最简单例子
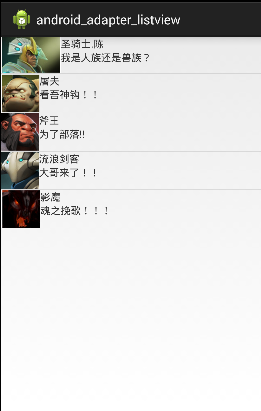
运行结果:
实现代码:
list_heros.xml
activity_main.xml中只有一个listview这里就不贴了;
自定义BaseAdapter—-HeroAdapter.java
MainActivity.java

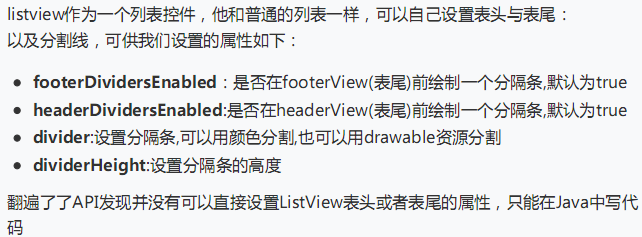
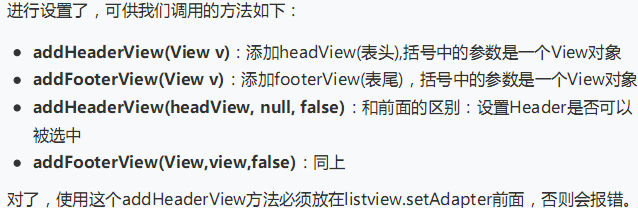
(二)表头表尾分割线的设置:
运行效果图:

实现代码:
表头view_head.xml(表尾跟表头一样,就不贴了):
MainActivity.java

0 ,但是此时却变成了1,因为表头也算;
(三)列表从底部开始显示:stackFromBottom
如果你想让列表显示到你列表的最下方的话,那么你可以使用这个属性,将stackFromBottom属性设置为true即可;
(四)设置点击颜色cacheColorHint

(五)隐藏滑动条

Android中的列表控件飞创灵活,可以自定义每一个列表项,实际上每一个列表项就是一个View,在Android定义了3个列表控件:ListView、ExpandableListView和Spinner,其中Spinner就是在Windows中常见的下拉列表框。
ListView控件用于列表的形式显示数据, ListView控件采用MVC模式将前端显示和后端数据进行分离。也就是说, ListView控件在装载数据时并不是直接使用ListView.add或者类似的方法添加数据,而是需要指定一个Adapter对象。该对象相当于MVC模式中的C(控制器,Controller)。ListView相当于MVC模式中的V(视图,View),用于显示数据。为ListView提供数据的List或数组相当于MVC模式中的M(模型,Model)
在ListView控件中通过Adapter对象获得需要显示的数据,在创建Adapter对象时需要指定要显示的数据(List或数组对象),因此,要显示的数据与ListView之间通过Adapter对象进行连接,同时又互相独立,也就是说,ListView只知道显示的数据来自Adapter,并不知道这些数据来自List还是数组。
对于数据本身来说,只是知道将这些数据添加到Adapter对象中,并不知道这些数据会被用于ListView控件或其他控。
如下图:
不过,在版本中已经被RecyclerView这个新的控件替换掉了,列表作为常用控件之一,还是有必要好好学习的;
(二)自定义BaseAdapter ,然后绑定ListView的最简单例子
运行结果:
实现代码:
list_heros.xml
<?xml version="1.0" encoding="utf-8"?>
<LinearLayout xmlns:android="http://schemas.android.com/apk/res/android"
android:layout_width="match_parent"
android:layout_height="match_parent"
android:orientation="horizontal">

<ImageView
android:id="@+id/heros_imgs"
android:layout_width="wrap_content"
android:layout_height="wrap_content"/>

<LinearLayout
android:layout_width="match_parent"
android:layout_height="wrap_content"
android:orientation="vertical">

<TextView
android:id="@+id/names"
android:layout_width="wrap_content"
android:layout_height="wrap_content" />

<TextView
android:id="@+id/spake"
android:layout_width="wrap_content"
android:layout_height="wrap_content" />
</LinearLayout>

</LinearLayout>
activity_main.xml中只有一个listview这里就不贴了;
自定义BaseAdapter—-HeroAdapter.java
public class HeroAdapter extends BaseAdapter {

private LinkedList<Hero> mHeros;
private Context mContext;

public HeroAdapter( LinkedList<Hero> NewmHeros ,Context Newcontext){
this.mHeros=NewmHeros;
this.mContext = Newcontext;
}

@Override
public int getCount() {

return mHeros.size();
}

@Override
public Object getItem(int position) {

return null;
}

@Override
public long getItemId(int position) {

return position;
}

@Override
public View getView(int position, View convertView, ViewGroup parent) {

convertView = LayoutInflater.from(mContext).inflate(R.layout.list_heros, parent,false);
ImageView img_iconView = (ImageView) convertView.findViewById(R.id.heros_imgs);
TextView tvNames = (TextView) convertView.findViewById(R.id.names);
TextView tvSpakes = (TextView) convertView.findViewById(R.id.spake);
img_iconView.setBackgroundResource(mHeros.get(position).gethIcon());
tvNames.setText(mHeros.get(position).gethName());
tvSpakes.setText(mHeros.get(position).gethSpake());

return convertView;
}

}
MainActivity.java
public class MainActivity extends Activity {

private List<Hero> mHeros = null;
private Context mContext;
private HeroAdapter mHeroAdapter = null;
private ListView mListView;
@Override
protected void onCreate(Bundle savedInstanceState) {
super.onCreate(savedInstanceState);
setContentView(R.layout.activity_main);
mContext = MainActivity.this;

mListView = (ListView) findViewById(R.id.heros_listView);
mHeros = new LinkedList<Hero>();
mHeros.add((new Hero("圣骑士.陈","我是人族还是兽族?", R.drawable.cheng)));
mHeros.add((new Hero("屠夫","看吾神钩!!", R.drawable.tufu)));
mHeros.add((new Hero("斧王","为了部落!!", R.drawable.fuwang)));
mHeros.add((new Hero("流浪剑客","大哥来了!!", R.drawable.seven)));
mHeros.add((new Hero("影魔","魂之挽歌!!!", R.drawable.nevermore)));

mHeroAdapter = new HeroAdapter((LinkedList<Hero>)mHeros, mContext);
mListView.setAdapter(mHeroAdapter);

}

}
(二)表头表尾分割线的设置:
运行效果图:
实现代码:
表头view_head.xml(表尾跟表头一样,就不贴了):
<?xml version="1.0" encoding="utf-8"?>
<LinearLayout xmlns:android="http://schemas.android.com/apk/res/android"
android:layout_width="match_parent"
android:layout_height="match_parent"
android:orientation="vertical"
android:gravity="center">

<TextView android:layout_width="match_parent"
android:layout_height="48dp"
android:textSize="18sp"
android:text="表头"
android:gravity="center"
android:background="#BBAADD"
android:textColor="#000000"/>

</LinearLayout>
MainActivity.java
public class MainActivity extends Activity implements OnItemClickListener{

private List<Hero> mHeros = null;
private Context mContext;
private HeroAdapter mHeroAdapter = null;
private ListView mListView;

private LinearLayout ly_contentLayout;
@Override
protected void onCreate(Bundle savedInstanceState) {
super.onCreate(savedInstanceState);
setContentView(R.layout.activity_main);
mContext = MainActivity.this;

mListView = (ListView) findViewById(R.id.heros_listView);

//动态加载顶部布局和底部布局
LayoutInflater inflater = LayoutInflater.from(this);
View headView = inflater.inflate(R.layout.view_header, null ,false);
View footView = inflater.inflate(R.layout.view_foot, null ,false);

mHeros = new LinkedList<Hero>();
mHeros.add((new Hero("圣骑士.陈","我是人族还是兽族?", R.drawable.cheng)));
mHeros.add((new Hero("屠夫","看吾神钩!!", R.drawable.tufu)));
mHeros.add((new Hero("斧王","为了部落!!", R.drawable.fuwang)));
mHeros.add((new Hero("流浪剑客","大哥来了!!", R.drawable.seven)));
mHeros.add((new Hero("影魔","魂之挽歌!!!", R.drawable.nevermore)));

mHeroAdapter = new HeroAdapter((LinkedList<Hero>)mHeros, mContext);

//添加表头跟表尾需要写在SetAdapter方法调用之前!!!!!!!
mListView.addHeaderView(headView);
mListView.addFooterView(footView);

mListView.setAdapter(mHeroAdapter);
mListView.setOnItemClickListener(this);

}
@Override
public void onItemClick(AdapterView<?> parent, View view, int position,
long id) {
Toast.makeText(mContext, "你点击了第"+position+"项", Toast.LENGTH_SHORT).show();
}

}
0 ,但是此时却变成了1,因为表头也算;
(三)列表从底部开始显示:stackFromBottom
如果你想让列表显示到你列表的最下方的话,那么你可以使用这个属性,将stackFromBottom属性设置为true即可;
(四)设置点击颜色cacheColorHint
(五)隐藏滑动条

相关文章推荐
- 使用C++实现JNI接口需要注意的事项
- Android IPC进程间通讯机制
- Android Manifest 用法
- [转载]Activity中ConfigChanges属性的用法
- Android之获取手机上的图片和视频缩略图thumbnails
- Android之使用Http协议实现文件上传功能
- Android学习笔记(二九):嵌入浏览器
- android string.xml文件中的整型和string型代替
- i-jetty环境搭配与编译
- android之定时器AlarmManager
- android wifi 无线调试
- Android Native 绘图方法
- Android java 与 javascript互访(相互调用)的方法例子
- android 代码实现控件之间的间距
- android FragmentPagerAdapter的“标准”配置
- Android"解决"onTouch和onClick的冲突问题
- android:installLocation简析
- android searchView的关闭事件
- SourceProvider.getJniDirectories