为RecyclerView打造通用Adapter 让RecyclerView更加好用
2016-06-23 18:28
387 查看
转载请标明出处:
http://blog.csdn.net/lmj623565791/article/details/47251585;
本文出自:【张鸿洋的博客】
简单的数据绑定(单种Item)
多种Item Type 数据绑定
增加onItemClickListener , onItenLongClickListener
优雅的添加分类header
是不是相当方便,在convert方法中完成数据、事件绑定即可。
剩下就简单了,将其作为参数传入到
贴个效果图:

依赖正常考虑下,这种方式需要额外指定header的布局,以及布局中显示标题的TextView了,以及根据Item显示什么样的标题。我们通过
3个方法,一个指定header的布局文件,一个指定布局文件中显示title的TextView,最后一个用于指定显示什么样的标题(根据Adapter的Bean)。
接下来就很简单了:
这样就完了,效果图如下:
ok,看完上面简单的介绍,相信你已经基本了解了,没错,和我上篇ListView万能Adapter的使用方式基本一样,并且已经封装到同一个库了,链接为:https://github.com/hongyangAndroid/base-adapter,此外还提供了ItemClick,ItemLongClick,添加EmptyView等支持。
说了这么多,下面进入正题,看我们如何一步步完成整个封装的过程。
首先我们确定下ViewHolder的主要的作用,实际上是通过成员变量存储对应的convertView中需要操作的字View,避免每次findViewById,从而提升运行的效率。
那么既然是通用的View,那么对于不同的ItemType肯定没有办法确定创建哪些成员变量View,取而代之的只能是个集合来存储了。
那么代码如下:
代码很简单,我们的ViewHolder继承自
ok,有了通用的ViewHolder之后,我们的通用的Adapter分分钟就出来了。
继承自
那么现在用户的使用是这样的:
看到这里,爽了很多,目前我们仅仅写了很少的代码,但是我们的通用的Adapter感觉已经初步完成了。
可以看到我们这里通过viewholder根据控件的id拿到控件,然后再进行数据绑定和事件操作,我们还能做些什么简化呢?
恩,我们可以通过一些辅助方法简化我们的代码,所以继续往下看。
当然上面只给出了几个方法,你可以把常用控件的方法都写进去,并且在使用过程中不断完善即可。
有了一堆辅助方法后,我们的操作更加简化了一步。
ok,到这里,我们的针对单种ViewItemType的通用Adapter就完成了,代码很简单也很少,但是简化效果非常明显。
ok,接下来我们考虑多种ItemViewType的情况。
复写
如果大家还记得,我们的ViewHolder是通用的,唯一依赖的就是个layoutId。那么上述第二条就变成,根据不同的itemView告诉我用哪个layoutId即可,生成viewholder这种事我们通用adapter来做。
于是,引入一个接口:
可以很清楚的看到,这个接口实际就是完成我们上述的两条工作。用户在使用过程中,通过实现上面两个方法,指明不同的Bean返回什么itemViewType,不同的itemView所对应的layoutId.
ok,有了上面这个接口,我们的参数就够了,下面开始我们的
几乎没有几行代码,感觉简直不需要消耗脑细胞。
ok,这样的话,我们的多种ItemViewType的支持也就完成了,一路下来感觉还是蛮轻松的~~~
最后,我们还有个添加分类的header,为什么想起来封装这个呢,这个是因为我看到了这么个项目:https://github.com/ragunathjawahar/simple-section-adapter,这个项目给了种类似装饰者模式的方法,为ListView添加了header,有兴趣可以看下。我想我们的RecylerView也来个吧,不过我们这里直接通过继承Adapter完成。
简单思考下,我们需要:
header所对应的布局文件
显示header的title对应的TextView
显示的title是什么(一般肯定根据Bean生成)
ok,这样的话,我们依然引入一个接口,用于提供上述3各参数
方法名应该很明确了,这里引入泛型,对应我们使用时的数据类型Bean。
刚才也说了我们的分类header是多种ItemViewType的一种,那么直接继承
根据我们之前的代码,使用
ok,可以看到我们构造方法中调用了
那么对应的
在
最后一点就是,每当我们的数据发生变化,我们的title集合,即
ok,到此我们的增加Header就结束了~~
恩,上面是针对普通的Item增加header的代码,如果是针对多种ItemViewType呢?其实也很简单,这种方式需要传入
那么这样的话,今天的博客就结束了,有几点需要说明下:
本来是想接着以前的万能Adapter后面写,但是为了本文的独立和完整性,还是尽可能没有去依赖上篇博客的内容了。
此外,文章最后给出的开源代码与上述代码存在些许的差异,因为开源部分源码整合了ListView,RecyclerView等,而本文上述代码完全针对RecyclerView进行编写。
对于ItemClick,ItemLongClick的代码就不赘述了,其实都是通过itemView.setXXXListener完成,详细的参考代码即可。
更多详细的内容以及代码,参见https://github.com/hongyangAndroid/base-adapter
欢迎关注我的微博:
http://weibo.com/u/3165018720
微信公众号:hongyangAndroid
(欢迎关注,第一时间推送博文信息)

http://blog.csdn.net/lmj623565791/article/details/47251585;
本文出自:【张鸿洋的博客】
一、概述
记得好久以前针对ListView类控件写过一篇打造万能的ListView GridView 适配器,如今RecyclerView异军突起,其Adapter的用法也与ListView类似,那么我们也可以一步一步的为其打造通用的Adapter,使下列用法书写更加简单:简单的数据绑定(单种Item)
多种Item Type 数据绑定
增加onItemClickListener , onItenLongClickListener
优雅的添加分类header
二、使用方式和效果图
在一步一步完成前,我们先看下使用方式和效果图:(1)简单的数据绑定
首先看我们最常用的单种Item的书写方式:<code class="hljs java has-numbering">mRecyclerView.setAdapter(<span class="hljs-keyword">new</span> CommonAdapter<String>(<span class="hljs-keyword">this</span>, R.layout.item_list, mDatas)
{
<span class="hljs-annotation">@Override</span>
<span class="hljs-keyword">public</span> <span class="hljs-keyword">void</span> <span class="hljs-title">convert</span>(ViewHolder holder, String s)
{
holder.setText(R.id.id_item_list_title, s);
}
});</code><ul style="" class="pre-numbering"><li>1</li><li>2</li><li>3</li><li>4</li><li>5</li><li>6</li><li>7</li><li>8</li></ul><ul style="" class="pre-numbering"><li>1</li><li>2</li><li>3</li><li>4</li><li>5</li><li>6</li><li>7</li><li>8</li></ul>是不是相当方便,在convert方法中完成数据、事件绑定即可。
(2)多种ItemViewType
多种ItemViewType,正常考虑下,我们需要根据Item指定ItemType,并且根据ItemType指定相应的布局文件。我们通过MultiItemTypeSupport完成指定:
<code class="hljs java has-numbering">MultiItemTypeSupport  multiItemSupport = <span class="hljs-keyword">new</span> MultiItemTypeSupport<ChatMessage>()
{
<span class="hljs-annotation">@Override</span>
<span class="hljs-keyword">public</span> <span class="hljs-keyword">int</span> <span class="hljs-title">getLayoutId</span>(<span class="hljs-keyword">int</span> itemType)
{
<span class="hljs-comment">//根据itemType返回item布局文件id</span>
}

<span class="hljs-annotation">@Override</span>
<span class="hljs-keyword">public</span> <span class="hljs-keyword">int</span> <span class="hljs-title">getItemViewType</span>(<span class="hljs-keyword">int</span> postion, ChatMessage msg)
{
<span class="hljs-comment">//根据当前的bean返回item type</span>
}
}
</code><ul style="" class="pre-numbering"><li>1</li><li>2</li><li>3</li><li>4</li><li>5</li><li>6</li><li>7</li><li>8</li><li>9</li><li>10</li><li>11</li><li>12</li><li>13</li><li>14</li><li>15</li></ul><ul style="" class="pre-numbering"><li>1</li><li>2</li><li>3</li><li>4</li><li>5</li><li>6</li><li>7</li><li>8</li><li>9</li><li>10</li><li>11</li><li>12</li><li>13</li><li>14</li><li>15</li></ul>
剩下就简单了,将其作为参数传入到
MultiItemCommonAdapter即可。
<code class="hljs java has-numbering">mRecyclerView.setAdapter(<span class="hljs-keyword">new</span> SectionAdapter<String>(<span class="hljs-keyword">this</span>, mDatas, multiItemSupport)
{
<span class="hljs-annotation">@Override</span>
<span class="hljs-keyword">public</span> <span class="hljs-keyword">void</span> <span class="hljs-title">convert</span>(ViewHolder holder, String s)
{
holder.setText(R.id.id_item_list_title, s);
}
});</code><ul style="" class="pre-numbering"><li>1</li><li>2</li><li>3</li><li>4</li><li>5</li><li>6</li><li>7</li><li>8</li></ul><ul style="" class="pre-numbering"><li>1</li><li>2</li><li>3</li><li>4</li><li>5</li><li>6</li><li>7</li><li>8</li></ul>
贴个效果图:
(3)添加分类header
其实属于多种ItemViewType的一种了,只是比较常用,我们就简单封装下。依赖正常考虑下,这种方式需要额外指定header的布局,以及布局中显示标题的TextView了,以及根据Item显示什么样的标题。我们通过
SectionSupport对象指定:
<code class="hljs java has-numbering">SectionSupport<String> sectionSupport = <span class="hljs-keyword">new</span> SectionSupport<String>()
{
<span class="hljs-annotation">@Override</span>
<span class="hljs-keyword">public</span> <span class="hljs-keyword">int</span> <span class="hljs-title">sectionHeaderLayoutId</span>()
{
<span class="hljs-keyword">return</span> R.layout.header;
}

<span class="hljs-annotation">@Override</span>
<span class="hljs-keyword">public</span> <span class="hljs-keyword">int</span> <span class="hljs-title">sectionTitleTextViewId</span>()
{
<span class="hljs-keyword">return</span> R.id.id_header_title;
}

<span class="hljs-annotation">@Override</span>
<span class="hljs-keyword">public</span> String <span class="hljs-title">getTitle</span>(String s)
{
<span class="hljs-keyword">return</span> s.substring(<span class="hljs-number">0</span>, <span class="hljs-number">1</span>);
}
};</code><ul style="" class="pre-numbering"><li>1</li><li>2</li><li>3</li><li>4</li><li>5</li><li>6</li><li>7</li><li>8</li><li>9</li><li>10</li><li>11</li><li>12</li><li>13</li><li>14</li><li>15</li><li>16</li><li>17</li><li>18</li><li>19</li><li>20</li></ul><ul style="" class="pre-numbering"><li>1</li><li>2</li><li>3</li><li>4</li><li>5</li><li>6</li><li>7</li><li>8</li><li>9</li><li>10</li><li>11</li><li>12</li><li>13</li><li>14</li><li>15</li><li>16</li><li>17</li><li>18</li><li>19</li><li>20</li></ul>
3个方法,一个指定header的布局文件,一个指定布局文件中显示title的TextView,最后一个用于指定显示什么样的标题(根据Adapter的Bean)。
接下来就很简单了:
<code class="hljs java has-numbering">mRecyclerView.setAdapter(<span class="hljs-keyword">new</span> SectionAdapter<String>(<span class="hljs-keyword">this</span>, R.layout.item_list, mDatas, sectionSupport)
{
<span class="hljs-annotation">@Override</span>
<span class="hljs-keyword">public</span> <span class="hljs-keyword">void</span> <span class="hljs-title">convert</span>(ViewHolder holder, String s)
{
holder.setText(R.id.id_item_list_title, s);
}
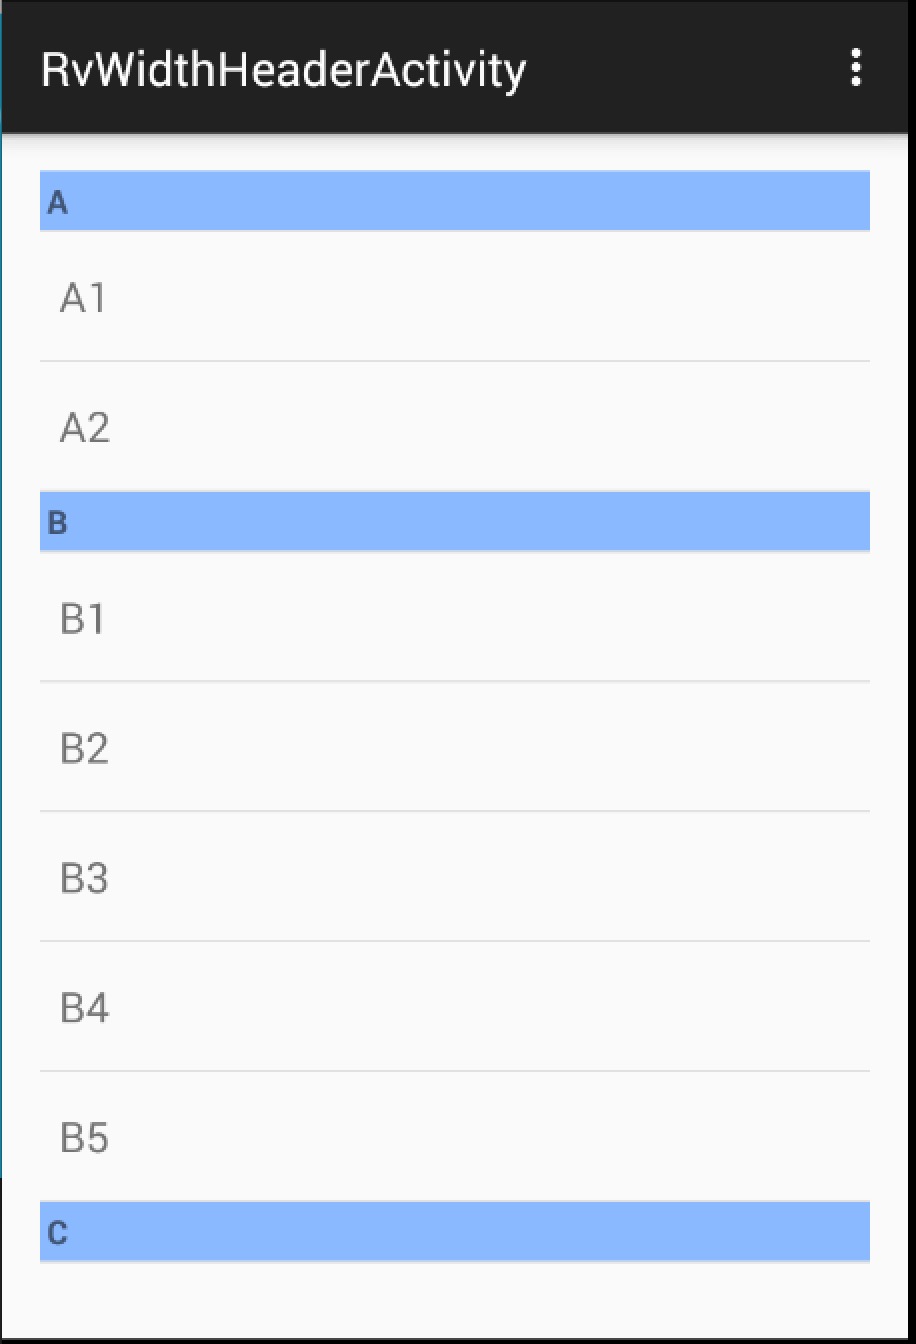
});</code><ul style="" class="pre-numbering"><li>1</li><li>2</li><li>3</li><li>4</li><li>5</li><li>6</li><li>7</li><li>8</li></ul><ul style="" class="pre-numbering"><li>1</li><li>2</li><li>3</li><li>4</li><li>5</li><li>6</li><li>7</li><li>8</li></ul>这样就完了,效果图如下:
ok,看完上面简单的介绍,相信你已经基本了解了,没错,和我上篇ListView万能Adapter的使用方式基本一样,并且已经封装到同一个库了,链接为:https://github.com/hongyangAndroid/base-adapter,此外还提供了ItemClick,ItemLongClick,添加EmptyView等支持。
说了这么多,下面进入正题,看我们如何一步步完成整个封装的过程。
三、通用的ViewHolder
RecyclerView要求必须使用ViewHolder模式,一般我们在使用过程中,都需要去建立一个新的ViewHolder然后作为泛型传入Adapter。那么想要建立通用的Adapter,必须有个通用的ViewHolder。首先我们确定下ViewHolder的主要的作用,实际上是通过成员变量存储对应的convertView中需要操作的字View,避免每次findViewById,从而提升运行的效率。
那么既然是通用的View,那么对于不同的ItemType肯定没有办法确定创建哪些成员变量View,取而代之的只能是个集合来存储了。
那么代码如下:
<code class="hljs java has-numbering"><span class="hljs-keyword">public</span> <span class="hljs-class"><span class="hljs-keyword">class</span> <span class="hljs-title">ViewHolder</span> <span class="hljs-keyword">extends</span> <span class="hljs-title">RecyclerView</span>.<span class="hljs-title">ViewHolder</span>
{</span>
<span class="hljs-keyword">private</span> SparseArray<View> mViews;
<span class="hljs-keyword">private</span> View mConvertView;
<span class="hljs-keyword">private</span> Context mContext;

<span class="hljs-keyword">public</span> <span class="hljs-title">ViewHolder</span>(Context context, View itemView, ViewGroup parent)
{
<span class="hljs-keyword">super</span>(itemView);
mContext = context;
mConvertView = itemView;
mViews = <span class="hljs-keyword">new</span> SparseArray<View>();
}

<span class="hljs-keyword">public</span> <span class="hljs-keyword">static</span> ViewHolder <span class="hljs-title">get</span>(Context context, ViewGroup parent, <span class="hljs-keyword">int</span> layoutId)
{

View itemView = LayoutInflater.from(context).inflate(layoutId, parent,
<span class="hljs-keyword">false</span>);
ViewHolder holder = <span class="hljs-keyword">new</span> ViewHolder(context, itemView, parent, position);
<span class="hljs-keyword">return</span> holder;
}

<span class="hljs-javadoc">/**
* 通过viewId获取控件
*
*<span class="hljs-javadoctag"> @param</span> viewId
*<span class="hljs-javadoctag"> @return</span>
*/</span>
<span class="hljs-keyword">public</span> <T extends View> T <span class="hljs-title">getView</span>(<span class="hljs-keyword">int</span> viewId)
{
View view = mViews.get(viewId);
<span class="hljs-keyword">if</span> (view == <span class="hljs-keyword">null</span>)
{
view = mConvertView.findViewById(viewId);
mViews.put(viewId, view);
}
<span class="hljs-keyword">return</span> (T) view;
}
}</code><ul style="" class="pre-numbering"><li>1</li><li>2</li><li>3</li><li>4</li><li>5</li><li>6</li><li>7</li><li>8</li><li>9</li><li>10</li><li>11</li><li>12</li><li>13</li><li>14</li><li>15</li><li>16</li><li>17</li><li>18</li><li>19</li><li>20</li><li>21</li><li>22</li><li>23</li><li>24</li><li>25</li><li>26</li><li>27</li><li>28</li><li>29</li><li>30</li><li>31</li><li>32</li><li>33</li><li>34</li><li>35</li><li>36</li><li>37</li><li>38</li><li>39</li><li>40</li><li>41</li><li>42</li></ul><ul style="" class="pre-numbering"><li>1</li><li>2</li><li>3</li><li>4</li><li>5</li><li>6</li><li>7</li><li>8</li><li>9</li><li>10</li><li>11</li><li>12</li><li>13</li><li>14</li><li>15</li><li>16</li><li>17</li><li>18</li><li>19</li><li>20</li><li>21</li><li>22</li><li>23</li><li>24</li><li>25</li><li>26</li><li>27</li><li>28</li><li>29</li><li>30</li><li>31</li><li>32</li><li>33</li><li>34</li><li>35</li><li>36</li><li>37</li><li>38</li><li>39</li><li>40</li><li>41</li><li>42</li></ul>
代码很简单,我们的ViewHolder继承自
RecyclerView.ViewHolder,内部通过SparseArray来缓存我们itemView内部的子View,从而得到一个通用的ViewHolder。每次需要创建ViewHolder只需要传入我们的layoutId即可。
ok,有了通用的ViewHolder之后,我们的通用的Adapter分分钟就出来了。
四、通用的Adapter
我们的每次使用过程中,针对的数据类型Bean肯定是不同的,那么这里肯定要引入泛型代表我们的Bean,内部通过一个List代表我们的数据,ok,剩下的看代码:<code class="hljs cs has-numbering">package com.zhy.<span class="hljs-keyword">base</span>.adapter.recyclerview;
import android.content.Context;
import android.support.v7.widget.RecyclerView;
import android.view.LayoutInflater;
import android.view.View;
import android.view.ViewGroup;
import com.zhy.<span class="hljs-keyword">base</span>.adapter.ViewHolder;
import java.util.List;
<span class="hljs-comment">/**
* Created by zhy on 16/4/9.
*/</span>
<span class="hljs-keyword">public</span> <span class="hljs-keyword">abstract</span> <span class="hljs-keyword">class</span> CommonAdapter<T> extends RecyclerView.Adapter<ViewHolder>
{
<span class="hljs-keyword">protected</span> Context mContext;
<span class="hljs-keyword">protected</span> <span class="hljs-keyword">int</span> mLayoutId;
<span class="hljs-keyword">protected</span> List<T> mDatas;
<span class="hljs-keyword">protected</span> LayoutInflater mInflater;
<span class="hljs-keyword">public</span> <span class="hljs-title">CommonAdapter</span>(Context context, <span class="hljs-keyword">int</span> layoutId, List<T> datas)
{
mContext = context;
mInflater = LayoutInflater.<span class="hljs-keyword">from</span>(context);
mLayoutId = layoutId;
mDatas = datas;
}
@Override
<span class="hljs-keyword">public</span> ViewHolder <span class="hljs-title">onCreateViewHolder</span>(final ViewGroup parent, <span class="hljs-keyword">int</span> viewType)
{
ViewHolder viewHolder = ViewHolder.<span class="hljs-keyword">get</span>(mContext, parent, mLayoutId);
<span class="hljs-keyword">return</span> viewHolder;
}
@Override
<span class="hljs-keyword">public</span> <span class="hljs-keyword">void</span> <span class="hljs-title">onBindViewHolder</span>(ViewHolder holder, <span class="hljs-keyword">int</span> position)
{
holder.updatePosition(position);
convert(holder, mDatas.<span class="hljs-keyword">get</span>(position));
}
<span class="hljs-keyword">public</span> <span class="hljs-keyword">abstract</span> <span class="hljs-keyword">void</span> <span class="hljs-title">convert</span>(ViewHolder holder, T t);
@Override
<span class="hljs-keyword">public</span> <span class="hljs-keyword">int</span> <span class="hljs-title">getItemCount</span>()
{
<span class="hljs-keyword">return</span> mDatas.size();
}
}
</code><ul style="" class="pre-numbering"><li>1</li><li>2</li><li>3</li><li>4</li><li>5</li><li>6</li><li>7</li><li>8</li><li>9</li><li>10</li><li>11</li><li>12</li><li>13</li><li>14</li><li>15</li><li>16</li><li>17</li><li>18</li><li>19</li><li>20</li><li>21</li><li>22</li><li>23</li><li>24</li><li>25</li><li>26</li><li>27</li><li>28</li><li>29</li><li>30</li><li>31</li><li>32</li><li>33</li><li>34</li><li>35</li><li>36</li><li>37</li><li>38</li><li>39</li><li>40</li><li>41</li><li>42</li><li>43</li><li>44</li><li>45</li><li>46</li><li>47</li><li>48</li><li>49</li><li>50</li><li>51</li><li>52</li><li>53</li><li>54</li></ul><ul style="" class="pre-numbering"><li>1</li><li>2</li><li>3</li><li>4</li><li>5</li><li>6</li><li>7</li><li>8</li><li>9</li><li>10</li><li>11</li><li>12</li><li>13</li><li>14</li><li>15</li><li>16</li><li>17</li><li>18</li><li>19</li><li>20</li><li>21</li><li>22</li><li>23</li><li>24</li><li>25</li><li>26</li><li>27</li><li>28</li><li>29</li><li>30</li><li>31</li><li>32</li><li>33</li><li>34</li><li>35</li><li>36</li><li>37</li><li>38</li><li>39</li><li>40</li><li>41</li><li>42</li><li>43</li><li>44</li><li>45</li><li>46</li><li>47</li><li>48</li><li>49</li><li>50</li><li>51</li><li>52</li><li>53</li><li>54</li></ul>继承自
RecyclerView.Adapter,需要复写的方法还是比较少的。首先我们使用过程中传输我们的数据集mDatas,和我们item的布局文件layoutId。
onCreateViewHolder时,通过layoutId即可利用我们的通用的ViewHolder生成实例。
onBindViewHolder这里主要用于数据、事件绑定,我们这里直接抽象出去,让用户去操作。可以看到我们修改了下参数,用户可以拿到当前Item所需要的对象和viewHolder去操作。
那么现在用户的使用是这样的:
<code class="hljs java has-numbering">mRecyclerView.setAdapter(<span class="hljs-keyword">new</span> CommonAdapter<String>(<span class="hljs-keyword">this</span>, R.layout.item_list, mDatas)
{
<span class="hljs-annotation">@Override</span>
<span class="hljs-keyword">public</span> <span class="hljs-keyword">void</span> <span class="hljs-title">convert</span>(ViewHolder holder, String s)
{
TextView tv = holder.getView(R.id.id_item_list_title);
tv.setText(s);
}
});</code><ul style="" class="pre-numbering"><li>1</li><li>2</li><li>3</li><li>4</li><li>5</li><li>6</li><li>7</li><li>8</li><li>9</li></ul><ul style="" class="pre-numbering"><li>1</li><li>2</li><li>3</li><li>4</li><li>5</li><li>6</li><li>7</li><li>8</li><li>9</li></ul>
看到这里,爽了很多,目前我们仅仅写了很少的代码,但是我们的通用的Adapter感觉已经初步完成了。
可以看到我们这里通过viewholder根据控件的id拿到控件,然后再进行数据绑定和事件操作,我们还能做些什么简化呢?
恩,我们可以通过一些辅助方法简化我们的代码,所以继续往下看。
五、进一步封装ViewHolder
我们的Item实际上使用的控件较多时候可能都是TextView,
ImageView等,我们一般在convert方法都是去设置文本,图片什么的,那么我们可以在ViewHolder里面,写上如下的一些辅助方法:
<code class="hljs axapta has-numbering"><span class="hljs-class"><span class="hljs-keyword">class</span> <span class="hljs-title">ViewHolder</span> <span class="hljs-inheritance"><span class="hljs-keyword">extends</span></span> <span class="hljs-title">RecyclerView</span>.<span class="hljs-title">Adapter</span><<span class="hljs-title">ViewHolder</span>>
{</span>
<span class="hljs-comment">//...</span>
<span class="hljs-keyword">public</span> ViewHolder setText(<span class="hljs-keyword">int</span> viewId, String text)
{
TextView tv = getView(viewId);
tv.setText(text);
<span class="hljs-keyword">return</span> <span class="hljs-keyword">this</span>;
}

<span class="hljs-keyword">public</span> ViewHolder setImageResource(<span class="hljs-keyword">int</span> viewId, <span class="hljs-keyword">int</span> resId)
{
ImageView view = getView(viewId);
view.setImageResource(resId);
<span class="hljs-keyword">return</span> <span class="hljs-keyword">this</span>;
}

<span class="hljs-keyword">public</span> ViewHolder setOnClickListener(<span class="hljs-keyword">int</span> viewId,
View.OnClickListener listener)
{
View view = getView(viewId);
view.setOnClickListener(listener);
<span class="hljs-keyword">return</span> <span class="hljs-keyword">this</span>;
}
}
</code><ul style="" class="pre-numbering"><li>1</li><li>2</li><li>3</li><li>4</li><li>5</li><li>6</li><li>7</li><li>8</li><li>9</li><li>10</li><li>11</li><li>12</li><li>13</li><li>14</li><li>15</li><li>16</li><li>17</li><li>18</li><li>19</li><li>20</li><li>21</li><li>22</li><li>23</li><li>24</li><li>25</li><li>26</li></ul><ul style="" class="pre-numbering"><li>1</li><li>2</li><li>3</li><li>4</li><li>5</li><li>6</li><li>7</li><li>8</li><li>9</li><li>10</li><li>11</li><li>12</li><li>13</li><li>14</li><li>15</li><li>16</li><li>17</li><li>18</li><li>19</li><li>20</li><li>21</li><li>22</li><li>23</li><li>24</li><li>25</li><li>26</li></ul>
当然上面只给出了几个方法,你可以把常用控件的方法都写进去,并且在使用过程中不断完善即可。
有了一堆辅助方法后,我们的操作更加简化了一步。
<code class="hljs avrasm has-numbering">mRecyclerView<span class="hljs-preprocessor">.setAdapter</span>(new CommonAdapter<String>(this, R<span class="hljs-preprocessor">.layout</span><span class="hljs-preprocessor">.item</span>_list, mDatas)
{
@Override
public void convert(ViewHolder holder, String s)
{
//TextView tv = holder<span class="hljs-preprocessor">.getView</span>(R<span class="hljs-preprocessor">.id</span><span class="hljs-preprocessor">.id</span>_item_list_title)<span class="hljs-comment">;</span>
//tv<span class="hljs-preprocessor">.setText</span>(s)<span class="hljs-comment">;</span>
holder<span class="hljs-preprocessor">.setText</span>(R<span class="hljs-preprocessor">.id</span><span class="hljs-preprocessor">.id</span>_item_list_title,s)<span class="hljs-comment">;</span>
}
})<span class="hljs-comment">;</span></code><ul style="" class="pre-numbering"><li>1</li><li>2</li><li>3</li><li>4</li><li>5</li><li>6</li><li>7</li><li>8</li><li>9</li><li>10</li></ul><ul style="" class="pre-numbering"><li>1</li><li>2</li><li>3</li><li>4</li><li>5</li><li>6</li><li>7</li><li>8</li><li>9</li><li>10</li></ul>
ok,到这里,我们的针对单种ViewItemType的通用Adapter就完成了,代码很简单也很少,但是简化效果非常明显。
ok,接下来我们考虑多种ItemViewType的情况。
六、多种ItemViewType
多种ItemViewType,一般我们的写法是:复写
getItemViewType,根据我们的bean去返回不同的类型
onCreateViewHolder中根据itemView去生成不同的ViewHolder
如果大家还记得,我们的ViewHolder是通用的,唯一依赖的就是个layoutId。那么上述第二条就变成,根据不同的itemView告诉我用哪个layoutId即可,生成viewholder这种事我们通用adapter来做。
于是,引入一个接口:
<code class="hljs cs has-numbering"><span class="hljs-keyword">public</span> <span class="hljs-keyword">interface</span> MultiItemTypeSupport<T>
{
<span class="hljs-keyword">int</span> getLayoutId(<span class="hljs-keyword">int</span> itemType);

<span class="hljs-keyword">int</span> getItemViewType(<span class="hljs-keyword">int</span> position, T t);
}</code><ul style="" class="pre-numbering"><li>1</li><li>2</li><li>3</li><li>4</li><li>5</li><li>6</li></ul><ul style="" class="pre-numbering"><li>1</li><li>2</li><li>3</li><li>4</li><li>5</li><li>6</li></ul>
可以很清楚的看到,这个接口实际就是完成我们上述的两条工作。用户在使用过程中,通过实现上面两个方法,指明不同的Bean返回什么itemViewType,不同的itemView所对应的layoutId.
ok,有了上面这个接口,我们的参数就够了,下面开始我们的
MultiItemCommonAdapter的编写。
<code class="hljs axapta has-numbering"><span class="hljs-keyword">public</span> <span class="hljs-keyword">abstract</span> <span class="hljs-class"><span class="hljs-keyword">class</span> <span class="hljs-title">MultiItemCommonAdapter</span><<span class="hljs-title">T</span>> <span class="hljs-inheritance"><span class="hljs-keyword">extends</span></span> <span class="hljs-title">CommonAdapter</span><<span class="hljs-title">T</span>>
{</span>
<span class="hljs-keyword">protected</span> MultiItemTypeSupport<T> mMultiItemTypeSupport;

<span class="hljs-keyword">public</span> MultiItemCommonAdapter(Context context, List<T> datas,
MultiItemTypeSupport<T> multiItemTypeSupport)
{
<span class="hljs-keyword">super</span>(context, -<span class="hljs-number">1</span>, datas);
mMultiItemTypeSupport = multiItemTypeSupport;
}

@Override
<span class="hljs-keyword">public</span> <span class="hljs-keyword">int</span> getItemViewType(<span class="hljs-keyword">int</span> position)
{
<span class="hljs-keyword">return</span> mMultiItemTypeSupport.getItemViewType(position, mDatas.get(position));
}

@Override
<span class="hljs-keyword">public</span> ViewHolder onCreateViewHolder(ViewGroup parent, <span class="hljs-keyword">int</span> viewType)
{
<span class="hljs-keyword">int</span> layoutId = mMultiItemTypeSupport.getLayoutId(viewType);
ViewHolder holder = ViewHolder.get(mContext, parent, layoutId;
<span class="hljs-keyword">return</span> holder;
}

}</code><ul style="" class="pre-numbering"><li>1</li><li>2</li><li>3</li><li>4</li><li>5</li><li>6</li><li>7</li><li>8</li><li>9</li><li>10</li><li>11</li><li>12</li><li>13</li><li>14</li><li>15</li><li>16</li><li>17</li><li>18</li><li>19</li><li>20</li><li>21</li><li>22</li><li>23</li><li>24</li><li>25</li><li>26</li></ul><ul style="" class="pre-numbering"><li>1</li><li>2</li><li>3</li><li>4</li><li>5</li><li>6</li><li>7</li><li>8</li><li>9</li><li>10</li><li>11</li><li>12</li><li>13</li><li>14</li><li>15</li><li>16</li><li>17</li><li>18</li><li>19</li><li>20</li><li>21</li><li>22</li><li>23</li><li>24</li><li>25</li><li>26</li></ul>
几乎没有几行代码,感觉简直不需要消耗脑细胞。
getItemViewType用户的传入的
MultiItemTypeSupport.getItemViewType完成,
onCreateViewHolder中根据
MultiItemTypeSupport.getLayoutId返回的layoutId,去生成ViewHolder即可。
ok,这样的话,我们的多种ItemViewType的支持也就完成了,一路下来感觉还是蛮轻松的~~~
最后,我们还有个添加分类的header,为什么想起来封装这个呢,这个是因为我看到了这么个项目:https://github.com/ragunathjawahar/simple-section-adapter,这个项目给了种类似装饰者模式的方法,为ListView添加了header,有兴趣可以看下。我想我们的RecylerView也来个吧,不过我们这里直接通过继承Adapter完成。
七、添加分类Header
话说添加分类header,其实就是我们多种ItemViewType的一种,那么我们需要知道哪些参数呢?简单思考下,我们需要:
header所对应的布局文件
显示header的title对应的TextView
显示的title是什么(一般肯定根据Bean生成)
ok,这样的话,我们依然引入一个接口,用于提供上述3各参数
<code class="hljs cs has-numbering"><span class="hljs-keyword">public</span> <span class="hljs-keyword">interface</span> SectionSupport<T>
{
<span class="hljs-keyword">public</span> <span class="hljs-keyword">int</span> <span class="hljs-title">sectionHeaderLayoutId</span>();

<span class="hljs-keyword">public</span> <span class="hljs-keyword">int</span> <span class="hljs-title">sectionTitleTextViewId</span>();

<span class="hljs-keyword">public</span> String <span class="hljs-title">getTitle</span>(T t);
}</code><ul style="" class="pre-numbering"><li>1</li><li>2</li><li>3</li><li>4</li><li>5</li><li>6</li><li>7</li><li>8</li></ul><ul style="" class="pre-numbering"><li>1</li><li>2</li><li>3</li><li>4</li><li>5</li><li>6</li><li>7</li><li>8</li></ul>
方法名应该很明确了,这里引入泛型,对应我们使用时的数据类型Bean。
刚才也说了我们的分类header是多种ItemViewType的一种,那么直接继承
MultiItemCommonAdapter实现。
<code class="hljs cs has-numbering"><span class="hljs-keyword">public</span> <span class="hljs-keyword">abstract</span> <span class="hljs-keyword">class</span> SectionAdapter<T> extends MultiItemCommonAdapter<T>
{
<span class="hljs-keyword">private</span> SectionSupport mSectionSupport;
<span class="hljs-keyword">private</span> <span class="hljs-keyword">static</span> final <span class="hljs-keyword">int</span> TYPE_SECTION = <span class="hljs-number">0</span>;
<span class="hljs-keyword">private</span> LinkedHashMap<String, Integer> mSections;

<span class="hljs-keyword">private</span> MultiItemTypeSupport<T> headerItemTypeSupport = <span class="hljs-keyword">new</span> MultiItemTypeSupport<T>()
{
@Override
<span class="hljs-keyword">public</span> <span class="hljs-keyword">int</span> <span class="hljs-title">getLayoutId</span>(<span class="hljs-keyword">int</span> itemType)
{
<span class="hljs-keyword">if</span> (itemType == TYPE_SECTION)
<span class="hljs-keyword">return</span> mSectionSupport.sectionHeaderLayoutId();
<span class="hljs-keyword">else</span>
<span class="hljs-keyword">return</span> mLayoutId;
}
@Override
<span class="hljs-keyword">public</span> <span class="hljs-keyword">int</span> <span class="hljs-title">getItemViewType</span>(<span class="hljs-keyword">int</span> position, T o)
{
<span class="hljs-keyword">return</span> mSections.values().contains(position) ?
TYPE_SECTION :
<span class="hljs-number">1</span>;
}
};

@Override
<span class="hljs-keyword">public</span> <span class="hljs-keyword">int</span> <span class="hljs-title">getItemViewType</span>(<span class="hljs-keyword">int</span> position)
{
<span class="hljs-keyword">return</span> mMultiItemTypeSupport.getItemViewType(position, <span class="hljs-keyword">null</span>);
}

final RecyclerView.AdapterDataObserver observer = <span class="hljs-keyword">new</span> RecyclerView.AdapterDataObserver()
{
@Override
<span class="hljs-keyword">public</span> <span class="hljs-keyword">void</span> <span class="hljs-title">onChanged</span>()
{
super.onChanged();
findSections();
}
};

<span class="hljs-keyword">public</span> <span class="hljs-title">SectionAdapter</span>(Context context, <span class="hljs-keyword">int</span> layoutId, List<T> datas, SectionSupport sectionSupport)
{
super(context, datas, <span class="hljs-keyword">null</span>);
mLayoutId = layoutId;
mMultiItemTypeSupport = headerItemTypeSupport;
mSectionSupport = sectionSupport;
mSections = <span class="hljs-keyword">new</span> LinkedHashMap<>();
findSections();
registerAdapterDataObserver(observer);
}

@Override
<span class="hljs-keyword">protected</span> boolean <span class="hljs-title">isEnabled</span>(<span class="hljs-keyword">int</span> viewType)
{
<span class="hljs-keyword">if</span> (viewType == TYPE_SECTION)
<span class="hljs-keyword">return</span> <span class="hljs-keyword">false</span>;
<span class="hljs-keyword">return</span> super.isEnabled(viewType);
}

@Override
<span class="hljs-keyword">public</span> <span class="hljs-keyword">void</span> <span class="hljs-title">onDetachedFromRecyclerView</span>(RecyclerView recyclerView)
{
super.onDetachedFromRecyclerView(recyclerView);
unregisterAdapterDataObserver(observer);
}

<span class="hljs-keyword">public</span> <span class="hljs-keyword">void</span> <span class="hljs-title">findSections</span>()
{
<span class="hljs-keyword">int</span> n = mDatas.size();
<span class="hljs-keyword">int</span> nSections = <span class="hljs-number">0</span>;
mSections.clear();

<span class="hljs-keyword">for</span> (<span class="hljs-keyword">int</span> i = <span class="hljs-number">0</span>; i < n; i++)
{
String sectionName = mSectionSupport.getTitle(mDatas.<span class="hljs-keyword">get</span>(i));

<span class="hljs-keyword">if</span> (!mSections.containsKey(sectionName))
{
mSections.put(sectionName, i + nSections);
nSections++;
}
}

}

@Override
<span class="hljs-keyword">public</span> <span class="hljs-keyword">int</span> <span class="hljs-title">getItemCount</span>()
{
<span class="hljs-keyword">return</span> super.getItemCount() + mSections.size();
}

<span class="hljs-keyword">public</span> <span class="hljs-keyword">int</span> <span class="hljs-title">getIndexForPosition</span>(<span class="hljs-keyword">int</span> position)
{
<span class="hljs-keyword">int</span> nSections = <span class="hljs-number">0</span>;

Set<Map.Entry<String, Integer>> entrySet = mSections.entrySet();
<span class="hljs-keyword">for</span> (Map.Entry<String, Integer> entry : entrySet)
{
<span class="hljs-keyword">if</span> (entry.getValue() < position)
{
nSections++;
}
}
<span class="hljs-keyword">return</span> position - nSections;
}

@Override
<span class="hljs-keyword">public</span> <span class="hljs-keyword">void</span> <span class="hljs-title">onBindViewHolder</span>(ViewHolder holder, <span class="hljs-keyword">int</span> position)
{
position = getIndexForPosition(position);
<span class="hljs-keyword">if</span> (holder.getItemViewType() == TYPE_SECTION)
{
holder.setText(mSectionSupport.sectionTitleTextViewId(), mSectionSupport.getTitle(mDatas.<span class="hljs-keyword">get</span>(position)));
<span class="hljs-keyword">return</span>;
}
super.onBindViewHolder(holder, position);
}
}</code><ul style="" class="pre-numbering"><li>1</li><li>2</li><li>3</li><li>4</li><li>5</li><li>6</li><li>7</li><li>8</li><li>9</li><li>10</li><li>11</li><li>12</li><li>13</li><li>14</li><li>15</li><li>16</li><li>17</li><li>18</li><li>19</li><li>20</li><li>21</li><li>22</li><li>23</li><li>24</li><li>25</li><li>26</li><li>27</li><li>28</li><li>29</li><li>30</li><li>31</li><li>32</li><li>33</li><li>34</li><li>35</li><li>36</li><li>37</li><li>38</li><li>39</li><li>40</li><li>41</li><li>42</li><li>43</li><li>44</li><li>45</li><li>46</li><li>47</li><li>48</li><li>49</li><li>50</li><li>51</li><li>52</li><li>53</li><li>54</li><li>55</li><li>56</li><li>57</li><li>58</li><li>59</li><li>60</li><li>61</li><li>62</li><li>63</li><li>64</li><li>65</li><li>66</li><li>67</li><li>68</li><li>69</li><li>70</li><li>71</li><li>72</li><li>73</li><li>74</li><li>75</li><li>76</li><li>77</li><li>78</li><li>79</li><li>80</li><li>81</li><li>82</li><li>83</li><li>84</li><li>85</li><li>86</li><li>87</li><li>88</li><li>89</li><li>90</li><li>91</li><li>92</li><li>93</li><li>94</li><li>95</li><li>96</li><li>97</li><li>98</li><li>99</li><li>100</li><li>101</li><li>102</li><li>103</li><li>104</li><li>105</li><li>106</li><li>107</li><li>108</li><li>109</li><li>110</li><li>111</li><li>112</li><li>113</li><li>114</li><li>115</li><li>116</li><li>117</li><li>118</li><li>119</li><li>120</li><li>121</li></ul><ul style="" class="pre-numbering"><li>1</li><li>2</li><li>3</li><li>4</li><li>5</li><li>6</li><li>7</li><li>8</li><li>9</li><li>10</li><li>11</li><li>12</li><li>13</li><li>14</li><li>15</li><li>16</li><li>17</li><li>18</li><li>19</li><li>20</li><li>21</li><li>22</li><li>23</li><li>24</li><li>25</li><li>26</li><li>27</li><li>28</li><li>29</li><li>30</li><li>31</li><li>32</li><li>33</li><li>34</li><li>35</li><li>36</li><li>37</li><li>38</li><li>39</li><li>40</li><li>41</li><li>42</li><li>43</li><li>44</li><li>45</li><li>46</li><li>47</li><li>48</li><li>49</li><li>50</li><li>51</li><li>52</li><li>53</li><li>54</li><li>55</li><li>56</li><li>57</li><li>58</li><li>59</li><li>60</li><li>61</li><li>62</li><li>63</li><li>64</li><li>65</li><li>66</li><li>67</li><li>68</li><li>69</li><li>70</li><li>71</li><li>72</li><li>73</li><li>74</li><li>75</li><li>76</li><li>77</li><li>78</li><li>79</li><li>80</li><li>81</li><li>82</li><li>83</li><li>84</li><li>85</li><li>86</li><li>87</li><li>88</li><li>89</li><li>90</li><li>91</li><li>92</li><li>93</li><li>94</li><li>95</li><li>96</li><li>97</li><li>98</li><li>99</li><li>100</li><li>101</li><li>102</li><li>103</li><li>104</li><li>105</li><li>106</li><li>107</li><li>108</li><li>109</li><li>110</li><li>111</li><li>112</li><li>113</li><li>114</li><li>115</li><li>116</li><li>117</li><li>118</li><li>119</li><li>120</li><li>121</li></ul>
根据我们之前的代码,使用
MultiItemCommonAdapter,需要提供一个
MultiItemTypeSupport,我们这里当然也不例外。可以看到上述代码,我们初始化了成员变量
headerItemTypeSupport,分别对
getLayoutId和
getItemViewType进行了实现。
getLayoutId如果type是header类型,则返回
mSectionSupport.sectionHeaderLayoutId();否则则返回mLayout.
getItemViewType根据位置判断,如果当前是header所在位置,返回header类型常量;否则返回1.
ok,可以看到我们构造方法中调用了
findSections(),主要为了存储我们的title和对应的position,通过一个Map
mSections来存储。
那么对应的
getItemCount()方法,我们多了几个title肯定总数会增加,所以需要复写。
在
onBindViewHolder中我们有一行重置position的代码,因为我们的position变大了,所以在实际上绑定我们数据时,这个position需要还原,代码逻辑见
getIndexForPosition(position)。
最后一点就是,每当我们的数据发生变化,我们的title集合,即
mSections就可能会发生变化,所以需要重新生成,本来准备复写
notifyDataSetChanged方法,在里面重新生成,没想到这个方法是final的,于是利用了
registerAdapterDataObserver(observer);,在数据发生变化回调中重新生成,记得在
onDetachedFromRecyclerView里面对注册的observer进行解注册。
ok,到此我们的增加Header就结束了~~
恩,上面是针对普通的Item增加header的代码,如果是针对多种ItemViewType呢?其实也很简单,这种方式需要传入
MultiItemTypeSupport。那么对于headerItemTypeSupport中的
getItemViewType等方法,不是header类型时,交给传入的
MultiItemTypeSupport即可,大致的代码如下:
<code class="hljs java has-numbering">headerItemTypeSupport = <span class="hljs-keyword">new</span> MultiItemTypeSupport<T>()
{
<span class="hljs-annotation">@Override</span>
<span class="hljs-keyword">public</span> <span class="hljs-keyword">int</span> <span class="hljs-title">getLayoutId</span>(<span class="hljs-keyword">int</span> itemType)
{
<span class="hljs-keyword">if</span> (itemType == TYPE_SECTION)
<span class="hljs-keyword">return</span> mSectionSupport.sectionHeaderLayoutId();
<span class="hljs-keyword">else</span>
<span class="hljs-keyword">return</span> multiItemTypeSupport.getLayoutId(itemType);
}

<span class="hljs-annotation">@Override</span>
<span class="hljs-keyword">public</span> <span class="hljs-keyword">int</span> <span class="hljs-title">getItemViewType</span>(<span class="hljs-keyword">int</span> position, T o)
{
<span class="hljs-keyword">int</span> positionVal = getIndexForPosition(position);
<span class="hljs-keyword">return</span> mSections.values().contains(position) ?
TYPE_SECTION :
multiItemTypeSupport.getItemViewType(positionVal, o);
}
};</code><ul style="" class="pre-numbering"><li>1</li><li>2</li><li>3</li><li>4</li><li>5</li><li>6</li><li>7</li><li>8</li><li>9</li><li>10</li><li>11</li><li>12</li><li>13</li><li>14</li><li>15</li><li>16</li><li>17</li><li>18</li><li>19</li><li>20</li></ul><ul style="" class="pre-numbering"><li>1</li><li>2</li><li>3</li><li>4</li><li>5</li><li>6</li><li>7</li><li>8</li><li>9</li><li>10</li><li>11</li><li>12</li><li>13</li><li>14</li><li>15</li><li>16</li><li>17</li><li>18</li><li>19</li><li>20</li></ul>
那么这样的话,今天的博客就结束了,有几点需要说明下:
本来是想接着以前的万能Adapter后面写,但是为了本文的独立和完整性,还是尽可能没有去依赖上篇博客的内容了。
此外,文章最后给出的开源代码与上述代码存在些许的差异,因为开源部分源码整合了ListView,RecyclerView等,而本文上述代码完全针对RecyclerView进行编写。
对于ItemClick,ItemLongClick的代码就不赘述了,其实都是通过itemView.setXXXListener完成,详细的参考代码即可。
更多详细的内容以及代码,参见https://github.com/hongyangAndroid/base-adapter
欢迎关注我的微博:
http://weibo.com/u/3165018720
微信公众号:hongyangAndroid
(欢迎关注,第一时间推送博文信息)

相关文章推荐
- The entity type FooterLogo is not part of the model for the current context.zai
- 通过Http接口及SolrNet 两种方法基于Solr5.5.1 实现CURD
- jsp输出九九乘法表
- Executer invokeAll
- 收藏的网址
- java序列化一定要应该注意的6个事项!
- 数据结构实验之链表七:单链表中重复元素的删除
- code1001 舒适的路线
- java虚拟机之线程同步
- g. "MyType, MyAssembly".
- PDF从新编排页码
- 数据库必会必知 之 SQL四种语言:DDL DML DCL TCL(转)
- httplib、urllib、urllib2的区别
- Android Paint之Shader渲染详解
- mongodb与mysql相比的优缺点
- Web字体工具整理,网页图标字体以及使用方法整理
- Javascript中关于call()与apply()详解
- VS2010/VS2013 调试窗口一闪而过解决方法
- 设计模式-抽象工厂模式
- IOS开发笔记(Swift):UITableView表格视图的静态使用