TabLayout
2016-06-18 17:14
387 查看
步骤1:添加依赖
注意:下面的版本号一定要跟上面的一样否则会报错。
步骤2:使用TabLayout
在XML中设置TabItem
在Java中设置Tab
以上两种方式实现的效果一样。
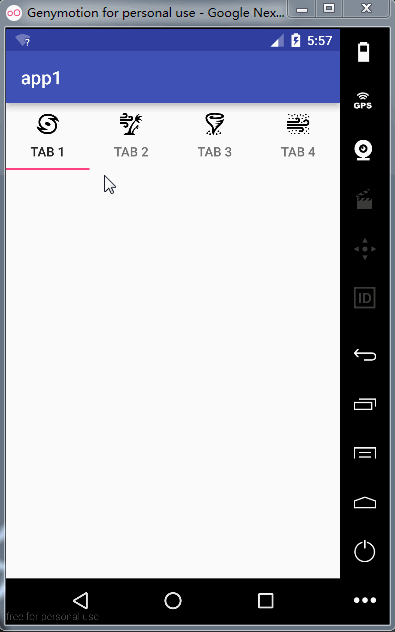
步骤3:效果如下
compile 'com.android.support:appcompat-v7:23.4.0'

compile 'com.android.support:design:23.4.0'
注意:下面的版本号一定要跟上面的一样否则会报错。
步骤2:使用TabLayout
在XML中设置TabItem
<RelativeLayout
xmlns:android="http://schemas.android.com/apk/res/android"
xmlns:tools="http://schemas.android.com/tools"
android:layout_width="match_parent"
android:layout_height="match_parent"
tools:context="com.example.app1.MainActivity">

<android.support.design.widget.TabLayout
android:layout_width="match_parent"
android:layout_height="wrap_content">
<android.support.design.widget.TabItem
android:layout_width="wrap_content"
android:layout_height="wrap_content"
android:text="Tab2"
android:icon="@drawable/icon_1"/>
<android.support.design.widget.TabItem
android:layout_width="wrap_content"
android:layout_height="wrap_content"
android:text="Tab2"
android:icon="@drawable/icon_2"/>
<android.support.design.widget.TabItem
android:layout_width="wrap_content"
android:layout_height="wrap_content"
android:text="Tab3"
android:icon="@drawable/icon_3"/>
<android.support.design.widget.TabItem
android:layout_width="wrap_content"
android:layout_height="wrap_content"
android:text="Tab4"
android:icon="@drawable/icon_4"/>
</android.support.design.widget.TabLayout>

</RelativeLayout>
在Java中设置Tab
<RelativeLayout
xmlns:android="http://schemas.android.com/apk/res/android"
xmlns:tools="http://schemas.android.com/tools"
android:layout_width="match_parent"
android:layout_height="match_parent"
tools:context="com.example.app1.MainActivity">

<android.support.design.widget.TabLayout
android:id="@+id/tabLayout"
android:layout_width="match_parent"
android:layout_height="wrap_content"/>

</RelativeLayout>
public class MainActivity extends AppCompatActivity {

private TabLayout mTabLayout;

@Override
protected void onCreate(Bundle savedInstanceState) {
super.onCreate(savedInstanceState);
setContentView(R.layout.activity_main);

mTabLayout = (TabLayout) findViewById(R.id.tabLayout);
TabLayout.Tab tab1 = mTabLayout.newTab();
TabLayout.Tab tab2 = mTabLayout.newTab();
TabLayout.Tab tab3 = mTabLayout.newTab();
TabLayout.Tab tab4 = mTabLayout.newTab();
tab1.setText("Tab 1");
tab2.setText("Tab 2");
tab3.setText("Tab 3");
tab4.setText("Tab 4");
tab1.setIcon(R.drawable.icon_1);
tab2.setIcon(R.drawable.icon_2);
tab3.setIcon(R.drawable.icon_3);
tab4.setIcon(R.drawable.icon_4);
mTabLayout.addTab(tab1);
mTabLayout.addTab(tab2);
mTabLayout.addTab(tab3);
mTabLayout.addTab(tab4);
}
}
以上两种方式实现的效果一样。
步骤3:效果如下

相关文章推荐
- 使用C++实现JNI接口需要注意的事项
- Android IPC进程间通讯机制
- Android Manifest 用法
- [转载]Activity中ConfigChanges属性的用法
- Android之获取手机上的图片和视频缩略图thumbnails
- Android之使用Http协议实现文件上传功能
- Android学习笔记(二九):嵌入浏览器
- android string.xml文件中的整型和string型代替
- i-jetty环境搭配与编译
- android之定时器AlarmManager
- android wifi 无线调试
- Android Native 绘图方法
- Android java 与 javascript互访(相互调用)的方法例子
- android 代码实现控件之间的间距
- android FragmentPagerAdapter的“标准”配置
- Android"解决"onTouch和onClick的冲突问题
- android:installLocation简析
- android searchView的关闭事件
- SourceProvider.getJniDirectories