Android自定义键盘
2016-06-16 17:16
369 查看
这是之前公司项目,需要用身份证来查询,绝大部分人的身份证是纯数字的,这个可以直接在EditText设置inputType,输入法弹出时会自动切换到数字键盘,但是,碰到身份证含有X的,这就麻烦了,得手动切换到英文输入界面,然后还得再切换回来,甚至还牵扯到大小写处理,虽然不算是个问题,但是互联网思维嘛,人性化!所以,本着不怕麻烦的精神,还是学习了自定义个键盘来提升用户体验
需要说的东西感觉不多
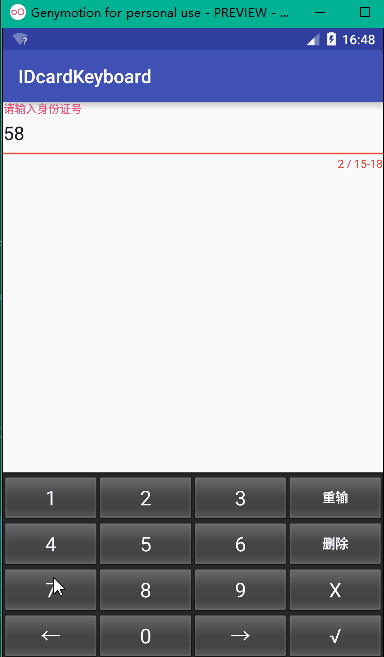
老规矩,先看效果:
首先,先新建个xml(应该一看就明白,没什么可说的),来定义我们键盘上要摆放的东西(codes为ASCII码)
然后新建个类,CustomKeyboard,来控制我们按键的操作
定义个回调接口:
然后在Activity的布局文件中定义
后台关键代码:
PS:键盘是android默认的样式,没有研究怎么改样式,知道的大xiong弟麻烦留言说说呗
代码:https://github.com/DonnyHe/IDcardKeyboard
需要说的东西感觉不多
老规矩,先看效果:
首先,先新建个xml(应该一看就明白,没什么可说的),来定义我们键盘上要摆放的东西(codes为ASCII码)
<Keyboard xmlns:android="http://schemas.android.com/apk/res/android"
android:keyHeight="50dp"
android:keyWidth="25%p">
<Row>
<Key
android:codes="49"
android:keyLabel="1" />
<Key
android:codes="50"
android:keyLabel="2" />
<Key
android:codes="51"
android:keyLabel="3" />
<Key

4000
android:codes="9995"
android:keyEdgeFlags="right"
android:keyLabel="重输" />
</Row>
<Row>
<Key
android:codes="52"
android:keyLabel="4" />
<Key
android:codes="53"
android:keyLabel="5" />
<Key
android:codes="54"
android:keyLabel="6" />
<Key
android:codes="-5"
android:keyLabel="删除"
android:isRepeatable="true"
android:keyEdgeFlags="right"/>
</Row>
<Row>
<Key
android:codes="55"
android:keyLabel="7" />
<Key
android:codes="56"
android:keyLabel="8" />
<Key
android:codes="57"
android:keyLabel="9" />
<Key
android:codes="88"
android:keyLabel="X"
android:keyEdgeFlags="right"/>
</Row>
<Row>
<Key
android:codes="9994"
android:keyLabel="←" />
<Key
android:codes="48"
android:keyLabel="0" />
<Key
android:codes="9996"
android:keyLabel="→" />
<Key
android:codes="-4"
android:keyLabel="√"
android:keyEdgeFlags="right"/>
</Row>
</Keyboard>
然后新建个类,CustomKeyboard,来控制我们按键的操作
public class CustomKeyboard {
private EditText mEdittext;
private KeyboardView mKeyboardView;
private Keyboard mKeyboard;
private IKeyboardFinish mIKeyboardFinish;

public CustomKeyboard(Context context, KeyboardView keyboardView, EditText editText, IKeyboardFinish iKeyboardFinish){
this.mEdittext = editText;
this.mIKeyboardFinish = iKeyboardFinish;
mKeyboard = new Keyboard(context, R.xml.keyboard);//从xml中加载自定义的键盘
mKeyboardView = keyboardView;
mKeyboardView.setKeyboard(mKeyboard);
mKeyboardView.setPreviewEnabled(false);
mKeyboardView.setOnKeyboardActionListener(actionListener);
}
private KeyboardView.OnKeyboardActionListener actionListener = new KeyboardView.OnKeyboardActionListener() {
@Override
public void onPress(int primaryCode) {
}

@Override
public void onRelease(int primaryCode) {

}

@Override
public void onKey(int primaryCode, int[] keyCodes) {
Editable editable = mEdittext.getText();
int index = mEdittext.getSelectionStart();//光标位置
switch (primaryCode){

case Keyboard.KEYCODE_DELETE://回退
if (editable != null && editable.length() > 0){
if (index > 0){
editable.delete(index - 1,index);
}
}
break;
case Keyboard.KEYCODE_DONE://完成
//hideKeyboard();
mIKeyboardFinish.inputFinish();//回调
break;
case 9995://重输
mEdittext.setText("");
break;
case 9994://左移
if (index > 0){
mEdittext.setSelection(index - 1);
}
break;
case 9996://右移
if (index < mEdittext.length()){
mEdittext.setSelection(index + 1);
}
break;
default:
editable.insert(index,Character.toString((char)primaryCode));
break;
}
}

@Override
public void onText(CharSequence text) {

}

@Override
public void swipeLeft() {

}

@Override
public void swipeRight() {

}

@Override
public void swipeDown() {

}

@Override
public void swipeUp() {

}
};

public void showKeyboard(){
if(mKeyboardView.getVisibility() != View.VISIBLE){
mKeyboardView.setVisibility(View.VISIBLE);
}
}

public void hideKeyboard(){
if (mKeyboardView.getVisibility() == View.VISIBLE){
mKeyboardView.setVisibility(View.GONE);
}
}
}
定义个回调接口:
public interface IKeyboardFinish {
void inputFinish();
}
然后在Activity的布局文件中定义
<android.inputmethodservice.KeyboardView
android:id="@+id/customKeyboard"
android:layout_width="match_parent"
android:layout_height="wrap_content"
android:layout_alignParentBottom="true"
android:focusable="true"
android:focusableInTouchMode="true"
android:shadowRadius="1.0" />
后台关键代码:
private MaterialEditText edtNum;//大名鼎鼎的MaterialEditText,github上一搜便知
private Context mContext = this;
private CustomKeyboard mCustomKeyboard;
@Override
protected void onCreate(Bundle savedInstanceState) {
super.onCreate(savedInstanceState);
setContentView(R.layout.activity_main);
edtNum = (MaterialEditText) findViewById(R.id.edtNum);
//屏蔽掉系统默认输入法
if (Build.VERSION.SDK_INT <= 10) {
edtNum.setInputType(InputType.TYPE_NULL);
} else {
getWindow().setSoftInputMode(WindowManager.LayoutParams.SOFT_INPUT_STATE_ALWAYS_HIDDEN);
try {
Class<EditText> cls = EditText.class;
Method setShowSoftInputOnFocus = cls.getMethod("setShowSoftInputOnFocus", boolean.class);
setShowSoftInputOnFocus.setAccessible(true);
setShowSoftInputOnFocus.invoke(edtNum, false);
} catch (Exception e) {
e.printStackTrace();
}
}
//初始化键盘,传入回调接口,以便在此处进行完成后的操作。默认就显示键盘
KeyboardView keyboardView = (KeyboardView) findViewById(R.id.customKeyboard);
mCustomKeyboard = new CustomKeyboard(mContext, keyboardView, edtNum, iKeyboardFinish);
mCustomKeyboard.showKeyboard();
edtNum.setOnTouchListener(new View.OnTouchListener() {
@Override
public boolean onTouch(View v, MotionEvent event) {
mCustomKeyboard.showKeyboard();
return false;
}
});
}

/**
* 输入完成
*/
private IKeyboardFinish iKeyboardFinish = new IKeyboardFinish() {
@Override
public void inputFinish() {
String idcard = edtNum.getText().toString();
Toast.makeText(mContext,idcard,Toast.LENGTH_SHORT).show();

}
};
PS:键盘是android默认的样式,没有研究怎么改样式,知道的大xiong弟麻烦留言说说呗
代码:https://github.com/DonnyHe/IDcardKeyboard

相关文章推荐
- 使用C++实现JNI接口需要注意的事项
- Android IPC进程间通讯机制
- Android Manifest 用法
- [转载]Activity中ConfigChanges属性的用法
- Android之获取手机上的图片和视频缩略图thumbnails
- Android之使用Http协议实现文件上传功能
- Android学习笔记(二九):嵌入浏览器
- android string.xml文件中的整型和string型代替
- i-jetty环境搭配与编译
- android之定时器AlarmManager
- android wifi 无线调试
- Android Native 绘图方法
- Android java 与 javascript互访(相互调用)的方法例子
- android 代码实现控件之间的间距
- android FragmentPagerAdapter的“标准”配置
- Android"解决"onTouch和onClick的冲突问题
- android:installLocation简析
- android searchView的关闭事件
- SourceProvider.getJniDirectories