android 自定义控件(二)
2016-06-15 19:45
399 查看
转自:鸿洋博客,正在学习,非常感谢!
之前已经初步了解了自定义,现在要做的是自定义View显示一张图片,下面包含图片的文本介绍。
1.自定义基本属性:
2.自定义控件CustomeView:
现在的效果:
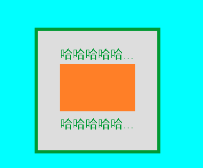
然后之前设置width 为warp_content的时候会出现平铺的效果,这个时候我们需要重写OnMeasure()方法:
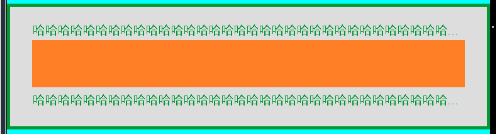
这个时候的效果是:

然后我们发现之前定义的imgStyleType我们并没有使用,这个又是做什么的呢?这个是用来区分绘制的图片是否是平铺还是中心显示,这个我们在OnDraw方法里面实现:
效果图:
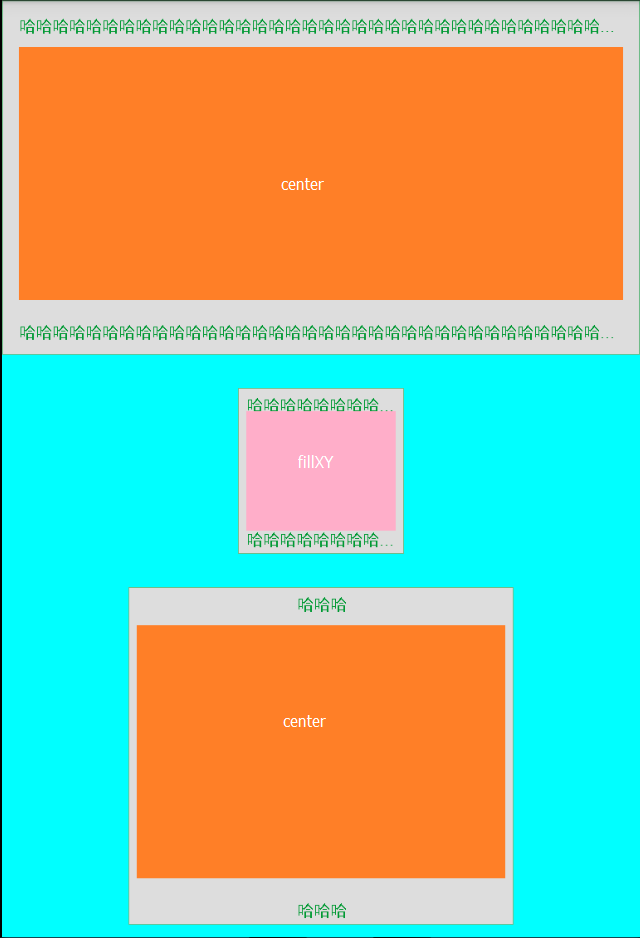
于上面一张图对比有没有发现图片的显示不一样?这就是imgStyleType的效果。
笔记总结:
1.代码编写的时候加上一个textView 让自己熟悉一下计算什么的
2.中间出现一个错误:
原因是属性styleable.xml中
color属性我写成了string
3. ondraw中不要new 对象,耗内存这个要修改优化。
以上。
之前已经初步了解了自定义,现在要做的是自定义View显示一张图片,下面包含图片的文本介绍。
1.自定义基本属性:
<?xml version="1.0" encoding="utf-8"?>
<resources>

<attr name="textSize" format="dimension" />
<attr name="textTitle" format="string" />
<attr name="textColor" format="color" />
<attr name="img" format="reference" />
<attr name="imgScaleType">
<enum name="fillXY" value="0" />
<enum name="center" value="1" />
</attr>

<declare-styleable name="CustomeView2">
<attr name="textSize" />
<attr name="textTitle" />
<attr name="textColor" />
<attr name="img" />
<attr name="imgScaleType" />

</declare-styleable>
</resources>
2.自定义控件CustomeView:
Paint mPaintText, mPaintDraw;

Rect textRect, imgRect;
//定义一些基本属性
private String mTextTitle;
private int mTextSize;
private int mTextColor;
private Bitmap img;
private int mImgScaleType;

//最终要显示的高和宽
private int width;
private int height;

public CustomeView2(Context context) {
this(context, null);
}

public CustomeView2(Context context, AttributeSet attrs) {
this(context, attrs, 0);
}

public CustomeView2(Context context, AttributeSet attrs, int defStyleAttr) {
super(context, attrs, defStyleAttr);

TypedArray a = context.getTheme().obtainStyledAttributes(attrs, R.styleable.CustomeView2, defStyleAttr, 0);
int n = a.getIndexCount();
for (int i = 0; i < n; i++) {
int attr = a.getIndex(i);
switch (attr) {
case R.styleable.CustomeView2_textTitle:
mTextTitle = a.getString(R.styleable.CustomeView2_textTitle);
break;
case R.styleable.CustomeView2_textColor:
mTextColor = a.getColor(attr, Color.BLACK);//默认黑色字体
break;
case R.styleable.CustomeView2_textSize://这里用的是px
mTextSize = a.getDimensionPixelSize(attr, (int) TypedValue.applyDimension(TypedValue.COMPLEX_UNIT_SP, 16, getResources().getDisplayMetrics()));//默认16sp
break;
case R.styleable.CustomeView2_img:
img = BitmapFactory.decodeResource(getResources(), a.getResourceId(attr, 0));
break;
case R.styleable.CustomeView2_imgScaleType:
mImgScaleType = a.getInt(attr, 0);
break;
}
}

a.recycle();

mPaintDraw = new Paint();
mPaintText = new Paint();
textRect = new Rect();
imgRect = new Rect();
mPaintText.setTextSize(mTextSize);
mPaintText.getTextBounds(mTextTitle, 0, mTextTitle.length(), textRect);
}

@Override
protected void onMeasure(int widthMeasureSpec, int heightMeasureSpec) {
super.onMeasure(widthMeasureSpec, heightMeasureSpec);

}

@Override
protected void onDraw(Canvas canvas) {
super.onDraw(canvas);

//绘制边框
mPaintDraw.setStrokeWidth(1);//这个边框大小暂写死
mPaintDraw.setAntiAlias(true);//消除锯齿
mPaintDraw.setStyle(Paint.Style.STROKE);//空心
mPaintDraw.setColor(mTextColor);
canvas.drawRect(0, 0, getMeasuredWidth(), getMeasuredHeight(), mPaintDraw);

//此时绘制的text过于长让其显示”哈哈哈哈....“
mPaintText.setColor(mTextColor);
if (textRect.width() > width) {

TextPaint paint = new TextPaint(mPaintText);

String msg = TextUtils.ellipsize(mTextTitle, paint, width - getPaddingLeft() - getPaddingRight(), TextUtils.TruncateAt.END).toString();

//绘制textView 放在图片的上面
//绘制的时候用的是这个方法  canvas.drawRect(title,x,y,paint);
canvas.drawText(msg, getPaddingLeft(), getPaddingTop() + textRect.height(), paint);

//绘制textView  放在图片的下面
//绘制的时候用的是这个方法  canvas.drawRect(title,x,y,paint);
canvas.drawText(msg, getPaddingLeft(), height - getPaddingBottom(), paint);

} else {
//绘制textView 放在图片的上面
//绘制的时候用的是这个方法  canvas.drawRect(title,x,y,paint);
canvas.drawText(mTextTitle, getWidth() / 2 - textRect.width() / 2 - getPaddingLeft() + getPaddingRight(), getPaddingTop() + textRect.height(), mPaintText);

//绘制textView  放在图片的下面
//绘制的时候用的是这个方法  canvas.drawRect(title,x,y,paint);
canvas.drawText(mTextTitle, getWidth() / 2 - textRect.width() / 2 - getPaddingLeft() + getPaddingRight(), height - getPaddingBottom(), mPaintText);
}

//绘制图片的绘制区域。放在textView的下面
imgRect.left = getPaddingLeft();
imgRect.right = width - getPaddingRight();
imgRect.bottom = height - getPaddingBottom() - textRect.height();
//这个地方由于还要绘制一个textVIew 所以他的高度应该要改变
imgRect.top = getPaddingTop() + textRect.height();//绘制图在textView
canvas.drawBitmap(img, null, imgRect, mPaintDraw);

}
现在的效果:
然后之前设置width 为warp_content的时候会出现平铺的效果,这个时候我们需要重写OnMeasure()方法:
int specModeWidth = MeasureSpec.getMode(widthMeasureSpec);
int specSizeWidth = MeasureSpec.getSize(widthMeasureSpec);
int specModeHeight = MeasureSpec.getMode(heightMeasureSpec);
int specSizeHeight = MeasureSpec.getSize(heightMeasureSpec);
if (specModeWidth == MeasureSpec.EXACTLY) {//match
width = specSizeWidth;
} else {
//这个时候要判断是图片太长还是文字太长
int imgWidth = getPaddingLeft() + img.getWidth() + getPaddingRight();
int textWidth = getPaddingLeft() + textRect.width() + getPaddingRight();

//在其设置为wrap_content的时候
if (specModeWidth == MeasureSpec.AT_MOST) {//会由子控件的宽度觉得
int desireWidth = Math.max(imgWidth, textWidth);

//这个时候,子控件设置的宽wrap_content,最终的宽会由父控件和自控件的宽的稍小值决定
width = Math.min(desireWidth, specSizeWidth);
}

}

if (specModeHeight == MeasureSpec.EXACTLY) {
height = specSizeHeight;
} else {
int desireHeight = getPaddingBottom() + img.getHeight() + getPaddingTop() + textRect.height();
if (specModeHeight == MeasureSpec.AT_MOST) {
height = Math.min(desireHeight, specSizeHeight);
}

}
setMeasuredDimension(width, height);
Log.i("yqy", getMeasuredHeight() + "," + getMeasuredWidth());
这个时候的效果是:
然后我们发现之前定义的imgStyleType我们并没有使用,这个又是做什么的呢?这个是用来区分绘制的图片是否是平铺还是中心显示,这个我们在OnDraw方法里面实现:
if (mImgScaleType == 0) {//平铺

canvas.drawBitmap(img, null, imgRect, mPaintDraw);
} else {//中心显示
imgRect.left = width / 2 - imgRect.width() / 2;
imgRect.right = width / 2 + imgRect.width() / 2;
imgRect.top = height / 2 + (textRect.height() / 2) * 2 - imgRect.height() / 2;
imgRect.bottom = height / 2 - (textRect.height() / 2) * 2 + imgRect.height() / 2;

canvas.drawBitmap(img, null, imgRect, mPaintDraw);
}
效果图:
于上面一张图对比有没有发现图片的显示不一样?这就是imgStyleType的效果。
笔记总结:
1.代码编写的时候加上一个textView 让自己熟悉一下计算什么的
2.中间出现一个错误:
Caused by: android.content.res.Resources$NotFoundException: File #009933 from drawable resource ID #0x0: .xml extension required
原因是属性styleable.xml中
<attr name="textColor" format="color" />
color属性我写成了string
3. ondraw中不要new 对象,耗内存这个要修改优化。
以上。

相关文章推荐
- Android开发的学习路线
- 【Android】各种小知识点,不间断更新
- android应用程序第8课:CheckBox
- 【翻译】Android Support Library Setup(三)
- Picasso--Android图片加载开源库
- Android动画初探-实现淘宝加入加入购物车的效果
- Android中MediaMuxer和MediaCodec用例 - audio+video
- Android版本更新,下载完成安装后提示,应用未安装
- Android Res资源适配详解
- 移植memtester到android平台
- Android M新的运行时权限开发者需要知道的一切
- android中的资源,资源与xml文件
- Android中采用的MVC框架
- Android访问数据文件
- Android+PHP简单实现
- Android中RelativeLayout与LinearLayout的性能分析
- Android Studio打包全攻略---从入门到精通
- android底层去掉虚拟按键
- 6、Android Content Provider测试
- 6、Android Content Provider测试